


 文章介绍了如何在Vue2项目中实现基于高德地图JSAPI2.0的轨迹回放组件,包括基础和进阶的组件抽取。基础组件展示了如何设置地图、轨迹动画控制按钮以及地图动画的实现。进阶部分讨论了动态获取轨迹数据并根据日期选择功能展示特定设备的轨迹,优化了性能问题。
vue2实现高德地图 JSAPI 2.0轨迹回放组件(MoveAnimation)
声明: 本人是做java后端的,组件抽取不是很规范请大家见谅
前提: 需要注册高德开放平台,之后创建应用并且开通
Web端(JS API)平台,然后拿到securityJsCode和key
实现效果:
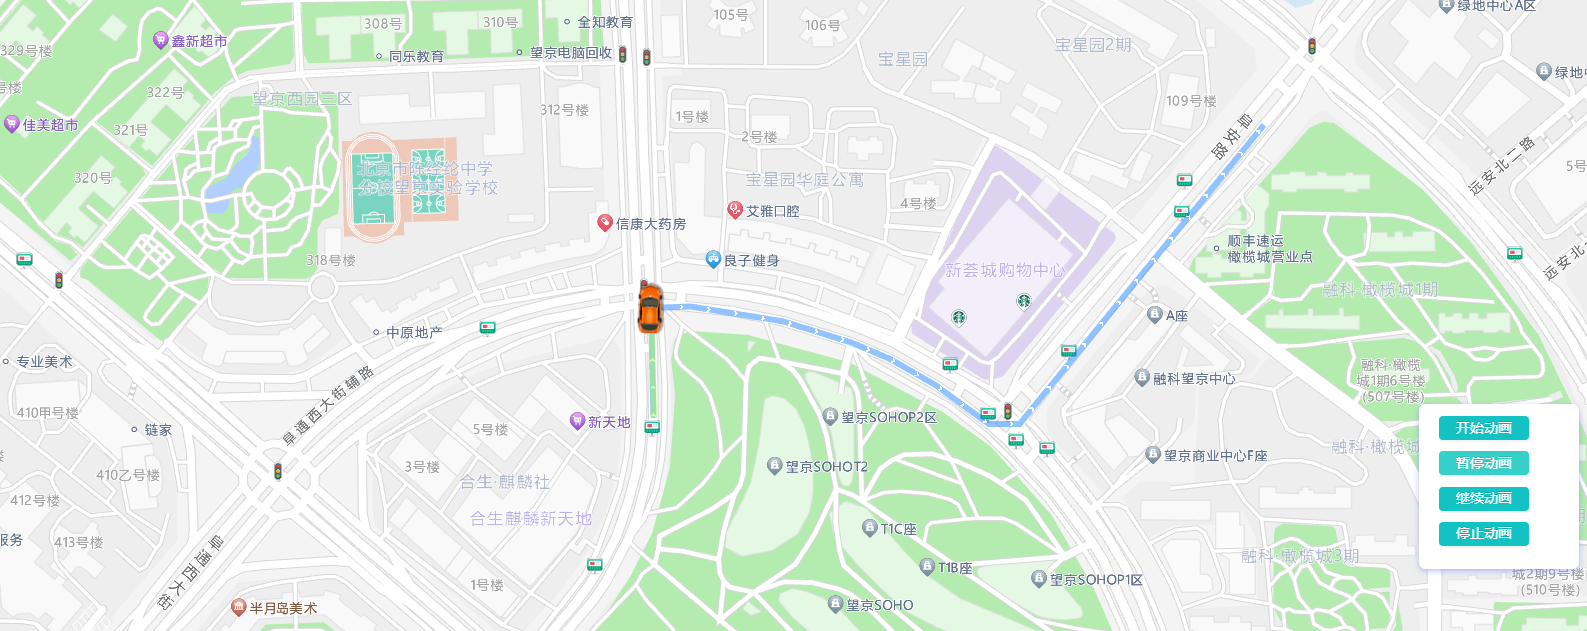
1. 基础抽取
注意:
- 将
securityJsCode和key修改为自己的即可v-show="true"是控制面板显示的,我基础抽取的时候设置我true,就会一直显示
组件代码:
<template>
  <div>
    <a-row>
      <div id="container"></div>
      <div class='input-card' v-show="true">
        <div class="input-item">
          <a-button type="primary" size="small" style="width: 90px" @click="startAnimation">
            开始动画
          </a-button>
        </div>

        <div class="input-item">
          <a-button type="primary" size="small" style="width: 90px" @click="pauseAnimation">
            暂停动画
          </a-button>
        </div>

        <div class="input-item">
          <a-button type="primary" size="small" style="width: 90px" @click="resumeAnimation">
            继续动画
          </a-button>
        </div>

        <div class="input-item">
          <a-button type="primary" size="small" style="width: 90px" @click="stopAnimation">
            停止动画
          </a-button>
        </div>

      </div>
    </a-row>

  </div>

</template>

<script>
  //这里可以导入其他文件(比如: 组件, 工具 js, 第三方插件 js, json文件, 图片文件等等)
  //例如: import 《组件名称》 from '《组件路径》 ';

  import AMapLoader from "@amap/amap-jsapi-loader";
  // 设置安全密钥
  window._AMapSecurityConfig = {
    securityJsCode: 'xxxx',
  }
  export default {
    name: 'TrackContainer',
    //import 引入的组件需要注入到对象中才能使用
    components: {},
    props: {
      visible: Boolean,
    },
    data() {
      //这里存放数据
      return {
        AMap: null,
        //此处不声明 map 对象,可以直接使用 this.map赋值或者采用非响应式的普通对象来存储。
        map: null,
        mouseTool: null,
        marker: null,
        lineArr: [],
      };
    },
    //计算属性 类似于 data 概念
    computed: {},
    //监控 data 中的数据变化
    watch: {
    },
    //方法集合
    methods: {
      pauseAnimation () {
        this.marker.pauseMove();
      },
      resumeAnimation () {
        this.marker.resumeMove();
      },
      stopAnimation () {
        this.marker.stopMove();
      },
      startAnimation () {
        this.marker.moveAlong(this.lineArr, {
          // 每一段的时长
          duration: 500,//可根据实际采集时间间隔设置
          // JSAPI2.0 是否延道路自动设置角度在 moveAlong 里设置
          autoRotation: true,
        });
      },
      initMap() {
        AMapLoader.load({
          key: "xxxx",             // 申请好的Web端开发者Key,首次调用 load 时必填
          version: "2.0",      // 指定要加载的 JSAPI 的版本,缺省时默认为 1.4.15
          "plugins": [
            "AMap.Scale",
            "AMap.HawkEye",
            "AMap.ToolBar",
            "AMap.AutoComplete",
            "AMap.PlaceSearch",
            "AMap.ControlBar",
            "AMap.MouseTool",
            "AMap.DragRoute",
            "AMap.MoveAnimation"],         // 需要使用的的插件列表,如比例尺'AMap.Scale'等
        }).then((AMap) => {
          this.AMap=AMap
          this.marker=null;
          this.lineArr = [[116.478935,39.997761],[116.478939,39.997825],[116.478912,39.998549],[116.478912,39.998549],[116.478998,39.998555],[116.478998,39.998555],[116.479282,39.99856],[116.479658,39.998528],[116.480151,39.998453],[116.480784,39.998302],[116.480784,39.998302],[116.481149,39.998184],[116.481573,39.997997],[116.481863,39.997846],[116.482072,39.997718],[116.482362,39.997718],[116.483633,39.998935],[116.48367,39.998968],[116.484648,39.999861]];
          this.map = new AMap.Map("container", {  //设置地图容器id
            viewMode: "2D",  //  是否为3D地图模式
            zoom: 13,   // 初始化地图级别
            center: [116.478935,39.997761], //中心点坐标  成都 104.065735, 30.659462
            resizeEnable: true
          });

          this.marker = new AMap.Marker({
            map: this.map,
            position: [116.478935,39.997761],
            icon: "https://a.amap.com/jsapi_demos/static/demo-center-v2/car.png",
            offset: new AMap.Pixel(-13, -26),
          });

          // 绘制轨迹
          var polyline = new AMap.Polyline({
            map: this.map,
            path: this.lineArr,
            showDir:true,
            strokeColor: "#28F",  //线颜色
            // strokeOpacity: 1,     //线透明度
            strokeWeight: 6,      //线宽
            // strokeStyle: "solid"  //线样式
          });

          var passedPolyline = new AMap.Polyline({
            map: this.map,
            strokeColor: "#AF5",  //线颜色
            strokeWeight: 6,      //线宽
          });

          this.marker.on('moving', function (e) {
            passedPolyline.setPath(e.passedPath);
            this.map.setCenter(e.target.getPosition(),true)
          }.bind(this));

          this.map.setFitView();


        }).catch(e => {
          console.log(e);
        })
      },
    },
    //生命周期 - 创建完成(可以访问当前 this 实例)
    created() {
    },
    //生命周期 - 挂载完成(可以访问 DOM 元素)
    mounted() {
      this.initMap();
    },
    //生命周期 - 创建之前
    beforeCreate() {
    },
    //生命周期 - 挂载之前
    beforeMount() {
    },
    //生命周期 - 更新之前
    beforeUpdate() {
    },
    //生命周期 - 更新之后
    updated() {
    },
    //生命周期 - 销毁之前
    beforeDestroy() {
    },
    //生命周期 - 销毁完成
    destroyed() {
    },
    //如果页面有 keep-alive 缓存功能, 这个函数会触发
    activated() {
    },
  }
</script>

<style scoped>
  #container {
    padding: 0px;
    margin: 0px;
    width: 100%;
    height: 800px;
  }
  .input-item {
    height: 2.2rem;
  }

  .input-card {
    display: flex;
    flex-direction: column;
    min-width: 0;
    word-wrap: break-word;
    background-color: #fff;
    background-clip: border-box;
    border-radius: .25rem;
    width: 10rem;
    border-width: 0;
    border-radius: 0.4rem;
    box-shadow: 0 2px 6px 0 rgba(114, 124, 245, .5);
    position: fixed;
    bottom: 12rem;
    right: 2rem;
    -ms-flex: 1 1 auto;
    flex: 1 1 auto;
    padding: 0.75rem 1.25rem;
  }
</style>
2. 基础抽取使用
3. 进阶抽取-自定义路线
思路:
- 将lineArr路径变量通过父组件传过来,而不是在子组件写死
- 考虑到性能问题(因为在父组件的时候就需要查询出所有设备的lineArr,但如果用户只查看一个就会有性能损耗),所以我没有直接将
lineArr直接通过父组件直接传到子组件,我是通过父组件将equipmentId传到子组件,然后子组件通过equipmentId调用后端接口可以查询的对应设备的lineArr(读者可以直接将lineArr传过来也没问题)- 同时通过父组件来操作控制面板在展示
v-show="visible"- 同时我还对组件新增了日期选择功能,可以查询到某个设备某天的路径轨迹
- 当然因为业务的不同,后端接口需要自己来写,但总体的返回值就是一个
lineArr
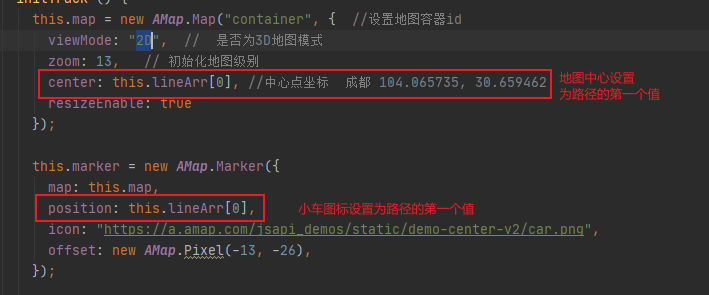
代码说明:
getTrackList方法为我调用的后端接口地图及小车起点设置
组件代码:
<template>
  <div>
    <a-row>
      <div id="container"></div>
      <div class='input-card' v-show="visible">
        <div class="input-item">
          <a-button type="primary" size="small" style="width: 90px" @click="startAnimation">
            开始动画
          </a-button>
        </div>

        <div class="input-item">
          <a-button type="primary" size="small" style="width: 90px" @click="pauseAnimation">
            暂停动画
          </a-button>
        </div>

        <div class="input-item">
          <a-button type="primary" size="small" style="width: 90px" @click="resumeAnimation">
            继续动画
          </a-button>
        </div>

        <div class="input-item">
          <a-button type="primary" size="small" style="width: 90px" @click="stopAnimation">
            停止动画
          </a-button>
        </div>

        <div class="input-item">
          <a-date-picker @change="onChange" />
        </div>


      </div>
    </a-row>

  </div>

</template>

<script>
  //这里可以导入其他文件(比如: 组件, 工具 js, 第三方插件 js, json文件, 图片文件等等)
  //例如: import 《组件名称》 from '《组件路径》 ';

  import AMapLoader from "@amap/amap-jsapi-loader";
  import moment from "moment";
  import {getTrackList} from '@/services/attendance/statistics.js'
  // 设置安全密钥
  window._AMapSecurityConfig = {
    securityJsCode: 'xxxxx',
  }
  export default {
    name: 'TrackContainer',
    //import 引入的组件需要注入到对象中才能使用
    components: {},
    props: {
      visible: Boolean,
      equipmentId: String,
    },
    data() {
      //这里存放数据
      return {
        AMap: null,
        //此处不声明 map 对象,可以直接使用 this.map赋值或者采用非响应式的普通对象来存储。
        map: null,
        mouseTool: null,
        marker: null,
        lineArr: [],
      };
    },
    //计算属性 类似于 data 概念
    computed: {},
    //监控 data 中的数据变化
    watch: {
    },
    //方法集合
    methods: {
      getLineArr(equipmentId, date) {
        getTrackList(equipmentId,date).then(res => {
          this.lineArr = res.data.data
          this.initTrackBefore(this.AMap);
        })
      },
      initTrack () {
        this.map = new AMap.Map("container", {  //设置地图容器id
          viewMode: "2D",  //  是否为3D地图模式
          zoom: 13,   // 初始化地图级别
          center: this.lineArr[0], //中心点坐标  成都 104.065735, 30.659462
          resizeEnable: true
        });

        this.marker = new AMap.Marker({
          map: this.map,
          position: this.lineArr[0],
          icon: "https://a.amap.com/jsapi_demos/static/demo-center-v2/car.png",
          offset: new AMap.Pixel(-13, -26),
        });

        // 绘制轨迹
        var polyline = new AMap.Polyline({
          map: this.map,
          path: this.lineArr,
          showDir: true,
          strokeColor: "#28F",  //线颜色
          // strokeOpacity: 1,     //线透明度
          strokeWeight: 6,      //线宽
          // strokeStyle: "solid"  //线样式
        });

        var passedPolyline = new AMap.Polyline({
          map: this.map,
          strokeColor: "#AF5",  //线颜色
          strokeWeight: 6,      //线宽
        });
        this.marker.on('moving', function (e) {
          passedPolyline.setPath(e.passedPath);
          this.map.setCenter(e.target.getPosition(), true)
        }.bind(this));

        this.map.setFitView();
      },
      onChange(date, dateString) {
        console.log(date, dateString);
        this.getLineArr(this.equipmentId,date.valueOf())
      },
      pauseAnimation () {
        this.marker.pauseMove();
      },
      resumeAnimation () {
        this.marker.resumeMove();
      },
      stopAnimation () {
        this.marker.stopMove();
      },
      startAnimation () {
        this.marker.moveAlong(this.lineArr, {
          // 每一段的时长
          duration: 500,//可根据实际采集时间间隔设置
          // JSAPI2.0 是否延道路自动设置角度在 moveAlong 里设置
          autoRotation: true,
        });
      },
      initTrackBefore (AMap) {
        if (this.lineArr.length > 0) {
          this.initTrack();
        } else {
          this.$message.error("该设备在当天无定位信息")
          this.map = new AMap.Map("container", {  //设置地图容器id
            viewMode: "2D",  //  是否为3D地图模式
            zoom: 13,   // 初始化地图级别
            center: [104.065735, 30.659462], //中心点坐标  成都 104.065735, 30.659462
            resizeEnable: true
          });
          this.map.setFitView();
        }
      },
      initMap() {
        AMapLoader.load({
          key: "xxxx",             // 申请好的Web端开发者Key,首次调用 load 时必填
          version: "2.0",      // 指定要加载的 JSAPI 的版本,缺省时默认为 1.4.15
          "plugins": [
            "AMap.Scale",
            "AMap.HawkEye",
            "AMap.ToolBar",
            "AMap.AutoComplete",
            "AMap.PlaceSearch",
            "AMap.ControlBar",
            "AMap.MouseTool",
            "AMap.DragRoute",
            "AMap.MoveAnimation"],         // 需要使用的的插件列表,如比例尺'AMap.Scale'等
        }).then((AMap) => {
          this.AMap=AMap
          this.marker=null;
          // this.lineArr = [[116.478935,39.997761],[116.478939,39.997825],[116.478912,39.998549],[116.478912,39.998549],[116.478998,39.998555],[116.478998,39.998555],[116.479282,39.99856],[116.479658,39.998528],[116.480151,39.998453],[116.480784,39.998302],[116.480784,39.998302],[116.481149,39.998184],[116.481573,39.997997],[116.481863,39.997846],[116.482072,39.997718],[116.482362,39.997718],[116.483633,39.998935],[116.48367,39.998968],[116.484648,39.999861]];
          this.initTrackBefore(AMap);


        }).catch(e => {
          console.log(e);
        })
      },
    },
    //生命周期 - 创建完成(可以访问当前 this 实例)
    created() {
      this.getLineArr(this.equipmentId,moment().valueOf())
    },
    //生命周期 - 挂载完成(可以访问 DOM 元素)
    mounted() {
      this.initMap();
    },
    //生命周期 - 创建之前
    beforeCreate() {
    },
    //生命周期 - 挂载之前
    beforeMount() {
    },
    //生命周期 - 更新之前
    beforeUpdate() {
    },
    //生命周期 - 更新之后
    updated() {
    },
    //生命周期 - 销毁之前
    beforeDestroy() {
    },
    //生命周期 - 销毁完成
    destroyed() {
    },
    //如果页面有 keep-alive 缓存功能, 这个函数会触发
    activated() {
    },
  }
</script>

<style scoped>
  #container {
    padding: 0px;
    margin: 0px;
    width: 100%;
    height: 800px;
  }
  .input-item {
    height: 2.2rem;
  }

  .input-card {
    display: flex;
    flex-direction: column;
    min-width: 0;
    word-wrap: break-word;
    background-color: #fff;
    background-clip: border-box;
    border-radius: .25rem;
    width: 10rem;
    border-width: 0;
    border-radius: 0.4rem;
    box-shadow: 0 2px 6px 0 rgba(114, 124, 245, .5);
    position: fixed;
    bottom: 12rem;
    right: 2rem;
    -ms-flex: 1 1 auto;
    flex: 1 1 auto;
    padding: 0.75rem 1.25rem;
  }
</style>
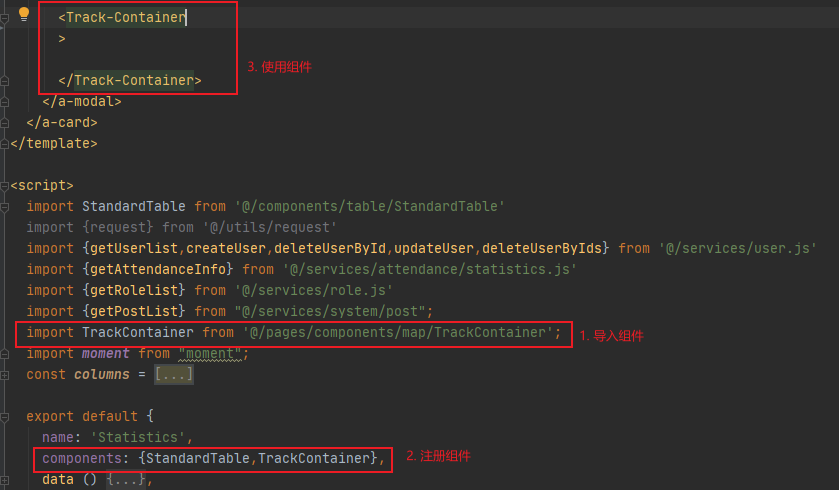
4. 进阶抽取使用
trackVisible只需要和地图组件在父组件的展示同步就可以实现和地图组件同步开关- 只需要在父组件时将这两个值传过去,如果是lineArr,需要修改一下组件直接传lineArr
      <Track-Container
        :visible="trackVisible"
        :equipmentId ="form.equipmentImei"
      >
      </Track-Container>
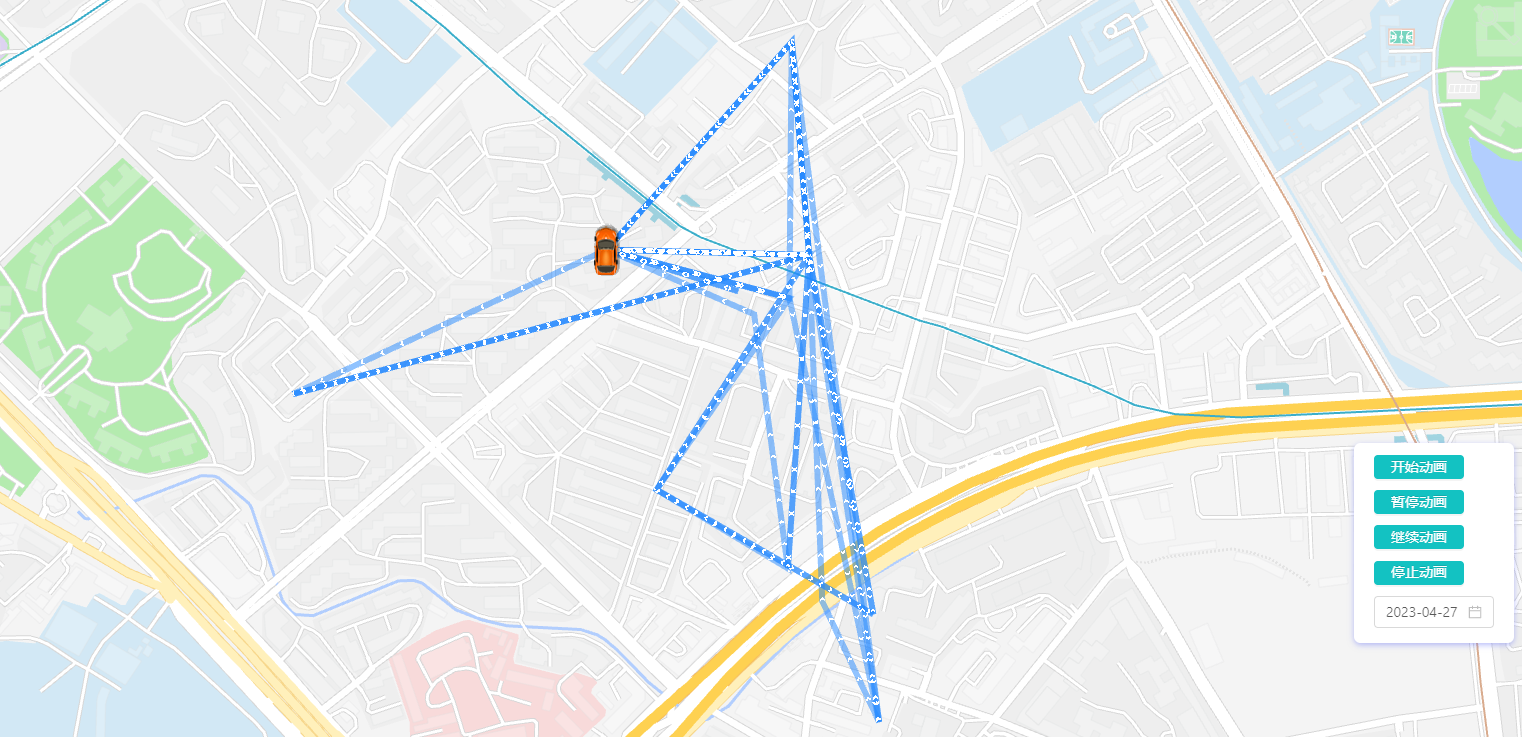
效果如下:


 1万+
1万+

 被折叠的 条评论
为什么被折叠?
被折叠的 条评论
为什么被折叠?
 到【灌水乐园】发言


