


1.介绍
Apereo CAS的一个功能就是单点登录,统一的登录登出接口与页面,让系统中的模块只需要关注在业务点,而把安全认证的功能交给统一认证来做。所以客户端的集成主要是单点登录的集成,客户端指定需要做安全认证的页面,然后Apereo CAS的安全包检测校验用户登录情况,并自动与CAS登录页面进行跳转交互。
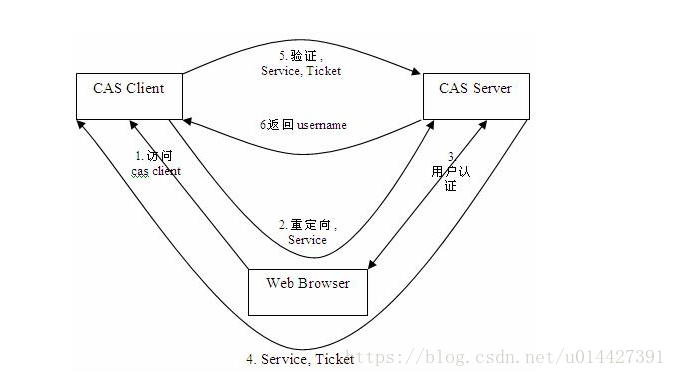
CAS登录等系统分为CAS Server和CAS Client,认证过程如下:
-
1、用户访问CAS Client请求资源
-
2、客户端程序做了重定向,重定向到CAS Server
-
3、CAS Server会对请求做认证,验证是否有TGC(Ticket Granted Cookie,有TGC说明已经登录过,不需要再登录,没有就返回登录页面
-
4、认证通过后会生成一个Service Ticket返回Cas Client,客户端进行Ticket缓存,一般放在Cookie里,我们称之为TGC(Ticket Granted Cookie)
-
5、然后Cas Client就带着Ticket再次访问Cas Server,CAS Server进行Ticket验证
-
6、CAS Server对Ticket进行验证,通过就返回用户信息,用户拿到信息后就可以登录
CAS Service和CAS Client通讯基于HttpUrlConnection。
注意要点:
-
TGT(Ticket Granded Ticket),就是存储认证凭据的Cookie,有TGT说明已经通过认证。
-
ST(Service Ticket),是由CAS认证中心生成的一个唯一的不可伪装的票据,用于认证的。
-
没登录过的或者TGT失效的,访问时候也跳转到认证中心,发现没有TGT,说明没有通过认证,直接重定向登录页面,输入账号密码后,再次重定向到认证中心,验证通过后,生成ST,返回客户端保存到TGC。
-
登录过的而且TGT没有失效的,直接带着去认证中心认证,认证中心发现有TGT,重定向到客户端,并且带上ST,客户端再带ST去认证中心验证。
2. Apereo Cas服务端搭建
1.从GitHub - apereo/cas-overlay-template: Apereo CAS WAR Overlay template下载源码,这里我们切换到分支remotes/origin/5.3。
2.进入到源码目录,执行mvn clean package 构建项目,当构建完成后,target目录下会生成cas.war包,直接放入到tomcat的webapps目录下。
3.cas.war\WEB-INF\classes \application.properties文件最后加入以下配置:
#开启识别json文件,默认false
cas.serviceRegistry.initFromJson=true
cas.tgc.secure=false
cas.warningCookie.secure=false
cas.war\WEB-INF\classes\services\HTTPSandIMAPS-10000001.json文件做如下修改,支持http协议:
"serviceId": "^(https|http|imaps)://*"
4.启动tomcat,并且访问http://127.0.0.1:8080/cas,输入casuser/Mellon【在applicaiton.properties中配置】登录。
3.Apereo Cas自定义认证策略
官网自定义认证策略:https://apereo.github.io/cas/5.3.x/installation/Configuring-Custom-Authentication.html
-
引入maven依赖:
<!-- Custom Authentication -->
<dependency>
<groupId>org.apereo.cas</groupId>
<artifactId>cas-server-core-authentication-api</artifactId>
<version>${cas.version}</version>
</dependency>
<!-- Custom Configuration -->
<dependency>
<groupId>org.apereo.cas</groupId>
<artifactId>cas-server-core-configuration-api</artifactId>
<version>${cas.version}</version>
</dependency>
<!-- 支持jdbc认证 -->
<dependency>
<groupId>org.apereo.cas</groupId>
<artifactId>cas-server-support-jdbc</artifactId>
<version>${cas.version}</version>
</dependency>
<dependency>
<groupId>org.apereo.cas</groupId>
<artifactId>cas-server-support-jdbc-drivers</artifactId>
<version>${cas.version}</version>
</dependency>
2.代码主要通过拦截传入的Credential,获取用户名和密码,然后再自定义返回给客户端的用户信息。如果只是简单认证传统的用户名和密码,则值需要实现AbstractUsernamePasswordAuthenticationHandler抽象类即可。
@Data
public class SysUser {
private String login_name;
private String password;
private Integer expire;
private Integer disabled;
}
/**
* 自定义的认证器
**/
public class MyAuthenticationHandler extends AbstractUsernamePasswordAuthenticationHandler {
public MyAuthenticationHandler(String name, ServicesManager servicesManager, PrincipalFactory principalFactory, Integer order) {
super(name, servicesManager, principalFactory, order);
}
@Override
protected AuthenticationHandlerExecutionResult authenticateUsernamePasswordInternal(UsernamePasswordCredential credential, String originalPassword) throws GeneralSecurityException, PreventedException {
String username = credential.getUsername();
String password = credential.getPassword();
System.out.println("username : " + username);
System.out.println("password : " + password);
// JDBC模板依赖于连接池来获得数据的连接,所以必须先要构造连接池
DriverManagerDataSource dataSource = new DriverManagerDataSource();
dataSource.setDriverClassName("com.mysql.jdbc.Driver");
dataSource.setUrl("jdbc:mysql://localhost:3306/jeesite");
dataSource.setUsername("root");
dataSource.setPassword("123456");
// 创建JDBC模板
JdbcTemplate jdbcTemplate = new JdbcTemplate();
jdbcTemplate.setDataSource(dataSource);
String sql = "SELECT * FROM sys_user WHERE login_name = ?";
SysUser info = (SysUser) jdbcTemplate.queryForObject(sql, new Object[]{username}, new BeanPropertyRowMapper(SysUser.class));
System.out.println("database username : "+ info.getLogin_name());
System.out.println("database password : "+ info.getPassword());
if (info == null) {
throw new AccountException("Sorry, username not found!");
}
if (!info.getPassword().equals(password)) {
throw new FailedLoginException("Sorry, password not correct!");
} else {
//可自定义返回给客户端的多个属性信息
HashMap<String, Object> returnInfo = new HashMap<>();
returnInfo.put("expired", info.getExpire());
final List<MessageDescriptor> list = new ArrayList<>();
return createHandlerResult(credential, this.principalFactory.createPrincipal(username, returnInfo), list);
}
}
}
3.接着注入配置信息,继承AuthenticationEventExecutionPlanConfigurer即可。
@Configuration("MyAuthenticationEventExecutionPlanConfiguration")
@EnableConfigurationProperties(CasConfigurationProperties.class)
public class MyAuthenticationEventExecutionPlanConfiguration implements AuthenticationEventExecutionPlanConfigurer {
@Autowired
private CasConfigurationProperties casProperties;
@Autowired
@Qualifier("servicesManager")
private ServicesManager servicesManager;
@Bean
public AuthenticationHandler myAuthenticationHandler() {
// 参数: name, servicesManager, principalFactory, order
// 定义为优先使用它进行认证
return new MyAuthenticationHandler(MyAuthenticationHandler.class.getName(),
servicesManager, new DefaultPrincipalFactory(), 1);
}
@Override
public void configureAuthenticationExecutionPlan(AuthenticationEventExecutionPlan plan) {
plan.registerAuthenticationHandler(myAuthenticationHandler());
}
}
4.最后在src/main/resources目录下新建META-INF目录,同时在下面新建spring.factories文件,将配置指定为我们自己新建的信息。
org.springframework.boot.autoconfigure.EnableAutoConfiguration=\
  org.apereo.cas.config.CasEmbeddedContainerTomcatConfiguration,\
  org.apereo.cas.config.CasEmbeddedContainerTomcatFiltersConfiguration,\
  org.apereo.cas.MyAuthenticationEventExecutionPlanConfiguration
-
当认证的信息不只有用户名和密码的时候,还包含其他的一些信息的时候,则需要实现
AbstractPreAndPostProcessingAuthenticationHandler。public class CustomerHandlerAuthentication extends AbstractPreAndPostProcessingAuthenticationHandler { public CustomerHandlerAuthentication(String name, ServicesManager servicesManager, PrincipalFactory principalFactory, Integer order) { super(name, servicesManager, principalFactory, order); } @Override public boolean supports(Credential credential) { //判断传递过来的Credential 是否是自己能处理的类型 return credential instanceof UsernamePasswordCredential; } @Override protected AuthenticationHandlerExecutionResult doAuthentication(Credential credential) throws GeneralSecurityException, PreventedException { UsernamePasswordCredential usernamePasswordCredentia = (UsernamePasswordCredential) credential; String username = usernamePasswordCredentia.getUsername(); String password = usernamePasswordCredentia.getPassword(); System.out.println("username : " + username); System.out.println("password : " + password); // JDBC模板依赖于连接池来获得数据的连接,所以必须先要构造连接池 DriverManagerDataSource dataSource = new DriverManagerDataSource(); dataSource.setDriverClassName("com.mysql.jdbc.Driver"); dataSource.setUrl("jdbc:mysql://localhost:3306/jeesite"); dataSource.setUsername("root"); dataSource.setPassword("123456"); // 创建JDBC模板 JdbcTemplate jdbcTemplate = new JdbcTemplate(); jdbcTemplate.setDataSource(dataSource); String sql = "SELECT * FROM sys_user WHERE login_name = ?"; SysUser info = (SysUser) jdbcTemplate.queryForObject(sql, new Object[]{username}, new BeanPropertyRowMapper(SysUser.class)); System.out.println("database username : "+ info.getLogin_name()); System.out.println("database password : "+ info.getPassword()); if (info == null) { throw new AccountException("Sorry, username not found!"); } if (!info.getPassword().equals(password)) { throw new FailedLoginException("Sorry, password not correct!"); } else { //可自定义返回给客户端的多个属性信息 HashMap<String, Object> returnInfo = new HashMap<>(); returnInfo.put("expired", info.getExpire()); final List<MessageDescriptor> list = new ArrayList<>(); return createHandlerResult(credential, this.principalFactory.createPrincipal(username, returnInfo), list); } } } -
然后在MyAuthenticationEventExecutionPlanConfiguration注册下:
@Bean public AuthenticationHandler customerHandlerAuthentication() { // 参数: name, servicesManager, principalFactory, order // 定义为优先使用它进行认证 return new CustomerHandlerAuthentication(CustomerHandlerAuthentication.class.getName(), servicesManager, new DefaultPrincipalFactory(), 1); } plan.registerAuthenticationHandler(customerHandlerAuthentication());
7.在tomcat中启动该应用,然后访问http://127.0.0.1:8080/cas输入密码即可进行验证。
Cas客户端接入
1. Shiro客户端的Cas接入方案
1.1引入依赖
<!-- Shiro -->
<dependency>
<groupId>org.apache.shiro</groupId>
<artifactId>shiro-spring</artifactId>
<version>${shiro.spring.version}</version>
</dependency>
<dependency>
<groupId>org.apache.shiro</groupId>
<artifactId>shiro-ehcache</artifactId>
<version>${shiro.encache.version}</version>
</dependency>
<dependency>
<groupId>org.apache.shiro</groupId>
<artifactId>shiro-cas</artifactId>
<version>${shiro.cas.version}</version>
</dependency>
<!-- cas -->
<dependency>
<groupId>org.jasig.cas.client</groupId>
<artifactId>cas-client-core</artifactId>
<version>${cas.version}</version>
</dependency>
1.2 配置shiro过滤器
@Configuration
public class ShiroConfig {
private static final Logger LOG = LoggerFactory.getLogger(ShiroConfig.class);
/**
* 单点登出监听器
* @return
*/
@Bean
public ServletListenerRegistrationBean singleSignOutHttpSeessionListener(){
ServletListenerRegistrationBean bean = new ServletListenerRegistrationBean();
bean.setListener(new SingleSignOutHttpSessionListener());
bean.setEnabled(true);
return bean;
}
/**
* 注册单点登出的过滤器
* @return
*/
@Bean
public FilterRegistrationBean singleSignOutFilter(){
FilterRegistrationBean bean = new FilterRegistrationBean();
bean.setName("singleSignOutFilter");
bean.setFilter(new SingleSignOutFilter());
bean.addUrlPatterns("/*");
bean.setEnabled(true);
return bean;
}
@Bean
public FilterRegistrationBean authenticationFilter(){
FilterRegistrationBean bean = new FilterRegistrationBean();
bean.setFilter(new AuthenticationFilter());
bean.addUrlPatterns("/*");
bean.setName("CAS AuthenticationFilter");
bean.addInitParameter("casServerLoginUrl",CAS_SERVER_URL_PREFIX);
bean.addInitParameter("serverName",SERVER_URL_PREFIX);
return bean;
}
/**
* 单点登录校验
* @return
*/
@Bean
public FilterRegistrationBean validationFilter(){
FilterRegistrationBean registrationBean = new FilterRegistrationBean();
registrationBean.setFilter(new Cas20ProxyReceivingTicketValidationFilter());
registrationBean.addUrlPatterns("/*");
registrationBean.setName("CAS Validation Filter");
registrationBean.addInitParameter("casServerUrlPrefix", CAS_SERVER_URL_PREFIX );
registrationBean.addInitParameter("serverName", SERVER_URL_PREFIX );
return registrationBean;
}
/**
* CAS过滤器
* @return
*/
@Bean
public CasFilter getCasFilter(){
CasFilter casFilter = new CasFilter();
casFilter.setName("casFilter");
casFilter.setEnabled(true);
casFilter.setFailureUrl(CAS_CLIENT_LOGIN_URL);
casFilter.setSuccessUrl(LOGIN_SUCCESS_URL);
return casFilter;
}
/**
* 定义ShrioRealm
* @return
*/
@Bean
public ShiroRealm myShiroRealm(){
ShiroRealm myShiroRealm = new ShiroRealm();
return myShiroRealm;
}
/**
* Shiro Security Manager
* @return
*/
@Bean
public SecurityManager securityManager(){
DefaultWebSecurityManager securityManager = new DefaultWebSecurityManager();
//securityManager.setRealm(myShiroRealm());
securityManager.setSubjectFactory(new CasSubjectFactory());
return securityManager;
}
/**
* ShiroFilterFactoryBean
* @param securityManager
* @return
*/
@Bean
public ShiroFilterFactoryBean shirFilter(SecurityManager securityManager,CasFilter casFilter) {
ShiroFilterFactoryBean shiroFilterFactoryBean = new ShiroFilterFactoryBean();
//注册Shrio Security Manager
shiroFilterFactoryBean.setSecurityManager(securityManager);
shiroFilterFactoryBean.setLoginUrl(CAS_CLIENT_LOGIN_URL);
shiroFilterFactoryBean.setSuccessUrl(LOGIN_SUCCESS_URL);
shiroFilterFactoryBean.setUnauthorizedUrl(LOGIN_UNAUTHORIZED_URL);
//添加CasFilter到ShiroFilter
Map<String,Filter> filters = new HashMap<String,Filter>();
filters.put("casFilter",casFilter);
shiroFilterFactoryBean.setFilters(filters);
//拦截器.
Map<String,String> filterChainDefinitionMap = new LinkedHashMap<>();
//Shiro集成CAS后需要添加该规则
filterChainDefinitionMap.put(CAS_FILTER_URL_PATTERN,"casFilter");
// 配置不会被拦截的链接 顺序判断
filterChainDefinitionMap.put("/static/**", "anon");
filterChainDefinitionMap.put("/upload/**", "anon");
filterChainDefinitionMap.put("/plugins/**", "anon");
filterChainDefinitionMap.put("/code", "anon");
//filterChainDefinitionMap.put("/login", "anon");
filterChainDefinitionMap.put("/403", "anon");
//filterChainDefinitionMap.put("/logincheck", "anon");
filterChainDefinitionMap.put("/logout","anon");
filterChainDefinitionMap.put("/**", "authc"); // 配置对所有的连接,
shiroFilterFactoryBean.setFilterChainDefinitionMap(filterChainDefinitionMap);
return shiroFilterFactoryBean;
}
}
其中配置拦截器的地方anon、authc和user等的含义如下:
anon: 无需认证即可访问
authc: 需要认证才可访问
user: 点击“记住我”功能可访问
perms: 拥有权限才可以访问
role: 拥有某个角色权限才能访问
1.3 进行认证的代码开发
/**
* 常量池
**/
public class CASConsts {
/* CAS单点登录配置 */
//Cas server地址
public static final String CAS_SERVER_URL_PREFIX = "http://localhost:8080/cas";
//Cas单点登录地址
public static final String CAS_LOGIN_URL = CAS_SERVER_URL_PREFIX +"/login";
//CAS单点登出地址
public static final String CAS_LOGOUT_URL = CAS_SERVER_URL_PREFIX + "/logout";
//对外提供的服务地址
public static final String SERVER_URL_PREFIX = "http://localhost:8081";
//Cas过滤器的urlPattern
public static final String CAS_FILTER_URL_PATTERN = "/jeeplatform";
//CAS客户端单点登录跳转地址
public static final String CAS_CLIENT_LOGIN_URL = CAS_LOGIN_URL + "?service="+SERVER_URL_PREFIX+CAS_FILTER_URL_PATTERN;
//CAS客户端单点登出
public static final String CAS_CLIENT_LOGOUT_URL = CAS_LOGOUT_URL + "?service="+SERVER_URL_PREFIX+CAS_FILTER_URL_PATTERN;
//登录成功地址
public static final String LOGIN_SUCCESS_URL = "/index";
//无权访问页面403
public static final String LOGIN_UNAUTHORIZED_URL = "/403";
}
/**
* 用户认证的类
**/
public class ShiroRealm extends CasRealm {
Logger LOG = LoggerFactory.getLogger(ShiroRealm.class);
/**注解引入业务类, 读写数据库操作**/
@Resource
UserService userService;
@PostConstruct
public void initProperty(){
// 这里设置Cas认证的服务器地址
setCasServerUrlPrefix(CAS_SERVER_URL_PREFIX);
// 客户端回调地址
setCasService(CAS_SERVER_URL_PREFIX + CAS_FILTER_URL_PATTERN);
}
/**
* 登录信息和用户验证信息验证(non-Javadoc)
* @see org.apache.shiro.realm.AuthenticatingRealm#doGetAuthenticationInfo(AuthenticationToken)
*/
@Override
protected AuthenticationInfo doGetAuthenticationInfo(AuthenticationToken token) throws AuthenticationException {
if(LOG.isInfoEnabled()) {
LOG.info("=>执行Shiro权限认证");
}
String username = (String)token.getPrincipal(); //得到用户名
String password = new String((char[])token.getCredentials()); //得到密码
User user = userService.findByUsername(username);
/* 检测是否有此用户 */
if(user == null){
throw new UnknownAccountException();//没有找到账号异常
}
/* 检验账号是否被锁定 */
if(Boolean.TRUE.equals(user.getLocked())){
throw new LockedAccountException();//抛出账号锁定异常
}
/* AuthenticatingRealm使用CredentialsMatcher进行密码匹配*/
if(null != username && null != password){
return new SimpleAuthenticationInfo(username, password, getName());
}else{
return null;
}
}
/**
* 授权查询回调函数, 进行鉴权但缓存中无用户的授权信息时调用,负责在应用程序中决定用户的访问控制的方法(non-Javadoc)
* @see AuthorizingRealm#doGetAuthorizationInfo(PrincipalCollection)
*/
@Override
protected AuthorizationInfo doGetAuthorizationInfo(PrincipalCollection pc) {
if(LOG.isInfoEnabled()) {
LOG.info("=>执行Shiro授权");
}
String username = (String)pc.getPrimaryPrincipal();
SimpleAuthorizationInfo authorizationInfo = new SimpleAuthorizationInfo();
// 设置角色信息
authorizationInfo.setRoles(userService.getRoles(username));
// 设置角色对应的所属的资源的权限等
authorizationInfo.setStringPermissions(userService.getPermissions(username));
return authorizationInfo;
}
@Override
public void clearCachedAuthorizationInfo(PrincipalCollection principals) {
super.clearCachedAuthorizationInfo(principals);
}
@Override
public void clearCachedAuthenticationInfo(PrincipalCollection principals) {
super.clearCachedAuthenticationInfo(principals);
}
@Override
public void clearCache(PrincipalCollection principals) {
super.clearCache(principals);
}
}
配置好之后,用户登录会先进入到用户认证的方法,然后跳到Cas Server进行校验登录操作。
2.Spring Security Cas接入方案
spring security 集成cas实现单点登录_阿文_ing的博客-CSDN博客_springsecurity集成cas
3.其他Springboot starter接入方案
CAS 4.2.7系列之客户端对接(三) - 腾讯云开发者社区-腾讯云
Shiro相关知识点
Shiro完整教程_普通网友的博客-CSDN博客_shiro教程
身份认证流程
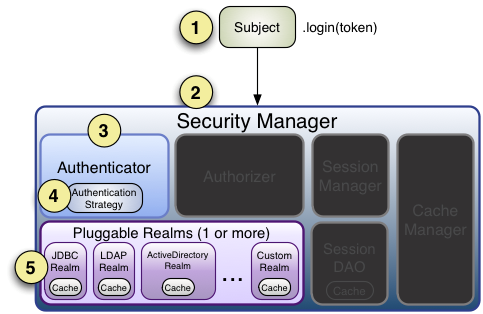
流程如下:
-
首先调用 Subject.login(token) 进行登录,其会自动委托给 Security Manager,调用之前必须通过 SecurityUtils.setSecurityManager() 设置;
-
SecurityManager 负责真正的身份验证逻辑;它会委托给 Authenticator 进行身份验证;
-
Authenticator 才是真正的身份验证者,Shiro API 中核心的身份认证入口点,此处可以自定义插入自己的实现;
-
Authenticator 可能会委托给相应的 AuthenticationStrategy 进行多 Realm 身份验证,默认 ModularRealmAuthenticator 会调用 AuthenticationStrategy 进行多 Realm 身份验证;
-
Authenticator 会把相应的 token 传入 Realm,从 Realm 获取身份验证信息,如果没有返回 / 抛出异常表示身份验证失败了。此处可以配置多个 Realm,将按照相应的顺序及策略进行访问。
Shiro对应的拦截器和标识


 244
244


 被折叠的 条评论
为什么被折叠?
被折叠的 条评论
为什么被折叠?
 到【灌水乐园】发言


