


1.MyBatis 简介
MyBatis is a first class persistence framework with support for custom SQL, stored procedures and advanced mappings. MyBatis eliminates almost all of the JDBC code and manual setting of parameters and retrieval of results. MyBatis can use simple XML or Annotations for configuration and map primitives, Map interfaces and Java POJOs (Plain Old Java Objects) to database records.MyBatis 是一流的持久化框架,支持自定义 SQL, 存储过程和高级映射。mybatis 几乎消除了所有 JDBC 代码和手动设置参数和检索的结果。MyBatis 可以使用简单的 XML 或注释来配置和映射基元,映射接口和 Java POJOs(普通 Java 对象)到数据库记录。
If you are completely new to database access in Java,Java & Databases: An Overview of Libraries & APIs contains a good overview of the various parts, pieces and options and shows you where exactly MyBatis fits in.如果你对Java中的数据库访问完全陌生,网址包含了对各个部分、部分和选项的良好概述,并向您展示了 MyBatis 的确切位置。
mybatis 官方文档:MyBatis 3 | Getting started – mybatis
对象关系映射(Object Relational Mapping[əbˈdʒekt,rɪˈleɪʃənl,ˈmæpɪŋ],简称 ORM)模式是一种为了解决面向对象与关系数据库存在的互不匹配的现象的技术。简单的说,ORM是通过使用描述对象和数据库之间映射的元数据,将程序中的对象自动持久化到关系数据库中。mybatis 就是全国使用最多的 orm 框架。
1.环境搭建
To use MyBatis you just need to include the mybatis-x.x.x.jar file in the classpath.要使用 MyBatis,您只需要在类路径中包含 mybatis-x.x.x.jar 文件。
If you are using Maven just add the following dependency to your pom.xml:如果您使用的是 Maven,只需将以下依赖项添加到您的 pom.xml:
<dependency>
    <groupId>org.mybatis</groupId>
    <artifactId>mybatis</artifactId>
    <version>3.4.6</version>
</dependency>
<dependency>
    <groupId>mysql</groupId>
    <artifactId>mysql-connector-java</artifactId>
    <version>5.1.48</version>
</dependency>
<dependency>
    <groupId>ch.qos.logback</groupId>
    <artifactId>logback-classic</artifactId>
    <version>1.2.6</version>
</dependency>
2.数据准备
为了方便学习,执行以下创表命令和插入数据命令。
CREATE TABLE `pet` (
  `id` int(11) NOT NULL AUTO_INCREMENT,
  `name` varchar(20) NOT NULL,
  `weight` double NOT NULL,
  PRIMARY KEY (`id`)
) ENGINE=InnoDB AUTO_INCREMENT=5 DEFAULT CHARSET=utf8mb4;
insert  into `pet`(`id`,`name`,`weight`) values (1,'花花',4.5);
insert  into `pet`(`id`,`name`,`weight`) values (2,'白白',5.6);
insert  into `pet`(`id`,`name`,`weight`) values (3,'黑黑',7.8);
insert  into `pet`(`id`,`name`,`weight`) values (4,'红红',9);
3.配置核心配置文件
The configuration XML file contains settings for the core of the MyBatis system, including a DataSource for acquiring database Connection instances, as well as a TransactionManager for determining how transactions should be scoped and controlled.配置 XML 文件包含 MyBatis 系统核心的设置,包括用于获取数据库连接实例的数据源,以及用于确定应如何确定事务范围和控制事务的事务管理器。
<?xml version="1.0" encoding="UTF-8"?>
<!DOCTYPE configuration PUBLIC "-//mybatis.org//DTD Config 3.0//EN" "http://mybatis.org/dtd/mybatis-3-config.dtd">
<configuration>
    <environments default="development">
        <environment id="development">
            <transactionManager type="JDBC" />
            <dataSource type="POOLED">
                <property name="driver" value="com.mysql.jdbc.Driver" />
                <property name="url" value="jdbc:mysql://localhost:3306/mybatis" />
                <property name="username" value="root" />
                <property name="password" value="123456" />
            </dataSource>
        </environment>
    </environments>
    <mappers>
        <mapper resource="mapper/PetMapper.xml"></mapper>
    </mappers>
</configuration>
While there is a lot more to the XML configuration file, the above example points out the most critical parts. Notice the XML header, required to validate the XML document. The body of the environment element contains the environment configuration for transaction management and connection pooling. The mappers element contains a list of mappers – the XML files and/or annotated Java interface classes that contain the SQL code and mapping definitions.虽然 XML 配置文件还有很多内容,但上面的示例指出了最关键的部分。请注意验证 XML 文档所需的 XML 标头。环境元素的正文包含事务管理和连接池的环境配置。映射器元素包含映射器列表 - 包含 SQL 代码和映射定义的 XML 文件和/或带注释的 Java 接口类。
注意:
dataSource[ˈdeɪtə sɔːs]的类型可以配置成其内置类型之一, UNPOOLED、POOLED 、JNDI。
- UNPOOLED,MyBatis 会为每一个数据库操作创建一个新的连接,并关闭它。该方式适用于只有小规模数量并发用户的简单应用程序上。
- POOLED,MyBatis 会创建一个数据库连接池,连接池中的一个连接将会被用作数据库操作。一旦数据库操作完成,MyBatis 会将此连接返回给连接池。在开发或测试环境中,经常使用此种方式。
- JNDI,MyBatis 从在应用服务器向配置好的 JNDI 数据源 dataSource 获取数据库连接。在生产环境中,优先考虑这种方式。
4.日志配置(可不配置)
为了监控 mybatis 执行情况,我们通过 logback 打印相关程序运行情况。在 resource 下添加日志配置文件 logback.xml
<?xml version="1.0" encoding="UTF-8"?>
<configuration>
    <!--控制台-->
    <appender name="console" class="ch.qos.logback.core.ConsoleAppender">
        <encoder>
            <pattern>%d{yyyy-MM-dd HH:mm:ss} %-5p --- [%t] %-40.40logger{39} : %m%n</pattern>
        </encoder>
    </appender>
    <!--根logger-->
    <root level="DEBUG" additivity="false">
        <appender-ref ref="console"/>
    </root>
</configuration>
加入该文件后,mybatis 运行情况、发送的 SQL、SQL 填充的数据和返回的数据条数都打印显示到控制台。
5.创建实体
创建对应实体,并添加对应的 getter 与 setter 方法。因为 mybatis 会使用反射完成对象的封装,所以实体一定需要无参构造方法。如果需要输出对象,还需要重写它的 toString 方法
public class Pet{
    private Integer id;
    private String name;
    private Double weight
}
6.创建 Mapper 文件
mybatis 的所有数据库操作都是通过 mapper 文件完成的。mapper 文件一般存放在 resource/mapper/ 目录下。
创建实体类对应的映射文件 *Mapper.xml,详细如下代码所示:
<?xml version="1.0" encoding="UTF-8" ?>
<!DOCTYPE mapper PUBLIC "-//mybatis.org//DTD Mapper 3.0//EN" "http://mybatis.org/dtd/mybatis-3-mapper.dtd">
<mapper namespace="cn.hx.mapper">
    <select id="getById" parameterType="int" resultType="cn.hx.Pet">
         select * from pet where id=#{id}
    </select>
</mapper>
注意:
parameterType[pəˈræmɪtə(r),taɪp]:参数类型
resultType[rɪˈzʌlt,taɪp]:方法返回类型(如果返回是集合,则返回类型添集合存放对象的类型的全路径)
不论是参数类型还是返回类型,自定义类都需要写类的全路径名。
7.注册 mapper 文件
在 mybatis 核心配置文件 mybatis-conf.xml 中注册上面的 *Mapper.xml
<mappers>
    <mapper resource="mapper/PetMapper.xml"></mapper>
</mappers>
下面是对这几个配置文件一点解释说明:
1、配置文件 mybatis-conf.xml 是 mybatis 用来建立 sessionFactory,里面主要包含了数据库连接相关内容。
2、mybatis-conf.xml 里面的 是包含要映射的类的 xml 配置文件。
3、在 *Mapper.xml 文件里面主要是定义各种 SQL 语句,以及这些语句的参数,以及要返回的类型等等。
8.运行测试
Every MyBatis application centers around an instance of SqlSessionFactory. A SqlSessionFactory instance can be acquired by using the SqlSessionFactoryBuilder. SqlSessionFactoryBuilder can build a SqlSessionFactory instance from an XML configuration file, or from a custom prepared instance of the Configuration class.每个 MyBatis 应用程序都以 SqlSessionFactory 的一个实例为中心。SqlSessionFactory 实例可以通过使用 SqlSessionFactoryBuilder 获取。SqlSessionFactoryBuilder 可以从 XML 配置文件或 Configuration 类的自定义准备实例生成 SqlSessionFactory 实例。
Building a SqlSessionFactory instance from an XML file is very simple. It is recommended that you use a classpath resource for this configuration, but you could use any InputStream instance, including one created from a literal file path or a file:// URL. MyBatis includes a utility class, called Resources, that contains a number of methods that make it simpler to load resources from the classpath and other locations.从 XML 文件构建 SqlSessionFactory 实例非常简单。建议对此配置使用类路径资源,但可以使用任何 InputStream 实例,包括从文本文件路径或 file://URL 创建的实例。MyBatis 包含一个名为 Resources 的实用程序类,其中包含许多方法,这些方法可以更轻松地从类路径和其他位置加载资源。
import org.apache.ibatis.io.Resources;
import org.apache.ibatis.session.SqlSession;
import org.apache.ibatis.session.SqlSessionFactory;
import org.apache.ibatis.session.SqlSessionFactoryBuilder;

import java.io.IOException;
import java.io.Reader;

public class MainTest {
    public static void main(String[] args) throws IOException {
        //加载 mybatis 的核心配置文件(它也加载关联的映射文件)
        Reader reader = Resources.getResourceAsReader("mybatis-conf.xml");
        //构建 sqlSession 的工厂
        SqlSessionFactory sessionFactory = new SqlSessionFactoryBuilder().build(reader);
        //创建能执行映射文件中 sql 的 sqlSession
        SqlSession session = sessionFactory.openSession();
        Object o = session.selectOne("cn.hx.mapper.petMapper.getById",3);
        System.out.println(o);
    }
}
Now that you have a SqlSessionFactory, as the name suggests, you can acquire an instance of SqlSession. The SqlSession contains absolutely every method needed to execute SQL commands against the database. You can execute mapped SQL statements directly against the SqlSession instance.现在你有一个 SqlSessionFactory,顾名思义,你可以获取 SqlSession 的实例。SqlSession 绝对包含对数据库执行 SQL 命令所需的所有方法。您可以直接针对 SqlSession 实例执行映射的 SQL 语句。
注意:
1.selectOne 设计的初衷是查询单个(Retrieve a single row mapped from the statement key and parameter.),当查询时出现多个结果会报下面的错误:如果查询出来是集合用 selectList 方法(Retrieve a list of mapped objects from the statement key and parameter.)。
org.apache.ibatis.exceptions.TooManyResultsException: Expected one result (or null) to be returned by selectOne(), but found: 32.SqlSessionFactory 线程安全性,可以设计成单例(Creates an SqlSession out of a connection or a DataSource.)
3.SqlSession 线程非安全,不能做类的公用变量(The primary Java interface for working with MyBatis. Through this interface you can execute commands, get mappers and manage transactions.)
4.Resources.getResourceAsReader:Returns a resource on the classpath as a Reader object.
练习:
1.创建项目 fruit01,并在项目中创建 fruit(id,name,color)实体和对应的数据库表,并完成根据 id 查询水果和查询全部水果功能。
参考代码:
<?xml version="1.0" encoding="UTF-8" ?>
<!DOCTYPE mapper PUBLIC "-//mybatis.org//DTD Mapper 3.0//EN" "http://mybatis.org/dtd/mybatis-3-mapper.dtd">
<mapper namespace="cn.hx.mapper">
    <select id="getById" parameterType="int" resultType="cn.hx.Fruit">
         select * from fruit where id=#{id}
    </select>
   <select id="getAll"  resultType="cn.hx.Fruit">
         select * from fruit
    </select>
</mapper>
2.接口注解
在上一节中实现了 mybatis 的一个简单的查询,还有更简单的方法,使用合理描述参数和 SQL 语句返回值的接口(比如:IUserMapper.java),这样现在就可以不使用类似 UserMapper.xml 配置文件,至此更简单,代码更安全,不容易发生的字符串文字和转换的错误,下面是项目创建的详细过程:
There's one more trick to Mapper classes like BlogMapper. Their mapped statements don't need to be mapped with XML at all. Instead they can use Java Annotations. For example, the XML above could be eliminated and replaced with:像 PetMapper 这样的 Mapper 类还有一个技巧。它们的映射语句根本不需要使用 XML 进行映射。相反,他们可以使用 Java 注解。例如,可以删除上面的 XML 并将其替换为:
创建一个接口:PetMapper,并在其中声明对应的操作方法
public interface PetMapper {
    @Insert("insert into pet(name,weight) values (#{name},#{weight})")
    int add(Pet pet);

    @Select("select * from pet where id=#{id}")
    Pet getById(int id);
}
在 mybatis-conf.xml 里面注册 mapper 接口
<mapper class="cn.hx.mybatis.mapper.PetMapper"></mapper>测试类修改下面的位置完成测试
public static void main(String[] args) throws IOException {
    //加载mybatis的配置文件(它也加载关联的映射文件)
    Reader reader = Resources.getResourceAsReader("mybatis-conf.xml");
    //构建sqlSession的工厂
    SqlSessionFactory sessionFactory = new SqlSessionFactoryBuilder().build(reader);
    //创建能执行映射文件中sql的sqlSession
    SqlSession session = sessionFactory.openSession();
    //映射sql的标识字符串
    //执行查询返回一个唯一user对象的sql
    Pet pet = session.getMapper(PetMapper.class ).getById( 1 );
    //根据 mapper 的 namespace 和 id 调用方法
    System.out.println(pet);
}
The annotations are a lot cleaner for simple statements, however, Java Annotations are both limited and messier for more complicated statements. Therefore, if you have to do anything complicated, you're better off with XML mapped statements.对于简单的语句,注解要干净得多,但是,对于更复杂的语句,Java注解既有限又混乱。因此,如果您必须执行任何复杂操作,最好使用 XML 映射语句。
It will be up to you and your project team to determine which is right for you, and how important it is to you that your mapped statements be defined in a consistent way. That said, you're never locked into a single approach. You can very easily migrate Annotation based Mapped Statements to XML and vice versa.由您和您的项目团队决定哪个适合您,以及以一致的方式定义映射语句对您有多重要。也就是说,您永远不会被锁定在单一的方法中。您可以非常轻松地将基于注释的映射语句迁移到 XML,反之亦然。
注意:在执行数据库增删改操作时 session 默认是不自动提交的。需要手动调用 session.commit();提交操作。
commit:
Flushes batch statements and commits database connection. Note that database connection will not be committed if no updates/deletes/inserts were called. To force the commit call SqlSession#commit(boolean)
rollback:
Discards pending batch statements and rolls database connection back. Note that database connection will not be rolled back if no updates/deletes/inserts were called. To force the rollback call SqlSession#rollback(boolean)
SqlSessionFactoryBuilder: This class can be instantiated, used and thrown away. There is no need to keep it around once you've created your SqlSessionFactory. Therefore the best scope for instances of SqlSessionFactoryBuilder is method scope (i.e. a local method variable). You can reuse the SqlSessionFactoryBuilder to build multiple SqlSessionFactory instances, but it's still best not to keep it around to ensure that all of the XML parsing resources are freed up for more important things. 这个类可以实例化、使用和丢弃。创建 SqlSessionFactory 后,无需保留它。因此,SqlSessionFactoryBuilder 实例的最佳作用域是方法作用域(即局部方法变量)。您可以重用 SqlSessionFactoryBuilder 来构建多个 SqlSessionFactory 实例,但最好不要保留它,以确保释放所有 XML 解析资源用于更重要的事情。
SqlSessionFactory:Once created, the SqlSessionFactory should exist for the duration of your application execution. There should be little or no reason to ever dispose of it or recreate it. It's a best practice to not rebuild the SqlSessionFactory multiple times in an application run. Doing so should be considered a “bad smell”. Therefore the best scope of SqlSessionFactory is application scope. This can be achieved a number of ways. The simplest is to use a Singleton pattern or Static Singleton pattern. 创建后,SqlSessionFactory 应在应用程序执行期间存在。应该很少或根本没有理由处理它或重新创建它。最佳做法是不要在应用程序运行中多次重新生成 SqlSessionFactory。这样做应该被认为是“难闻的气味”。因此,SqlSessionFactory 的最佳作用域是应用程序作用域。这可以通过多种方式实现。最简单的方法是使用单例模式或静态单例模式。
SqlSession:Each thread should have its own instance of SqlSession. Instances of SqlSession are not to be shared and are not thread safe. Therefore the best scope is request or method scope. Never keep references to a SqlSession instance in a static field or even an instance field of a class. Never keep references to a SqlSession in any sort of managed scope, such as HttpSession of the Servlet framework. If you're using a web framework of any sort, consider the SqlSession to follow a similar scope to that of an HTTP request. In other words, upon receiving an HTTP request, you can open a SqlSession, then upon returning the response, you can close it. Closing the session is very important. You should always ensure that it's closed within a finally block.每个线程都应该有自己的 SqlSession 实例。SqlSession 的实例不会共享,并且不是线程安全的。因此,最佳范围是请求或方法范围。切勿在静态字段甚至类的实例字段中保留对 SqlSession 实例的引用。切勿在任何类型的托管作用域中保留对 SqlSession 的引用,例如 Servlet 框架的 HttpSession。如果您使用的是任何类型的 Web 框架,请考虑使用 SqlSession 遵循与 HTTP 请求类似的范围。换句话说,在收到 HTTP 请求时,您可以打开 SqlSession,然后在返回响应后,您可以关闭它。关闭会话非常重要。您应该始终确保它在 finally 块内关闭。
Mapper Instances:Mappers are interfaces that you create to bind to your mapped statements. Instances of the mapper interfaces are acquired from the SqlSession. As such, technically the broadest scope of any mapper instance is the same as the SqlSession from which they were requested. However, the best scope for mapper instances is method scope. That is, they should be requested within the method that they are used, and then be discarded. They do not need to be closed explicitly. While it's not a problem to keep them around throughout a request, similar to the SqlSession, you might find that managing too many resources at this level will quickly get out of hand. Keep it simple, keep Mappers in the method scope.映射器是您创建的用于绑定到映射语句的接口。映射器接口的实例是从 SqlSession 获取的。因此,从技术上讲,任何映射器实例的最广泛范围与请求它们的 SqlSession 相同。但是,映射器实例的最佳作用域是方法作用域。也就是说,应在使用它们的方法中请求它们,然后丢弃它们。它们不需要显式关闭。虽然在整个请求过程中保留它们不是问题,但与 SqlSession 类似,您可能会发现在此级别管理过多资源很快就会失控。保持简单,将映射器保留在方法范围内。
练习:
1.创建项目 pet01 并使用注解完成宠物的基本操作 pet(添加、根据 id 修改、根据 id 删除、查询全部),并使用单元测试检测方法的可用性。
2.在项目 pet01 中使用全注解的方式完成水果 fruit(id,name,color)的基本操作并测试。
参考代码:PetMapper
import org.apache.ibatis.annotations.Delete;
import org.apache.ibatis.annotations.Insert;
import org.apache.ibatis.annotations.Select;
import org.apache.ibatis.annotations.Update;
import java.util.List;

public interface PetMapper {
    @Insert("insert into pet(name,weight) values (#{name},#{weight})")
    int add(Pet pet);

    @Update("update pet set name=#{name},weight=#{weight} where id=#{id}")
    int update(Pet pet);

    @Delete("delete from pet where id =#{id}")
    int deleteById(int id);

    @Select("select * from pet")
    List<pet> findAll();
}
单元测试
import cn.hx.entity.Pet;
import cn.hx.mapper.PetMapper;
import org.apache.ibatis.io.Resources;
import org.apache.ibatis.session.SqlSession;
import org.apache.ibatis.session.SqlSessionFactory;
import org.apache.ibatis.session.SqlSessionFactoryBuilder;
import org.junit.After;
import org.junit.Before;
import org.junit.Test;
import java.io.IOException;
import java.io.Reader;
import java.util.List;

public class MainTest {
    SqlSession session;

    @Before
    public void before() throws IOException {
        Reader reader = Resources.getResourceAsReader("mybatis-conf.xml");
        //构建 sqlSession 的工厂
        SqlSessionFactory sessionFactory = new SqlSessionFactoryBuilder().build(reader);
        //创建能执行映射文件中 sql 的 sqlSession
        session = sessionFactory.openSession(true);
        reader.close();

    }

    @Test
    public void add() throws IOException {
        PetMapper mapper = session.getMapper(PetMapper.class);
        Pet pet = new Pet();
        pet.setName("花花");
        pet.setWeight(12.5);
        mapper.add(pet);
    }

    @Test
    public void update() throws IOException {
        PetMapper mapper = session.getMapper(PetMapper.class);
        Pet pet = new Pet();
        pet.setId(6);
        pet.setName("花花");
        pet.setWeight(12.5);
        mapper.update(pet);
    }

    @Test
    public void delete() throws IOException {
        PetMapper mapper = session.getMapper(PetMapper.class);

        mapper.delete(2);
    }

    @Test
    public void findAll() throws IOException {
        PetMapper mapper = session.getMapper(PetMapper.class);
        List<pet> all = mapper.findAll();
        System.out.println(all);
    }

    @After
    public void close() {
        session.close();
    }
}
3.接口与xml结合
在实际开发中使用比较多的是接口与 xml 结合使用,这样既可以降低编写 statement 时使用字符串容易出错的概率,同时 xml 在编译过后里面的内容还是原样显示,方便后期的 SQL 优化。最后使用接口和 xml 结合的方式也体现 java 程序的高内聚低耦合特性。使用 接口与 xml 结合使用需要在 mybatis-conf.xml 里面注册对应用到的 xml。
<mappers>
    <mapper resource="mapper/PetMapper.xml"></mapper>
</mappers>
Mapper.xml 里面的 的 namespace 指向接口的类路径,同时接口里面的方法和 xml 里面的 id 对应。
Namespaces were optional in previous versions of MyBatis, which was confusing and unhelpful. Namespaces are now required and have a purpose beyond simply isolating statements with longer, fully-qualified names.命名空间在以前版本的 MyBatis 中是可选的,这令人困惑且没有帮助。命名空间现在是必需的,其用途不仅仅是隔离具有较长、完全限定名称的语句。
Using the namespace once, and putting it in a proper Java package namespace will clean up your code and improve the usability of MyBatis in the long term.使用一次命名空间,并将其放在适当的 Java 包命名空间中,从长远来看,将清理您的代码并提高 MyBatis 的可用性。
调用时还是通过接口调用,但是接口的注解需要全部去掉。
PetDao mapper = session.getMapper(PetDao.class);
System.out.println(mapper.queryById(87));
这样我们就可以使用 mybatis 的动态 SQL,又可以通过接口调用,减少书写错误的可能。
通过接口与 Mapper.xml 结合的方式可以很好的完成数据库的各种操作。在 mapper.xml 里面加入对应的 CRUD 的语句与接口中的方法名对应即可完成相关操作,对应的 mapper.xml 可以使用 insert、delete、update、select 等节点完成相应的操作,同时指定相应的参数类型和返回类型。
<insert id="insert" parameterType="cn.hx.entity.Pet">
insert into pet(name,weight) values(#{name},#{weight})
</insert>

<delete id="delete" parameterType="int">
delete from pet where id=#{id}
</delete>

<select id="getById" parameterType="int" resultType="cn.hx.entity.Pet">
select * from pet where id=#{id}
</select>

<select id="selectAll" resultType="cn.hx.entity.Pet">
select * from pet
</select>
注意:SQL 中含有特殊字符使用 CDATA 标签
weight <![CDATA[<]]> 10注意:
- xml 的 id 对应接口的方法名。
- 除了查询方法以外其它方法都必须添加事务
SqlSession session = sessionFactory.openSession();
session.getMapper( UserMapper.class ).insertUser( new User( "222",1 ) );
session.commit();
session 有对应的提交与回滚的方法
或者获取 session 时就让 session 自动提交
SqlSession session = sessionFactory.openSession(true);练习:
1.创建项目 fruit02 使用 xml 与接口组合的方式完成 fruit 表的基本操作(添加、根据 id 修改、根据 id 删除、查询全部)并使用单元测试测试方法的可用性。
参考代码:
mapper 接口
public interface FruitMapper {

    int deleteByPrimaryKey(Integer id);

    int insert(Fruit record);

    List selectAll();

    int updateByPrimaryKey(Fruit record);
}
mapper xml
<?xml version="1.0" encoding="UTF-8" ?>
<!DOCTYPE mapper PUBLIC "-//mybatis.org//DTD Mapper 3.0//EN" "http://mybatis.org/dtd/mybatis-3-mapper.dtd">
<mapper namespace="cn.hx.PetMapper">
    <resultMap id="BaseResultMap" type="cn.hx.entity.Fruit">
        <id column="id" jdbcType="INTEGER" property="id"/>
        <result column="name" jdbcType="VARCHAR" property="name"/>
        <result column="color" jdbcType="VARCHAR" property="color"/>
    </resultMap>

    <sql id="Base_Column_List">
        id, `name`, color
    </sql>

    <select id="selectAll" parameterType="java.lang.Integer" resultMap="BaseResultMap">
        select
        <include refid="Base_Column_List"/>
        from fruit
    </select>
    <delete id="deleteByPrimaryKey" parameterType="java.lang.Integer">
        delete from fruit
        where id = #{id,jdbcType=INTEGER}
    </delete>
    <insert id="insert" parameterType="cn.hx.entity.Fruit">
        insert into fruit (`name`, color)
        values (#{name,jdbcType=VARCHAR}, #{color,jdbcType=VARCHAR})
    </insert>

    <update id="updateByPrimaryKey" parameterType="cn.hx.entity.Fruit">
        update fruit
        set `name` = #{name,jdbcType=VARCHAR},
        color = #{color,jdbcType=VARCHAR}
        where id = #{id,jdbcType=INTEGER}
    </update>
</mapper>
单元测试
import cn.hx.entity.Fruit;
import cn.hx.mapper.FruitMapper;
import org.apache.ibatis.io.Resources;
import org.apache.ibatis.session.SqlSession;
import org.apache.ibatis.session.SqlSessionFactory;
import org.apache.ibatis.session.SqlSessionFactoryBuilder;
import org.junit.After;
import org.junit.Before;
import org.junit.Test;
import java.io.IOException;
import java.io.Reader;
import java.util.List;

public class MainTest {
    SqlSession session;

    @Before
    public void getSession() throws IOException {
        Reader reader = Resources.getResourceAsReader("mybatis-conf.xml");
        SqlSessionFactory sessionFactory = new SqlSessionFactoryBuilder().build(reader);
        session = sessionFactory.openSession(true);
        reader.close();
    }

    @Test
    public void add() throws IOException {
        FruitMapper mapper = session.getMapper(FruitMapper.class);
        Fruit fruit = new Fruit();
        fruit.setName("apple");
        fruit.setColor("red");
        mapper.insert(fruit);
    }

    @Test
    public void select() throws IOException {
        FruitMapper mapper = session.getMapper(FruitMapper.class);
        List fruits = mapper.selectAll();
        System.out.println(fruits);
    }

    @Test
    public void delete() throws IOException {
        FruitMapper mapper = session.getMapper(FruitMapper.class);
        int i = mapper.deleteByPrimaryKey(1);
        System.out.println("数据库影响:" + i);
    }

    @Test
    public void update() throws IOException {
        FruitMapper mapper = session.getMapper(FruitMapper.class);
        Fruit fruit = new Fruit();
        fruit.setId(1);
        fruit.setName("apple");
        fruit.setColor("white");
        mapper.insert(fruit);
    }

    @After
    public void close() {
        session.close();
    }
}
4.优化配置与别名
数据库连接信息专门放到一个文件中
resource 下创建 db.properties 文件
jdbc.driverClassName=com.mysql.jdbc.Driver
jdbc.url=jdbc:mysql:///mybatis?useUnicode=true&characterEncoding=utf8&characterSetResults=utf8
jdbc.username=root
jdbc.password=123456
修改配置文件
<properties resource="db.properties">
<property name="driver" value="${jdbc.driverClassName}">
<property name="url" value="${jdbc.url}">
<property name="username" value="${jdbc.username}">
<property name="password" value="${jdbc.password}">
别名管理器
为实体类定义别名,简化 sql 映射 xml 文件中的引用,在 mybatis-conf.xml 文件加入
<typealiases>
    <typealias type="cn.hx.entity.Pet" alias="pet"/>
</typealiases>
type:指定要起别名的类型全类名,默认别名就是类名(不区分大小写);
alias:指定新的别名
这样,使用时使用别名即可操作数据库
<select id="selectById" parametertype="int" resulttype="pet">
    select * from pet where id=#{id}
</select>
typeAliases 批量起别名
package:为某个包下的所有类批量起别名。
<typealiases>
    <package name="cn.hx.ibatis.bean"/>
</typealiases>
name:为当前包以及下面所有的后代包的每一个类都起一个默认别名(与类名相同且不区分大小写)
批量起别名的情况下,使用 @Alias 注解为某个类型指定新的别名。
5.mybatisX 插件
MyBatisX 是一款为 IntelliJ IDEA 提供支持的 MyBatis 插件。它提供了一系列功能,帮助开发人员更方便地使用 MyBatis 框架进行开发。
以下是 MyBatisX 插件的一些主要特性:
-
自动生成 MyBatis 相关代码:MyBatisX 可以根据数据库表结构自动生成 MyBatis 的实体类、Mapper 接口和 XML 配置文件,极大地减少了手动编写这些代码的工作量。
-
SQL 语句智能补全和错误检查:在编写 SQL 语句时,MyBatisX 提供了智能补全功能,可以自动补全表名、列名等信息,并检查语法错误,避免因拼写错误或语法错误导致的运行时错误。
-
SQL 语句可视化编辑器:MyBatisX 提供了一个可视化的 SQL 语句编辑器,可以直观地编辑和查看 SQL 语句,支持语法高亮、代码折叠等功能,提高了开发效率。
-
SQL 语句的参数和结果集可视化:MyBatisX 可以将 SQL 语句中的参数和结果集以表格的形式展示出来,方便开发人员查看和调试。
-
代码导航和跳转:MyBatisX 提供了代码导航和跳转功能,可以快速定位到 MyBatis 相关的代码,方便开发人员阅读和修改。
-
自动生成测试代码:MyBatisX 可以根据数据库表结构自动生成测试代码,帮助开发人员快速编写测试用例,提高代码的质量和稳定性。
总的来说,MyBatisX 是一款功能强大的 MyBatis 插件,可以提高开发人员的开发效率和代码质量,是 MyBatis 开发的好帮手。
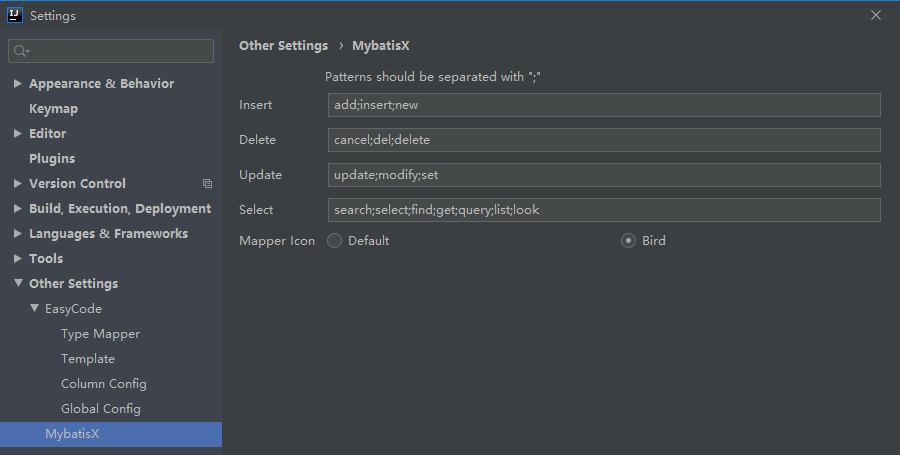
代码生成配置模块路径、基础包、实体包名,忽略表前后缀,忽略属性前后缀,增加的类后缀,类名策略(驼峰或与表面相同)
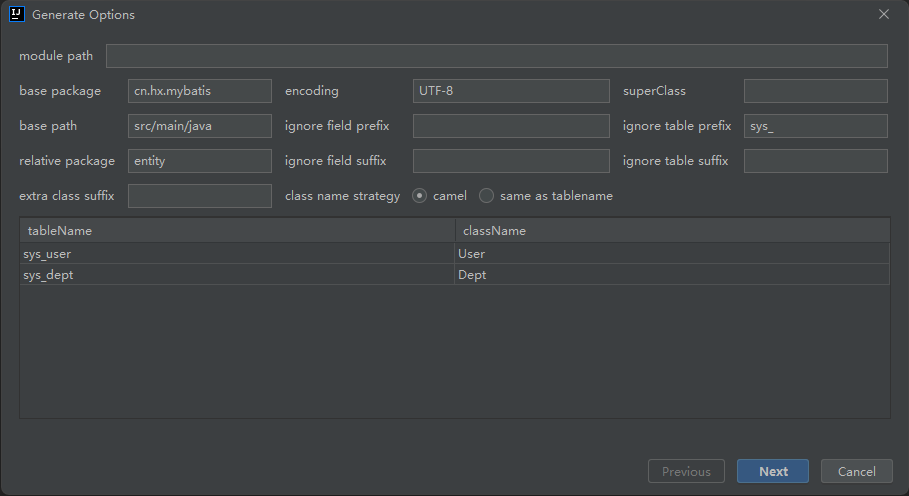
代码生成选项配置

6.获取自增主键
在开发中经常需要获取插入数据的自增 id,mybatis 底层会使用 jdbc 将获取到的 id 设置到参数对象中。配置如下:
<insert id="add" parameterType="cn.hx.Pet" keyProperty="id" useGeneratedKeys="true">在执行完插入语句后该实体的 id 便不再为空。
keyProperty:表示返回的 id 要保存到对象的那个属性中
useGeneratedKeys:表示主键 id 为自增长模式
练习:
1.创建项目 fruit03,使用循环往数据库中插入 100 条 fruit 数据,并在插入前后输出对象的 id。
参考答案:
mapper xml
<insert id="insert" keycolumn="id" keyproperty="id" parametertype="cn.hx.entity.Fruit" usegeneratedkeys="true">
    insert into fruit (`name`, color)
    values (#{name,jdbcType=VARCHAR}, #{color,jdbcType=VARCHAR})
</insert>
测试:
import cn.hx.entity.Fruit;
import cn.hx.mapper.FruitMapper;
import org.apache.ibatis.io.Resources;
import org.apache.ibatis.session.SqlSession;
import org.apache.ibatis.session.SqlSessionFactory;
import org.apache.ibatis.session.SqlSessionFactoryBuilder;
import org.junit.After;
import org.junit.Before;
import org.junit.Test;

import java.io.IOException;
import java.io.Reader;
import java.util.List;

public class MainTest {
    SqlSession session;

    @Before
    public void getSession() throws IOException {
        Reader reader = Resources.getResourceAsReader("mybatis-conf.xml");
        SqlSessionFactory sessionFactory = new SqlSessionFactoryBuilder().build(reader);
        session = sessionFactory.openSession(true);
        reader.close();
    }

    @Test
    public void add() throws IOException {
        FruitMapper mapper = session.getMapper(FruitMapper.class);
        for (int i = 0; i < 100; i++) {
            Fruit fruit = new Fruit();
            fruit.setName("apple" + i);
            fruit.setColor("red");
            mapper.insert(fruit);
            System.out.println(fruit.getId());
        }

    }

    @After
    public void close() {
        session.close();
    }
}
7.全 map 操作
有时在开发中,由于数据库结构经常发生变化或开发人员为了图方便不创建实体,也就是在属性全部都使用 map 传输。
在使用 map 时注意将原来的实体位置全部换成 map 即可,一个对象对应一个 map。
接口改造:
import java.util.List;
import java.util.Map;

public interface PetMapper {
    int insert(Map map);
    List<Map> selectAll();
}
xml 改造:
<insert id="insert" parameterType="map">
	insert into pet(name, weight) values(#{name}, #{weight})
</insert>

<select id="selectAll" resultType="map">
	select * from pet
</select>
使用 map 极大的影响程序正确率与可读性。虽然这种操作并不是 java 程序设计者建议使用的,但是还是有很多程序员违规使用。
注意:使用全 map 操作会导致 mybatisX 插件报错说需要使用 @MapKey 修饰该接口方法。@MapKey 的主要作用是查询多个结果时需要取对象的什么属性作为 map 存放的键,也就是下面这种操作。
@MapKey("name")
Map<String,Map<String,Object>> findAll();
返回结果如下:
{西西={name=西西, weight=12.5, id=7}, 黑黑={name=黑黑, weight=7.8, id=3}, 白白={name=白白, weight=5.6, id=2}, 红红={name=红红, weight=9.0, id=4}}如果不需要封装成上面结构,直接忽略报错信息即可。
练习:
1.创建项目 fruit04 使用全 map 的方式完成 fruit 的基本操作,并使用单元测试判断方法的可用性。
参考代码:
mapper xml:
<mapper namespace="cn.hx.mapper.FruitMapper">
    <sql id="Base_Column_List">
        id, `name`, color
    </sql>
    <select id="selectAll" parametertype="java.lang.Integer" resulttype="map">
        select

        from fruit
    </select>
    <delete id="deleteByPrimaryKey" parametertype="java.lang.Integer">
        delete from fruit
        where id = #{id,jdbcType=INTEGER}
    </delete>
    <insert id="insert" keycolumn="id" keyproperty="id" parametertype="map" usegeneratedkeys="true">
        insert into fruit (`name`, color)
        values (#{name,jdbcType=VARCHAR}, #{color,jdbcType=VARCHAR})
    </insert>

    <update id="updateByPrimaryKey" parametertype="map">
        update fruit
        set `name` = #{name,jdbcType=VARCHAR},
        color = #{color,jdbcType=VARCHAR}
        where id = #{id,jdbcType=INTEGER}
    </update>
</mapper>
接口:
import java.util.List;
import java.util.Map;
public interface FruitMapper {

    int deleteByPrimaryKey(Integer id);

    int insert(Map record);

    List<Map> selectAll();

    int updateByPrimaryKey(Map record);
}
测试:
import cn.hx.mapper.FruitMapper;
import org.apache.ibatis.io.Resources;
import org.apache.ibatis.session.SqlSession;
import org.apache.ibatis.session.SqlSessionFactory;
import org.apache.ibatis.session.SqlSessionFactoryBuilder;
import org.junit.After;
import org.junit.Before;
import org.junit.Test;

import java.io.IOException;
import java.io.Reader;
import java.util.HashMap;
import java.util.List;
import java.util.Map;

public class MainTest {
    SqlSession session;

    @Before
    public void getSession() throws IOException {
        Reader reader = Resources.getResourceAsReader("mybatis-conf.xml");
        SqlSessionFactory sessionFactory = new SqlSessionFactoryBuilder().build(reader);
        session = sessionFactory.openSession(true);
        reader.close();
    }

    @Test
    public void add() throws IOException {
        FruitMapper mapper = session.getMapper(FruitMapper.class);
        Map fruit = new HashMap();
        fruit.put("name", "apple");
        fruit.put("color", "red");
        mapper.insert(fruit);
    }

    @Test
    public void select() throws IOException {
        FruitMapper mapper = session.getMapper(FruitMapper.class);
        List<map> fruits = mapper.selectAll();
        System.out.println(fruits);
    }

    @Test
    public void delete() throws IOException {
        FruitMapper mapper = session.getMapper(FruitMapper.class);
        int i = mapper.deleteByPrimaryKey(1);
        System.out.println("数据库影响:" + i);
    }

    @Test
    public void update() throws IOException {
        FruitMapper mapper = session.getMapper(FruitMapper.class);
        Map fruit = new HashMap();
        fruit.put("id", 1);
        fruit.put("name", "apple");
        fruit.put("color", "red");
        mapper.insert(fruit);
    }

    @After
    public void close() {
        session.close();
    }
}
8.一对一级联查询
有了前面几章的基础,对一些简单的应用是可以处理的,但在实际项目中,经常是关联表的查询,比如:最常见到的一对一,一对多和多对多等。这些查询是如何处理的呢,这一讲就讲这个问题。前面节中介绍的都是单表映射的一些操作,然而在我们的实际项目中往往是用到多表映射。在 Java 实体对象对中,一对多可以根据 List 和 Set 来实现,两者在 mybatis 中都是通过 collection 标签来配合来加以实现。这篇介绍的是多表中的多对一表关联查询。
创建两张表,假设一个老师对应一个班级
CREATE TABLE `teacher` (
  `t_id` int(11) NOT NULL AUTO_INCREMENT,
  `t_name` varchar(20) DEFAULT NULL,
  PRIMARY KEY (`t_id`)
) ENGINE=InnoDB AUTO_INCREMENT=3 DEFAULT CHARSET=utf8;

insert  into `teacher`(`t_id`,`t_name`) values (1,'张三');
insert  into `teacher`(`t_id`,`t_name`) values (2,'李四');

CREATE TABLE `class` (
  `c_id` int(11) NOT NULL AUTO_INCREMENT,
  `c_name` varchar(20) DEFAULT NULL,
  `teacher_id` int(11) DEFAULT NULL,
  PRIMARY KEY (`c_id`)
) ENGINE=InnoDB AUTO_INCREMENT=3 DEFAULT CHARSET=utf8;

insert  into `class`(`c_id`,`c_name`,`teacher_id`) values (1,'Java',1);
insert  into `class`(`c_id`,`c_name`,`teacher_id`) values (2,'UI',2);

CREATE TABLE `student` (
  `s_id` int(11) NOT NULL AUTO_INCREMENT,
  `s_name` varchar(20) DEFAULT NULL,
  `class_id` int(11) DEFAULT NULL,
  PRIMARY KEY (`s_id`)
) ENGINE=InnoDB AUTO_INCREMENT=7 DEFAULT CHARSET=utf8;
insert  into `student`(`s_id`,`s_name`,`class_id`) values (1,'AA',1);
insert  into `student`(`s_id`,`s_name`,`class_id`) values (2,'BB',1);
insert  into `student`(`s_id`,`s_name`,`class_id`) values (3,'CC',1);
insert  into `student`(`s_id`,`s_name`,`class_id`) values (4,'DD',2);
insert  into `student`(`s_id`,`s_name`,`class_id`) values (5,'EE',2);
insert  into `student`(`s_id`,`s_name`,`class_id`) values (6,'FF',2);
创建实体
public class Teacher {
    private int id;
    private String name;

public class Classes {
    private int id;
    private String name;
    private Teacher teacher;
}
ClassesMapper.xml 查询将出现两张方式
方式一:级联查询
<resultMap id="classResultMap" type="cn.hx.mybatis.entity.Classes">
    <id column="c_id" property="id"/>
    <result column="c_name" property="name"/>
    <result column="t_id" property="teacher.id"/>
    <result column="t_name" property="teacher.name"/>
</resultMap>

<select id="selectAll" resultMap="classResultMap">
    SELECT * FROM `class` c LEFT JOIN `teacher` t ON t.`t_id`=c.`teacher_id`
</select>
9.嵌套结果与嵌套查询
方式二:嵌套结果,使用嵌套结果映射 association 来处理重复的联合结果的子集封装联表查询的数据(去除重复的数据)
<resultMap id="classResultMap2" type="cn.hx.mybatis.entity.Classes">
    <id column="c_id" property="id"/>
    <result column="c_name" property="name"/>
    <association property="teacher" javaType="cn.hx.mybatis.entity.Teacher">
        <id property="id" column="t_id"/>
        <result property="name" column="t_name"/>
    </association>
</resultMap>

<select id="selectAll" resultMap="classResultMap2">
    SELECT * FROM `class` c LEFT JOIN `teacher` t ON t.`t_id`=c.`teacher_id`
</select>
方式三:嵌套查询,通过执行另外一个 SQL 映射语句来返回预期的复杂类型
<select id="getClass2" resultMap="ClassResultMap2">
    select * from class
</select>

<resultMap type="cn.hx.mybatis.entity.Classes" id="ClassResultMap2">
    <id property="id" column="c_id"/>
    <result property="name" column="c_name"/>
    <association property="teacher" column="teacher_id" select="getTeacher"></association>
</resultMap>

<select id="getTeacher" parameterType="int" resultType="cn.hx.mybatis.entity.Teacher">
    SELECT t_id id, t_name name FROM teacher WHERE t_id=#{id}
</select>
association [əˌsəʊsɪˈeɪʃən] 定义关联对象的封装规则 。
select:表明当前属性是调用 select 指定的方法查出的结果。
column:指定将哪一列的值传给这个方法。
注意:$ 与 # 的区别:
#{} 使用占位符 ?的方式编译和发送 SQL;好处:防止 SQL 注入(推荐)
${} 将用户填入的参数直接拼接到 SQL。坏处:SQL 注入;
注意:使用 #{} 不能生成表名和字段名,所以在字段和表名处,必须使用 ${}。
将 #{id} 转成 ${id} 会报 There is no getter for property named 'id' in 'class java.lang.Integer' ,只需要将参数换成 ${_parameter} 或者换成更高的 3.5.6 即可。
练习:
1.创建项目 mybatis11,分别使用嵌套查询和嵌套结果完成如下用户角色的查询。表数据下载。
需使用两种查询完成如下功能:
一、查询单个用户时将其所属角色查询出来。
User{id=1,name=超级管理员,loginName=admin,loginPassword=123,createTime=2020-07-06 15=13=38,updateTime=2020-07-06 15=03=08,
role=Role{id= 1,createTime=2020-07-06 15=13=38,updateTime=2020-07-06 15=03=08,remark=拥有整个网站的全部权限}}
参考代码:
<mapper namespace="cn.hx.mapper.UserMapper">

    <!--    嵌套结果-->
    <resultMap id="userResultMap1" type="cn.hx.entity.User">
        <id column="u_id" property="id"/>
        <result column="u_name" property="name"/>
        <result column="login_name" property="loginName"/>
        <result column="login_password" property="loginPassword"/>
        <result column="u_create_time" property="createTime"/>
        <result column="u_update_time" property="updateTime"/>
        <association property="role" javaType="cn.hx.entity.Role">
            <id column="r_id" property="id"/>
            <result column="r_name" property="name"/>
            <result column="remark" property="remark"/>
            <result column="r_create_time" property="createTime"/>
            <result column="r_update_time" property="updateTime"/>
        </association>
    </resultMap>

    <sql id="user">u.id u_id,u.name u_name,u.login_name login_name, u.login_password login_password,
        u.create_time u_create_time,u.update_time u_update_time</sql>
    <sql id="role">r.id r_id,r.name r_name,r.remark remark,r.create_time r_create_time,r.update_time r_update_time</sql>

    <select id="findByIdWithRole1" resultMap="userResultMap1">
        select
        <include refid="user"/>,
        <include refid="role"/>
        from user u left join role r on u.role_id=r.id where u.id=#{id}
    </select>

    <!--    嵌套查询-->
    <resultMap id="userResultMap2" type="cn.hx.entity.User">
        <id column="u_id" property="id"/>
        <result column="u_name" property="name"/>
        <result column="login_name" property="loginName"/>
        <result column="login_password" property="loginPassword"/>
        <result column="u_create_time" property="createTime"/>
        <result column="u_update_time" property="updateTime"/>
        <association property="role" javaType="cn.hx.entity.Role" column="role_id" select="getRole">
        </association>
    </resultMap>

    <select id="findByIdWithRole2" resultMap="userResultMap2">
        select
        <include refid="user"/>,role_id
        from user u where id=#{id}
    </select>

    <select id="getRole" resultType="cn.hx.entity.Role">
        select id,name,remark,create_time createTime,update_time updateTime from role where id=#{id}
    </select>

</mapper>
10.一对多单向查询
一对多关系(One-to-Many Relationship)是数据库设计中常见的一种关系类型,表示一个实体(表)中的一条记录可以对应另一个实体中的多条记录。这种关系通常用于描述主从表之间的关联。
在关系型数据库中,一对多关系通过外键(Foreign Key)实现。外键是子表中的一个字段,它引用了父表中的主键(Primary Key)。子表中的多条记录可以引用父表中的同一条记录,从而形成一对多的关系。
实体类
public class Student {
    private int id;
    private String name;

public class Classes {
    private int id;
    private String name;
    private Teacher teacher;
    private List<Student> students;
}
方式一:嵌套结果:使用嵌套结果映射来处理重复的联合结果的子集
<select id="findAll" resultMap="ClassResultMap3">
    SELECT * FROM `class` c LEFT JOIN `student` s ON c.`c_id` =s.`class_id`
</select>
<resultMap type="cn.hx.mybatis.entity.Classes" id="ClassResultMap3">
    <id property="id" column="c_id"/>
    <result property="name" column="c_name"/>
    <collection property="students" ofType="cn.hx.mybatis.entity.Student">
        <id property="id" column="s_id"/>
        <result property="name" column="s_name"/>
    </collection>
</resultMap>
注意:ofType 指定 students 集合中的对象类型
方式二:嵌套查询,通过执行另外一个SQL映射语句来返回预期的复杂类型
<select id="findAll" resultMap="ClassResultMap4">
    select * from class
</select>

<resultMap type="cn.hx.mybatis.entity.Classes" id="ClassResultMap4">
    <id property="id" column="c_id"/>
    <result property="name" column="c_name"/>
    <collection property="students" ofType="cn.hx.mybatis.entity.Student"
                column="c_id" select="getStudent"></collection>
</resultMap>

<select id="getStudent" parameterType="int" resultType="cn.hx.mybatis.entity.Student">
    SELECT s_id id, s_name name FROM student WHERE class_id=#{id}
</select>
collection 定义关联集合类型的属性的封装规则
ofType:指定集合里面元素的类型
在 mybatis 中关联关系常用如下:
一对一 association javaType
一对多 collection ofType
练习:
1.在上面项目 mybatis11 中,使用嵌套查询与嵌套结果完成用户角色资源的查询。完成如下功能:
一、查询单个角色时将其角色下的所有资源全部查询出来。
Role{id= 1,createTime=2020-07-06 15=13=38,updateTime=2020-07-06 15=03=08,remark=拥有整个网站的全部权限,
resources=[Resource{id= 2,name= 用户添加,url= /userEdit,pid= 1,...},{id= 3,name= 用户修改,url= /userEdit,pid= 1,},{id= 4,name= 用户删除,url= /user,pid= 1,},....]}
二、查询单个用户时将其所属的角色以及角色拥有的资源全部查询出来。
User{id=1,name=超级管理员,loginName=admin,loginPassword=123,createTime=2020-07-06 15=13=38,updateTime=2020-07-06 15=03=08,
role=Role{id= 1,createTime=2020-07-06 15=13=38,updateTime=2020-07-06 15=03=08,remark=拥有整个网站的全部权限
resources=[Resources{id= 2,name= 用户添加,url= /userEdit,pid= 1,...},{id= 3,name= 用户修改,url= /userEdit,pid= 1,},{id= 4,name= 用户删除,url= /user,pid= 1,},....]}}
参考代码:
UserDao.xml
<?xml version="1.0" encoding="UTF-8"?>
<!DOCTYPE mapper PUBLIC "-//mybatis.org//DTD Mapper 3.0//EN" "http://mybatis.org/dtd/mybatis-3-mapper.dtd">
<mapper namespace="cn.hx.dao.UserDao">

    <resultMap type="cn.hx.entity.User" id="UserMap">
        <result property="id" column="id" jdbcType="INTEGER"/>
        <result property="name" column="name" jdbcType="VARCHAR"/>
        <result property="loginName" column="login_name" jdbcType="VARCHAR"/>
        <result property="loginPassword" column="login_password" jdbcType="VARCHAR"/>
        <result property="createTime" column="create_time" jdbcType="TIMESTAMP"/>
        <result property="updateTime" column="update_time" jdbcType="TIMESTAMP"/>
        <association property="role" column="role_id" select="cn.hx.dao.RoleDao.queryById"></association>
    </resultMap>

    <!--查询单个-->
    <select id="queryById" resultMap="UserMap">
        select
          id, name, login_name, login_password, role_id, create_time, update_time
        from mybatis.user
        where id = #{id}
    </select>

</mapper>
RoleDao.xml
<?xml version="1.0" encoding="UTF-8"?>
<!DOCTYPE mapper PUBLIC "-//mybatis.org//DTD Mapper 3.0//EN" "http://mybatis.org/dtd/mybatis-3-mapper.dtd">
<mapper namespace="cn.hx.dao.RoleDao">

    <resultMap type="cn.hx.entity.Role" id="RoleMap">
        <result property="id" column="id" jdbcType="INTEGER"/>
        <result property="name" column="name" jdbcType="VARCHAR"/>
        <result property="remark" column="remark" jdbcType="VARCHAR"/>
        <result property="createTime" column="create_time" jdbcType="TIMESTAMP"/>
        <result property="updateTime" column="update_time" jdbcType="TIMESTAMP"/>
        <collection property="resources" ofType="cn.hx.entity.Resource" column="id"
                    select="cn.hx.dao.ResourceDao.queryByRoleId"></collection>
    </resultMap>

    <!--查询单个-->
    <select id="queryById" resultMap="RoleMap">
        select
          id, name, remark, create_time, update_time
        from mybatis.role
        where id = #{id}
    </select>
</mapper>
ResourceDao.xml
<?xml version="1.0" encoding="UTF-8"?>
<!DOCTYPE mapper PUBLIC "-//mybatis.org//DTD Mapper 3.0//EN" "http://mybatis.org/dtd/mybatis-3-mapper.dtd">
<mapper namespace="cn.hx.dao.ResourceDao">

    <resultMap type="cn.hx.entity.Resource" id="ResourceMap">
        <result property="id" column="id" jdbcType="INTEGER"/>
        <result property="name" column="name" jdbcType="VARCHAR"/>
        <result property="url" column="url" jdbcType="VARCHAR"/>
        <result property="pid" column="pid" jdbcType="INTEGER"/>
        <result property="createTime" column="create_time" jdbcType="TIMESTAMP"/>
        <result property="updateTime" column="update_time" jdbcType="TIMESTAMP"/>
        <result property="orderNumber" column="order_number" jdbcType="INTEGER"/>
    </resultMap>

    <!--查询单个-->
    <select id="queryByRoleId" resultMap="ResourceMap">
        select
        id, name, url, pid, create_time, update_time, order_number
        from resource re left join role_resource rr on re.id = rr.resource_id where rr.role_id=#{roleId}
    </select>
</mapper>
11.缓存
1.一级缓存:基于 PerpetualCache 的 HashMap本地缓存,其存储作用域为 Session,当 Session clearCache 或 close 之后,该 Session中的所有 Cache 就将清空。 (默认开启)
2.二级缓存与一级缓存其机制相同,默认也是采用 PerpetualCache,HashMap 存储,不同在于其存储作用域为 Mapper(Namespace 命名空间),并且可自定义存储源,如 Ehcache。
3.对于缓存数据更新机制,当某一个作用域(一级缓存 Session /二级缓存 Namespaces)的进行了 C/U/D 操作后,默认该作用域下所有 select 中的缓存将被 clear。
一级缓存就是 Session 不关闭的情况下多次查询同一个对象不发 SQL,mybatis 默认开启一级缓存。
二级缓存通常需要在 *Mapper.xml 中添加一个 cache 标签 ,还要在 mybatis 配置文件中全局开启。
<settings>
    <setting name="cacheEnabled" value="true"/>
</settings>
注意:第一个一级缓存关闭时会将数据刷入 SqlSessionFactory 另外一个 session 才能获取二级缓存内容,即前面的 session 必须关闭或 commit,后面的 session 才能获取。
SqlSessionFactory factory = MybatisUtils.getFactory();
SqlSession session1 = factory.openSession();
SqlSession session2 = factory.openSession();

String statement = "com.ibaits.mapper.userMapper.getUser";
CUser user = session1.selectOne(statement, 1);
session1.commit();
System.out.println(user);

user = session2.selectOne(statement, 1);
session2.commit();
System.out.println(user);
1. 映射语句文件中的所有 select 语句将会被缓存。
2. 映射语句文件中的所有 insert,update 和 delete 语句会刷新缓存。
3. 缓存会使用 Least Recently Used(LRU,最近最少使用的)算法来收回。
4. 缓存会根据指定的时间间隔来刷新。
5. 缓存会存储 1024 个对象
<cache
eviction="FIFO"  //回收策略为先进先出
flushInterval="60000" //自动刷新时间60s
size="512" //最多缓存512个引用对象
readOnly="true"/> //只读
12.延迟加载
JDK 实现动态代理需要实现类通过接口定义业务方法,对于没有接口的类,如何实现动态代理呢,这就需要 cglib 了。cglib 采用了非常底层的字节码技术,其原理是通过字节码技术为一个类创建子类,并在子类中采用方法拦截的技术拦截所有父类方法的调用,顺势织入横切逻辑。但因为采用的是继承,所以不能对 final 修饰的类进行代理。
需要用到 cglib 做代理模式。使用如下方式导入 cglib 依赖
<dependency>
    <groupId>cglib</groupId>
    <artifactId>cglib</artifactId>
    <version>2.2.2</version>
</dependency>
然后在全局配置文件加入
<!-- 全局配置参数 -->
<settings>
    <!-- 延迟加载总开关 -->
    <setting name="lazyLoadingEnabled" value="true" />
    <!-- 设置按需加载 -->
    <setting name="aggressiveLazyLoading" value="false" />
</settings>
如上配置,所有的嵌套查询就会延迟加载,但是所有的嵌套结果方式没有影响。
13.鉴别器
mybatis 可以使用 discriminator 判断某列的值,然后根据某列的值改变封装行为。
案例:封装 Employee
如果查出的是女生:就把部门信息查询出来,否则不查询;
如果是男生,把 last_name 这一列的值赋值给 email;
<resultMap type="cn.hx.mybatis.bean.Employee" id="MyEmpDis">
    <id column="id" property="id"/>
    <result column="last_name" property="lastName"/>
    <result column="email" property="email"/>
    <result column="gender" property="gender"/>
    <discriminator javaType="string" column="gender">
        <!--女生  resultType:指定封装的结果类型;不能缺少。/resultMap-->
        <case value="0" resultType="employee">
            <association property="dept" select="cn.hszy.mybatis.mapper.DepartmentMapper.getDeptById"
             column="d_id"></association>
        </case>
        <!--男生 ;如果是男生,把last_name这一列的值赋值给email; -->
        <case value="1" resultType="employee">
            <id column="id" property="id"/>
            <result column="last_name" property="lastName"/>
            <result column="last_name" property="email"/>
            <result column="gender" property="gender"/>
        </case>
    </discriminator>
</resultMap>
14.调用存储过程
存储过程(Stored Procedure)是在大型数据库系统中,一组为了完成特定功能的SQL 语句集,它存储在数据库中,一次编译后永久有效,用户通过指定存储过程的名字并给出参数(如果该存储过程带有参数)来执行它。存储过程是数据库中的一个重要对象。在数据量特别庞大的情况下利用存储过程能达到倍速的效率提升。
create table p_user(
	id int primary key auto_increment,
	name varchar(10),
	sex char(2)
)ENGINE=InnoDB DEFAULT CHARSET=utf8;
insert into p_user(name,sex) values('A',"男");
insert into p_user(name,sex) values('B',"女");
insert into p_user(name,sex) values('C',"男");
创建存储过程(查询得到男性或女性的数量,如果传入的是 0 就女性否则是男性)
CREATE PROCEDURE ges_user_count(IN sex_id INT, OUT user_count INT)
BEGIN
IF sex_id=0 THEN
SELECT COUNT(*) FROM p_user WHERE p_user.sex='女' INTO user_count;
ELSE
SELECT COUNT(*) FROM p_user WHERE p_user.sex='男' INTO user_count;
END IF;
END <br/>
调用存储过程
SET @user_count = 0;
CALL ges_user_count(1, @user_count);
SELECT @user_count;
查询得到男性或女性的数量,如果传入的是0就女性否则是男性
mapper.xml
<mapper namespace="cn.hx.mybatis.test7.userMapper">
    <select id="getCount" statementType="CALLABLE" parameterMap="getCountMap">
        call ges_user_count(?,?)
    </select>
    <parameterMap type="map" id="getCountMap">
        <parameter property="sex_id" mode="IN" jdbcType="INTEGER"/>
        <parameter property="user_count" mode="OUT" jdbcType="INTEGER"/>
    </parameterMap>
</mapper>
执行查询
Map<String, Integer> parameterMap = new HashMap<String, Integer>();
parameterMap.put("sex_id", 1);
parameterMap.put("user_count", -1);
session.selectOne(statement, parameterMap);
Integer result = parameterMap.get("user_count");
System.out.println(result);
15.分页拦截器
分页可以分为逻辑分页和物理分页。逻辑分页是我们的程序在显示每页的数据时,首先查询得到表中的 1000 条数据,然后成熟根据当前页的“页码”选出其中的 100 条数据来显示。
物理分页是程序先判断出该选出这 1000 条的第几条到第几条,然后数据库根据程序给出的信息查询出程序需要的 100 条返回给我们的程序。
mybatis 的分页通常在开发中有时借助第三方分页插件进行分页
添加如下两个第三方 jar 包
<dependency>
    <groupId>com.github.pagehelper</groupId>
    <artifactId>pagehelper</artifactId>
    <version>5.3.0</version>
</dependency>
mybatis 配置文件加入插件
<plugins>
    <plugin interceptor="com.github.pagehelper.PageInterceptor"></plugin>
</plugins>
在查询之前调用静态方法即可完成分页和排序查询。
@Test
public void testGetAll() {
    SqlSessionFactory factory = MybatisUtils.getFactory();
    SqlSession session = factory.openSession();
    String statement = "cn.hx.userMapper.getAllUsers";
    Page<User> startPage = PageHelper.startPage(1, 12," id desc ");
    List<User> list = session.selectList(statement);
    session.close();
    for (User user : list) {
        System.out.println(user);
    }
    System.out.println(startPage.getPages());
}
Page 使用 json 序列化工具会导致其他属性(总页数,总条数)不见,可使用 PageInfo 弥补该问题
public PageInfo<MenuGroup> findAll(Integer page, Integer size) {
    Page<MenuGroup> objects = PageHelper.startPage(page, size);
    menuGroupMapper.selectByExample(new MenuGroupExample());
    return new PageInfo<>(objects);
}
16.多形参问题
由于 jdk7 之前通过反射无法获取方法参数的名字,jdk8 有该功能但是未开启。所以在接口中方法有多个参数时xml中无法正常识别。
List<Resource> queryAll(int start,int size,String name);xml
<select id="queryAll" resultType="cn.hx.entity.Resource">
        select id, name, url, pid, create_time, update_time, order_number
from resource where name like #{name} limit #{start},#{size}
</select>
解决的办法有如下几个:
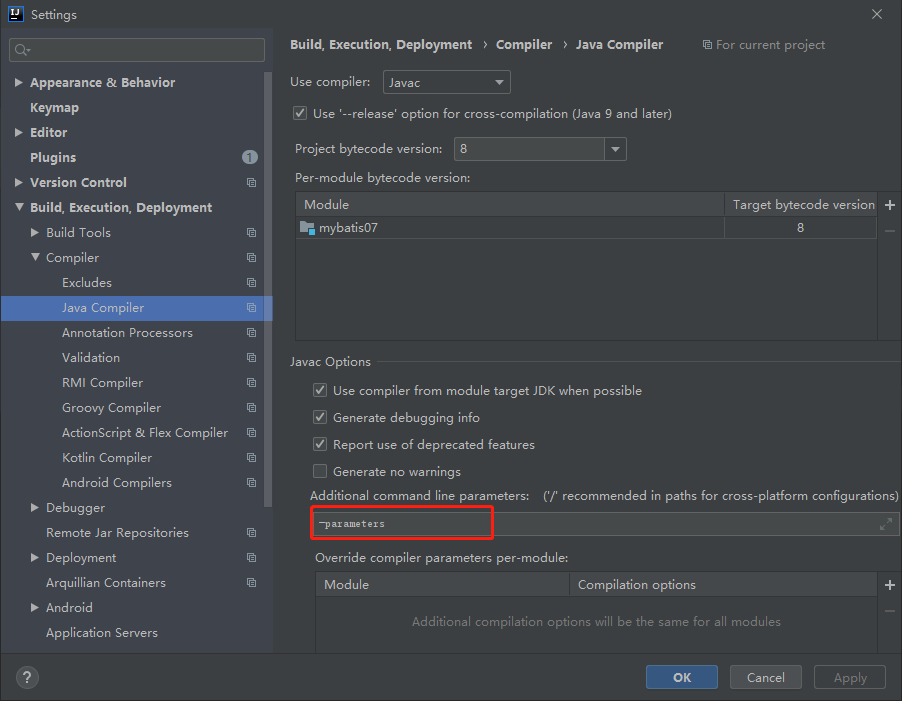
1.搜索打开 jdk8 反射获取参数名 -parameters,或者升级更高版本的 jdk。
2.使用 [arg2, arg1, arg0, param3, param1, param2] 代替#{name}、#{start}和#{size}
3.像如下方式加入 mybatis 的注解 org.apache.ibatis.annotations.Param。
List<Resource> queryAll(@Param("start") int start,@Param("size") int size,@Param("name") String name);4.使用对象将所有的参数封装后再传参。
17.动态 SQL
MyBatis 的强大特性之一便是它的动态 SQL。如果你有使用 JDBC 或其他类似框架的经验,你就能体会到根据不同条件拼接 SQL 语句有多么痛苦。拼接的时候要确保不能忘了必要的空格,还要注意省掉列名列表最后的逗号。利用动态 SQL 这一特性可以彻底摆脱这种痛苦。
通常使用动态 SQL 不可能是独立的一部分,MyBatis 当然使用一种强大的动态 SQL 语言来改进这种情形,这种语言可以被用在任意的 SQL 映射语句中。
动态 SQL 元素和使用 JSTL 或其他类似基于 XML 的文本处理器相似。在 MyBatis 之前的版本中,有很多的元素需要来了解。MyBatis3 大大提升了它们,现在用不到原先一半的元素就可以了。MyBatis 采用功能强大的基于 OGNL 的表达式来消除其他元素。
- if 语句 (简单的条件判断)
- choose (when,otherwize),相当于 java 语言中的 switch,与 jstl 中的 choose 很类似。
- trim (对包含的内容加上 prefix,或者 suffix 等,前缀,后缀)
- where (主要是用来简化 sql 语句中 where 条件判断的,能智能的处理 and or,不必担心多余导致语法错误)
- set (主要用于更新时)
- foreach (在实现 in 语句查询时特别有用)
在实际开发中我们经常封装用于包含所有查询条件的询条件类,有时条件类也可以使用 map 代替,只是使用 map 代码可读性较差。
public class ConditionPet {
    private String name;
    private Double minWeight;
    private Double maxWeight;
}
if 的用法
用于根据参数的条件,动态拼接 SQL。if 里面的 test 就是对应的条件,当条件满足,if 中的 SQL 就会正常拼接。
案例:
<select id="findByCondition" resultType="cn.hx.entity.Pet">
    select * from pet
    <if test="name != null and name != ''">
        where name like #{name}
    </if>
</select>
案例:
<select id="findByCondition" resultType="cn.hx.entity.Pet">
    select * from pet where true
    <if test="name!=null and name!=''">
        and name like #{name}
    </if>
    <if test="minWeight!=null">
        and weight > #{minWeight}
    </if>
</select>
注意:xml 中包含特殊字符请使用 CDATA 标签包裹,idea 中可以简打 CD。
and weight <![CDATA[<]]> #{maxWeight}
18.choose 与 trim
choose (when,otherwize) 相当于 java 语言中的 if-else/switch,与 jstl 中 的 choose 很类似。但是它与 if 的区别是,如下案例中三条分支语句程序只能走其中一条。
案例:
<select id="findByCondition" resultType="cn.hx.entity.Pet">
    select * from pet where
    <choose>
        <when test="name != null">
            name = #{name}
        </when>
        <when test="minWeight != null">
            weight >= #{minWeight}
        </when>
        <otherwise>
            id = 1
        </otherwise>
    </choose>
</select>
mybatis 的 trim 标签一般用于去除 sql 语句中多余的 and 关键字,逗号,或者给 sql 语句前拼接 “where“、“set“以及“values(“ 等前缀,或者添加“)“等后缀,可用于选择性插入、更新、删除或者条件查询等操作,如果要同时去除多个使用管道符连接 prefixOverrides="AND|OR"。
案例1:去除多余的 and 或者 where
select * from pet
<trim prefix="WHERE" prefixOverrides="AND">
    <if test="name != null">
        name = #{name}
    </if>
    <if test="minWeight != null">
        AND weight >= #{minWeight}
    </if>
    <if test="maxWeight != null">
        AND weight <![CDATA[ <=]]> #{maxWeight}
    </if>
</trim>
prefix:前缀
prefixOverrides:去除 SQL 语句前面的关键字或者字符。
suffixOverrides:去除 SQL 语句结束位置的关键字或者字符。
案例2:使用 trim 标签去除结尾多余的逗号
insert into pet
<trim prefix="(" suffix=")" suffixOverrides=",">
    <if test="name != null">name,</if>
    <if test="weight != null">weight,</if>
</trim>
values
<trim prefix="(" suffix=")" suffixOverrides=",">
    <if test="name!=null">#{name},</if>
    <if test="weight!=null">#{weight},</if>
</trim>
19.where 与 set
where 会自动判断后面的条件,如果没有条件则不在 SQL 中拼接 where 关键字。同时还能自动去掉 where 最前面多出的 and 或者 or 关键字。
案例:
select * from pet
<where>
    <if test="name != null">and name like #{name}</if>
    <if test="weight != null">and weight = #{weight}</if>
</where>
与 trim 类似 set 元素会动态地在行首插入 SET 关键字,并会删掉额外的逗号(这些逗号是在使用条件语句给列赋值时引入的)。
案例:
update pet
<set>
    <if test="name != null">name = #{name},</if>
    <if test="weight != null">weight = #{weight},</if>
</set>
where id =#{id}
练习:
1.在 resource 表中增加如下的查询条件,并使用一条查询语句完成,参数统一使用 map,没有参数时查询全部。
一、用户传入 page 与 size 参数时分页查询。
二、用户传入 beginTime 用于查询创建时间在 beginTime 的之后创建的资源。
三、传入 url 后可以根据 url 模糊查询。
四、传入 name 后可以根据 name 模糊查询。
2.在 resource 表中增加如下的修改方法,使其能完成只修改不为空的属性,参数统一使用 map。
参考代码:
<resultMap id="BaseResultMap" type="cn.hx.entity.Resource">
    <id column="id" jdbcType="INTEGER" property="id"/>
    <result column="name" jdbcType="VARCHAR" property="name"/>
    <result column="url" jdbcType="VARCHAR" property="url"/>
    <result column="pid" jdbcType="INTEGER" property="pid"/>
    <result column="create_time" jdbcType="TIMESTAMP" property="createTime"/>
    <result column="update_time" jdbcType="TIMESTAMP" property="updateTime"/>
    <result column="order_number" jdbcType="INTEGER" property="orderNumber"/>
</resultMap>
<sql id="Base_Column_List">
id, `name`, url, pid, create_time, update_time, order_number
</sql>
<select id="select" parameterType="map" resultMap="BaseResultMap">
    select
    <include refid="Base_Column_List"/>
    from resource
    <where>
        <if test="name != null and name !=''">
            and `name` like #{name}
        </if>
        <if test="url != null and url != ''">
            and url like #{url}
        </if>
        <if test="pid != null">
            and pid = #{pid}
        </if>
        <if test="beginTime != null">
            and create_time >= #{beginTime }
        </if>
    </where>
    <if test="page!=null and size!=null">
        limit #{page},#{size}
    </if>
</select>
参考代码:
<update id="updateByPrimaryKeySelective" parameterType="cn.hx.entity.Resource">
    update resource
    <set>
        <if test="name != null">
            `name` = #{name},
        </if>
        <if test="url != null">
            url = #{url},
        </if>
        <if test="pid != null">
            pid = #{pid},
        </if>
        <if test="orderNumber != null">
            order_number = #{orderNumber},
        </if>
        update_time = now()
    </set>
    where id = #{id}
</update>
20.bind 与 foreach
bind 元素允许你在 OGNL 表达式以外创建一个变量,并将其绑定到当前的上下文。比如:
<select id="selectBlogsLike" resultType="Blog">
  <bind name="pattern" value="'%' + parameter.titie + '%'" />
  SELECT * FROM BLOG
  WHERE title LIKE #{pattern}
</select>
foreach 主要用于数组、集合的遍历,foreach 提供大量属性用于满足开发需求如:collection 用于指定遍历的集合名称、 item 正在遍历的那个对象、 open 遍历前拼接的字符串、 close 结束时拼接的字符串、 separator 间隔字符和 index 指定遍历的索引。
案例:
where id in
<foreach collection="ids" item="id" open="(" close=")" separator=",">
    #{id}
</foreach>

等价于

where id in (
<foreach collection="ids" item="id" separator=",">
    #{id}
</foreach>
)
foreach 中的 collection 在实际开发中有如下使用方法:
- 如果传入的是单参数且参数类型是一个 array 数组的时候,collection 的属性值为 array
- 如果传入的是单参数且参数类型是一个 List 的时候,collection 属性值为 list
- 如果传入的参数是多个的时候,我们就需要把它们封装成一个 Map,当然单参数也可,如果传入的参数是多个的时候,我们也可以放在实体类中(这种实际用到也是非常多的)
1.普通数组
<select id="select" parameterType="int">
    select * from person
    where id in
    <foreach collection="array" item="id" open="(" close=")" separator=",">
        #{id}
    </foreach>
</select>
使用时
int[] ids = {4,6};
mapper.select(int [] ids);
2.List 集合
<select id="select" parameterType="int">
    select * from person
    where id in
    <foreach collection="list" item="id" open="(" close=")" separator=",">
        #{id}
    </foreach>
</select>
使用时
List<Integer> list = new ArrayList<Integer>();
list.add(4);
list.add(6);
mapper.select(list);
3.map 传值
<select id="select" parameterType="map">
    delete from person
    where id in
    <foreach collection="ids" item="id" open="(" close=")" separator=",">
        #{id}
    </foreach>
</select>
使用时
Map<String,Object> map = new HashMap<String,Object>();
int[] ids = {4,6};
map.put("ids", ids);
mapper.select(map);
练习:
1.在修改时经常使用到批量修改操作,创建如下方法完成 resource 批量修改。
int updateAll(int[]ids, Resource resource);
ids 为修改的数据id集合
resource 包含修改的属性,不为空的属性才修改。
2.使用动态标签库完成如下方法的编写,所写代码尽可能通用。Selective 表示实体属性为空时常用数据库默认值。
int deleteByPrimaryKey(Integer id);
int insert(User user);
int insertSelective(User user);
User selectByPrimaryKey(Integer id);
List<User> selectByPrimaryKeys(Collection<Integer> ids);
List<User> selectAll();
List<User> selectAllByPage(@Param("start") int start, @Param("size") int size);
int updateByPrimaryKeySelective(User user);
int updateByPrimaryKey(User user);
参考代码:
<update id="updateAll">
    update resource
    <set>
        <if test="param1.name != null and param1.name != ''">
            name = #{param1.name},
        </if>
        <if test="param1.url != null and param1.url != ''">
            url = #{param1.url},
        </if>
        <if test="param1.pid != null">
            pid = #{param1.pid},
        </if>

        <if test="param1.orderNumber != null">
            order_number = #{param1.orderNumber},
        </if>
        update_time = now()
    </set>
    where id
    <foreach collection="param2" open="in (" close=")" separator="," item="i">#{i}</foreach>
</update>
接口方法
int update(Resource resource,List<Integer> ids);参考代码:
<?xml version="1.0" encoding="UTF-8"?>
<!DOCTYPE mapper PUBLIC "-//mybatis.org//DTD Mapper 3.0//EN" "http://mybatis.org/dtd/mybatis-3-mapper.dtd">
<mapper namespace="cn.hx.mapper.UserMapper">
    <resultMap id="BaseResultMap" type="cn.hx.entity.User">
        <id column="id" jdbcType="INTEGER" property="id"/>
        <result column="name" jdbcType="VARCHAR" property="name"/>
        <result column="login_name" jdbcType="VARCHAR" property="loginName"/>
        <result column="login_password" jdbcType="VARCHAR" property="loginPassword"/>
        <result column="role_id" jdbcType="INTEGER" property="roleId"/>
        <result column="create_time" jdbcType="TIMESTAMP" property="createTime"/>
        <result column="update_time" jdbcType="TIMESTAMP" property="updateTime"/>
    </resultMap>
    <sql id="Base_Column_List">
        id, `name`, login_name, login_password, role_id, create_time, update_time
    </sql>
    <select id="selectByPrimaryKey" parameterType="java.lang.Integer" resultMap="BaseResultMap">
        select
        <include refid="Base_Column_List"/>
        from user
        where id = #{id}
    </select>
    <select id="selectByPrimaryKeys" parameterType="java.lang.Integer" resultMap="BaseResultMap">
        select
        <include refid="Base_Column_List"/>
        from user
        where id in
        <foreach collection="ids" item="id" open="(" close=")" separator=",">
            #{id}
        </foreach>
    </select>
    <select id="selectAll" resultType="cn.hx.entity.User" resultMap="BaseResultMap">
        select
        <include refid="Base_Column_List"/>
        from user
    </select>
    <select id="selectAllByPage" resultMap="BaseResultMap">
        select
        <include refid="Base_Column_List"/>
        from user
        limit #{start},#{size}
    </select>
    <delete id="deleteByPrimaryKey" parameterType="java.lang.Integer">
        delete from user
        where id = #{id}
    </delete>
    <insert id="insert" keyColumn="id" keyProperty="id" parameterType="cn.hx.entity.User" useGeneratedKeys="true">
        insert into user (`name`, login_name, login_password,
            role_id, create_time
        )
        values (#{name}, #{loginName}, #{loginPassword},
            #{roleId}, now()
        )
    </insert>
    <insert id="insertSelective" keyProperty="id" parameterType="cn.hx.entity.User"
            useGeneratedKeys="true">
        insert into user
        <trim prefix="(" suffix=")" suffixOverrides=",">
            <if test="name != null">
                `name`,
            </if>
            <if test="loginName != null">
                login_name,
            </if>
            <if test="loginPassword != null">
                login_password,
            </if>
            <if test="roleId != null">
                role_id,
            </if>
            create_time
        </trim>
        <trim prefix="values (" suffix=")" suffixOverrides=",">
            <if test="name != null">
                #{name},
            </if>
            <if test="loginName != null">
                #{loginName},
            </if>
            <if test="loginPassword != null">
                #{loginPassword},
            </if>
            <if test="roleId != null">
                #{roleId},
            </if>
            now()
        </trim>
    </insert>
    <update id="updateByPrimaryKeySelective" parameterType="cn.hx.entity.User">
        update user
        <set>
            <if test="name != null">
                `name` = #{name},
            </if>
            <if test="loginName != null">
                login_name = #{loginName},
            </if>
            <if test="loginPassword != null">
                login_password = #{loginPassword},
            </if>
            <if test="roleId != null">
                role_id = #{roleId},
            </if>
            update_time = now()
        </set>
        where id = #{id}
    </update>
    <update id="updateByPrimaryKey" parameterType="cn.hx.entity.User">
        update user
        set `name` = #{name},
          login_name = #{loginName},
          login_password = #{loginPassword},
          role_id = #{roleId},
          update_time = now()
        where id = #{id}
  </update>
</mapper>
21.script 标签
要在带注解的映射器接口类中使用动态 SQL,可以使用 script 元素。比如:
@Update({"<script>",
      "update Author",
      "  <set>",
      "    <if test='username != null'>username=#{username},</if>",
      "    <if test='password != null'>password=#{password},</if>",
      "    <if test='email != null'>email=#{email},</if>",
      "    <if test='bio != null'>bio=#{bio}</if>",
      "  </set>",
      "where id=#{id}",
      "</script>"})
void updateAuthorValues(Author author);


 被折叠的 条评论
为什么被折叠?
被折叠的 条评论
为什么被折叠?
 到【灌水乐园】发言


