


前言
回顾上章,了解了JDK动态代理要基于接口实现的局限性,如果一个类没有实现任何接口,想要对其进行代理,那么我们可以使用CGLib动态代理。
一、阐述CGLIB动态代理
CGLIB是一个强大的高性能的代码生成包,底层是通过ASM字节码处理框架来转换字节码并生成代理对象,以方法拦截来控制方法调用,和JDK动态代理不同,CGLIB生成的代理类是代理对象的子类。
要实现CGLIB动态代理主要有两个步骤:
1、实现一个MethodInterceptor方法拦截器;
2、利用Enhancer字节码增强器创建代理对象。
话不多说,我们通过代码实现能更直观理解。
二、代码实现
沿用老师课代表例子。
1、创建老师类(实际对象),包含两个方法doSomething()和doOtherThing(),其中doOtherThing()定义成final方法:
/**
 * 老师
 */
public class Teacher {

    public void doSomething() {
        System.out.println("老师:批改作业");
    }

    public final void doOtherThing() {
        System.out.println("老师:休息");
    }
}
2、创建一个方法拦截器,实现MethodInterceptor接口的intercept方法。四个参数的含义:代理对象、被调用的方法的Method对象、方法参数、CGLIB的方法代理对象。这部分的实现和JDK动态代理中的调用处理器相似,只不过不再直接调用Method对象的invoke方法,而是调用MethodProxy的invokeSuper方法:
/**
 * 拦截器
 */
public class TeacherMethodInterceptor implements MethodInterceptor {

    @Override
    public Object intercept(Object o, Method method, Object[] objects, MethodProxy methodProxy) throws Throwable {
        System.out.println("课代表:收作业");
        Object result = methodProxy.invokeSuper(o, objects);
        System.out.println("课代表:发作业");
        return result;
    }
}
3、CGLIB代理类是实际代理对象的子类,我们要通过Enhancer设置代理对象类别和拦截器,再通过create方法生成代理对象:
public class CGLibTest {

    public static void main(String[] args) {

        Enhancer enhancer = new Enhancer();
        enhancer.setSuperclass(Teacher.class);//设置超类
        enhancer.setCallback(new TeacherMethodInterceptor());//设置拦截器
        Teacher representative = (Teacher) enhancer.create();//生成代理类

        representative.doSomething();

        System.out.println("---------------------------------------------------------------------------------");

        representative.doOtherThing();

    }
}
运行结果:
课代表:收作业
老师:批改作业
课代表:发作业
---------------------------------------------------------------------------------
老师:休息
从运行结果可以看到doSomething()方法被成功代理了,doOtherThing()却没有,因为在开始时我们就将doOtherThing()方法用final修饰了,final方法无法被覆盖,所以作为子类的代理类也无法代理final方法。
三、扩展内容
-
了解SpringBoot AOP中的动态代理类型
(作为扩展内容,就不再赘述AOP的概念和使用方法了!我现有的环境是Spring Boot 3.3.1和Java17,后续演示基于此环境。)
先了解下SpringBoot中AOP代理类型:
- Spring Boot 1.x 默认使用JDK动态代理
- Spring Boot 2.x 开始,默认改为使用CGLIB代理,是因为CGLIB可以为没有实现接口的类创建代理,提供了更广泛的适用性
1、首先我们先创建两个service,一个不具体实现接口,另一个实现接口,都有method()方法:
/**
 * 不实现接口
 */
@Service
public class AopTestService {

    public void method() {
        System.out.println("老师:批改作业");
    }
}
/**
* 实现接口
*/
@Service
public class AopTestInterfaceImpl implements AopTestInterface {
@Override
public void method() {
System.out.println("老师:批改作业");
}
}
public interface AopTestInterface {
void method();
}2、 创建一个切面类,通过注解中的表达式对上面创建的两个service中的方法进行拦截增强:
@Component
@Aspect
public class AopTestAspectDemo {

    @Before(value = "execution(* com.example.aop_study.test.service.*.*(..))")
    public void before(JoinPoint joinPoint){//前置通知
        System.out.println("课代表:收作业");
    }

    @After(value = "execution(* com.example.aop_study.test.service.*.*(..))")
    public void after(JoinPoint joinPoint){//后置通知
        System.out.println("课代表:发作业");
    }

    @Around(value = "execution(* com.example.aop_study.test.service.*.*(..))")
    public Object around(ProceedingJoinPoint proceedingJoinPoint){//环绕通知
        System.out.println("上学啦");
        Object proceed = null;
        try {
            proceed = proceedingJoinPoint.proceed();
        } catch (Throwable e) {
            throw new RuntimeException(e);
        }
        System.out.println("放学啦");
        return proceed;
    }
}
3、创建Controller接受请求:
@Slf4j
@RestController
@RequestMapping("/aop-test")
public class AopTestController {

    private AopTestService aopTestService;

    private AopTestInterfaceImpl aopTestInterface;

    @Autowired
    void setService(
            AopTestService aopTestService,
            AopTestInterfaceImpl aopTestInterface
    ) {
        this.aopTestService = aopTestService;
        this.aopTestInterface = aopTestInterface;
    }

    @GetMapping("/method")
    public String method() {

        //请求未实现接口的service方法
        aopTestService.method();

        System.out.println("-------------------------------------------------------");

        //请求实现接口的service方法
        aopTestInterface.method();

        return "ok";
    }
}
4、分别请求两个接口,我们看看AOP使用的是哪种代理模式:
响应结果:
上学啦
课代表:收作业
老师:批改作业
课代表:发作业
放学啦
-------------------------------------------------------
上学啦
课代表:收作业
老师:批改作业
课代表:发作业
放学啦
从结果看无论service是否实现接口,AOP都对方法进行了增强,我们打断点看看:
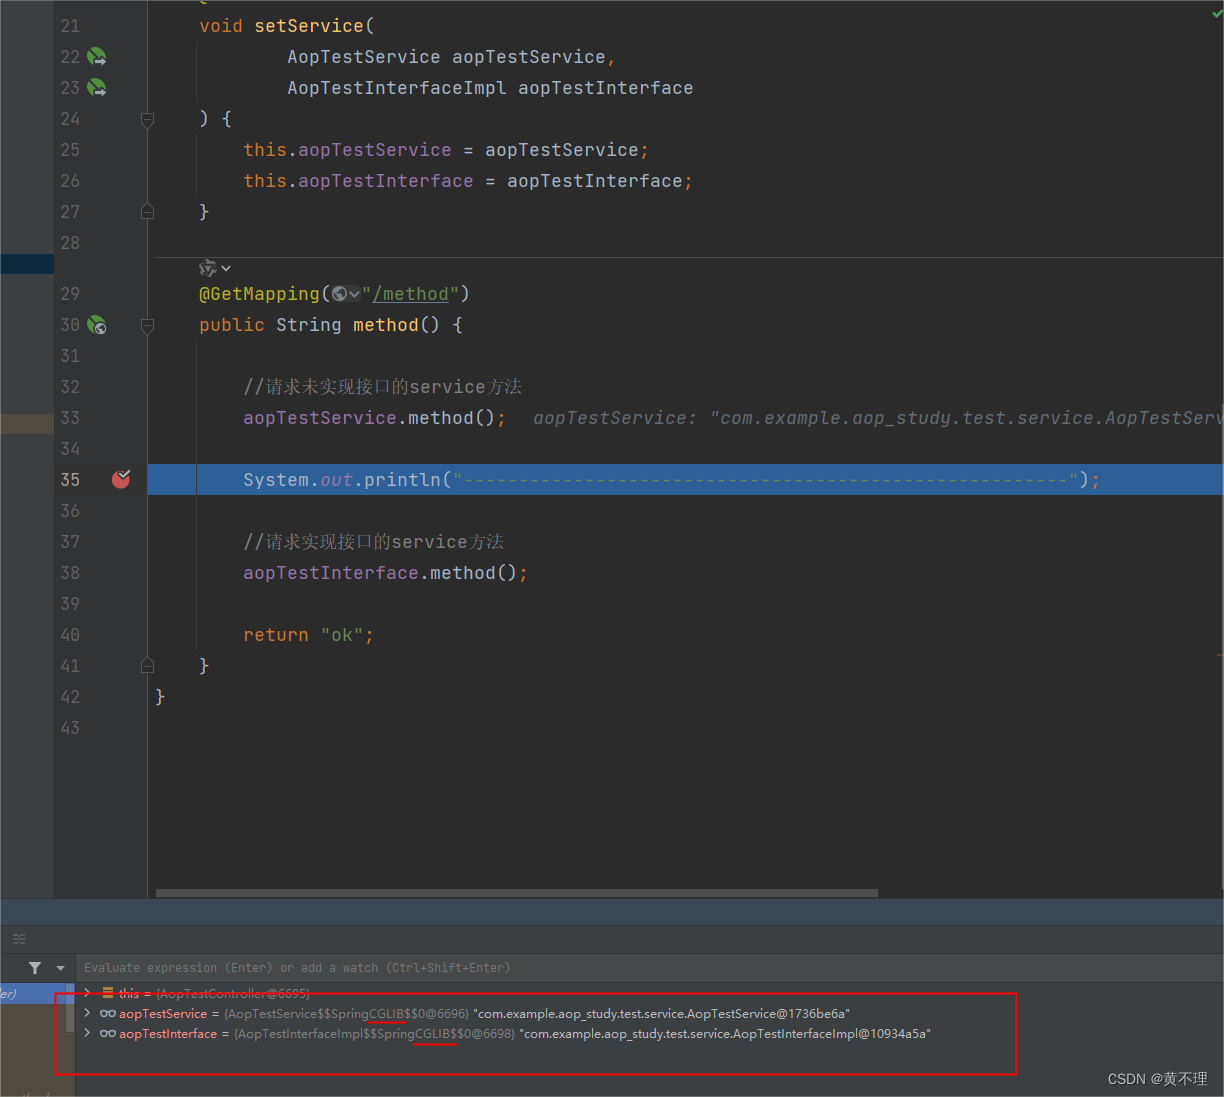
可以看到AOP当前使用的代理模式确实是CGLIB动态代理。
5、既然之前也说过Spring Boot 2.x 开始,默认改为使用CGLIB代理,但我们可以通过添加配置不是用默认方式,可以在application.properties配置文件中添加:
spring.aop.proxy-target-class = false
添加配置之后,框架会根据对象有无实现接口动态选择CGLIB代理或JDK代理。
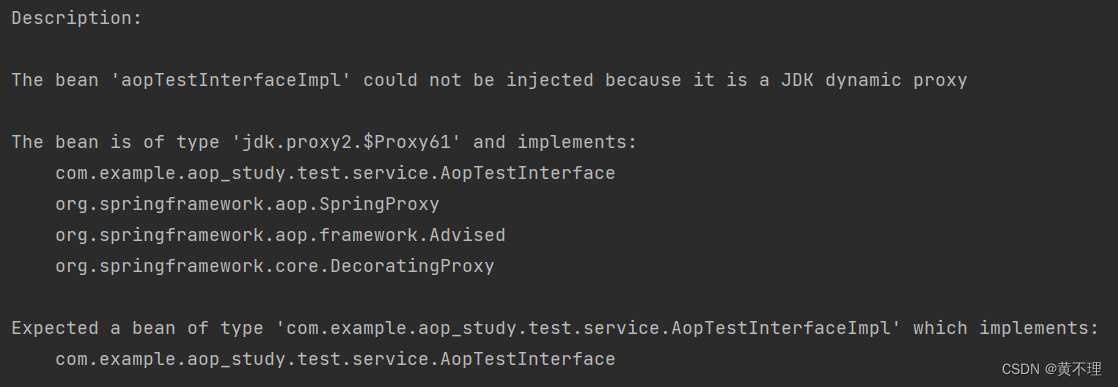
注意,之前我们说过JDK代理是基于接口实现的,生成的代理类和实际对象是一种同级关系,都实现了同样的接口,因此之前代码中注入AopTestInterfaceImpl 类在启动时会报错:
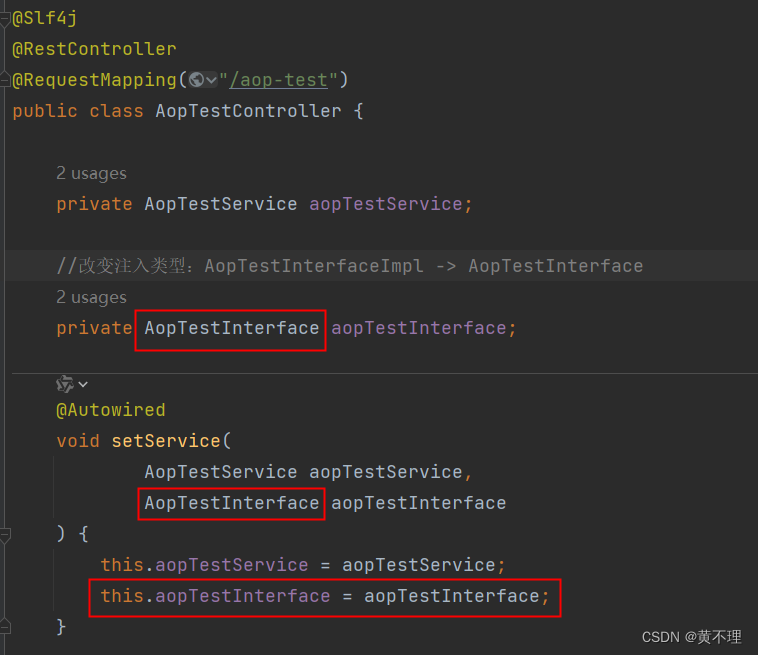
改变注入类型:
6、继续运行断点察看代理类型:
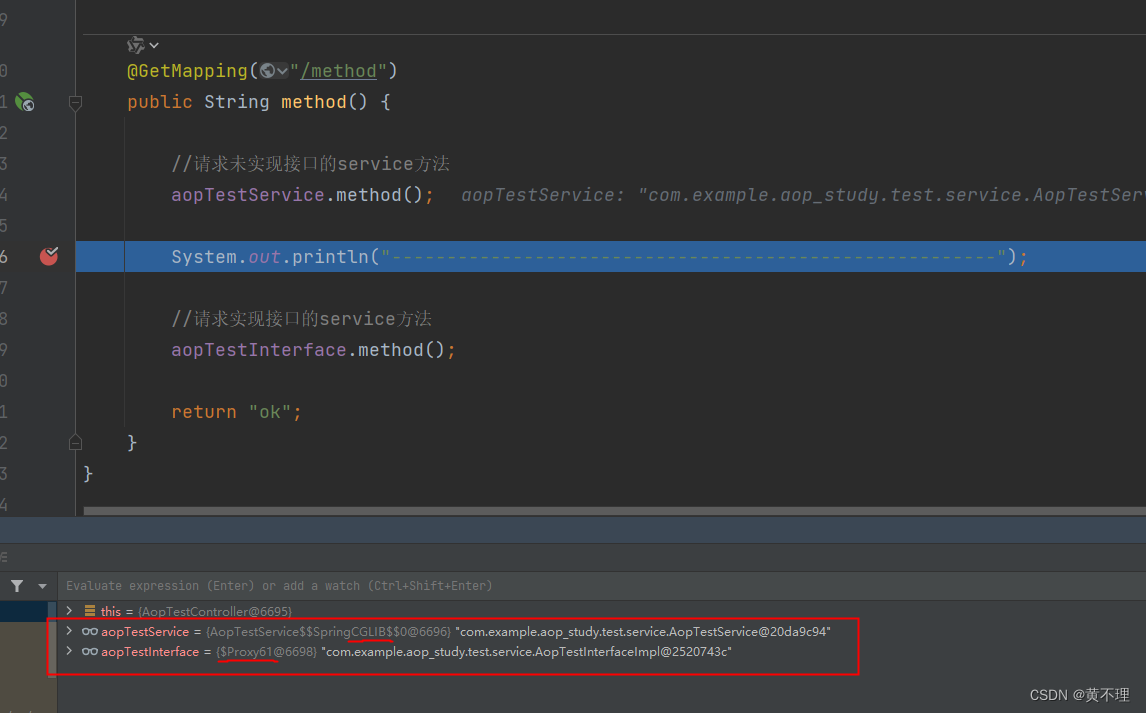
可以发现对实现接口的service的代理方式确实变成了JDK动态代理。
四、总结
到此,java代理的三种方式我们基本了解了,但这也只是代理中的部分基础,更多的知识点我也还在不断了解学习中。平常工作原因写得比较慢,遇到有用有趣的东西会尽量写写博客,也希望自己在这个过程中能有更多提升,共同进步。


 14万+
14万+

 被折叠的 条评论
为什么被折叠?
被折叠的 条评论
为什么被折叠?
 到【灌水乐园】发言


