


1、在每个组件模板,不再支持片段代码
Vue1.0代码如下,我们可以正常运行:
<!DOCTYPE html>
<html>
    <head>
        <meta charset="UTF-8">
        <title></title>
        <script type="text/javascript" src="js/vue1.0.js" ></script>
        <script>
            Vue.component('my-aaa',{
                template: '<h3>我是组件</h3><strong>我是加粗标签</strong>'
            });
            window.onload = function(){
                new Vue({
                    el: '#box',
                    data: {
                        msg: 'welcome vue2.0'
                    }
                });
            }
        </script>
    </head>
    <body>
        <div id="box">
            <my-aaa></my-aaa>
            {{msg}}
        </div>
    </body>
</html>- vue1.0显示效果如下图所示

Vue2.0代码如下,我们会发现现实不正常:
<!DOCTYPE html>
<html>
    <head>
        <meta charset="UTF-8">
        <title></title>
        <script type="text/javascript" src="js/vue2.0.js" ></script>
        <script>
            Vue.component('my-aaa',{
                template: '<h3>我是组件</h3><strong>我是加粗标签</strong>'
            });
            window.onload = function(){
                new Vue({
                    el: '#box',
                    data: {
                        msg: 'welcome vue2.0'
                    }
                });
            }
        </script>
    </head>
    <body>
        <div id="box">
            <my-aaa></my-aaa>
            {{msg}}
        </div>
    </body>
</html>- vue2.0显示效果如下图所示

- 我们将上面的template代码修改成如下就可以正常运行了。
Vue.component('my-aaa',{
    template: '<div><h3>我是组件</h3><strong>我是加粗标签</strong></div>'
});
2、生命周期
Vue1.0版本的生命周期
init
created
beforeCompile
compiled
ready
beforeDestroy
destroyed
Vue2.0版本的生命周期
beforeCreate    组件实例刚刚被创建,属性都没有
created         实例已经创建完成,属性已经绑定
beforeMount     模板编译之前
mounted         模板编译之后,代替之前ready  *
beforeUpdate    组件更新之前
updated         组件更新完毕  *
beforeDestroy   组件销毁前
destroyed       组件销毁后
vue2.0生命周期运行顺序
<!DOCTYPE html>
<html>
    <head>
        <meta charset="UTF-8">
        <title></title>
        <script type="text/javascript" src="js/vue2.0.js" ></script>
        <script>
            window.onload = function(){
                new Vue({
                    el: '#box',
                    data: {
                        msg: 'welcome vue2.0'
                    },
                    methods: {
                        update(){
                            this.msg = '大家好'
                        },
                        destroy(){
                            this.$destroy();
                        }
                    },
                    beforeCreate() {
                        console.info('组件实例刚刚被创建');
                    },
                    created() {
                        console.info('实例已经创建完成');
                    },
                    beforeMount() {
                        console.info('模板编译之前');
                    },
                    mounted() {
                        console.info('模板编印完成');
                    },
                    beforeUpdate() {
                        console.info("组件更新之前");
                    },
                    updated() {
                        console.info("组件更新完毕");
                    },
                    beforeDestroy() {
                        console.info("组件销毁之前");
                    },
                    destroyed() {
                        console.info("组件销毁之后");
                    }
                })
            }
        </script>
    </head>
    <body>
        <div id="box">
            <input type="button" value="更新数据" @click="update" />
            <input type="button" value="销毁组件" @click="destroy" />
            {{msg}}
        </div>
    </body>
</html>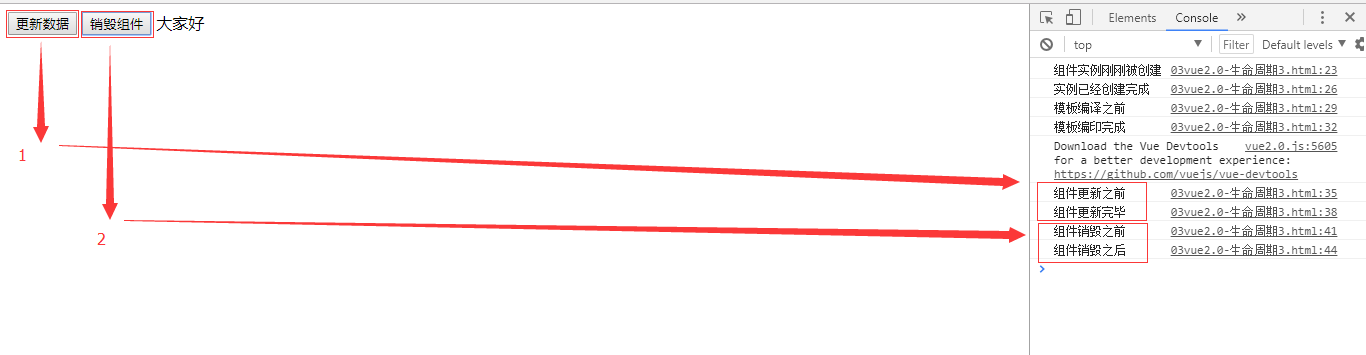
3、循环
- 第一:在vue2.0里面是可以添加重复数据
<!DOCTYPE html>
<html>
    <head>
        <meta charset="UTF-8">
        <title></title>
        <script type="text/javascript" src="js/vue2.0.js" ></script>
        <script>
            window.onload = function(){
                new Vue({
                    el:'#box',
                    data:{
                        list:['width','height','border']
                    },
                    methods:{
                        add(){
                            this.list.push('background');
                        }
                    }
                });
            }
        </script>
    </head>
    <body>
        <div id="box">
            <input type="button" value="添加" @click="add"/>
            <ul>
                <li v-for="val in list" track-by="$index">
                    {{val}}
                </li>
            </ul>
        </div>
    </body>
</html>- 第二:去掉了一些隐式变量,循环遍历方式改变。
<!DOCTYPE html>
<html>
    <head>
        <meta charset="UTF-8">
        <title></title>
        <script type="text/javascript" src="js/vue2.0.js" ></script>
        <script>
            window.onload = function(){
                new Vue({
                    el:'#box',
                    data:{
                        list:['width','height','border']
                    },
                    methods:{
                        add(){
                            this.list.push('background');
                        }
                    }
                });
            }
        </script>
    </head>
    <body>
        <div id="box">
            <input type="button" value="添加" @click="add"/>
            <ul>
                <li v-for="(val, key) in list">
                    {{val}} {{key}}
                </li>
            </ul>
        </div>
    </body>
</html>
4、track-by=”id”的变化
- vue2.0版本之后
<li v-for="(val, key) in list" :key="key">
    {{val}} {{key}}
</li>
5、自定义键盘指令
<!DOCTYPE html>
<html>
    <head>
        <meta charset="UTF-8">
        <title></title>
        <script type="text/javascript" src="js/vue2.0.js" ></script>
        <script>
            Vue.directive('on').keyCodes.ctrl=17;   //vue1.0版本
            Vue.config.keyCodes.ctrl=17;            //vue2.0版本
            window.onload = function(){
                new Vue({
                    el:'#box',
                    data:{
                    },
                    methods:{
                        change(event){
                            console.info(event);
                        }
                    }
                });
            }
        </script>
    </head>
    <body>
        <div id="box">
            <input type="text" @keyup.ctrl="change" />
        </div>
    </body>
</html>
6、过滤器
- vue1.0之前系统自带了很多过滤器,有:
{{msg | currency}}
{{msg | json}}
vue2.0之后去除了很多过滤器,官方推荐使用lodash工具库,
自定义过滤器的使用方法也变了
- 之前:{{msg | toDou ‘12’ ‘5’}}
- 现在:{{msg | toDou(‘12’,’5’)}}
7、组件通信
<!DOCTYPE html>
<html>
    <head>
        <meta charset="UTF-8">
        <title></title>
        <script type="text/javascript" src="js/vue2.0.js" ></script>
        <script>
            var Event = new Vue();
            var A = {
                template:`
                    <div>
                        <span>我是A组件</span> -> {{a}}
                        <input type="button" value="把A数据给C" @click="send" />
                    </div>
                `,
                methods: {
                    send() {
                        Event.$emit('a-msg',this.a);
                    }
                },
                data() {
                    return {
                        a: '我是a数据'
                    }
                }
            };
            var C = {
                template: `
                    <div>
                        <h3>我是C组件</h3>
                        <span>接收过来的A的数据为: {{a}}</span>
                    </div>
                `,
                data() {
                    return {
                        a: '',
                        b: ''
                    }
                },
                mounted() {
                    Event.$on('a-msg',function(a){
                        this.a = a;
                    }.bind(this));
                }
            };
            window.onload = function(){
                new Vue({
                    el: '#box',
                    components: {
                        'com-a': A,
                        'com-c': C
                    }
                })
            }
        </script>
    </head>
    <body>
        <div id="box">
            <com-a></com-a>
            <com-c></com-c>
        </div>
    </body>
</html>
8、vue动画
transition单个元素动画
<!DOCTYPE html>
<html>
    <head>
        <meta charset="UTF-8">
        <title></title>
        <script type="text/javascript" src="js/vue2.0.js" ></script>
        <style>
            /**动画零界点状态:也是动画进入最终显示的状态**/
            p {
                width: 100px;
                height: 100px;
                margin: 20px auto;
                background-color: red;
            }
            .fade-enter-active, .fade-leave-active {
                transition: 3s all ease;
            }
            /** 动画进入之初的状态,fade表示动画名称 **/
            .fade-enter {
                opacity:0;
                width: 10px;
                height: 10px;
            }
            /** 动画运行过程中的状态**/
            .fade-enter-active {
                opacity: 1;
            }
            /** 动画离开过程中的状态 **/
            .fade-leave-active {
                opacity: 0.5;
                width: 10px;
                height: 10px;
            }
            /** 动画离开最终状态 ,一般情况下是看不见的,用以上代码就可以实现效果**/
            /*.fade-leave {
                opacity:0;
                width: 10px;
                height: 10px;
            }*/
        </style>
        <script>
            window.onload = function(){
                new Vue({
                    el: '#box',
                    data: {
                        show: false
                    }
                });
            }
        </script>
    </head>
    <body>
        <div id="box">
            <input type="button" value="点击显示隐藏" @click="show=!show" />
            <!-- 定义动画及其名称 -->
            <transition name="fade">
                <p v-show="show"></p>
            </transition>
        </div>
    </body>
</html>
transition配置animate插件使用
<!DOCTYPE html>
<html>
    <head>
        <meta charset="UTF-8">
        <title></title>
        <style>
            p{
                width:100px;
                height:100px;
                background: red;
                margin:0 auto;
            }
        </style>
        <script type="text/javascript" src="js/vue2.0.js" ></script>
        <link rel="stylesheet" href="css/animate.css" />
        <script>
            window.onload=function(){
                new Vue({
                    el:'#box',
                    data:{
                        show:false
                    }
                });
            };
        </script>
    </head>
    <body>
        <div id="box">
            <input type="button" value="点击显示隐藏" @click="show=!show">
            <!--
                不用name属性了,
                设置enter-active-class表示进入动画
                设置leave-active-class表示离开动画
            -->
            <transition enter-active-class="bounceInLeft" leave-active-class="bounceOutRight">
                <!-- class="animated"表示预备动画,必须得先加入 -->
                <p v-show="show" class="animated"></p>
            </transition>
        </div>
    </body>
</html>- 或者将
class="animated"写入到transition标签中
<transition enter-active-class="animated zoomInLeft" leave-active-class="animated zoomOutRight">
    <p v-show="show"></p>
</transition>
transition多个元素动画
- 案例一
<!DOCTYPE html>
<html>
    <head>
        <meta charset="UTF-8">
        <title></title>
        <style>
            p {
                width: 100px;
                height: 100px;
                background: red;
                margin: 10px auto;
            }
        </style>
        <script type="text/javascript" src="js/vue2.0.js" ></script>
        <link rel="stylesheet" href="css/animate.css" />
        <script>
            window.onload = function(){
                new Vue({
                    el: '#box',
                    data: {
                        show: false
                    }
                });
            }
        </script>
    </head>
    <body>
        <div id="box">
            <input type="button" value="点击显示隐藏" @click="show=!show" />
            <!-- 将动画放入到transition-group里 -->
            <transition-group enter-active-class="zoomInLeft" leave-active-class="zoomOutRight">
                <!-- 用:key来区分组中的各个动画元素 -->
                <p v-show="show" class="animated" :key="1"></p>
                <p v-show="show" class="animated" :key="2"></p>
            </transition-group>
        </div>
    </body>
</html>- 案例二:多重路由
<!DOCTYPE html>
<html>
    <head>
        <meta charset="UTF-8">
        <title></title>
        <script type="text/javascript" src="js/vue2.0.js" ></script>
        <script type="text/javascript" src="js/vue-router.js" ></script>
        <style>
            .router-link-active {
                font-size: 20px;
                color: #f60;
            }
        </style>
    </head>
    <body>
        <div id="box">
            <div>
                <router-link to="/home">主页</router-link>
                <router-link to="/user">用户</router-link>
            </div>
            <div>
                <router-view></router-view>
            </div>
        </div>
    </body>
    <script>
        //组件
        var Home = {
            template: '<h3>我是主页</h3>'
        };
        var User = {
            template: `
                <div>
                    <h3></h3>
                    <ul>
                        <li><router-link to="/user/strive/age/10">Strive</router-link></li>
                        <li><router-link to="/user/blue/age/80">Blue</router-link></li>
                        <li><router-link to="/user/eric/age/70">Eric</router-link></li>
                    </ul>
                    <div>
                        <router-view></router-view>
                    </div>
                </div>
            `
        };
        var UserDetail={
            template: '<div>{{$route.params}}</div>'
        };

        //配置路由
        const routes = [
            {path: '/home', component: Home},
            {
                path: '/user',
                component: User,
                children: [
                    {path: ':username/age/:age',component: UserDetail}
                ]
            },
            {path: '*', redirect: '/home'}
        ];
        //生成路由实例
        const router = new VueRouter({
            routes
        });
        new Vue({
            //es6简写,表示router: router
            router,
            el: '#box'
        });
    </script>
</html>


 869
869

 被折叠的 条评论
为什么被折叠?
被折叠的 条评论
为什么被折叠?
 到【灌水乐园】发言


