


掌握如何通过CXF+Spring发布SOAP协议的服务
2.1 服务端开发步骤
创建Web程序
名称为【07.spring_cxf_web】
将cxf的lib放在WEB-INF/lib中
把【springmvc3.1.4与cxf2.7.11整合jar】目的jar都导入
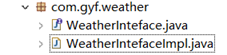
创建SEI接口和实现类
把前面写的copy过来即可
|
|
配置spring配置文件,添加applicationContext.xml (内容)
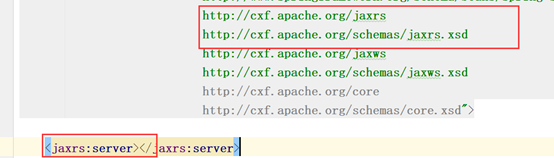
| <?xml version="1.0" encoding="UTF-8"?> <beans xmlns="http://www.springframework.org/schema/beans" xmlns:xsi="http://www.w3.org/2001/XMLSchema-instance" xmlns:jaxws="http://cxf.apache.org/jaxws" xmlns:jaxrs="http://cxf.apache.org/jaxrs" xmlns:cxf="http://cxf.apache.org/core" xsi:schemaLocation="http://www.springframework.org/schema/beans http://www.springframework.org/schema/beans/spring-beans.xsd http://cxf.apache.org/jaxrs http://cxf.apache.org/schemas/jaxrs.xsd http://cxf.apache.org/jaxws http://cxf.apache.org/schemas/jaxws.xsd http://cxf.apache.org/core http://cxf.apache.org/schemas/core.xsd">
</beans> |
在applicationContext.xml配置webservice服务内容
| <!--1.配置个服务接口实现类 --> <bean id="weatherInterfaceImpl" class="com.gyf.weather.WeatherInterfaceImpl"></bean>
<!--2.配置cxf服务工厂bean --> <jaxws:server address="/weather" serviceClass="com.gyf.weather.WeatherInteface"> <jaxws:serviceBean> <ref bean="weatherInterfaceImpl"/> </jaxws:serviceBean> </jaxws:server> |
配置web.xml加载spring,和CXF请求拦截
| <context-param> <!--contextConfigLocation是不能修改的 --> <param-name>contextConfigLocation</param-name> <param-value>classpath:applicationContext.xml</param-value> </context-param> <listener> <listener-class>org.springframework.web.context.ContextLoaderListener</listener-class> </listener>
<!-- 2.配置CXF --> <servlet> <servlet-name>CXF</servlet-name> <servlet-class>org.apache.cxf.transport.servlet.CXFServlet</servlet-class> </servlet> <servlet-mapping> <servlet-name>CXF</servlet-name> <url-pattern>/ws/*</url-pattern> </servlet-mapping> |
布置到tomcat中,启动tomcat
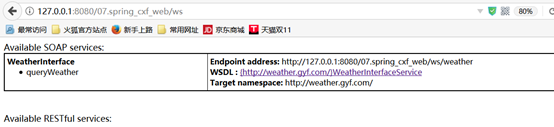
在浏览器访问
http://127.0.0.1:8080/09.cxf_spring_web/ws/weather?wsdl
|
|

2.2 配置日志拦截器
步骤
在applicationContext.xml配置拦截器
http://localhost:8080/项目名称/ws可以看到所有服务列表
| <!--1.配置个服务接口实现类 --> <bean id="weatherInterfaceImpl" class="com.gyf.weather.WeatherInterfaceImpl"></bean>
<!--2.配置cxf服务工厂bean --> <jaxws:server address="/weather" serviceClass="com.gyf.weather.WeatherInterface"> <jaxws:serviceBean> <ref bean="weatherInterfaceImpl"/> </jaxws:serviceBean>
<jaxws:inInterceptors> <ref bean="inInterceptor"/> </jaxws:inInterceptors>
<jaxws:outInterceptors> <ref bean="outInterceptor"/> </jaxws:outInterceptors> </jaxws:server>
<!-- 3.配置cxf的日志拦截器 --> <bean name="inInterceptor" class="org.apache.cxf.interceptor.LoggingInInterceptor"/> <bean name="outInterceptor" class="org.apache.cxf.interceptor.LoggingOutInterceptor"/> |
|
|
2.3 Endpoint标签发布服务[喜欢这种,方便]
步骤
- 在服务端项目中添加一个任意服务
|
|

- 在applicationContext.xml配置endpoint
|
|
2.4 客户端开发
步骤
- 创建一个javaweb项目
- 导入cxf的jar包,(内部已经有spring的jar包了)
- 生成客户端面代码
wsdl2java -d . http://127.0.0.1:8080/07.spring_cxf_web/ws/weather?wsdl
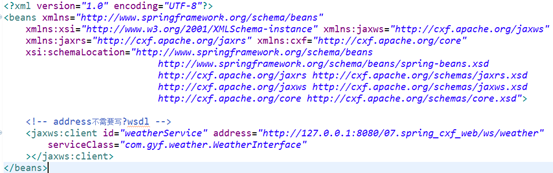
- 配置applicationContext.xml
|
|
- 写一个main方法来调用接口
| public static void main(String[] args) { ApplicationContext context = new ClassPathXmlApplicationContext("classpath:applicationContext.xml"); WeatherInterface weatherService = (WeatherInterface) context.getBean("weatherService");
System.out.println(weatherService.queryWeather("广州")); } |
- JSP-查询天气

- 写Servlet
|
- 用tomcat8来跑服务端,用tomcat7跑客户端面,注意:tomcat8使用8080端面的话,那tomcat7就需要改端口,改端口在server.xml文件中为8888

- 改在IEDA配置tomcat7时的1099端口

- CXF发布REST服务
3.1 REST概述
- REST 是一种软件架构模式,只是一种风格
- rest服务采用HTTP 做传输协议
- REST 对于HTTP 的利用实现精确的资源定位
- rest要求对资源定位更加准确,如下:
- 非rest方式:
http://ip:port/queryUser.action?userType=student&id=001
http://ip:port/queryUser.action?userType=teacher&id=002

-
- Rest方式:
http://ip:port/user/student/query/001
http://ip:port/user/teacher/query/001
- Rest方式表示互联网上的资源更加准确,但是也有缺点,可能目录的层级较多不容易理解
- REST 是一种软件架构理念,现在被移植到Web 服务上,那么在开发Web 服务上,偏于面向资源的服务适用于REST,REST 简单易用,效率高,SOAP 成熟度较高,安全性较好。
- 注意:REST 不等于WebService-soap,JAX-RS 只是将REST 设计风格应用到Web 服务开发上。
3.2案例
- 发布查询学生信息的服务,以json和xml数据格式返回。
功能:
- 通过ID查询一个学生信息服务
- 查询所有学生信息服务
3.3案例步骤
A.创建Java程序【09.cxf_rest_server】
B.导入cxf 的jar包
C.创建学生pojo类,添加注解
|
|

D.创建SEI和SEI实现类,添加注解
Service Endpoint Interface 发布的服务接口在接口名上面声明@WebService和@Path
在接口方法名上面声明@GET/@POST、@Path、@Produces
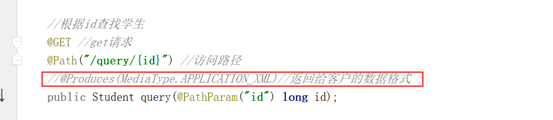
| @WebService @Path("student") public interface StudentInterface {
@GET//指定请求方式 @Produces(MediaType.APPLICATION_XML)//指定返回数据格式是xml还是json @Path("/query/{id}")//指定访问路径,query映射到方法,id映射到参数 public Student query(@PathParam("id")long id);
@GET @Produces(MediaType.APPLICATION_XML) @Path("/queryList/{name}") public List<Student> queryList(@PathParam("name")String name);
} |
|
|

E.程序代码发布
| public class Server {
public static void main(String[] args) { JAXRSServerFactoryBean service = new JAXRSServerFactoryBean(); //设置服务接口 service.setResourceClasses(StudentInterfaceImpl.class); //设置服务实现 service.setServiceBean(new StudentInterfaceImpl()); //设置地址 service.setAddress("http://127.0.0.1:12345/user"); //发布服务 service.create(); } } |
F.测试发布,切换xml,json返回类型
- http://127.0.0.1:12345/user/student/query/23
- http://127.0.0.1:12345/user/student/queryList/zs
- 如果不写@Produces,可以在访问路径后面添加?_type=xml/json来实现数据格式转换
3.4客户端REST的GET请求
客户端写REST的GET请求,只需要使用HttpURLConnection访问资源路径即可
代码如下:
| //创建url URL url = new URL("http://127.0.0.1:12345/user/student/query/23?_type=json");
//打开连接 HttpURLConnection con = (HttpURLConnection) url.openConnection();
//设置请求方式 con.setRequestMethod("GET"); /**默认connection没有读写的权限*/ con.setDoOutput(true);
//获取响应 int code = con.getResponseCode(); if(code == 200){ System.out.println("响应成功"); //读取数据 InputStream is = con.getInputStream(); InputStreamReader isr = new InputStreamReader(is); BufferedReader br = new BufferedReader(isr); String line = null; while((line = br.readLine()) != null){ System.out.println(line); } br.close(); isr.close(); is.close(); }else{ System.out.println("响应失败"); }
|
3.5 CXF+Spring web整合发布REST服务
关键点就是使用jaxrs:server来发布rest服务


 2747
2747


 被折叠的 条评论
为什么被折叠?
被折叠的 条评论
为什么被折叠?
 到【灌水乐园】发言


