


自定义view是Android的一个重要技能,能自己订制出各式各样的图案。其大致步骤就是下图(来自慕课网).
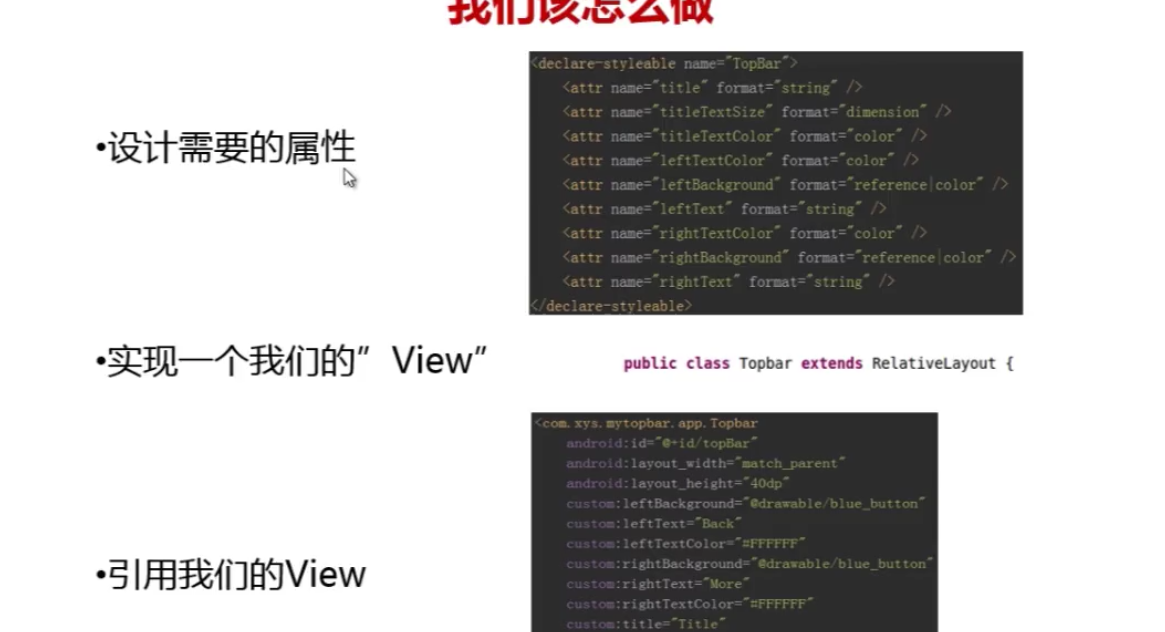
第一步—–设计需要的属性
所谓设计需要的属性就是指在layout文件里一个控件拥有的各种属性,在values文件里新建一个xml文件叫”atts“,加入declare-styleable 标签,name取自己定义的view的名字。完整代码如下
<resources>
    <declare-styleable name="Topbar">
       <attr name="title" format="string" />
        <attr name="titleTextSize" format="dimension" />
        <attr name="titleTextColor" format="color" />
        <attr name="leftTextColor" format="color" />
        <attr name="leftBackground" format="reference|color" />
        <attr name="leftText" format="string" />
        <attr name="rightTextColor" format="color" />
        <attr name="rightBackground" format="reference|color" />
        <attr name="rightText" format="string" />
    </declare-styleable>
</resources>这里的每一个attr 标签就代表着一个属性,name表示属性名,format就表示格式,其中string表示字符串,color就代表颜色代码,dimension代表尺寸。这个代码的意思就是左右两个button,中间一个text。效果就是这样的-
这样第一步就做完了。
第二步—–在代码中实现我们的view
接下来在新建一个java类,名字要与<declare-styleable name="Topbar"> 中的name一致否则要出问题!这个类继承于RelativeLayout。 接下来就要在这个类中添加成员,我想要的是俩个Button和一个Text也就是textview。每个控件都有自己的属性,这里的属性也要写为成员,背景图片就是Drawable类, 颜色就是int,文字就是String。
然后就要写我们的构造方法,首先new一个属性数组TypedArray,这个类调用 context.obtainStyledAttributes方法可以包含我们先前写的xml文件里的所有属性TypedArray ta = context.obtainStyledAttributes(attrs, R.styleable.Topbar); 接下来分别用这个数组里的getColor,getDrawable,getString,getDimension方法对应刚才定义的属性成员。
leftTextColor=ta.getColor(R.styleable.Topbar_leftTextColor,0);
leftBackground=ta.getDrawable(R.styleable.Topbar_leftBackground);
leftText=ta.getString(R.styleable.Topbar_leftText);
参数就写xml文件里的属性,这样一一对应的去写。
写完后,将我们的三个控件实例化,并一一将我们于xml文件绑定好的属性设置好,如:
leftButton.setTextColor(leftTextColor);
leftButton.setText(leftText);
leftButton.setBackground(leftBackground);
接下来就要用到LayoutParams, LayoutParams相当于一个Layout的信息包,它封装了Layout的位置、高、宽等信息。假设在屏幕上一块区域是由一个Layout占领的,如果将一个View添加到一个Layout中,最好告诉Layout用户期望的布局方式,也就是将一个认可的layoutParams传递进去。
        leftParams = new LayoutParams(ViewGroup.LayoutParams.WRAP_CONTENT, ViewGroup.LayoutParams.WRAP_CONTENT);
        leftParams.addRule(RelativeLayout.ALIGN_PARENT_LEFT, TRUE);
        addView(leftButton,leftParams);//将其加入父layout中
第三步—引用xml
接下来就在xml中引用控件了,首先写xmlns,xmlns:custom="http://schemas.android.com/apk/res-auto" 这就指向了我们的所有自定义view属性,其中custom可以自定义名称,res-auto在eclipse下要写完整的包名,然后我们就可以开始写控件了
<com.example.gyf.topbartest.Topbar
       android:layout_width="match_parent"
       android:layout_height="40dp"
      android:id="@+id/Topbar"
       custom:leftBackground="@drawable/blue"
       custom:leftText="back"
       custom:leftTextColor="#FFFFFF"
       custom:rightBackground="@drawable/blue"
       custom:rightText="more"
       custom:rightTextColor="#FFFFFF"
       custom:title="auto"
       custom:titleTextColor="#FFFFFF"
       custom:titleTextSize="10sp"
       ></com.example.gyf.topbartest.Topbar>
最后—在Activity中调用
在Activity中调用还是findviewby,我们还可以自定义按钮监听动作。完整代码如下:
public class Topbar extends RelativeLayout
{
    private Button leftButton, rightButton;
    private TextView textView;

    private int leftTextColor;
    private Drawable leftBackground;
    private String leftText;

    private int rightTextColor;
    private Drawable rightBackground;
    private String rightText;

    private float titleTextSize;
    private int titleTextColor;
    private String titleText;

    private LayoutParams leftParams;
    private LayoutParams rightParams;
    private LayoutParams titleParams;

    public interface topbarClickListener{
        public void leftClick();

        public void rightClick();
    }

    private topbarClickListener listener;
    public void setonTopbarClickListener(topbarClickListener listener)
    {
        this.listener = listener;

    }
    public Topbar(final Context context, AttributeSet attrs)
    {
        super(context, attrs);
        TypedArray ta = context.obtainStyledAttributes(attrs, R.styleable.Topbar);
        leftTextColor=ta.getColor(R.styleable.Topbar_leftTextColor,0);
        leftBackground = ta.getDrawable(R.styleable.Topbar_leftBackground);
        leftText = ta.getString(R.styleable.Topbar_leftText);

        rightTextColor=ta.getColor(R.styleable.Topbar_rightTextColor,0);
        rightBackground = ta.getDrawable(R.styleable.Topbar_rightBackground);
        rightText = ta.getString(R.styleable.Topbar_rightText);

        titleTextSize=ta.getDimension(R.styleable.Topbar_titleTextSize,0);
        titleTextColor = ta.getColor(R.styleable.Topbar_titleTextColor, 0);
        titleText=ta.getString(R.styleable.Topbar_title );

        ta.recycle();//回收内存

        leftButton = new Button(context);
        rightButton = new Button(context);
        textView = new TextView(context);

        leftButton.setTextColor(leftTextColor);
        leftButton.setText(leftText);
        leftButton.setBackground(leftBackground);

        rightButton.setTextColor(rightTextColor);
        rightButton.setText(rightText);
        rightButton.setBackground(rightBackground);

        textView.setText(titleText);
        textView.setTextColor(titleTextColor);
        textView.setTextSize(titleTextSize);
        textView.setGravity(Gravity.CENTER);

        setBackgroundColor(0xFFF59563);

        leftParams = new LayoutParams(ViewGroup.LayoutParams.WRAP_CONTENT, ViewGroup.LayoutParams.WRAP_CONTENT);
        leftParams.addRule(RelativeLayout.ALIGN_PARENT_LEFT, TRUE);
        addView(leftButton,leftParams);

        rightParams = new LayoutParams(ViewGroup.LayoutParams.WRAP_CONTENT, ViewGroup.LayoutParams.WRAP_CONTENT);
        rightParams.addRule(RelativeLayout.ALIGN_PARENT_RIGHT, TRUE);
        addView(rightButton,rightParams);

        titleParams = new LayoutParams(ViewGroup.LayoutParams.WRAP_CONTENT, ViewGroup.LayoutParams.MATCH_PARENT);
        titleParams.addRule(RelativeLayout.CENTER_IN_PARENT, TRUE);
        addView(textView,titleParams);

        leftButton.setOnClickListener(new OnClickListener()
        {
            @Override
            public void onClick(View v)
            {
                listener.leftClick();
            }
        });

        rightButton.setOnClickListener(new OnClickListener()
        {
            @Override
            public void onClick(View v)
            {
                listener.rightClick();
            }
        });
    }

    public void setLeftIsVisible(boolean flag)
    {
        if(flag)
        {
            leftButton.setVisibility(View.VISIBLE);

        }else
        {
            leftButton.setVisibility(View.GONE);
        }
    }
}
<?xml version="1.0" encoding="utf-8"?>
<RelativeLayout
    xmlns:android="http://schemas.android.com/apk/res/android"
    xmlns:custom="http://schemas.android.com/apk/res-auto"
    xmlns:tools="http://schemas.android.com/tools"
    android:layout_width="match_parent"
    android:layout_height="match_parent"
    android:padding="15dp"
    tools:context="com.example.gyf.topbartest.MainActivity">

   <com.example.gyf.topbartest.Topbar
       android:layout_width="match_parent"
       android:layout_height="40dp"
      android:id="@+id/Topbar"
       custom:leftBackground="@drawable/blue"
       custom:leftText="back"
       custom:leftTextColor="#FFFFFF"
       custom:rightBackground="@drawable/blue"
       custom:rightText="more"
       custom:rightTextColor="#FFFFFF"
       custom:title="auto"
       custom:titleTextColor="#FFFFFF"
       custom:titleTextSize="10sp"
       ></com.example.gyf.topbartest.Topbar>
</RelativeLayout>
public class MainActivity extends AppCompatActivity {

    @Override
    protected void onCreate(Bundle savedInstanceState) {
        super.onCreate(savedInstanceState);
        setContentView(R.layout.activity_main);
        Topbar topbar = (Topbar) findViewById(R.id.Topbar);
        topbar.setonTopbarClickListener(new Topbar.topbarClickListener()
        {
            @Override
            public void leftClick()
            {
                Toast.makeText(MainActivity.this, "Left click", Toast.LENGTH_SHORT).show();
            }

            @Override
            public void rightClick()
            {
                Toast.makeText(MainActivity.this, "right click", Toast.LENGTH_SHORT).show();
            }
        });
        topbar.setLeftIsVisible(false);
    }
}


 6000
6000

 被折叠的 条评论
为什么被折叠?
被折叠的 条评论
为什么被折叠?
 到【灌水乐园】发言


