


创建复合控件是自定义View的一项基本技能,这里要介绍的不是简单的将控件在xml文件中拖到一起,而是可以自定义属性的。这里就以自定义的一个TopBar来当作例子,这个topbar有左右两个按钮,以及中间有个标题。
创建自定义属性
既然说到了自定义属性,那么我们就要自己写一个文件来描述我们需要自定义的属性。在Values文件夹下创建attrs.xml文件,我们就将属性写在里面。
<resources>
    <declare-styleable name="TopBar">
        <attr name="Title" format="string"></attr>
        <attr name="titleTextSize" format="dimension"></attr>
        <attr name="titleTextColor" format="color"></attr>
        <attr name="leftText" format="string"></attr>
        <attr name="leftTextBackground" format="reference|color"></attr>
        <attr name="leftTextColor" format="color"></attr>
        <attr name="rightText" format="string"></attr>
        <attr name="rightTextTextBackground" format="reference|color"></attr>
        <attr name="rightTextTextColor" format="color"></attr>
        ></declare-styleable>
</resources>其中有几项注意事项,首先declare-styleable name="TopBar" 中的name必须要跟你后来取的类名相同,后面的attr中的name救是属性名称,format就是属性格式,是color,dimension还是string都在这里申明,若要同时兼容两种属性格式,就用| 将其隔开。
创建自己的类
接下来就要创建自己的类了,我们取名叫TopBar并且继承自RelativeLayout,当我们在写构造方法的时候一定要注意要写public TopBar(Context context, AttributeSet attrs) 因为我们的属性都包含在 AttributeSet中了。
接下来我们创建TypedArray数组将attrs吸收转化为我们好操作的数组。TypedArray typedArray = context.obtainStyledAttributes(attrs, R.styleable.TopBar); 这个应该很简单。得到了属性数组,那么我们就要将属性一个个的取出来,放入我们自己创建的类的变量中。
        mLeftText = typedArray.getString(R.styleable.TopBar_leftText);

        mLeftTextColor = typedArray.getColor(R.styleable.TopBar_leftTextColor,0);

        mLeftBackGround = typedArray.getDrawable(R.styleable.TopBar_leftTextBackground);

        mRightBackGround = typedArray.getDrawable(R.styleable.TopBar_rightTextTextBackground);

        mRightText = typedArray.getString(R.styleable.TopBar_rightText);

        mRightTextColor = typedArray.getColor(R.styleable.TopBar_rightTextTextColor,0);

        mTitleSize = typedArray.getDimension(R.styleable.TopBar_titleTextSize,10);

        mTitleText = typedArray.getString(R.styleable.TopBar_Title);

        mTitleTextColor = typedArray.getColor(R.styleable.TopBar_titleTextColor,0);

        typedArray.recycle();
要记住的是color属性要int变量来保存而不是Color对象,记得最后要recycler这个数组。
现在我们的TopBar空空如也,里面什么控件都没有,那么现在我们就要addView()几个控件,那就是创建两个Button和一个TextView。然后给这些控件把我们从属性数组里取出来的属性设置进去.
 leftButton.setTextColor(mLeftTextColor);
        leftButton.setText(mLeftText);
        leftButton.setBackground(mLeftBackGround);

        rightButton.setTextColor(mRightTextColor);
        rightButton.setText(mRightText);
        rightButton.setBackground(mRightBackGround);

        titleView.setText(mTitleText);
        titleView.setTextColor(mTitleTextColor);
        titleView.setTextSize(mTitleSize);
titleView.setGravity(Gravity.CENTER);这些都很好理解。那么现在我们又想控件都准备好了,那么我们该如何往Bar中放置呢,很明显,一个在左边,一个在中间,一个在右边。要给控件如何布局,那么就要用到LayoutParams 来帮忙了。
 mLefttParams = new LayoutParams(LayoutParams.WRAP_CONTENT, LayoutParams.MATCH_PARENT);
        mLefttParams.addRule(RelativeLayout.ALIGN_PARENT_LEFT, TRUE);
        addView(leftButton, mLefttParams);

        mRightParams = new LayoutParams(LayoutParams.WRAP_CONTENT, LayoutParams.MATCH_PARENT);
        mRightParams.addRule(RelativeLayout.ALIGN_PARENT_RIGHT, TRUE);
        addView(rightButton, mRightParams);

        mTitleParam = new LayoutParams(LayoutParams.WRAP_CONTENT, LayoutParams.MATCH_PARENT);
        mTitleParam.addRule(RelativeLayout.CENTER_IN_PARENT,TRUE);
        addView(titleView,mTitleParam);
再addRule时就可以按照我们想要的布局来安排了,最后addView,就会按照你想要得布局就行安排了。
那么如果我想给控件增加点击事件怎么办呢?
当然是给控件增加点击事件了,我们自己创建一个监听器接口。
 public interface topBarClickListenner//暴露接口给使用者
    {
        void leftClick();

        void RightClick();
}将这个接口暴露给使用者,当然我们的监听器需要初始化,我们要在类中创建一个监听器变量。private topBarClickListenner clickListenner;
然后在set方法中让使用者初始化它
 public void setOnTopBarClickListenner(topBarClickListenner listenner)//在调用时初始化自定义的监听器
    {
        this.clickListenner = listenner;
    }
接着我们就在构造函数里调用监听器了。
rightButton.setOnClickListener(new OnClickListener()
        {
            @Override
            public void onClick(View v)
            {
                clickListenner.RightClick();
            }
        });

        leftButton.setOnClickListener(new OnClickListener()
        {
            @Override
            public void onClick(View v)
            {
                clickListenner.leftClick();
            }
        });
分别调用我们的左右按钮的方法.
当我们在外部使用这个监听器的时候就是这样的。
topBar.setOnTopBarClickListenner(new TopBar.topBarClickListenner()
{
@Override
public void leftClick()
{
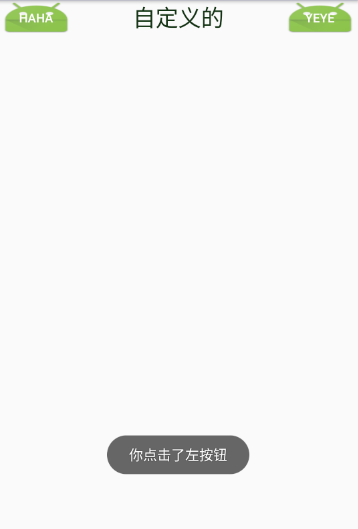
Toast.makeText(MainActivity.this, "你点击了左按钮", Toast.LENGTH_SHORT).show();
}
@Override
public void RightClick()
{
Toast.makeText(MainActivity.this, "你点击了右按钮", Toast.LENGTH_SHORT).show();
}
});布局文件中使用自定义view
 <com.program.gyf.viewtest.TopBar
        android:layout_width="match_parent"
        android:layout_height="40dp"
        android:id="@+id/topBar"
        Hugo:leftText="haha"
        Hugo:leftTextColor="#FFFFFF"
        Hugo:leftTextBackground="@mipmap/ic_launcher"
        Hugo:rightText="yeye"
        Hugo:rightTextTextBackground="@mipmap/ic_launcher"
        Hugo:rightTextTextColor="#FFFFFF"
        Hugo:Title="自定义的"
        Hugo:titleTextColor="#123412"
        Hugo:titleTextSize="10sp">


</com.program.gyf.viewtest.TopBar>就这样使用,要注意的一点是要使用代码中Hugo(可以自定义名称)需要在最外层ViewGroup中声明与默认不同的命名控件。默认的命名控件就是这么申明的xmlns:android="http://schemas.android.com/apk/res/android" 而我们自己的命名空间这么申明
xmlns:Hugo="http://schemas.android.com/apk/res-auto"
注意只有在Android Studio下才能这么申明。


 230
230


 被折叠的 条评论
为什么被折叠?
被折叠的 条评论
为什么被折叠?
 到【灌水乐园】发言


