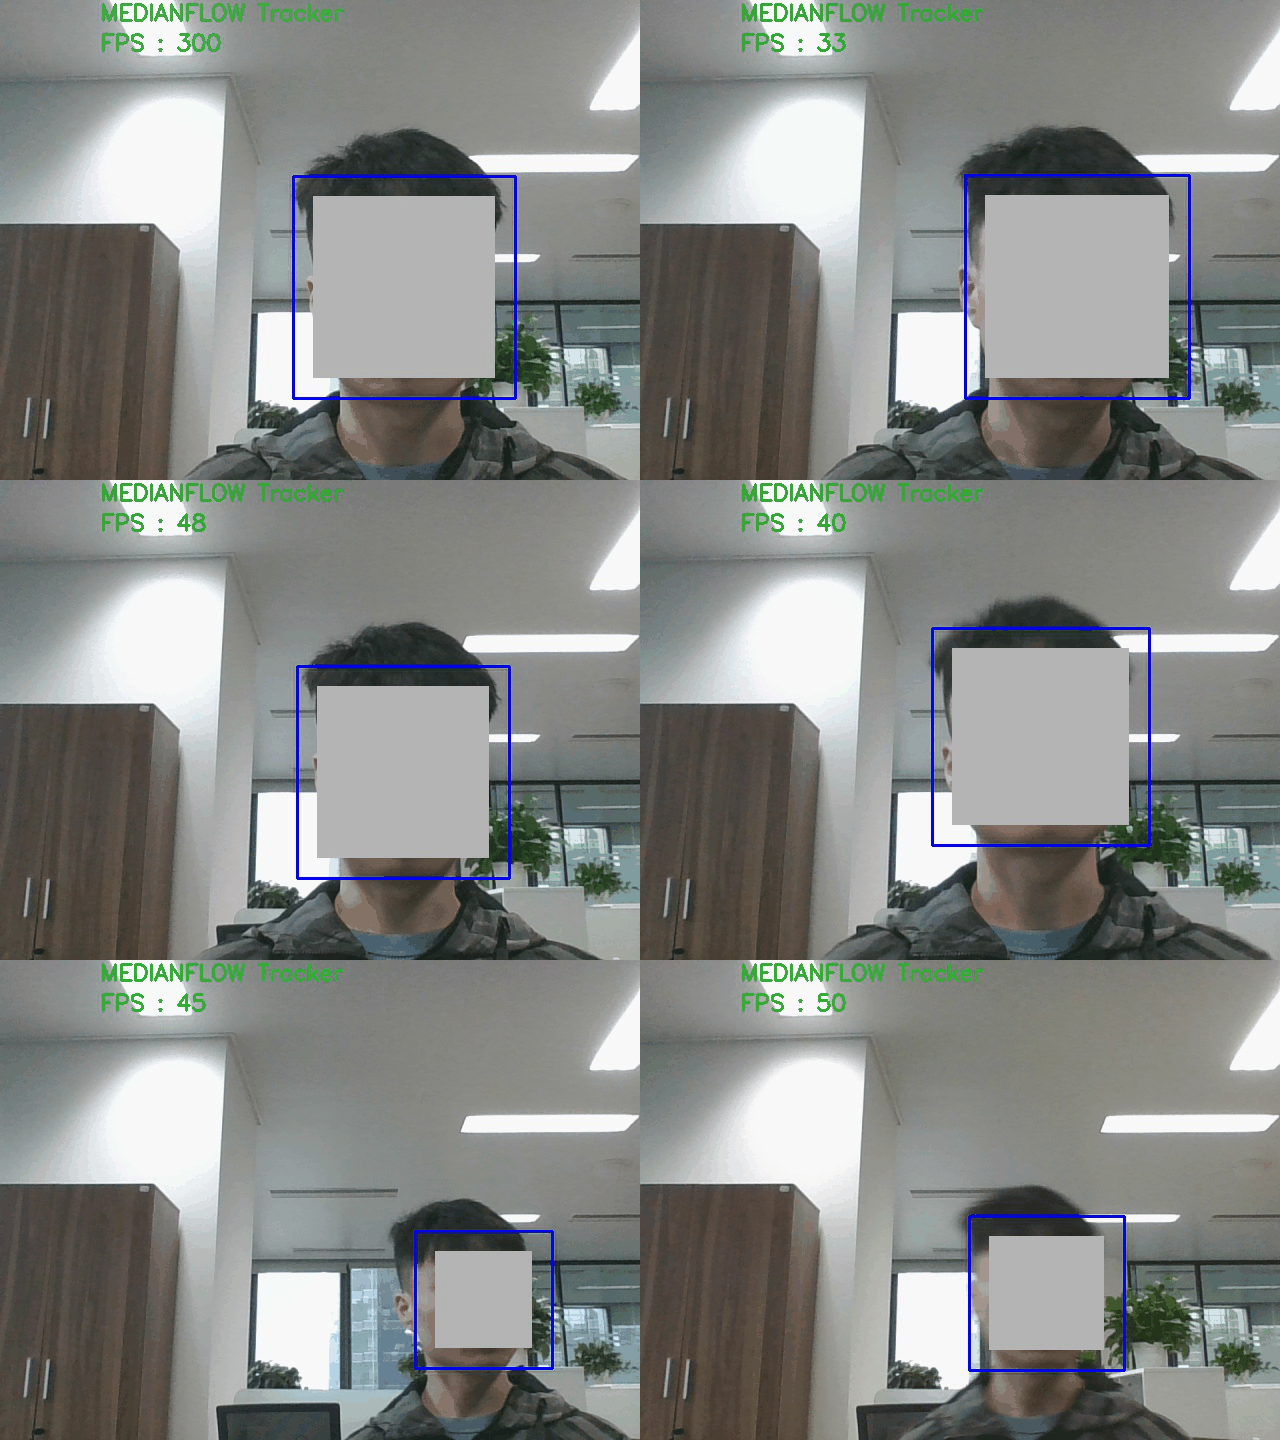
无论是人脸检测类还是自己训练分类器来识别物体,opencv的adboost(linux 下opencv的adboost使用方法)都为我们提供了便捷快速的接口。但对于长时间的检测或每帧都要进行处理来说,opencv还为我们提供了更加快速稳定的跟踪算法。这次记录的是利用opencv的人脸检测与其跟踪算法做对比,在检测目标运动不是很快的情况下,跟踪算法在稳定性和运行速度上都更胜一筹。
下面运用人脸检测第一帧然后之后进行跟踪该帧的检测目标,与每帧都进行检测作为对比,判断因素为帧率和检测框的稳定性。

行人检测函数:
//识别行人,返回rect
int adboost_detect(cv::Mat image)
{
	cv::Mat image_gray;

	if(image.empty()){
		cout <<"open image false"<<endl;
		return 1;
	}
	cv::cvtColor(image,image_gray,CV_BGR2GRAY);
	cv::equalizeHist(image_gray,image_gray);
	ped_cascade.detectMultiScale(image_gray, pedRect, 1.2, 2, 0 |CV_HAAR_SCALE_IMAGE, cv::Size(30, 30));
        for(int i = 0;i < pedRect.size();i++)
	{
/*
		cv::Point p3[pedRect.size()],p4[pedRect.size()];
        	p3[i].x =  cvRound(pedRect[i].x);
	        p3[i].y =  cvRound(pedRect[i].y);
	        p4[i].x =  cvRound((pedRect[i].x +pedRect[i].width));
	        p4[i].y =  cvRound((pedRect[i].y +pedRect[i].height));
	        cv::rectangle(image, p3[i],p4[i],  colors[0]);
*/
		cv::rectangle(image,pedRect[i] ,  colors[0],2);
	}
	cv::imshow("result",image);
	return 0;
}
上图为自己训练出的行人检测,文末有代码下载链接(想赚点积分…)包含adboost训练脚本、训练好的分类器及测试代码。

上图用的MEDIANFLOW跟踪算法。跟踪算法的学习参考这里。
完整代码(py):
#!/usr/bin/python
# -*- coding: utf-8 -*-
'''
使用opencv的tracking算法api进行测试
人脸检测第一帧,接下来进行跟踪;对比效率
单看处理效率不算采集时间,检测60-70,跟踪110-120
'''
import cv2
import sys
import numpy as np
import imageio

def detect_face(img):

	gray = cv2.cvtColor(img, cv2.COLOR_BGR2GRAY)
	faces = faceCascade.detectMultiScale(  # 人脸检测
                    gray,
                    scaleFactor=1.2,
                    minNeighbors=5,
                    minSize=(100, 100),
                )
	return faces

# 50 - 70fps
def detect_test():

	# Read video
	video = cv2.VideoCapture(0)
	# Exit if video not opened.
	if not video.isOpened():
		print("Could not open video")
		sys.exit()

	# Read first frame.
	ok, frame = video.read()
	if not ok:
		print('Cannot read video file')
		sys.exit()

	while True:
		# Start timer
		timer = cv2.getTickCount()

		# Read a new frame
		ok, frame = video.read()
		if not ok:
			break

		#timer = cv2.getTickCount()
	 	gray = cv2.cvtColor(frame, cv2.COLOR_BGR2GRAY)
		faces = faceCascade.detectMultiScale(  # 人脸检测
		            gray,
		            scaleFactor=1.2,
		            minNeighbors=5,
		            minSize=(100, 100),
		        )


			# Calculate Frames per second (FPS)
		fps = cv2.getTickFrequency() / (cv2.getTickCount() - timer);

			# Draw bounding box
		if len(faces):
            # Tracking success
			p1 = (int(faces[0][0]), int(faces[0][1]))
			p2 = (int(faces[0][0] + faces[0][2]), int(faces[0][1] + faces[0][3]))
			cv2.rectangle(frame, p1, p2, (255,0,0), 2, 1)
		else :
		# detect failure
			cv2.putText(frame, "Detect failure detected", (100,80), cv2.FONT_HERSHEY_SIMPLEX, 0.75,(0,0,255),2)

		# Display FPS on frame
		cv2.putText(frame, "FPS : " + str(int(fps)), (100,50), cv2.FONT_HERSHEY_SIMPLEX, 0.75, (50,170,50), 2);


		# Display result
		cv2.imshow("Detect", frame)

        # Exit if ESC pressed
		k = cv2.waitKey(1) & 0xff
		if k == 27 : break


#打码函数
def drawMask(img,x,y,w,h,size=5):

	for xx in range(int(x),int(x+w),size):
		for yy in range(int(y),int(y+h),size):
			X = xx/size*size
			Y = yy/size*size
			for i in range(size):
				for j in range(size):
					img[X+i][Y+j]=img[X][Y]


#110 -130 fps
def tracking_test(Max_frames):
    # Set up tracker.
    # Instead of MIL, you can also use

	tracker_types = ['BOOSTING', 'MIL','KCF', 'TLD', 'MEDIANFLOW', 'MOSSE', 'CSRT']
	tracker_type = tracker_types[4]


	if tracker_type == 'BOOSTING':				#基于adboost 抖动
		tracker = cv2.TrackerBoosting_create()
	if tracker_type == 'MIL':                             #效果差
		tracker = cv2.TrackerMIL_create()
	if tracker_type == 'KCF':				#太慢了
		tracker = cv2.TrackerKCF_create()
	if tracker_type == 'TLD':				#误报率高
		tracker = cv2.TrackerTLD_create()
	if tracker_type == 'MEDIANFLOW':			#效果好!!!
		tracker = cv2.TrackerMedianFlow_create()
	if tracker_type == "CSRT": 				#效果差
		tracker = cv2.TrackerCSRT_create()
	if tracker_type == "MOSSE":				#跟踪效果可以,帧率比MEDIANFLOW低,远距离时会扩大目标框
		tracker = cv2.TrackerMOSSE_create()
	# Read video
	video = cv2.VideoCapture(0)

	    # Exit if video not opened.
	if not video.isOpened():
		print("Could not open video")
		sys.exit()

	# Read first frame.
	ok, frame = video.read()
	if not ok:
		print('Cannot read video file')
		sys.exit()

	while 1:
		ok, frame = video.read()
		if not ok:
			break

		faces = detect_face(frame)
    		if(len(faces)):
			bbox = faces[0]
			p1 = (int(bbox[0]), int(bbox[1]))
			p2 = (int(bbox[0] + bbox[2]), int(bbox[1] + bbox[3]))
			cv2.rectangle(frame, p1, p2, (255,0,0), 2, 1)
			break
    	# Define an initial bounding box
    	#bbox = (287, 23, 86, 320)
	bbox = (faces[0][0],faces[0][1],faces[0][2],faces[0][3])
	print (bbox)

    	# Uncomment the line below to select a different bounding box
	#bbox = cv2.selectROI("roi",frame)
	#print (bbox)
 	#cv2.imshow("bbox",bbox)
    	# Initialize tracker with first frame and bounding box
	#gray = cv2.cvtColor(frame, cv2.COLOR_BGR2GRAY)
	ok = tracker.init(frame, bbox)

	count = 0
	save = 0

	while True:
		# Start timer
		timer = cv2.getTickCount()
		save += 1
		count += 1
		if count > Max_frames:           #每多少帧更新一次目标
			while 1:
				faces = detect_face(frame)
		    		if(len(faces)):
					bbox = faces[0]
					p1 = (int(bbox[0]), int(bbox[1]))
					p2 = (int(bbox[0] + bbox[2]), int(bbox[1] + bbox[3]))
					cv2.rectangle(frame, p1, p2, (255,0,0), 2, 1)
					break
				ok, frame = video.read()

			bbox = (faces[0][0],faces[0][1],faces[0][2],faces[0][3])
			print (bbox)
			#gray = cv2.cvtColor(frame, cv2.COLOR_BGR2GRAY)
			ok = tracker.init(frame, bbox)
			count = 0
			print (cv2.getTickCount() - timer)

		# Read a new frame
		ok, frame = video.read()
		if not ok:
			break

		# Start timer
		#timer = cv2.getTickCount()

		# Update tracker
		#gray = cv2.cvtColor(frame, cv2.COLOR_BGR2GRAY)
		ok, bbox = tracker.update(frame)

			# Calculate Frames per second (FPS)
		fps = cv2.getTickFrequency() / (cv2.getTickCount() - timer);

			# Draw bounding box
		if ok:
            # Tracking success
			p1 = (int(bbox[0]), int(bbox[1]))
			p2 = (int(bbox[0] + bbox[2]), int(bbox[1] + bbox[3]))
			cv2.rectangle(frame, p1, p2, (255,0,0), 2, 1)


		else :
		# Tracking failure
			cv2.putText(frame, "Tracking failure detected", (100,80), cv2.FONT_HERSHEY_SIMPLEX, 0.75,(0,0,255),2)

		# Display tracker type on frame
		cv2.putText(frame, tracker_type + " Tracker", (100,20), cv2.FONT_HERSHEY_SIMPLEX, 0.75, (50,170,50),2);

		# Display FPS on frame
		cv2.putText(frame, "FPS : " + str(int(fps)), (100,50), cv2.FONT_HERSHEY_SIMPLEX, 0.75, (50,170,50), 2);


 		#drawMask(frame,bbox[0]+5,bbox[1]+5,bbox[2]-10,bbox[3]-10)
		# Display result

		show_img = frame.copy()
		show_img[int(bbox[1]+20):int(bbox[1]+bbox[3]-20),int(bbox[0]+20):int(bbox[0]+bbox[2]-20)]  = 180
		cv2.imshow("Tracking", show_img)
		cv2.imwrite("./save/"+str(save)+".jpg", show_img)

        # Exit if ESC pressed
		k = cv2.waitKey(1) & 0xff
		if k == 27 : break


def create_gif(gif_name, path, duration = 0.3):
    frames = []
    image_list = []
    for i in range(1,200,10):
        image_list.append(path+"/%d.jpg" % i)
    for image_name in image_list:
        frames.append(imageio.imread(image_name))
    imageio.mimsave(gif_name, frames, 'GIF', duration=duration)
    return

if __name__ == '__main__' :

	cascadePath = "haarcascade_frontalface_alt.xml"      # 下载人脸检测器
	print('facedetect xml load completed')
	faceCascade = cv2.CascadeClassifier(cascadePath)

	#detect_test()
	#tracking_test(100)
	create_gif("test.gif","./save",0.15)


 763
763


 被折叠的 条评论
为什么被折叠?


