


前言
远古时代,出现过很多黑科技,比如MarsDaemon,使用双进程守护的方式进行保活,在当时可谓风光无限,可惜在8.0时代到来就被废弃了。
又比如后面出现的1像素Activity的保活方式,说他流氓一点不过分,如果每个人都使用这些操作,因为功耗的大大增加,会直接影响到手机使用寿命。 因此各大手机厂商为了解决这一现象的发生,在系统层面对这些流氓行为做出了限制: 后台进程即使你是要黑科技让进程优先级很高,也可能被杀死,所以我宁愿称是应用的求生而不是保活。
这种方式初衷是好的,降低了设备功耗,降低了内存,防止手机发烫等,但是对于一些真正需要做保活操作的应用来说,可谓苦不堪言。
于是乎新型的求生措施又出现了。
如何优雅的进行求生
Android6.0以后系统推出了一个电池优化方案,对一些高耗电的进程会进行策略杀死。
那可能有人要问了,微信和qq这些高耗电应用是怎么做到保存的呢?
看下图
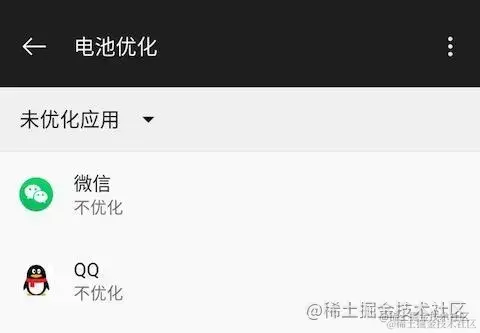
可以看到系统将微信和qq都放到了他们的白名单里面了,这个是怎么做到的呢?
其实, 这个是微信和厂商做了协商,将他们自己的应用设置到了他们的电量优化白名单中。 下次产品再问我为啥他们可以做到的时候,我就把这张图甩给他们。。
那我们可不可以也让厂商给我们加名单呢?呃呃呃。。

好在手机厂商没有把路堵死,给我们留了一条后路
- 1.首先使用下面的代码检测我们进程是否在白名单中:
java
复制代码
@RequiresApi(api = Build.VERSION_CODES.M)
private boolean isIgnoringBatteryOptimizations() {
    boolean isIgnoring = false;
    PowerManager powerManager = (PowerManager) getSystemService(Context.POWER_SERVICE);
    if (powerManager != null) {
        isIgnoring = powerManager.isIgnoringBatteryOptimizations(getPackageName());
    }
    return isIgnoring;
}
- 2.如果没有:调用下面的代码申请加入白名单
java
复制代码
@RequiresApi(api = Build.VERSION_CODES.M)
public void requestIgnoreBatteryOptimizations() {
    try {
        Intent intent = new Intent(Settings.ACTION_REQUEST_IGNORE_BATTERY_OPTIMIZATIONS);
        intent.setData(Uri.parse("package:" + getPackageName()));
        startActivity(intent);
    } catch (Exception e) {
        e.printStackTrace();
    }
}
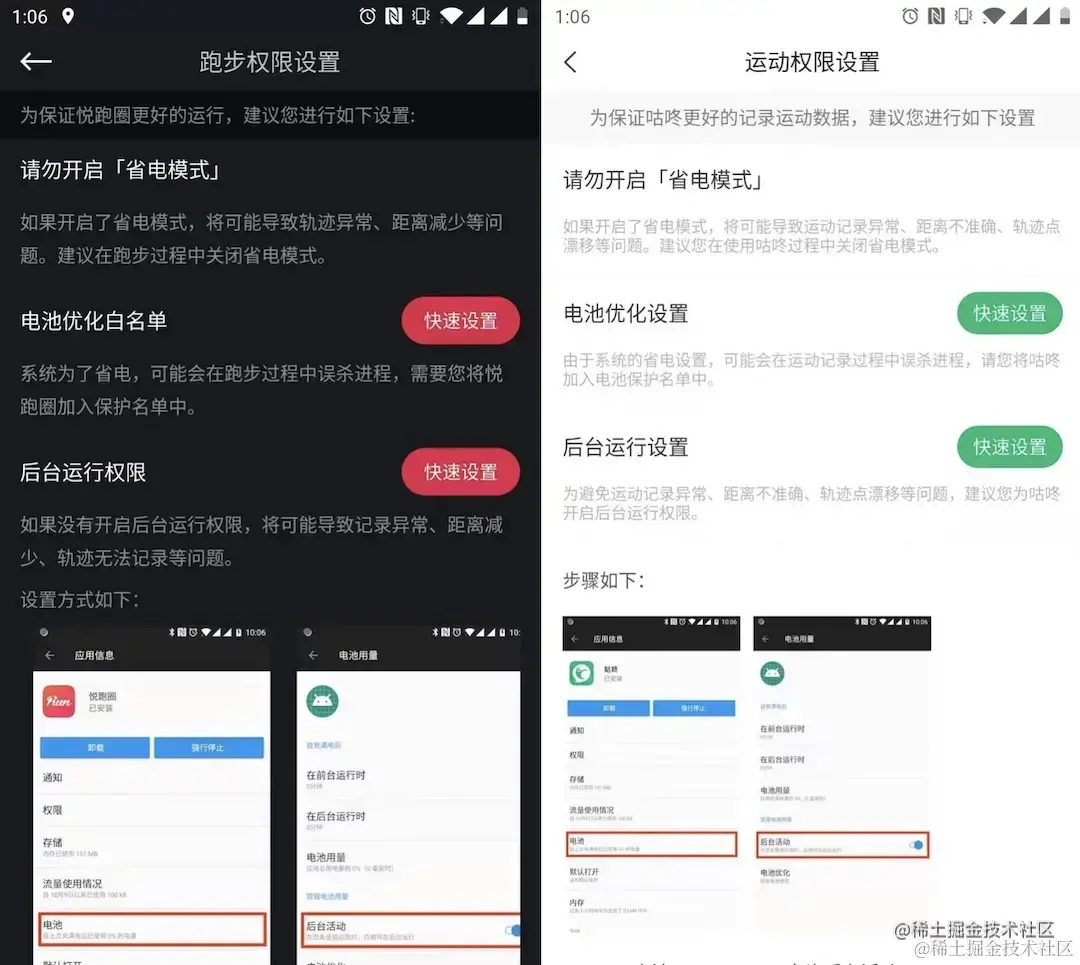
申请时会弹出一个让用户选择的Dialog:

窗口中会提示该操作可能是影响电池的使用,如果需要监听用户的按键,可以使用startActivityResult在onActivityResult中监听
好了,白名单是加好了,那是不是就是万事大吉了呢?
手机厂商:哪有那么容易,就算你加入了电量优化白名单,你要是不按规矩来,在后台运行的进程还是会被我们杀掉?还有啥招式快快使出来吧
 eee。。
eee。。
我们知道进程被杀死,是因为系统的后台管理系统把我们重启的路堵住了,为啥堵我啊?按我说可能系统看你这个进程不顺眼吧,哈哈。。
言归正传:
其实是你不在后台管理的自启动白名单中,自启动白名单就像一张通行证,你的应用需要在系统后台自启动,就要在白名单上,否则哪里来回哪里去吧
那白名单这么好,怎么才能加入TM呢?
要知道市面上手机厂家很多,每个厂家的系统都不一样,一个系统还有很多甚至几十个版本,这让我们怎么加入啊?
而大部分自启动操作可以在厂商的手机管家的设置里面设置:
最理想的做法:我们根据不同手机,甚至是不同的系统版本,给用户呈现一个图文操作步骤,并且提供一个按钮,直接跳转到指定页面进行设置
- 我们先定义下面两个方法:
java
复制代码
/**
 * 跳转到指定应用的首页
 */
private static void showActivity(Context context,@NonNull String packageName) {
	Intent intent = context.getPackageManager().getLaunchIntentForPackage(packageName);
	context.startActivity(intent);
}

/**
 * 跳转到指定应用的指定页面
 */
private void showActivity(Context context,@NonNull String packageName, @NonNull String activityDir) {
	Intent intent = new Intent();
	intent.setComponent(new ComponentName(packageName, activityDir));
	intent.addFlags(Intent.FLAG_ACTIVITY_NEW_TASK);
	context.startActivity(intent);
}
- 手机厂商判断:
java
复制代码
华为:
public boolean isHuawei() {
    if (Build.BRAND == null) {
        return false;
    } else {
        return Build.BRAND.toLowerCase().equals("huawei") || Build.BRAND.toLowerCase().equals("honor");
    }
}
小米
public static boolean isXiaomi() {
    return Build.BRAND != null && Build.BRAND.toLowerCase().equals("xiaomi");
}
OPPO
public static boolean isOPPO() {
    return Build.BRAND != null && Build.BRAND.toLowerCase().equals("oppo");
}

VIVO
public static boolean isVIVO() {
    return Build.BRAND != null && Build.BRAND.toLowerCase().equals("vivo");
}
魅族
public static boolean isMeizu() {
    return Build.BRAND != null && Build.BRAND.toLowerCase().equals("meizu");
}
三星
public static boolean isSamsung() {
    return Build.BRAND != null && Build.BRAND.toLowerCase().equals("samsung");
}
- 手机管家或者自启动界面启动方式:
java
复制代码
华为:
private void goHuaweiSetting() {
    try {
        showActivity("com.huawei.systemmanager",
            "com.huawei.systemmanager.startupmgr.ui.StartupNormalAppListActivity");
    } catch (Exception e) {
        showActivity("com.huawei.systemmanager",
            "com.huawei.systemmanager.optimize.bootstart.BootStartActivity");
    }
}
小米:

private void goXiaomiSetting() {
    showActivity("com.miui.securitycenter",
        "com.miui.permcenter.autostart.AutoStartManagementActivity");
}

OPPO:
private void goOPPOSetting() {
    try {
        showActivity("com.coloros.phonemanager");
    } catch (Exception e1) {
        try {
            showActivity("com.oppo.safe");
        } catch (Exception e2) {
            try {
                showActivity("com.coloros.oppoguardelf");
            } catch (Exception e3) {
                showActivity("com.coloros.safecenter");
            }
        }
    }
}

VIVO
private void goVIVOSetting() {
    showActivity("com.iqoo.secure");
}

魅族:
private void goMeizuSetting() {
    showActivity("com.meizu.safe");
}
三星:
private void goSamsungSetting() {
    try {
        showActivity("com.samsung.android.sm_cn");
    } catch (Exception e) {
        showActivity("com.samsung.android.sm");
    }
}
总结下上面我们所讲:
- 1.为了不被电量优化,我们需要将应用添加进电量优化白名单中
- 2.为了可以在被杀死后,自己可以启动自己,需要将应用自启动开关开启,可以使 用图文引导的方式:
参考下面这张图:
保活增强:
我们都知道保活操作一般是使用一个前台服务来挂起我们的应用: 还有的保活操作是使用一个JobService来对让系统在某个条件符合下回调一个请求操作。
基于以上分析:
- 笔者这边封装了一个保活组件-
lib_pull_alive: 结合了:前台服务+JobService+电量优化白名单+引导用户应用自启动的方式实现了一个求生方案,代码如下:
java
复制代码
keepAliveService.java
package com.anna.lib_keepalive.service;

import android.app.job.JobInfo;
import android.app.job.JobParameters;
import android.app.job.JobScheduler;
import android.app.job.JobService;
import android.content.ComponentName;
import android.content.Context;
import android.content.Intent;
import android.os.Build;
import android.os.Handler;
import android.os.Message;
import android.util.Log;

import androidx.annotation.RequiresApi;

import com.anna.lib_keepalive.forground.ForgroundNF;
import com.anna.lib_keepalive.utils.Utils;

/**
 * 创建一个JobService用于提高应用优先级
 */
@RequiresApi(api = Build.VERSION_CODES.LOLLIPOP)
public class KeepAliveService extends JobService {
    private static final String TAG = KeepAliveService.class.getSimpleName();
    private JobScheduler mJobScheduler;
    private static final int JOB_ID = 1;
    private ComponentName JOB_PG;
    private int NOTIFICATION_ID = 10;
    private ForgroundNF mForgroundNF;


    private Handler mJobHandler = new Handler(new Handler.Callback() {

        @Override
        public boolean handleMessage(Message msg) {
            Log.d(TAG, "pull alive.");
            jobFinished((JobParameters) msg.obj, true);
            return true;
        }
    });
    @Override
    public void onCreate() {
        super.onCreate();
        mJobScheduler = (JobScheduler) getSystemService(Context.JOB_SCHEDULER_SERVICE);
        JOB_PG = new ComponentName(getPackageName(),KeepAliveService.class.getName());
        mForgroundNF = new ForgroundNF(this);
        Utils.requestIgnoreBatteryOptimizations(this);
    }
    @RequiresApi(api = Build.VERSION_CODES.LOLLIPOP)
    public static void start(Context context){
        Intent intent = new Intent(context,KeepAliveService.class);
        context.startService(intent);
    }

    @Override
    public boolean onStartJob(JobParameters params) {
        Log.d(TAG,"onStartJob");
        mJobHandler.sendMessage(Message.obtain(mJobHandler, 1, params));
        return true;
    }

    /**系统回调使用,说明触发了job条件
     * @param params
     * @return
     */
    @Override
    public boolean onStopJob(JobParameters params) {
        Log.d(TAG,"onStopJob");
        mJobHandler.sendEmptyMessage(1);
        return false;
    }

    @Override
    public int onStartCommand(Intent intent, int flags, int startId) {
        JobInfo job = initJob();
        mJobScheduler.schedule(job);
        startNotificationForGround();
        return START_STICKY;
    }

    /**
     * 大于18可以使用一个取消Notification的服务
     */
    private void startNotificationForGround(){
        if(Build.VERSION.SDK_INT<18){
            mForgroundNF.startForegroundNotification();
        }else{
            mForgroundNF.startForegroundNotification();
            Intent it = new Intent(this, CancelNotifyervice.class);
            startService(it);
        }
    }

    /**初始化Job任务
     * @return
     */
    private JobInfo initJob() {
        JobInfo.Builder builder = new JobInfo.Builder(JOB_ID, JOB_PG);
        if(Build.VERSION.SDK_INT>=Build.VERSION_CODES.N){
            builder.setMinimumLatency(JobInfo.DEFAULT_INITIAL_BACKOFF_MILLIS); //执行的最小延迟时间
            builder.setOverrideDeadline(JobInfo.DEFAULT_INITIAL_BACKOFF_MILLIS);  //执行的最长延时时间
            builder.setBackoffCriteria(JobInfo.DEFAULT_INITIAL_BACKOFF_MILLIS,
                    JobInfo.BACKOFF_POLICY_LINEAR);//线性重试方案
        }else {
            builder.setPeriodic(JobInfo.DEFAULT_INITIAL_BACKOFF_MILLIS);
        }
        builder.setPersisted(false);
        builder.setRequiredNetworkType(JobInfo.NETWORK_TYPE_NONE);
        builder.setRequiresCharging(false);
        return builder.build();
    }

    @Override
    public void onDestroy() {
        super.onDestroy();
        mForgroundNF.stopForegroundNotification();
    }

}
java
复制代码
ForgroundNF.java
package com.anna.lib_keepalive.forground;

import android.app.Notification;
import android.app.NotificationChannel;
import android.app.NotificationManager;
import android.app.Service;
import android.content.Context;
import android.os.Build;

import androidx.core.app.NotificationCompat;

import com.anna.lib_keepalive.R;

public class ForgroundNF {
    private static final int START_ID = 101;
    private static final String CHANNEL_ID = "app_foreground_service";
    private static final String CHANNEL_NAME = "前台保活服务";

    private Service service;
    private NotificationManager notificationManager;
    private NotificationCompat.Builder mNotificationCompatBuilder;
    public ForgroundNF(Service service){
        this.service = service;
        initNotificationManager();
        initCompatBuilder();
    }


    /**
     * 初始化NotificationCompat.Builder
     */
    private void initCompatBuilder() {
        mNotificationCompatBuilder = new NotificationCompat.Builder(service,CHANNEL_ID);
        //标题
        mNotificationCompatBuilder.setContentTitle("test keep alive");
        //通知内容
        mNotificationCompatBuilder.setContentText("test alive");
        mNotificationCompatBuilder.setSmallIcon(R.mipmap.ic_launcher_round);
    }

    /**
     * 初始化notificationManager并创建NotificationChannel
     */
    private void initNotificationManager(){
        notificationManager = (NotificationManager) service.getSystemService(Context.NOTIFICATION_SERVICE);
        //针对8.0+系统
        if (Build.VERSION.SDK_INT >= Build.VERSION_CODES.O) {
            NotificationChannel channel  = new NotificationChannel(CHANNEL_ID,CHANNEL_NAME,NotificationManager.IMPORTANCE_LOW);
            channel.setLockscreenVisibility(Notification.VISIBILITY_PUBLIC);
            channel.setShowBadge(false);
            notificationManager.createNotificationChannel(channel);
        }
    }

    public void startForegroundNotification(){
        service.startForeground(START_ID,mNotificationCompatBuilder.build());
    }

    public void stopForegroundNotification(){
        notificationManager.cancelAll();
        service.stopForeground(true);
    }

}
完整代码可以查看github上的Demo: github.com/ByteYuhb/an…
总结:
本文是组件化开发的第四篇,也是第三个功能组件的封装,都已上传到Github,后期会陆续推荐其他组件的封装。


 被折叠的 条评论
为什么被折叠?
被折叠的 条评论
为什么被折叠?
 到【灌水乐园】发言


