


springsecurity在springboot项目中的配置
1 jsp做页面展示
1.1 包
 <!--使用jsp必须打war包,表明这是一个web项目-->
<packaging>war</packaging>

<parent>
    <groupId>org.springframework.boot</groupId>
    <artifactId>spring-boot-starter-parent</artifactId>
    <version>2.1.3.RELEASE</version>
    <relativePath/>
</parent>

<dependencies>
    <dependency>
        <groupId>org.springframework.boot</groupId>
        <artifactId>spring-boot-starter-web</artifactId>
    </dependency>
    <dependency>
        <groupId>org.springframework.boot</groupId>
        <artifactId>spring-boot-starter-security</artifactId>
    </dependency>
    <dependency>
        <groupId>org.springframework.boot</groupId>
        <artifactId>spring-boot-starter-tomcat</artifactId>
    </dependency>
    <dependency>
        <groupId>org.apache.tomcat.embed</groupId>
        <artifactId>tomcat-embed-jasper</artifactId>
    </dependency>

    <!--jsp页面的el标签-->
    <dependency>
        <groupId>org.springframework.security</groupId>
        <artifactId>spring-security-taglibs</artifactId>
        <version>5.1.5.RELEASE</version>
    </dependency>
    <dependency>
        <groupId>jstl</groupId>
        <artifactId>jstl</artifactId>
        <version>1.2</version>
    </dependency>

    <dependency>
        <groupId>mysql</groupId>
        <artifactId>mysql-connector-java</artifactId>
    </dependency>
    <!--通用mapper-->
    <dependency>
        <groupId>tk.mybatis</groupId>
        <artifactId>mapper-spring-boot-starter</artifactId>
        <version>2.0.4</version>
    </dependency>

    <dependency>
        <groupId>org.projectlombok</groupId>
        <artifactId>lombok</artifactId>
    </dependency>
</dependencies>
1.2 application.yml配置文件
配置很简单,不做解释
server:
  port: 8080
spring:
  mvc:
    view:
      prefix: /pages/
      suffix: .jsp

  datasource:
    url: jdbc:mysql:///security_authority?useUnicode=true&characterEncoding=UTF-8&serverTimezone=UTC
    username: root
    password:
    driver-class-name: com.mysql.cj.jdbc.Driver


mybatis:
  type-aliases-package: cn.lx.security.doamin
  configuration:
    #驼峰
    map-underscore-to-camel-case: true

logging:
  level:
    cn.lx.security: debug
1.3 日志的配置文件log4j.properties
这个可以去log4j官网找
# Set root category priority to INFO and its only appender to CONSOLE.
#log4j.rootCategory=INFO, CONSOLE            debug   info   warn error fatal
log4j.rootCategory=debug, CONSOLE, LOGFILE
# Set the enterprise logger category to FATAL and its only appender to CONSOLE.
log4j.logger.org.apache.axis.enterprise=FATAL, CONSOLE
# CONSOLE is set to be a ConsoleAppender using a PatternLayout.
log4j.appender.CONSOLE=org.apache.log4j.ConsoleAppender
log4j.appender.CONSOLE.layout=org.apache.log4j.PatternLayout
log4j.appender.CONSOLE.layout.ConversionPattern=%d{ISO8601} %-6r [%15.15t] %-5p %30.30c %x - %m\n
# LOGFILE is set to be a File appender using a PatternLayout.
log4j.appender.LOGFILE=org.apache.log4j.FileAppender
log4j.appender.LOGFILE.File=../logs/wlanapi/client.log
log4j.appender.LOGFILE.Append=true
log4j.appender.LOGFILE.layout=org.apache.log4j.PatternLayout
log4j.appender.LOGFILE.layout.ConversionPattern=%d{ISO8601} %-6r [%15.15t] %-5p %30.30c %x - %m\n
1.4 在main下面创建一个webapp包
项目会自动将包标点,如此,web项目创建成功
将项目需要的jsp,css等资源复制到webapp下,使用代码生成工具生成三层结构,并实现对用户,角色,权限的增删改查,这个太简单了,而且不是我们的重点,这里我们就默认已经搭建好了。接下来我们就来实现对security的配置。
1.5 security的前置准备
1.5.1 修改SysUser
SysUser直接UserDetails接口,这样我们在loadUserByUsername方法中就不用创建UserDetails实现类User的对象了,而是直接使用SysUser,非常方便,注意,要添加一个额外的属性,就是该用户拥有的权限的list集合
@Data
@Table(name = "sys_user")
public class SysUser implements UserDetails {

    @Id
    @GeneratedValue(strategy= GenerationType.IDENTITY)
    @Column(name = "id")
    private Integer id;

    @Column(name = "username")
    private String username;

    @Column(name = "password")
    private String password;

    @Column(name = "status")
    private Integer status;


    //权限的集合对象
    private List<SysPermission> authorities;


    /**
     * Returns the authorities granted to the user. Cannot return <code>null</code>.
     *
     * @return the authorities, sorted by natural key (never <code>null</code>)
     */
    @JsonIgnore
    @Override
    public Collection<? extends GrantedAuthority> getAuthorities() {
        return authorities;
    }

    /**
     * Indicates whether the user's account has expired. An expired account cannot be
     * authenticated.
     *
     * @return <code>true</code> if the user's account is valid (ie non-expired),
     * <code>false</code> if no longer valid (ie expired)
     */
    @JsonIgnore
    @Override
    public boolean isAccountNonExpired() {
        return true;
    }

    /**
     * Indicates whether the user is locked or unlocked. A locked user cannot be
     * authenticated.
     *
     * @return <code>true</code> if the user is not locked, <code>false</code> otherwise
     */
    @JsonIgnore
    @Override
    public boolean isAccountNonLocked() {
        return true;
    }

    /**
     * Indicates whether the user's credentials (password) has expired. Expired
     * credentials prevent authentication.
     *
     * @return <code>true</code> if the user's credentials are valid (ie non-expired),
     * <code>false</code> if no longer valid (ie expired)
     */
    @JsonIgnore
    @Override
    public boolean isCredentialsNonExpired() {
        return true;
    }

    /**
     * Indicates whether the user is enabled or disabled. A disabled user cannot be
     * authenticated.
     * 4个布尔值必须全为true,用户才算认证通过,这几个上篇文档已经讲过了
     * @return <code>true</code> if the user is enabled, <code>false</code> otherwise
     */
    @JsonIgnore
    @Override
    public boolean isEnabled() {
        return status==1;
    }
}
1.5.2 修改SysPermission
我们让SysPermission实现GrantedAuthority接口,这样在loadUserByUsername方法中就不用了重新封装权限了
@Data
@Table(name = "sys_permission")
public class SysPermission implements GrantedAuthority {

    @Id
    @GeneratedValue(strategy= GenerationType.IDENTITY)
    @Column(name = "ID")
    private Integer id;

    @Column(name = "permission_NAME")
    private String permissionName;

    @Column(name = "permission_url")
    private String permissionUrl;

    @Column(name = "parent_id")
    private String parentId;

    /**
     * If the <code>GrantedAuthority</code> can be represented as a <code>String</code>
     * and that <code>String</code> is sufficient in precision to be relied upon for an
     * access control decision by an {@link AccessDecisionManager} (or delegate), this
     * method should return such a <code>String</code>.
     * <p>
     * If the <code>GrantedAuthority</code> cannot be expressed with sufficient precision
     * as a <code>String</code>, <code>null</code> should be returned. Returning
     * <code>null</code> will require an <code>AccessDecisionManager</code> (or delegate)
     * to specifically support the <code>GrantedAuthority</code> implementation, so
     * returning <code>null</code> should be avoided unless actually required.
     *
     * @return a representation of the granted authority (or <code>null</code> if the
     * granted authority cannot be expressed as a <code>String</code> with sufficient
     * precision).
     * @JsonIgnore 这个注解这个注解的作用是在序列化的时候忽略authority字段
     */
    @JsonIgnore
    @Override
    public String getAuthority() {
        return permissionName;
    }
}
1.5.3 修改IUserService接口
继承UserDetailsService接口,并实现
@Service
public class IUserServiceImpl implements IUserService {

    @Autowired
    private UserMapper userMapper;


    /**
     * Locates the user based on the username. In the actual implementation, the search
     * may possibly be case sensitive, or case insensitive depending on how the
     * implementation instance is configured. In this case, the <code>UserDetails</code>
     * object that comes back may have a username that is of a different case than what
     * was actually requested..
     *
     * @param username the username identifying the user whose data is required.
     * @return a fully populated user record (never <code>null</code>)
     * @throws UsernameNotFoundException if the user could not be found or the user has no
     *                                   GrantedAuthority
     */
    @Override
    public UserDetails loadUserByUsername(String username) throws UsernameNotFoundException {
        //这里是不是很简单
        SysUser sysUser = userMapper.findByUsername(username);
        if (null==sysUser){
            throw new RuntimeException("没有此用户");
        }
        return sysUser;
    }
}
1.5.4 修改UserMapper
//这里不仅仅只是查询出用户信息,还要查询用户拥有的权限
SysUser sysUser = userMapper.findByUsername(username);
所以我们可以直接这样,不理解的自己去查一下资料
@Select("select * from sys_user where username=#{username}")
    @Results({@Result(id = true, property = "id", column = "id"),
            @Result(property = "authorities", column = "id", javaType = List.class,
                    many = @Many(select = "cn.lx.security.dao.RermissionMapper.findByUid"))})
    public SysUser findByUsername(String username);
然后我们在RermissionMapper定义一个方法
//根据用户id查询该用户所拥有的权限
@Select("SELECT * FROM sys_permission WHERE ID IN(" +
            "SELECT PID FROM sys_role_permission WHERE RID IN(" +
            "SELECT RID FROM sys_user_role WHERE uid=#{uid}" +
            "))")
    public List<SysPermission> findByUid(Integer uid);
1.6 配置security
新建一个security的配置类
@Configuration
@EnableWebSecurity
//spring的安全注解,推荐使用
@EnableGlobalMethodSecurity(prePostEnabled = true)
public class SecurityConfig extends WebSecurityConfigurerAdapter {
@Autowired
private IUserService iUserService;
@Autowired
private BCryptPasswordEncoder bCryptPasswordEncoder;
/**
* Used by the default implementation of {@link #authenticationManager()} to attempt
* to obtain an {@link AuthenticationManager}. If overridden, the
* {@link AuthenticationManagerBuilder} should be used to specify the
* {@link AuthenticationManager}.
*
* <p>
* The {@link #authenticationManagerBean()} method can be used to expose the resulting
* {@link AuthenticationManager} as a Bean. The {@link #userDetailsServiceBean()} can
* be used to expose the last populated {@link UserDetailsService} that is created
* with the {@link AuthenticationManagerBuilder} as a Bean. The
* {@link UserDetailsService} will also automatically be populated on
* {@link HttpSecurity#getSharedObject(Class)} for use with other
* {@link SecurityContextConfigurer} (i.e. RememberMeConfigurer )
* </p>
*
* <p>
* For example, the following configuration could be used to register in memory
* authentication that exposes an in memory {@link UserDetailsService}:
* </p>
*
* <pre>
* @Override
* protected void configure(AuthenticationManagerBuilder auth) {
* auth
* // enable in memory based authentication with a user named
* // "user" and "admin"
* .inMemoryAuthentication().withUser("user").password("password").roles("USER").and()
* .withUser("admin").password("password").roles("USER", "ADMIN");
* }
*
* // Expose the UserDetailsService as a Bean
* @Bean
* @Override
* public UserDetailsService userDetailsServiceBean() throws Exception {
* return super.userDetailsServiceBean();
* }
*
* </pre>
*
* @param auth the {@link AuthenticationManagerBuilder} to use
* @throws Exception
*/
@Override
protected void configure(AuthenticationManagerBuilder auth) throws Exception {
//在内存中注册一个账号
//auth.inMemoryAuthentication().withUser("user").password("{noop}123").roles("USER");
//连接数据库,使用数据库中的账号
auth.userDetailsService(iUserService).passwordEncoder(bCryptPasswordEncoder);
}
/**
* Override this method to configure {@link WebSecurity}. For example, if you wish to
* ignore certain requests.
* 这些资源可以直接访问,不需要认证
* @param web
*/
@Override
public void configure(WebSecurity web) throws Exception {
web.ignoring().antMatchers("/css/**",
"/img/**",
"/plugins/**",
"/failer.jsp",
"/login.jsp");
}
/**
* Override this method to configure the {@link HttpSecurity}. Typically subclasses
* should not invoke this method by calling super as it may override their
* configuration. The default configuration is:
*
* <pre>
* http.authorizeRequests().anyRequest().authenticated().and().formLogin().and().httpBasic();
* </pre>
* 读过上一篇文档的应该对这些配置有所了解
* @param http the {@link HttpSecurity} to modify
* @throws Exception if an error occurs
*/
@Override
protected void configure(HttpSecurity http) throws Exception {
http.csrf().disable() //禁用csrf
.authorizeRequests()
//所有请求都需要认证
.anyRequest().authenticated()
.and()
//配置登录相关
.formLogin().loginPage("/login.jsp").loginProcessingUrl("/login").defaultSuccessUrl("/index.jsp").failureForwardUrl("/failer.jsp").permitAll()
.and()
//配置注销相关
.logout().logoutUrl("/logout").logoutSuccessUrl("/login.jsp").invalidateHttpSession(true).permitAll();
}
1.7 方法授权控制
//具体加到那个方法上,我就不具体说了
@PreAuthorize(value = "hasAuthority('权限名')")
jsp上菜单控制上一篇文档已经给大家看过了,这里就不展示了
2 thymeleaf模板做页面展示
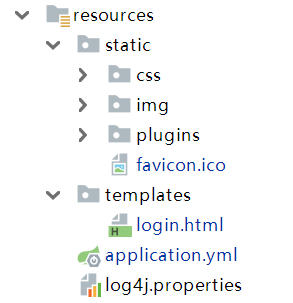
2.1 静态资源
在resources下面新建一个static文件夹,静态资源全部放这里面,具体的见下图
2.2 登录页面
只需要注意两个地方,其他的和jsp差不多
(1)thymeleaf的约束
<!DOCTYPE HTML>
<html xmlns:th="http://www.thymeleaf.org">
(2)静态资源的路径
不需要写static路径,程序会自动识别static下的静态资源
<link rel="stylesheet"
	href="/plugins/bootstrap/css/bootstrap.min.css">
<link rel="stylesheet"
	href="/plugins/font-awesome/css/font-awesome.min.css">
<link rel="stylesheet"
	href="/plugins/ionicons/css/ionicons.min.css">
<link rel="stylesheet"
	href="/plugins/adminLTE/css/AdminLTE.css">
<link rel="stylesheet"
	href="/plugins/iCheck/square/blue.css">
2.3 页面跳转的控制器
必须要写一个控制器,通过controller访问页面,我们可以写一个mvc的配置类
@Configuration
//不要使用这个注解,他会禁用springboot的自动装配,导致很多默认配置失效
//@EnableWebMvc
public class MvcConfig implements WebMvcConfigurer {
    /**
     * Configure simple automated controllers pre-configured with the response
     * status code and/or a view to render the response body. This is useful in
     * cases where there is no need for custom controller logic -- e.g. render a
     * home page, perform simple site URL redirects, return a 404 status with
     * HTML content, a 204 with no content, and more.
     *
     * @param registry
     */
    @Override
    public void addViewControllers(ViewControllerRegistry registry) {
        registry.addViewController("/loginPage").setViewName("login");
    }
}
2.4 security的配置
//这些资源不需要认证即可访问
@Override
public void configure(WebSecurity web) throws Exception {
    web.ignoring().antMatchers("/css/**",
                               "/img/**",
                               "/plugins/**",
                               "favicon.ico",
                               "/loginPage");
}
还要修改登录页面
@Override
protected void configure(HttpSecurity http) throws Exception {
    http.csrf().disable()
        .authorizeRequests()
        //.antMatchers("/css/**", "/img/**", "/plugins/**").permitAll()
        .anyRequest().authenticated()
        .and()
        //.formLogin().loginPage("/login.jsp").loginProcessingUrl("/login").defaultSuccessUrl("/index.jsp").failureForwardUrl("/failer.jsp").permitAll()
        //我们这里是前后端分离,不需要默认跳转页面和登录失败的页面
        .formLogin().loginPage("/loginPage").loginProcessingUrl("/login").permitAll()
        .and()
        .logout().logoutUrl("/logout").logoutSuccessUrl("/loginPage").invalidateHttpSession(true).permitAll();
}


 592
592


 被折叠的 条评论
为什么被折叠?
被折叠的 条评论
为什么被折叠?
 到【灌水乐园】发言


