


文章目录
前言
@和原子哥一起学习Linux
开发环境:I.MX6Ull开发板
参考书籍:
《【正点原子】I.MX6U嵌入式Linux驱动开发指南V1.6.pdf》
《linux设备驱动开发详解-基于最新的linux4.0内核》
个人学习笔记,欢迎讨论
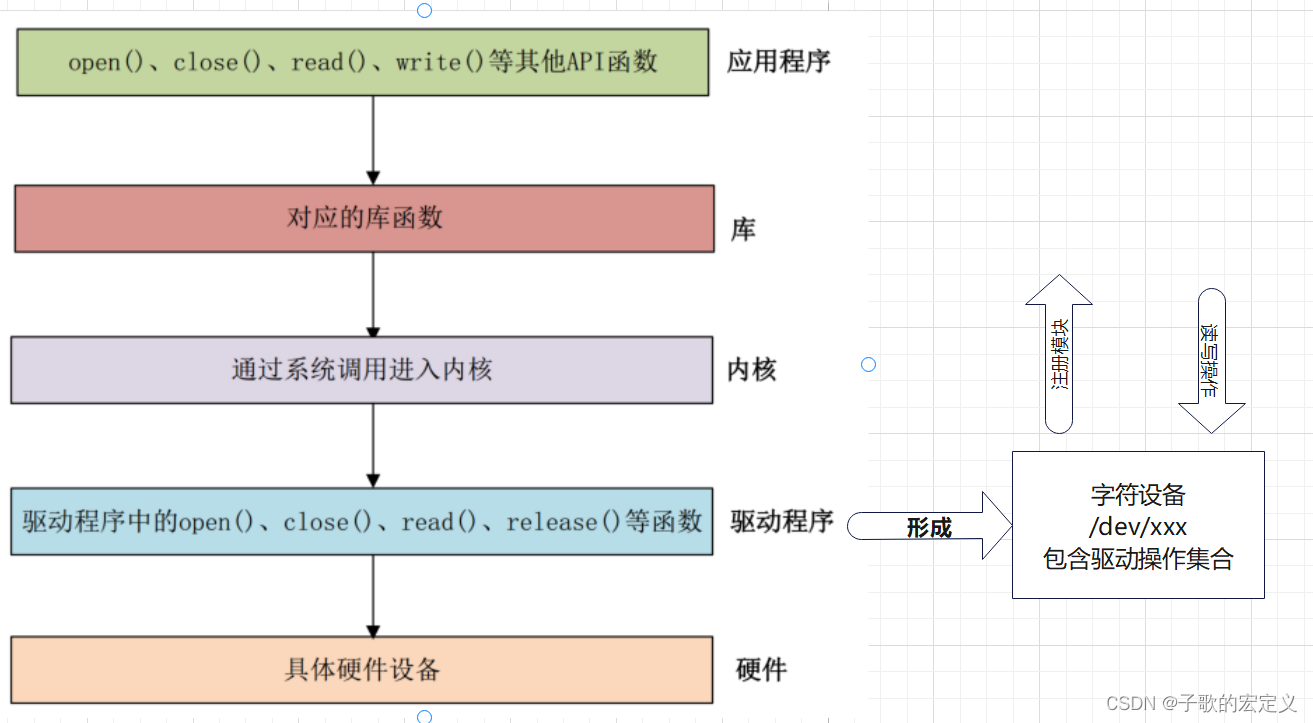
一、字符设备的位置
驱动编译完成后会形成模块,加载模块会形成驱动文件,本质上就是对文件的操作。
1、使用命令“cat /proc/devices”可以看到你注册设备的设备号
2、字符设备就是“dev/xxx”,xxx是注册的字符设备名称
二、驱动的分离
简单来说,就是大家想复用写好的东西
1.一个设备驱动想对应多个不同平台
每个平台对设备的控制器是不一样的,比如I2C控制器,SPI控制器,这些根据不同厂家设计不同而不同,厂家实现了主机端控制器的驱动,也就是可以产生各种波形,那么设备驱动写入设备寄存器的接口难道要按照厂家变化?
此处需要引入中间层,实现对外统一接口api,这样不同的主机就有了相同的神经。厂家可以根据自己的不同方案,去实现自己的控制器驱动,统一注册到api接口,设备驱动只需要调用通用接口,这样就完成了一个设备驱动可以在多个平台上运行的构想。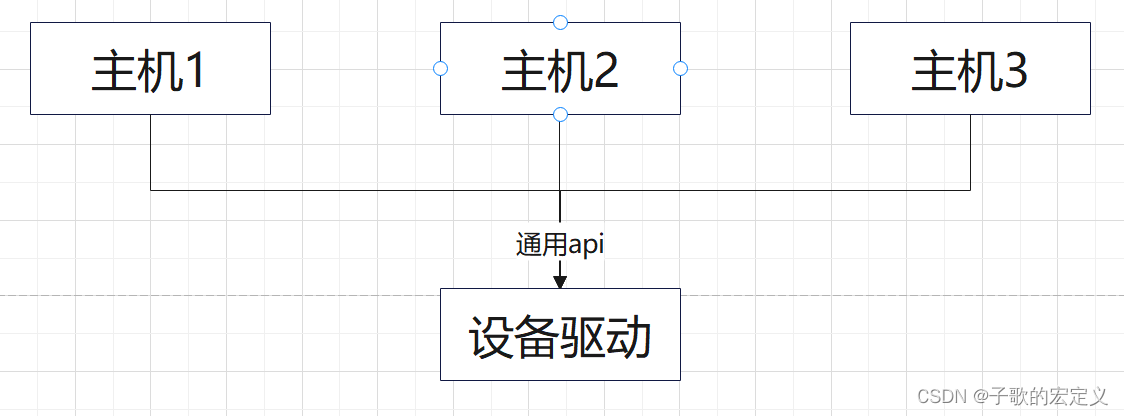
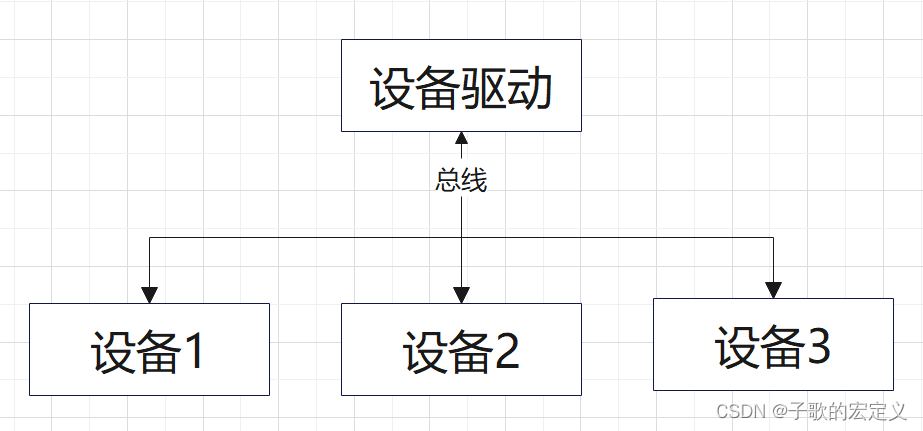
2.一个设备驱动想对应多个同类设备
有了一个设备驱动后,当然想的是无论多少这样的设备都可以使用这个设备驱动了,但是不同设备设备信息不同,比如地址之类的,此时必须要把设备信息从设备驱动中剥离出去,设备驱动使用标准的方法获取设备信息即可。
此处引入总线,当我们向系统注册一个驱动的时候,总线就会在设备中查找,看看有没有与之匹配的设备,如果有的话就将两者联系起来。同样的,当向系统中注册一个设备的时候,总线就会在驱动中查找看有没有与之匹配的设备,有的话也联系起来。 这样就实现了一个驱动多个设备都可以用的设想。
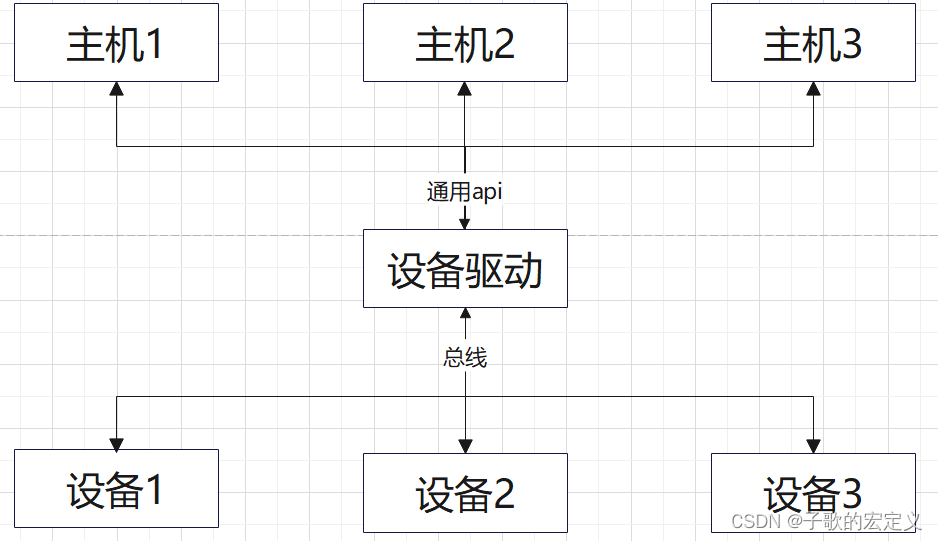
3.设备驱动完成了他的终极进化
Linux 的总线(bus)、驱动(driver)和设备(device)模型,也就是常说的驱动分离,总线负责连接设备和驱动
二、驱动的分层
简单来说,就是大家想只做自己的活,不一定是分几层,就是为了在不同的层处理不同的内容。
>最主要的核心层有三个功能
1、对上提供接口,类似2.1中的对外统一接口API
2、中间层通用逻辑,避免底层重复实现
3、底层驱动只负责硬件相关的访问
这就是面向对象的设计!
三、总线驱动
Linux 的总线(bus)、驱动(driver)和设备(device)模型的总线,比如 I2C、 SPI、 USB 等总线是实体的。但是有些外设是没有总线这个概念的,为了解决此问题, Linux 提出了 platform 这个虚拟总线,相应的就有 platform_driver 和 platform_device。
1.platform 总线
Linux系统内核使用 bus_type结构体表示总线,platform 总线是 bus_type 的一个具体实例:
struct bus_type platform_bus_type = {
	.name = "platform",
	.dev_groups = platform_dev_groups,
	.match = platform_match,
	.uevent = platform_uevent,
	.pm = &platform_dev_pm_ops,
};
platform_bus_type 就是 platform 平台总线,其中 platform_match 就是匹配函数,采用3种匹配方法,1)设备树 2)ACPI 3)id_table 匹配
2.platform 驱动
* 字符设备驱动操作集
*/
static struct file_operations xxx_fops = {
	.owner = THIS_MODULE,
	.open = xxx_open,
	.write = xxx_write,
};

 /*
 * platform 驱动的 probe 函数
 * 驱动与设备匹配成功以后此函数就会执行
 */
 static int xxx_probe(struct platform_device *dev)
 {
	 ......
	 cdev_init(&xxxdev.cdev, &xxx_fops); /* 注册字符设备驱动 */
	 /* 函数具体内容 */
	 return 0;
 }

 static int xxx_remove(struct platform_device *dev)
 {
	 ......
	 cdev_del(&xxxdev.cdev);/* 删除 cdev */
	 /* 函数具体内容 */
	 return 0;
 }

 /* 匹配列表 */
 static const struct of_device_id xxx_of_match[] = {
	 { .compatible = "xxx-gpio" },
	 { /* Sentinel */ }
 };

 /*
 * platform 平台驱动结构体
 */
 static struct platform_driver xxx_driver = {
	 .driver = {
	 .name = "xxx",
	 .of_match_table = xxx_of_match,
	 },
	 .probe = xxx_probe,
	 .remove = xxx_remove,
 };

 /* 驱动模块加载 */
 static int __init xxxdriver_init(void)
 {
	return platform_driver_register(&xxx_driver);
 }

 /* 驱动模块卸载 */
 static void __exit xxxdriver_exit(void)
 {
	platform_driver_unregister(&xxx_driver);
 }

 module_init(xxxdriver_init);
 module_exit(xxxdriver_exit);
3.platform 设备
1、 platform 设备框架
/* 资源 */
static struct resource xxx_resources[] = {
	[0] = {
		.start = xx,
		.end = xxx,
		.flags = xxxx,
	 },
};

/* platform 设备结构体 */
static struct platform_device xxxdevice = {
	.name = "xxx-",
	.id = -1,
	.num_resources = ARRAY_SIZE(xxx_resources),
	.resource = xxx_resources,
};

 /* 设备模块加载 */
 static int __init xxxdevice_init(void)
 {
	return platform_device_register(&xxxdevice);
 }

 /* 设备模块注销 */
 static void __exit xxx_resourcesdevice_exit(void)
 {
	platform_device_unregister(&xxxdevice);
 }

 module_init(xxxdevice_init);
 module_exit(xxxdevice_exit);
2、 设备树
	gpioled {
		#address-cells = <1>;
		#size-cells = <1>;
		compatible = "atkalpha-gpioled";
		pinctrl-names = "default";
		pinctrl-0 = <&pinctrl_led>;
		led-gpio = <&gpio1 3 GPIO_ACTIVE_LOW>;
		status = "okay";
	};
总结
上述就是字符设备学习的笔记,后面I2C和SPI都是按照设备总线驱动来的,大部分是调用接口,总线驱动基本由厂家完成,设备驱动需要对不同的设备进行适配,设备树都是按照官方给到的原版进行修改适配,目前学完只是会改,不禁感叹前辈们的对此的贡献,才有如此简单的使用方式。


 3650
3650


 被折叠的 条评论
为什么被折叠?
被折叠的 条评论
为什么被折叠?
 到【灌水乐园】发言


