


初学 tensorflow ,想把训练结果用到 c/c++ 程序中,所以先用 numpy 实现一个 cnn 分类器,简单了解它的结构。
这里用到 tensorflow 训练 cnn 的代码,是基于这篇 tensorflow 官方的MNIST进阶文章改的,在测试集可以达到99%的正确率。
一、训练神经网络并保存结果
1.训练神经网络并保存结果(tf_cnn.py)
这部分官方教程MNIST进阶介绍得很详细,这里只贴上代码。
pickle 是用来保存训练结果的。tensorflow本身能把结果保存为 ckpt 文件,但是读取时也只能用 tf ,所以我用了 pickle 保存和读取数据。
cnn结构
import tensorflow as tf
import pickle

isTrain = True

def compute_accuracy(v_xs, v_ys):
    global prediction
    y_pre = sess.run(prediction, feed_dict={xs: v_xs, keep_prob: 1})
    correct_prediction = tf.equal(tf.argmax(y_pre,1), tf.argmax(v_ys,1))
    accuracy = tf.reduce_mean(tf.cast(correct_prediction, tf.float32))
    result = sess.run(accuracy, feed_dict={xs: v_xs, ys: v_ys, keep_prob: 1})
    return result

def weight_var(shape):
	initial = tf.truncated_normal(shape, stddev = 0.1)
	return tf.Variable(initial)

def bias_var(shape):
	initial = tf.constant(0.1, shape = shape)
	return tf.Variable(initial)

def conv2d(x, W):
	return tf.nn.conv2d(x, W, strides = [1, 1, 1, 1], padding = 'SAME')

def max_pool_2x2(x):
	return tf.nn.max_pool(x, ksize = [1, 2, 2, 1],
					   strides = [1, 2, 2, 1], padding = 'SAME')

xs = tf.placeholder(tf.float32, [None, 784])/255.
ys = tf.placeholder(tf.float32, [None, 10])
keep_prob = tf.placeholder(tf.float32)
x_image = tf.reshape(xs, [-1, 28, 28, 1])

w_conv1 = weight_var([5, 5, 1, 32])
b_conv1 = bias_var([32])
h_conv1 = tf.nn.relu(conv2d(x_image, w_conv1) + b_conv1)
h_pool1 = max_pool_2x2(h_conv1)

w_conv2 = weight_var([5, 5, 32, 64])
b_conv2 = bias_var([64])
h_conv2 = tf.nn.relu(conv2d(h_pool1, w_conv2) + b_conv2)
h_pool2 = max_pool_2x2(h_conv2)

w_fc1 = weight_var([7*7*64, 512])
b_fc1 = bias_var([512])
h_pool2_flat = tf.reshape(h_pool2, [-1, 7*7*64])
h_fc1 = tf.nn.relu(tf.matmul(h_pool2_flat, w_fc1) +b_fc1)
h_fc1_drop = tf.nn.dropout(h_fc1, keep_prob)

w_fc2 = weight_var([512,10])
b_fc2 = bias_var([10])
prediction = tf.nn.softmax(tf.matmul(h_fc1_drop, w_fc2) + b_fc2)

cross_entropy = tf.reduce_mean(-tf.reduce_sum(ys * tf.log(prediction), reduction_indices = [1]))
train_step = tf.train.AdamOptimizer(1e-4).minimize(cross_entropy)
训练和保存
一开始设了一个标志位 isTrain ,第一次运行先设为 True 训练神经网络。完成后设为 False 再运行一遍程序,就把结果导出为 pickle 格式的了。
isTrain 为 True 时:训练20000轮,每50轮用mnist的测试集计算一次准确率,和准确率最大值 acc_max 比较。如果比最大值大,就导出参数、更新最大值 acc_max 。实际运行过程中发现保存参数的操作很慢,训练初期几乎每次都要保存,很浪费时间。所以 acc_max 的初值设为0.99,防止频繁保存。
isTrain 为 False 时:先导入参数,再用 sess.run() 获取每层网络的参数,格式是 np.array。最后用 pickle 保存。
with tf.Session() as sess:
	saver =tf.train.Saver()
	init = tf.global_variables_initializer()
	acc_max = 0.99
	sess.run(init)
	if isTrain:
		from tensorflow.examples.tutorials.mnist import input_data
		mnist = input_data.read_data_sets('MNIST_data', one_hot=True)
		for i in range(20000):
			batch_xs, batch_ys = mnist.train.next_batch(50)
			sess.run(train_step, feed_dict = {xs:batch_xs, ys:batch_ys, keep_prob: 0.5})
			if i % 50 == 0:
				acc = compute_accuracy(mnist.test.images[:1000], mnist.test.labels[:1000])
				print(acc)
				if acc > acc_max:
					acc_max = acc
					saver.save(sess, 'ckpt/mnist.ckpt')
	else:
		ckpt = tf.train.latest_checkpoint('ckpt/')
		saver.restore(sess, ckpt)

		wcv1 = sess.run(w_conv1)
		bcv1 = sess.run(b_conv1)
		wcv2 = sess.run(w_conv2)
		bcv2 = sess.run(b_conv2)
		wfc1 = sess.run(w_fc1)
		bfc1 = sess.run(b_fc1)
		wfc2 = sess.run(w_fc2)
		bfc2 = sess.run(b_fc2)

		cnn = [wcv1,bcv1,wcv2,bcv2,wfc1,bfc1,wfc2,bfc2]

		with open('cnn.pickle','bw') as file:
			pickle.dump(cnn, file)
二、用numpy搭建cnn(np_cnn.py)
1.导入库
cv2 是 opencv 的 python 版,这里用来简单地处理要识别的数字图片。
由于numpy没有提供二维卷积的函数,所以要用到 scipy.signal 中的函数 convolve2d。
import cv2
import numpy as np
import pickle
from scipy import signal
2.搭建 cnn 的函数
根据 cnn 结构,归一化输入的图片:
输入一张白底黑字的黑白图片,先用从 cv2.resize() 把图片尺寸转换成28*28,再改成黑底白字。cnn 要求输入的是28*28*1的数组,所以用 np.reshape() 再做一次转换。这时每个像素的范围是0-255,还要除以255,使范围变成 0-1 。
def img2arr(img):
	img_s = 255-cv2.resize(img, (28, 28), interpolation = cv2.INTER_CUBIC)
	return np.reshape(img_s,(28,28,1))/255
导入 cnn 参数:
def load_pickle(f_name):
	with open(f_name,'rb') as file:
		d = pickle.load(file)
	return d
卷积层:
二维卷积用了 scipy 的 signal.convolved2d()。要注意的是,它会把输入的卷积核调转180度再卷积。所以为了获得正确的结果,输入的卷积核要事先翻转,即 kernel[::-1,::-1,j,i] 而不是 kernel[:,:,j,i]。(调试的时候在这里卡了很久)
def conv2d(src, kernel):
	src_x,src_y,src_h = src.shape
	kernel_x,kernel_y,input,output = kernel.shape
	out_dst = np.zeros((src_x,src_y,output),np.float32)
	for i in range(output):
		for j in range(input):
			out_dst[:,:,i] += signal.convolve2d(src[:,:,j],kernel[::-1,::-1,j,i],'same')
	return out_dst
池化层:
def max_pool(src, strides):
	src_x,src_y,src_h = src.shape
	m,n = strides
	dst_x = int(src_x/m)
	dst_y = int(src_y/n)
	dst = np.zeros((dst_x,dst_y,src_h),np.float64)
	for i in range(src_h):
		dst[:,:,i] = np.nanmax(src[:,:,i].reshape(dst_x,m,dst_y,n),axis=(1,3))
	return dst
激活函数:
def relu(src):
	return np.maximum(src,0)
def softmax(x):
exp_x = np.exp(x)
softmax_x = exp_x / np.sum(exp_x)
return softmax_x进行预测
做好上面的准备工作后,正式构造 cnn 进行预测
按 tf_cnn.py 保存参数的格式导入数据:
wcv1,bcv1,wcv2,bcv2,wfc1,bfc1,wfc2,bfc2 = load_pickle('cnn.pickle')
归一化图片:
img = img2arr(bin_img)
构建 cnn :卷积 -> 正则化 -> 池化 -> 卷积 -> 正则化 -> 池化 -> 全连接层 -> 正则化 -> 输出层 -> softmax -> 结果
	np_hcv1 = max_pool(relu(conv2d(img, wcv1)+bcv1),(2,2))
	np_hcv2 = max_pool(relu(conv2d(np_hcv1,wcv2)+bcv2),(2,2))
	h_flat = np.reshape(np_hcv2,(7*7*64))
	np_hfc1 = relu(np.dot(h_flat,wfc1)+bfc1)
prediction = softmax(np.dot(np_hfc1, wfc2)+bfc2)def prediction(bin_img):
wcv1,bcv1,wcv2,bcv2,wfc1,bfc1,wfc2,bfc2 = load_pickle('cnn.pickle')
img = img2arr(bin_img)
np_hcv1 = max_pool(relu(conv2d(img, wcv1)+bcv1),(2,2))
np_hcv2 = max_pool(relu(conv2d(np_hcv1,wcv2)+bcv2),(2,2))
h_flat = np.reshape(np_hcv2,(7*7*64))
np_hfc1 = relu(np.dot(h_flat,wfc1)+bfc1)
prediction = softmax(np.dot(np_hfc1, wfc2)+bfc2)
return prediction测试
img = cv2.imread('test0.jpg',cv2.IMREAD_GRAYSCALE)
print('图中的数字为:',prediction(img).argmax())
cv2.imshow('cnn_test',img)
cv2.waitKey()
cv2.destroyAllWindows()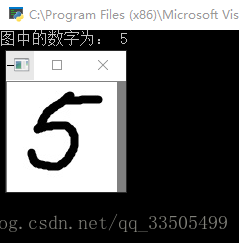
用到的代码、nmist数据集、导出的神经网络参数下载:https://download.csdn.net/download/qq_33505499/10324226


 1449
1449

 被折叠的 条评论
为什么被折叠?
被折叠的 条评论
为什么被折叠?
 到【灌水乐园】发言


