


 超级会员免费看
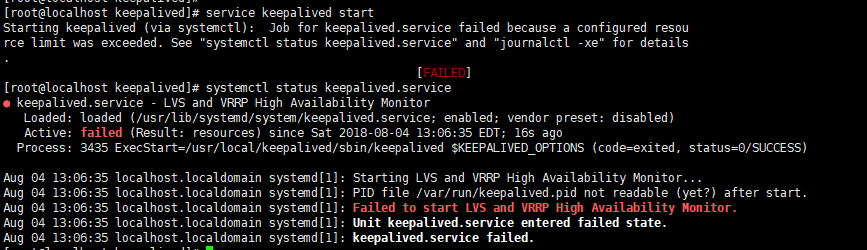
● keepalived.service - LVS and VRRP High Availability Monitor
Loaded: loaded (/usr/lib/systemd/system/keepalived.service; enabled; vendor preset: disabled)
Active: failed (Result: resources) since Sat 2018-08-04 13:06:35 EDT; 16s ago
Process: 3435 ExecStart=/usr/local/keepalived/sbin/keepalived $KEEPALIVED_OPTIONS (code=exited, status=0/SUCCESS)
Aug 04 13:06:35 localhost.localdomain systemd[1]: Starting LVS and VRRP High Availability Monitor...
Aug 04 13:06:35 localhost.localdomain systemd[1]: PID file /var/run/keepalived.pid not readable (yet?) after start.
Aug 04 13:06:35 localhost.localdomain systemd[1]: Failed to start LVS and VRRP High Availability Monitor.
Aug 04 13:06:35 localhost.localdomain systemd[1]: Unit keepalived.service entered failed state.
Aug 04 13:06:35 localhost.localdomain systemd[1]: keepalived.service failed.
搭建keepalived注意事项:
环境
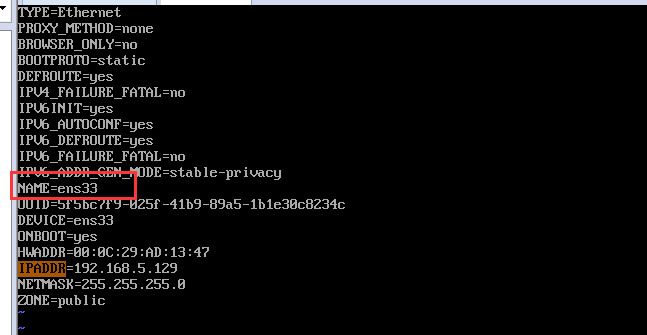
主nginx负载均衡器:192.168.5.129 (通过keepalived配置了VIP:192.168.5.101/0供外使用)
副nginx负载均衡器:192.168.5.130(通过keepalived配置了VIP:192.168.5.101/0供外使用)
1.安装 keepalived-1.4.1
 tar xf keepalived-1.3.4.tar.gz
 cd keepalived-1.3.4
 ./configure --prefix=/usr/local/keepalived
 make && make install
2.配置keepalived文件
复制/sbin/keepalived到/usr/sbin下
> cp /keepalived/sbin/keepalived /usr/sbin/

keepalived默认会读取/etc/keepalived/keepalived.conf配置文件
> mkdir /etc/keepalived
> cp /keepalived/etc/keepalived/keepalived.conf /etc/keepalived/

复制sysconfig文件到/etc/sysconfig下
> cp /keepalived/etc/sysconfig/keepalived /etc/sysconfig/

复制启动脚本到/etc/init.d下
> cd /keepalived-1.3.4
> cp ./keepalived/etc/init.d/keepalived /etc/init.d/
> chmod 755 /etc/init.d/keepalived
3.配置keepalived.conf启动文件
! Configuration File for keepalived

global_defs {
   notification_email {
     acassen@firewall.loc
     failover@firewall.loc
     sysadmin@firewall.loc
   }
   notification_email_from Alexandre.Cassen@firewall.loc
   smtp_server 192.168.200.1
   smtp_connect_timeout 30
   router_id LVS_DEVEL
   vrrp_skip_check_adv_addr
   vrrp_strict
   vrrp_garp_interval 0
   vrrp_gna_interval 0
}

vrrp_instance VI_1 {
    state MASTER(BACKUP)
    interface ens33    -- 注意网卡名字
    virtual_router_id 51
    priority 50
    advert_int 1
    authentication {
        auth_type PASS
        auth_pass 1111
    }

    virtual_ipaddress {
        192.168.5.100
        192.168.5.101
    }
}
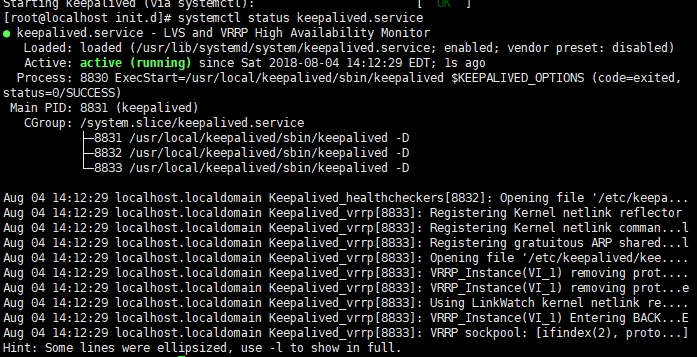
4.启动与验证keepalievd <ip addr list>
service keepalived start
systemctl status keepalived.service
ps -aux|grep keepalived

5. 遗留问题:
当服务启动后一段时间就自动关闭了服务;(大约几分钟后)
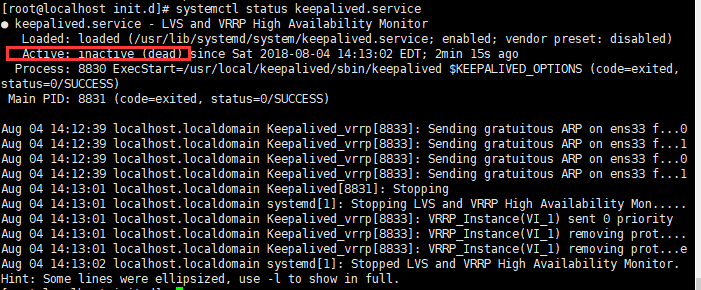
原因:并未设置监听服务,导致自动关闭服务
6. 设置centos7开机自动启动服务
vim /lib/systemd/system/keepalived.service
[Unit]
Description=Keepalived
After=syslog.target network.target remote-fs.target nss-lookup.target

[Service]
Type=forking
PIDFile=/var/run/keepalived.pid
ExecStart=/usr/local/keepalived/sbin/keepalived -D
ExecReload=/bin/kill -s HUP $MAINPID
ExecStop=/bin/kill -s QUIT $MAINPID
PrivateTmp=true

[Install]
WantedBy=multi-user.target
-
1;systemctl daemon-reload 重新加载 -
2:systemctl enable keepalived.service 设置开机自动启动 -
3:systemctl disable keepalived.service 取消开机自动启动 -
4:systemctl start keepalived.service 启动 -
5:systemctl stop keepalived.service停止
设置nginx开机自启动
vim /lib/systemd/system/nginx.service

[Unit]
Description=nginx
After=network.target

[Service]
Type=forking
ExecStart=/usr/local/nginx/sbin/nginx
ExecReload=/usr/local/nginx/sbin/nginx reload
ExecStop=/usr/local/nginx/sbin/nginx quit
PrivateTmp=true

[Install]
WantedBy=multi-user.target
systemctl enable nginx.service

systemctl start nginx.service    启动nginx

systemctl stop nginx.service    结束nginx

systemctl restart nginx.service    重启nginx
7.配置监听文件
vi /root/check_nginx.sh
#!/bin/sh
count=`ps aux | grep nginx | grep -v grep | wc -l`
if [ $count -eq 0 ]
then
echo "running....., please starting...."
systemctl start nginx.service
sleep 2
else
echo "running...."
fi
chmod +x /root/check_nginx.sh
加入到作业计划
crontab -e
*/1 * * * * /root/check_nginx.sh >>/root/check_nginx.log
追加keepalived.conf文件
! Configuration File for keepalived
global_defs {
notification_email {
acassen@firewall.loc
failover@firewall.loc
sysadmin@firewall.loc
}
notification_email_from Alexandre.Cassen@firewall.loc
smtp_server 192.168.200.1
smtp_connect_timeout 30
router_id LVS_DEVEL
vrrp_skip_check_adv_addr
vrrp_strict
vrrp_garp_interval 0
vrrp_gna_interval 0
}
vrrp_script check_nginx {
script "/root/check_nginx.sh"
interval 2
weight 2
}
vrrp_instance VI_1 {
state MASTER
interface ens33
virtual_router_id 51
mcast_src_ip 192.168.5.129
priority 100
advert_int 1
authentication {
auth_type PASS
auth_pass 111111
}
track_script { ######执行监控nginx进程的脚本
check_nginx
}
virtual_ipaddress {
192.168.5.100
}
}


 1万+
1万+


 被折叠的 条评论
为什么被折叠?
被折叠的 条评论
为什么被折叠?
 到【灌水乐园】发言


