


本文章简要对Spring Security的执行流程进行分析。
前序
源码阅读前的建议:
1.了解过Spring&SpringBoot源码(非必需)。
1.前置流程
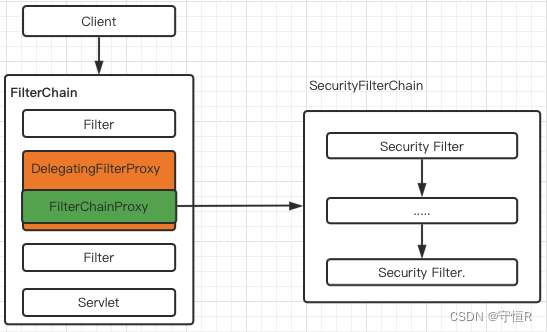
古老的SSM时代,我们引入security是在web.xml中配置这样的一个filter:
  <filter>
      <filter-name>springSecurityFilterChain</filter-name>
      <filter-class>org.springframework.web.filter.DelegatingFilterProxy</filter-class>
  </filter>
    <filter-mapping>
    	// 这个名字是固定的
        <filter-name>springSecurityFilterChain</filter-name>
        <url-pattern>/*</url-pattern>
    </filter-mapping>
Spring Boot时代,我们就不需要那么配置,直接引入依赖即可完成配置:
<dependency>
    <groupId>org.springframework.boot</groupId>
    <artifactId>spring-boot-starter-security</artifactId>
</dependency>
那么问题来了,Springboot是什么时候给我们自动配置了该filter呢?
答案就在:SecurityFilterAutoConfiguration自动配置类。
public class SecurityFilterAutoConfiguration {
	private static final String DEFAULT_FILTER_NAME = AbstractSecurityWebApplicationInitializer.DEFAULT_FILTER_NAME;
@Bean
@ConditionalOnBean(name = DEFAULT_FILTER_NAME)
public DelegatingFilterProxyRegistrationBean securityFilterChainRegistration(
		SecurityProperties securityProperties) {
	// DEFAULT_FILTER_NAME = springSecurityFilterChain
	DelegatingFilterProxyRegistrationBean registration = new DelegatingFilterProxyRegistrationBean(DEFAULT_FILTER_NAME);
	registration.setOrder(securityProperties.getFilter().getOrder());
	registration.setDispatcherTypes(getDispatcherTypes(securityProperties));
	return registration;
}
这个配置类可以看出给我们自动配置了filter,filter的功能就是在于处理请求之前的拦截,那么源码分析的入口也就是个filter。
DelegatingFilterProxyRegistrationBean类中getFilter():
	@Override
	public DelegatingFilterProxy getFilter() {
		return new DelegatingFilterProxy(this.targetBeanName, getWebApplicationContext()) {
			@Override
			protected void initFilterBean() throws ServletException {
				// Don't initialize filter bean on init()
			}
		};
	}
这个getFilter()方法何时被调用呢?本文暂时不做分析,感兴趣的可以直接在这打个端点看看何时调用的,这个调用时机是和tomcat的扩展接口有关。
这个方法返回的就是一个Filter,DelegatingFilterProxy是一个代理filter,增强原始的filter,能让fliter也注入到IOC容器中,这样就能享受到容器的依赖注入能力了。
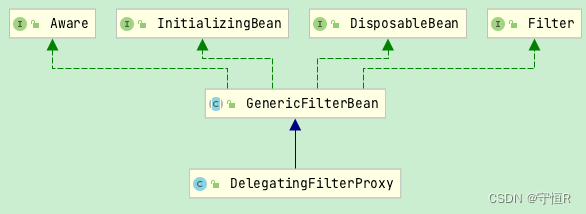
所以源码分析的断点直接打到DelegatingFilterProxy的doFilter方法中即可。
@Override
public void doFilter(ServletRequest request, ServletResponse response, FilterChain filterChain)
		throws ServletException, IOException {
	// ...
	invokeDelegate(delegateToUse, request, response, filterChain);
}
protected void invokeDelegate(
	Filter delegate, ServletRequest request, ServletResponse response, FilterChain filterChain)
	throws ServletException, IOException {
	// delegate 是 FilterChainProxy
	delegate.doFilter(request, response, filterChain);
 }
org.springframework.security.web.FilterChainProxy#doFilter
@Override
public void doFilter(ServletRequest request, ServletResponse response,
FilterChain chain) throws IOException, ServletException {
boolean clearContext = request.getAttribute(FILTER_APPLIED) == null;
if (clearContext) {
try {
request.setAttribute(FILTER_APPLIED, Boolean.TRUE);
// 走这一步
doFilterInternal(request, response, chain);
}
}
else {
doFilterInternal(request, response, chain);
}
}
private void doFilterInternal(ServletRequest request, ServletResponse response,
FilterChain chain) throws IOException, ServletException {
FirewalledRequest fwRequest = firewall
.getFirewalledRequest((HttpServletRequest) request);
HttpServletResponse fwResponse = firewall
.getFirewalledResponse((HttpServletResponse) response);
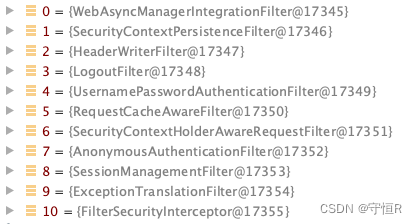
// 这个地方会获取匹配security内置的所有filter
List<Filter> filters = getFilters(fwRequest);
if (filters == null || filters.size() == 0) {
// 没有匹配的,就说明不需要走security filter流程,放行即可
fwRequest.reset();
chain.doFilter(fwRequest, fwResponse);
return;
}
// VirtualFilterChain这个类组织要执行的filter按顺序去执行
VirtualFilterChain vfc = new VirtualFilterChain(fwRequest, chain, filters);
// 执行filter链
vfc.doFilter(fwRequest, fwResponse);
}
private List<Filter> getFilters(HttpServletRequest request) {
// SecurityFilterChain 默认实现是 DefaultSecurityFilterChain
for (SecurityFilterChain chain : filterChains) {
if (chain.matches(request)) {
return chain.getFilters();
}
}
return null;
}
VirtualFilterChain.doFilter:
@Override
public void doFilter(ServletRequest request, ServletResponse response)
		throws IOException, ServletException {
	if (currentPosition == size) {
		// exit the security filter chain
		this.firewalledRequest.reset();
		originalChain.doFilter(request, response);
	}
	else {
		// 位置+1
		currentPosition++;
		// 取出要执行的filter
		Filter nextFilter = additionalFilters.get(currentPosition - 1);
		// 逐个执行
		nextFilter.doFilter(request, response, this);
	}
}
以上大致就是security执行的流程,可以看出spring代码设计的是真的厉害,这样的链式实现方式,在以后的业务代码中必须的模仿一波。
2.认证流程
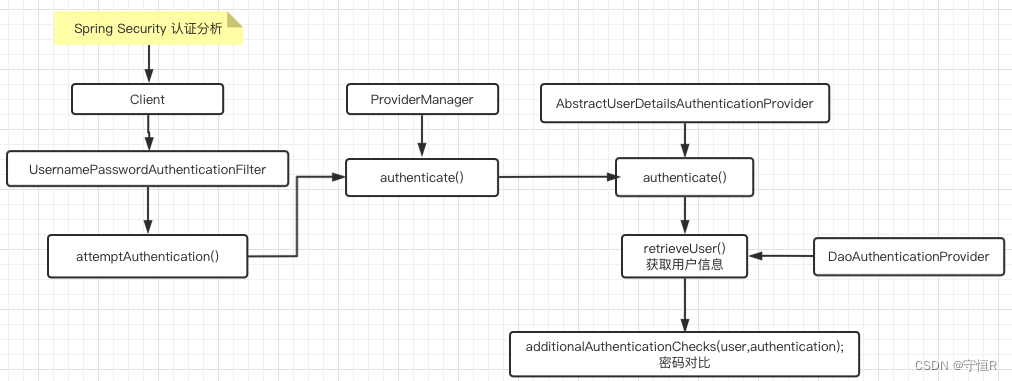
所谓的认证其实就是登录流程,这个流程security使用核心过滤器就是UsernamePasswordAuthenticationFilter。
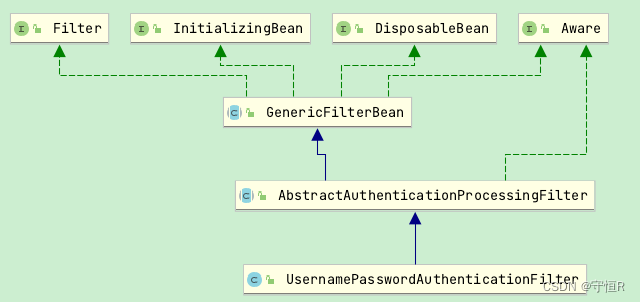
这里继承了一个父类:AbstractAuthenticationProcessingFilter类。
public UsernamePasswordAuthenticationFilter() {
	// 拦截 Post /login 请求
	// Content-Type: application/x-www-form-urlencoded
	super(new AntPathRequestMatcher("/login", "POST"));
}
构造器中可明显的看出拦截路径。我们主要关注一下doFilter部分:
AbstractAuthenticationProcessingFilter#doFilter:
	public void doFilter(ServletRequest req, ServletResponse res, FilterChain chain)
			throws IOException, ServletException {
		HttpServletRequest request = (HttpServletRequest) req;
		HttpServletResponse response = (HttpServletResponse) res;
		// 是否需要认证,,直接根据路径匹配的
		if (!requiresAuthentication(request, response)) {
			chain.doFilter(request, response);
			return;
		}
		// 认证逻辑
		Authentication authResult;
		try {
			// 核心方法
			// 这是个抽象方法,在UsernamePasswordAuthenticationFilter进行了重写
			authResult = attemptAuthentication(request, response);
			if (authResult == null) {
				return;
			}
			// 认证信息的存储策略。
			sessionStrategy.onAuthentication(authResult, request, response);
		}
		catch (AuthenticationException failed) {
			unsuccessfulAuthentication(request, response, failed);
			return;
		}
		// Authentication success
		if (continueChainBeforeSuccessfulAuthentication) {
			chain.doFilter(request, response);
		}
		// 存到上下文,回调认证成功的逻辑等等
		successfulAuthentication(request, response, chain, authResult);
	}
上面的整体代码流程还是比较清晰的,我们来看看是怎么认证的
UsernamePasswordAuthenticationFilter#attemptAuthentication:
public Authentication attemptAuthentication(HttpServletRequest request,
			HttpServletResponse response) throws AuthenticationException {
		String username = obtainUsername(request);
		String password = obtainPassword(request);
		username = username.trim();
		UsernamePasswordAuthenticationToken authRequest = new UsernamePasswordAuthenticationToken(
				username, password);
		setDetails(request, authRequest);
		return this.getAuthenticationManager().authenticate(authRequest);
	}
请求中获取username&password交给认证管理器做认证。
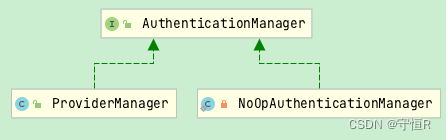
ProviderManager#authenticate:
public Authentication authenticate(Authentication authentication)
throws AuthenticationException {
Class<? extends Authentication> toTest = authentication.getClass();
Authentication result = null;
for (AuthenticationProvider provider : getProviders()) {
if (!provider.supports(toTest)) {
continue;
}
try {
// 默认的是ProviderManager,都可以自定义添加的
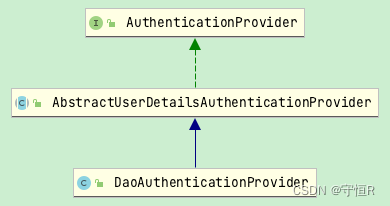
// AbstractUserDetailsAuthenticationProvider#authenticate
result = provider.authenticate(authentication);
if (result != null) {
copyDetails(authentication, result);
break;
}
}
catch (AccountStatusException | InternalAuthenticationServiceException e) {
prepareException(e, authentication);
throw e;
}
}
// AbstractUserDetailsAuthenticationProvider#authenticate
public Authentication authenticate(Authentication authentication)
throws AuthenticationException {
String username = (authentication.getPrincipal() == null) ? "NONE_PROVIDED"
: authentication.getName();
UserDetails user = this.userCache.getUserFromCache(username);
if (user == null) {
try {
// 子类实现DaoAuthenticationProvider#retrieveUser
// 这个方法是核心,返回用户信息
user = retrieveUser(username,
(UsernamePasswordAuthenticationToken) authentication);
}
catch (UsernameNotFoundException notFound) {
logger.debug("User '" + username + "' not found");
}
// 存在该用户的信息
try {
preAuthenticationChecks.check(user);
// 这个地方进行密码对比,不一样直接异常抛出 BadCredentialsException,结束
additionalAuthenticationChecks(user,
(UsernamePasswordAuthenticationToken) authentication);
}
catch (AuthenticationException exception) {
throw exception;
}
return createSuccessAuthentication(principalToReturn, authentication, user);
}
// DaoAuthenticationProvider#retrieveUser
protected final UserDetails retrieveUser(String username,
UsernamePasswordAuthenticationToken authentication)
throws AuthenticationException {
prepareTimingAttackProtection();
try {
// 加载用户信息,用户信息的加载可以是数据库和内存的方式
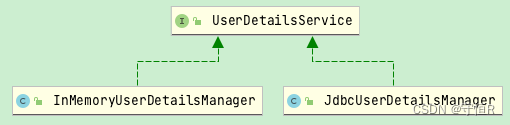
UserDetails loadedUser = this.getUserDetailsService().loadUserByUsername(username);
// 用户信息能获取成功的话
if (loadedUser == null) {
throw new InternalAuthenticationServiceException("xxxx");
}
return loadedUser;
}
catch (UsernameNotFoundException ex) {
mitigateAgainstTimingAttack(authentication);
throw ex;
}
}
用户信息加载的方式:
以上就是secur认证的大致流程,总体来说还是比较简单的。
来张图描述一下:
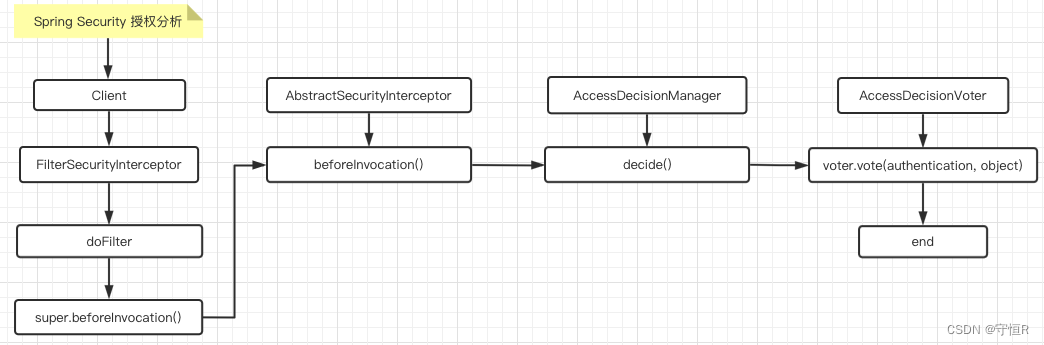
3.授权流程
授权的核心过滤器是FilterSecurityInterceptor直接看doFilter方法:
public void doFilter(ServletRequest request, ServletResponse response,
		FilterChain chain) throws IOException, ServletException {
	FilterInvocation fi = new FilterInvocation(request, response, chain);
	invoke(fi);
}
public void invoke(FilterInvocation fi) throws IOException, ServletException {
	// 核心是这个
	// AbstractSecurityInterceptor#beforeInvocation
	InterceptorStatusToken token = super.beforeInvocation(fi);
	try {
		fi.getChain().doFilter(fi.getRequest(), fi.getResponse());
	}
	finally {
		super.finallyInvocation(token);
	}
	super.afterInvocation(token, null);
}

protected InterceptorStatusToken beforeInvocation(Object object) {
	Authentication authenticated = authenticateIfRequired();
	// Attempt authorization
	try {
	    // 决策管理器去做决策
		this.accessDecisionManager.decide(authenticated, object, attributes);
	}
	catch (AccessDeniedException accessDeniedException) {
		publishEvent(new AuthorizationFailureEvent(object, attributes, authenticated,
				accessDeniedException));
		throw accessDeniedException;
	}
	if (publishAuthorizationSuccess) {
		publishEvent(new AuthorizedEvent(object, attributes, authenticated));
	}
}

// AffirmativeBased#decide
public void decide(Authentication authentication, Object object,
		Collection<ConfigAttribute> configAttributes) throws AccessDeniedException {
	// 票数
	int deny = 0;
	// 投票器进行投票
	for (AccessDecisionVoter voter : getDecisionVoters()) {
	    // 投票
		int result = voter.vote(authentication, object, configAttributes);
		switch (result) {
		// 决策成功,直接返回
		case AccessDecisionVoter.ACCESS_GRANTED:
			return;
		case AccessDecisionVoter.ACCESS_DENIED:
			deny++;
			break;
		default:
			break;
		}
	}
	// 负票数直接结束
	if (deny > 0) {
		throw new AccessDeniedException(messages.getMessage(
				"AbstractAccessDecisionManager.accessDenied", "Access is denied"));
	}
}
认证逻辑也是比较简单的,这里涉及几个比较重要的类:
1.决策管理器:AccessDecisionManager
默认的是:AffirmativeBased
AffirmativeBased:众多的投票者中只要有一个返回肯定的结果,就会授予访问权限。
ConsensusBased:是基于少数服从多数的授权决策方案。
UnanimousBased:要求所有的投票器都是成功才会授权访问。
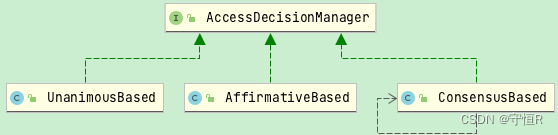
2.投票器:AccessDecisionVoter
默认的是:WebExpressionVoter

- WebExpressionVoter:基于Spring-EL投票控制。
- RoleVoter:角色投票器。
从上面可以看出,认证的逻辑其实就是投票对比,解析权限表达式进行对比,最后来张图:
4.异常处理
异常处理filter: ExceptionTranslationFilter。
认证/授权失败都会抛出异常,该filter负责捕获异常统一处理。
public void doFilter(ServletRequest req, ServletResponse res, FilterChain chain)
			throws IOException, ServletException {
	HttpServletRequest request = (HttpServletRequest) req;
	HttpServletResponse response = (HttpServletResponse) res;
	try {
		chain.doFilter(request, response);
	}
	catch (Exception ex) {
		Throwable[] causeChain = throwableAnalyzer.determineCauseChain(ex);
		RuntimeException ase = (AuthenticationException) throwableAnalyzer
				.getFirstThrowableOfType(AuthenticationException.class, causeChain);
		if (ase != null) {
			// 处理security抛出的异常
			handleSpringSecurityException(request, response, chain, ase);
		}
	}
}

private void handleSpringSecurityException(HttpServletRequest request,
			HttpServletResponse response, FilterChain chain, RuntimeException exception)
			throws IOException, ServletException {
	if (exception instanceof AuthenticationException) {
		sendStartAuthentication(request, response, chain,
				(AuthenticationException) exception);
	}
	else if (exception instanceof AccessDeniedException) {
		Authentication authentication = SecurityContextHolder.getContext().getAuthentication();
		if (authenticationTrustResolver.isAnonymous(authentication)) {
			// 自定义认证失败异常
			sendStartAuthentication(request,response,chain,
					new InsufficientAuthenticationException()
			);
		}
		else {
			// 自定义授权失败的异常
			accessDeniedHandler.handle(request, response,
					(AccessDeniedException) exception);
		}
	}
}
OK,本文对security大致原理进行了讲解,流程总体来说还是没有过于复杂的,再接再厉吧!


 2271
2271


 被折叠的 条评论
为什么被折叠?
被折叠的 条评论
为什么被折叠?
 到【灌水乐园】发言


