


这里以上传图片为例
-
先决条件
- 你已经看完了上一篇 : ueditor 之 holleworld,因为我是使用上一篇的开发环境
- 你已经知道如何搭建 ueditor 的 helloworld
-
问题
- ueditor 上传图片的过程不受我们控制,编辑过程产生的垃圾(例如:用户上传后没有使用的图片)不知如何清理?
- 上传图片只能保存在本服务器上(继承上一篇的开发环境:也就本 tomcat 上),使得我们无法为本项目配置单独一台图片服务器进行开发、生产(服务器集群)
-
寻找后端入口 :
(com.baidu.ueditor.ActionEnter)
查看 ueditor.config.js


-
下载 ueditor 源码
-
删除 ueditor jar包

-
引入源码

几个比较重要的类(突然然发现这些名字都起的好好,见名知义):
-
ActionEnter.java
后台入口,调用 CongigManager 加载 jsp/config.json 的配置信息,根据不同请求执行不同的逻辑代码- 构造方法,初始化的时候 利用 CongigManager 加载 jsp/config.json 的数据
public ActionEnter ( HttpServletRequest request, String rootPath ) { this.request = request; this.rootPath = rootPath; this.actionType = request.getParameter( "action" ); this.contextPath = request.getContextPath(); this.configManager = ConfigManager.getInstance( this.rootPath, this.contextPath, request.getRequestURI() ); }- 根据不同请求执行不同的逻辑代码
public String invoke() { if ( actionType == null || !ActionMap.mapping.containsKey( actionType ) ) { return new BaseState( false, AppInfo.INVALID_ACTION ).toJSONString(); } if ( this.configManager == null || !this.configManager.valid() ) { return new BaseState( false, AppInfo.CONFIG_ERROR ).toJSONString(); } State state = null; int actionCode = ActionMap.getType( this.actionType ); Map<String, Object> conf = null; switch ( actionCode ) { case ActionMap.CONFIG: return this.configManager.getAllConfig().toString(); case ActionMap.UPLOAD_IMAGE: case ActionMap.UPLOAD_SCRAWL: case ActionMap.UPLOAD_VIDEO: case ActionMap.UPLOAD_FILE: conf = this.configManager.getConfig( actionCode ); state = new Uploader( request, conf ).doExec(); break; case ActionMap.CATCH_IMAGE: conf = configManager.getConfig( actionCode ); String[] list = this.request.getParameterValues( (String)conf.get( "fieldName" ) ); state = new ImageHunter( conf ).capture( list ); break; case ActionMap.LIST_IMAGE: case ActionMap.LIST_FILE: conf = configManager.getConfig( actionCode ); int start = this.getStartIndex(); state = new FileManager( conf ).listFile( start ); break; } return state.toJSONString(); } -
ConfigManager.java
配置管理器 : 看下面代码对比一下 jsp/config.json 就知道了
    public Map<String, Object> getConfig ( int type ) {

	Map<String, Object> conf = new HashMap<String, Object>();
	String savePath = null;

	switch ( type ) {

		case ActionMap.UPLOAD_FILE:
			conf.put( "isBase64", "false" );
			conf.put( "maxSize", this.jsonConfig.getLong( "fileMaxSize" ) );
			conf.put( "allowFiles", this.getArray( "fileAllowFiles" ) );
			conf.put( "fieldName", this.jsonConfig.getString( "fileFieldName" ) );
			savePath = this.jsonConfig.getString( "filePathFormat" );
			break;

		case ActionMap.UPLOAD_IMAGE:
			conf.put( "isBase64", "false" );
			conf.put( "maxSize", this.jsonConfig.getLong( "imageMaxSize" ) );
			conf.put( "allowFiles", this.getArray( "imageAllowFiles" ) );
			conf.put( "fieldName", this.jsonConfig.getString( "imageFieldName" ) );
			savePath = this.jsonConfig.getString( "imagePathFormat" );
			break;

		case ActionMap.UPLOAD_VIDEO:
			conf.put( "maxSize", this.jsonConfig.getLong( "videoMaxSize" ) );
			conf.put( "allowFiles", this.getArray( "videoAllowFiles" ) );
			conf.put( "fieldName", this.jsonConfig.getString( "videoFieldName" ) );
			savePath = this.jsonConfig.getString( "videoPathFormat" );
			break;

		case ActionMap.UPLOAD_SCRAWL:
			conf.put( "filename", ConfigManager.SCRAWL_FILE_NAME );
			conf.put( "maxSize", this.jsonConfig.getLong( "scrawlMaxSize" ) );
			conf.put( "fieldName", this.jsonConfig.getString( "scrawlFieldName" ) );
			conf.put( "isBase64", "true" );
			savePath = this.jsonConfig.getString( "scrawlPathFormat" );
			break;

		case ActionMap.CATCH_IMAGE:
			conf.put( "filename", ConfigManager.REMOTE_FILE_NAME );
			conf.put( "filter", this.getArray( "catcherLocalDomain" ) );
			conf.put( "maxSize", this.jsonConfig.getLong( "catcherMaxSize" ) );
			conf.put( "allowFiles", this.getArray( "catcherAllowFiles" ) );
			conf.put( "fieldName", this.jsonConfig.getString( "catcherFieldName" ) + "[]" );
			savePath = this.jsonConfig.getString( "catcherPathFormat" );
			break;

		case ActionMap.LIST_IMAGE:
			conf.put( "allowFiles", this.getArray( "imageManagerAllowFiles" ) );
			conf.put( "dir", this.jsonConfig.getString( "imageManagerListPath" ) );
			conf.put( "count", this.jsonConfig.getInt( "imageManagerListSize" ) );
			break;

		case ActionMap.LIST_FILE:
			conf.put( "allowFiles", this.getArray( "fileManagerAllowFiles" ) );
			conf.put( "dir", this.jsonConfig.getString( "fileManagerListPath" ) );
			conf.put( "count", this.jsonConfig.getInt( "fileManagerListSize" ) );
			break;

	}

	conf.put( "savePath", savePath );
	conf.put( "rootPath", this.rootPath );

	return conf;

}
3. Uploader.java 执行下载 4. State.java 处理状态接口 ,前后台沟通的接口。 5. BaseState.java State 的其中一个实现类里面包含了一个 Map<String ,String > 实例,通过 Map 添加前台需要的参数。 1. 前台请求规范 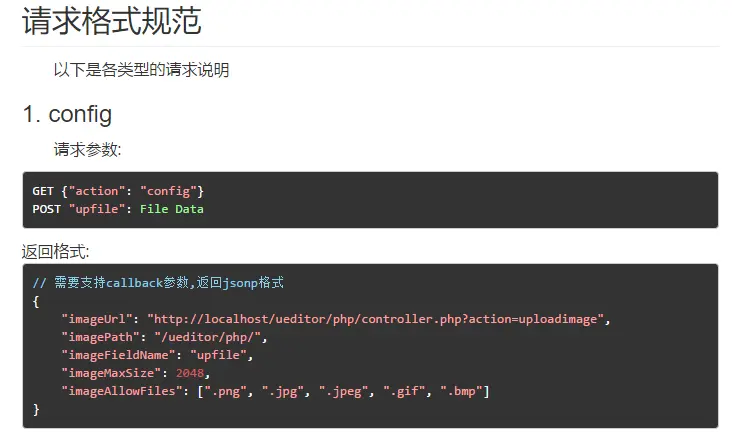 2. 后台返回规范(以上传图片为例) 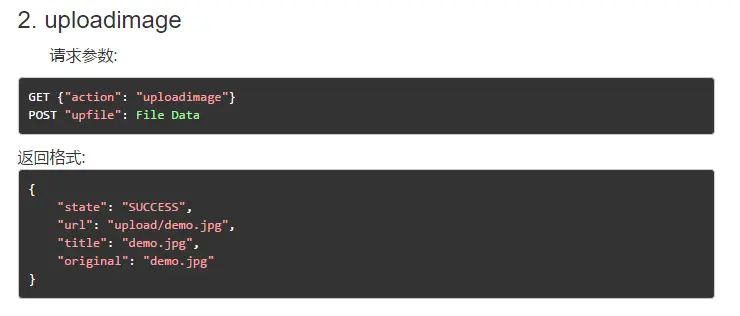 -
-
具体后台运行过程,自己用 debug 工具,多走几下就知道了(这里就不演示了)
-
运行项目
-
访问:
http://localhost:8080/_ueditor/ueditor/index.html -
上传图片功能也可正常使用

-


 875
875

 被折叠的 条评论
为什么被折叠?
被折叠的 条评论
为什么被折叠?
 到【灌水乐园】发言


