


前言:
工作上需要开发一个系统级的应用,但是在调试上很不方便,自带的Android板并不符合最终的定制,而且模拟器也能得到更好的开发体验.那直接在模拟器上如何将自己的应用改成系统应用,也更方便的开发自己的应用呢?..
1.准备好模拟器
普通来说我们下载的后面导游的Google Play,是无法进行root的,那自然就只能开发手机正常应用,而无法将自己的应用改成系统应用。
所以要重新下载一个可以root的应用.一般选择下载模拟器我们会在Recommended内,所以我们点击x86 Images的镜像,选择后缀为[没有]的的镜像。

2.下载完成后,root模拟器
打开cmd.
输入 adb devices
看一下自己的设备名是哪一个
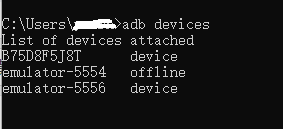
输入 adb -s [deivce] root (例如 adb -s B75D8F5J8T root)
将设备root.如果不行,进入开发者选项去允许adb和app去root.
然后继续输入 adb -s [device] remount 重新挂载
这样设备就被我们root掉了.
然后就很容易了.
编译自己的应用Build,获得自己的apk-debug.apk
push 到该设备的sysytem/app 的目录中
>adb -s [device] push E:\xxx\xxx\xxx\xxx\outputs\apk\debug\ /system/app/EmptyActivity2
进入到该设备的adb shell去
adb -s [device] shell
将你push进去的app.debug.apk权限改为777.
cd system/app/EmptyActivity2
 chmod 777 app-debug.apk
最后记得给你的应用加上
android:sharedUserId=“android.uid.system” >
并且签上名~ (方法自己百度喔~)

然后重启你的机器,你就会发现你的app自动就在这个系统里面,而且无法删除了,然后你就可以在你的app内为所欲为了,这样就可以系统应用在此设备上用Android Studio也可以持续调试了,很方便吧~
(PS)楼主直接失败了,因为重启之后Android的模拟器会重新加载镜像导致恢复了,然后找了很多资料发现没办法搞…用了Android板之后是正常的!
3.修改语言配置
直接贴方法,没什么好说的,这个修改语言配置是直接修改系统的,而不是应用内的,如果需要请看上一篇文章~
public void setLanguage(Locale locale) {
        try {
            Object objIActMag;

            Class clzIActMag = Class.forName("android.app.IActivityManager");

            Class clzActMagNative = Class
                    .forName("android.app.ActivityManagerNative");
            Method mtdActMagNative$getDefault = clzActMagNative
                    .getDeclaredMethod("getDefault");//反射得到隐藏接口1

            objIActMag = mtdActMagNative$getDefault.invoke(clzActMagNative);//获得一个IActivityManager

            Method mtdIActMag$getConfiguration = clzIActMag
                    .getDeclaredMethod("getConfiguration");

            Configuration config = (Configuration) mtdIActMag$getConfiguration//获得configuration
                    .invoke(objIActMag);

            config.locale = locale;

            Class clzConfig = Class
                    .forName("android.content.res.Configuration");
            java.lang.reflect.Field userSetLocale = clzConfig
                    .getField("userSetLocale");
            userSetLocale.set(config, true);//拿了包里的属性设置起来

            Class[] clzParams = { Configuration.class };

            Method mtdIActMag$updateConfiguration = clzIActMag
                    .getDeclaredMethod("updateConfiguration", clzParams);

            mtdIActMag$updateConfiguration.invoke(objIActMag, config);//使用更新config

            BackupManager.dataChanged("com.android.providers.settings");

        } catch (Exception e) {
            e.printStackTrace();
        }
    }
setLanguage(Locale.ENGLISH);
4.发送adb 命令.
如何发送一个广播让framwork层收到呢.这是一个很无语的过程.要知道应用层无法通过sendBroadcastAsUser让系统层去收到广播(到底能不能我觉得8.0以上已经不可以了,如果可以请大佬纠正一下).然后毕竟我是root用户和应用,那我直接通过adb命令发送广播即可…然后通信就好了.
工具类代码如下:
public class ShellUtils {

    public static final String COMMAND_SU = "su";
    public static final String COMMAND_SH = "sh";
    public static final String COMMAND_EXIT = "exit\n";
    public static final String COMMAND_LINE_END = "\n";
    private static String MYLOGFILEName = "uidump.xml";// 本类输出的日志文件名称
    private static String MYLOG_PATH_SDCARD_DIR = "/sdcard/uidump";// 日志文件在sdcard中的路径
    private static SimpleDateFormat myLogSdf = new SimpleDateFormat("yyyy-MM-dd HH:mm:ss");// 日志的输出格式
    private static SimpleDateFormat logfile = new SimpleDateFormat("yyyy-MM-dd");// 日志文件格式

    private ShellUtils() {
        throw new AssertionError();
    }


    /**
     * 查看是否有了root权限
     *
     * @return
     */
    public static boolean checkRootPermission() {
        return execCommand("echo root", true, false).result == 0;
    }


    /**
     * 执行shell命令,默认返回结果
     *
     * @param command
     *            command
     * @param isRoot 运行是否需要root权限
     * @return
     * @see ShellUtils#execCommand(String[], boolean, boolean)
     */
    public static CommandResult execCommand(String command, boolean isRoot) {
        return execCommand(new String[] { command }, isRoot, true);
    }


    /**
     * 执行shell命令,默认返回结果
     *
     * @param commands
     *            command list
     * @param isRoot  运行是否需要root权限
     * @return
     * @see ShellUtils#execCommand(String[], boolean, boolean)
     */
    public static CommandResult execCommand(List<String> commands,
                                            boolean isRoot) {
        return execCommand(
                commands == null ? null : commands.toArray(new String[] {}),
                isRoot, true);
    }


    /**
     * 执行shell命令,默认返回结果
     *
     * @param commands
     *            command array
     * @param isRoot  运行是否需要root权限
     * @return
     * @see ShellUtils#execCommand(String[], boolean, boolean)
     */
    public static CommandResult execCommand(String[] commands, boolean isRoot) {
        return execCommand(commands, isRoot, true);
    }


    /**
     * execute shell command
     *
     * @param command
     *            command
     * @param isRoot  运行是否需要root权限
     * @param isNeedResultMsg
     *            whether need result msg
     * @return
     * @see ShellUtils#execCommand(String[], boolean, boolean)
     */
    public static CommandResult execCommand(String command, boolean isRoot,
                                            boolean isNeedResultMsg) {
        return execCommand(new String[] { command }, isRoot, isNeedResultMsg);
    }


    /**
     * execute shell commands
     *
     * @param commands
     *            command list
     * @param isRoot  运行是否需要root权限
     * @param isNeedResultMsg 是否需要返回运行结果
     * @return
     * @see ShellUtils#execCommand(String[], boolean, boolean)
     */
    public static CommandResult execCommand(List<String> commands,
                                            boolean isRoot, boolean isNeedResultMsg) {
        return execCommand(
                commands == null ? null : commands.toArray(new String[] {}),
                isRoot, isNeedResultMsg);
    }


    /**
     * execute shell commands
     *
     * @param commands
     *            command array
     * @param isRoot 运行是否需要root权限
     * @param isNeedResultMsg 是否需要返回运行结果
     * @return <ul>
     *         <li>if isNeedResultMsg is false, {@link CommandResult#successMsg}
     *         is null and {@link CommandResult#errorMsg} is null.</li>
     *         <li>if {@link CommandResult#result} is -1, there maybe some
     *         excepiton.</li>
     *         </ul>
     */
    public static CommandResult execCommand(String[] commands, boolean isRoot,
                                            boolean isNeedResultMsg) {
        int result = -1;
        if (commands == null || commands.length == 0) {
            return new CommandResult(result, null, null);
        }


        Process process = null;
        BufferedReader successResult = null;
        BufferedReader errorResult = null;
        StringBuilder successMsg = null;
        StringBuilder errorMsg = null;


        DataOutputStream os = null;
        try {
            process = Runtime.getRuntime().exec(isRoot ? COMMAND_SU : COMMAND_SH);//是通过这个实例获取输出/输入流
            os = new DataOutputStream(process.getOutputStream());//创造一个数据输出流写入指定的底层
            for (String command : commands) {
                if (command == null) {
                    continue;
                }


                // donnot use os.writeBytes(commmand), avoid chinese charset
                // error
                os.write(command.getBytes());
                os.writeBytes(COMMAND_LINE_END);
                os.flush();
            }
            os.writeBytes(COMMAND_EXIT);
            os.flush();//把流写进去


            result = process.waitFor();
            // get command result
            if (isNeedResultMsg) {
                successMsg = new StringBuilder();
                errorMsg = new StringBuilder();
                successResult = new BufferedReader(new InputStreamReader(
                        process.getInputStream()));
                errorResult = new BufferedReader(new InputStreamReader(
                        process.getErrorStream()));
                String s;
                while ((s = successResult.readLine()) != null) {
                    successMsg.append(s);
                }
                while ((s = errorResult.readLine()) != null) {
                    errorMsg.append(s);
                }
            }
        } catch (IOException e) {
            e.printStackTrace();
        } catch (Exception e) {
            e.printStackTrace();
        } finally {
            try {
                if (os != null) {
                    os.close();
                }
                if (successResult != null) {
                    successResult.close();
                }
                if (errorResult != null) {
                    errorResult.close();
                }
            } catch (IOException e) {
                e.printStackTrace();
            }


            if (process != null) {
                process.destroy();
            }
        }
        return new CommandResult(result, successMsg == null ? null
                : successMsg.toString(), errorMsg == null ? null
                : errorMsg.toString());
    }


    /**
     * 运行结果
     * <ul>
     * <li>{@link CommandResult#result} means result of command, 0 means normal,
     * else means error, same to excute in linux shell</li>
     * <li>{@link CommandResult#successMsg} means success message of command
     * result</li>
     * <li>{@link CommandResult#errorMsg} means error message of command result</li>
     * </ul>
     *
     * @author <a href="http://www.trinea.cn" target="_blank">Trinea</a>
     *         2013-5-16
     */
    public static class CommandResult {


        /** 运行结果 **/
        public int result;
        /** 运行成功结果 **/
        public String successMsg;
        /** 运行失败结果 **/
        public String errorMsg;


        public CommandResult(int result) {
            this.result = result;
        }


        public CommandResult(int result, String successMsg, String errorMsg) {
            this.result = result;
            this.successMsg = successMsg;
            this.errorMsg = errorMsg;
        }
    }

    /**
     * 打开日志文件并写入日志
     * @param mylogtype
     * @param tag
     * @param text
     */
    public static void writeLogtoFile(String mylogtype, String tag, String text) {// 新建或打开日志文件
        Date nowtime = new Date();
        String needWriteFiel = logfile.format(nowtime);
        String needWriteMessage = myLogSdf.format(nowtime) + "    " + mylogtype + "    " + tag + "    " + text;
        File dirPath = Environment.getExternalStorageDirectory();

        File dirsFile = new File(MYLOG_PATH_SDCARD_DIR);
        if (!dirsFile.exists()){
            dirsFile.mkdirs();
        }
        //Log.i("创建文件","创建文件");
        File file = new File(dirsFile.toString(), MYLOGFILEName);// MYLOG_PATH_SDCARD_DIR
        if (!file.exists()) {
            try {
                //在指定的文件夹中创建文件
                file.createNewFile();
            } catch (Exception e) {
            }
        }

        try {
            FileWriter filerWriter = new FileWriter(file, true);// 后面这个参数代表是不是要接上文件中原来的数据,不进行覆盖
            BufferedWriter bufWriter = new BufferedWriter(filerWriter);
            bufWriter.write(needWriteMessage);
            bufWriter.newLine();
            bufWriter.close();
            filerWriter.close();
        } catch (IOException e) {
            e.printStackTrace();
        }
    }

}
调用
         if (ShellUtils.checkRootPermission()) {
                    Toast.makeText(getContext(), "有权限了", Toast.LENGTH_SHORT).show();
                }


                String commend2 = "am broadcast -a \"CLEAR_ALL_TASK\"";
                ShellUtils.CommandResult result2 = ShellUtils.execCommand(commend2, true);
                Log.e("result2", "result2-----" + result2.result + "\n" + "successMsg2-----" + result2.successMsg + "\n" + "errorMsg2-----" + result2.errorMsg + "\n\n\n\n\n");
好啦,结束~!总结一句话:你是root用户就应该可以为所欲为!!!


 8万+
8万+


 被折叠的 条评论
为什么被折叠?
被折叠的 条评论
为什么被折叠?
 到【灌水乐园】发言


