文章目录
参考
drivers\mtd\maps\physmap.c。

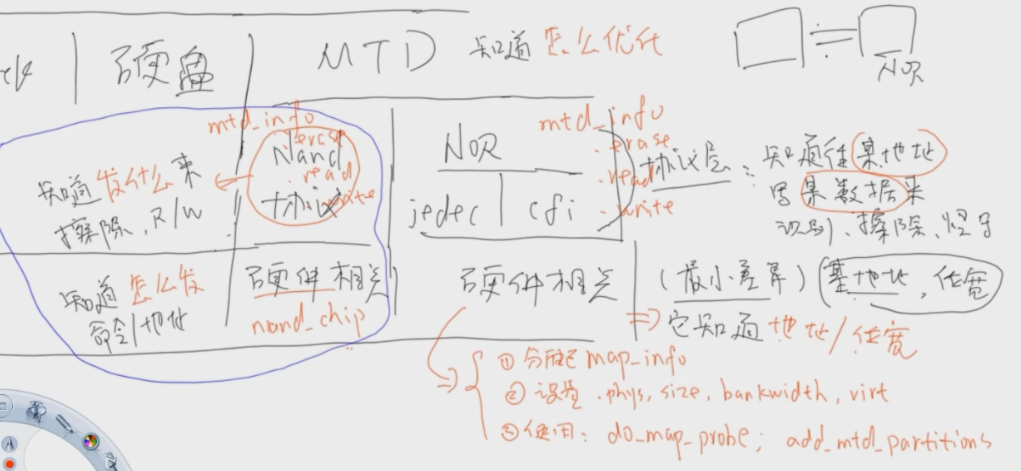
最后分析出我们配置硬件相关需要做:
- 分配map_info结构体
- 设置 物理基地址(phys)、大小(size)、位宽(bankwidth) 虚拟基地址(virt)。
内核看到的不同开发板最小的差别就是这些了 - 使用 调用nor flash的协议层函数来识别
- 添加分区,不是必须。add_mtd_partitions
第一个程序 简单框架 内核识别nor
第一个程序代码
#include <linux/module.h>
#include <linux/types.h>
#include <linux/kernel.h>
#include <linux/init.h>
#include <linux/slab.h>
#include <linux/device.h>
#include <linux/platform_device.h>
#include <linux/mtd/mtd.h>
#include <linux/mtd/map.h>
#include <linux/mtd/partitions.h>
#include <linux/mtd/physmap.h>
#include <asm/io.h>
// 参考drivers\mtd\maps\physmap.c。

static struct map_info *normap_info;
static struct mtd_info *normtd_info;

static int s3c_nor_init(void)
{
    // 1.分配map_info结构体
    normap_info = kzalloc(sizeof(struct map_info), GFP_KERNEL);
    // 2.设置 物理基地址(phys)、大小(size)、位宽(bankwidth) 虚拟基地址(virt)
    //  内核看到的不同开发板最小的差别就是这些了
	normap_info->name = "s3c_nor";
	normap_info->phys = 0;          // nor启动时 物理地址为0
	normap_info->size = 0x1000000;  // 16M 一定>=nor的实际大小
	normap_info->bankwidth = 2;     // 2*Byte=16bit
	normap_info->virt = ioremap(normap_info->phys, normap_info->size);

	simple_map_init(&normap_info);  // 简单初始化

    // 3.使用 调用nor flash的协议层函数来识别
	normtd_info = do_map_probe("cfi_probe", &normap_info);
    if (normap_info)    // 这里只尝试两种模式cfi和jedec
        printk("use cfi_probe.\n");
    else {
        printk("use jedec_probe.\n");
	    normtd_info = do_map_probe("jedec_probe", &normap_info);
    }
    if (!normap_info) { // 不是这两种模式
        printk("mode cfi_probe or jedec_probe failed.\n");
        iounmap(normap_info->virt);
        kfree(normap_info);
        return -EIO;    // I/O error
    }
    // 4.添加分区,不是必须。add_mtd_partitions

    return 0;
}

static void s3c_nor_exit(void)
{
    iounmap(normap_info->virt);
    kfree(normap_info);
}
module_init(s3c_nor_init);
module_exit(s3c_nor_exit);
MODULE_LICENSE("GPL");
简单测试第一个程序,插入能否识别nor
在测试nor时先卸载,出现警告physmap-flash.0 does not have a release() function,在platform_device平台设备中需要提供release()函数,内核中自带nor没有,
`drivers\mtd\maps\physmap.c`
static struct platform_device physmap_flash = {
	.name		= "physmap-flash",
	.id		= 0,
	.dev		= {
		.platform_data	= &physmap_flash_data,
	},
	.num_resources	= 1,
	.resource	= &physmap_flash_resource,
	// 无release()函数
};


第二个程序 添加了分区add_mtd_partitions
第二个程序代码
#include <linux/module.h>
#include <linux/types.h>
#include <linux/kernel.h>
#include <linux/init.h>
#include <linux/slab.h>
#include <linux/device.h>
#include <linux/platform_device.h>
#include <linux/mtd/mtd.h>
#include <linux/mtd/map.h>
#include <linux/mtd/partitions.h>
#include <linux/mtd/physmap.h>
#include <asm/io.h>
// 参考drivers\mtd\maps\physmap.c。

static struct map_info *normap_info;
static struct mtd_info *normtd_info;
static struct mtd_partition nor_part[] = { // 用于nor分区的数组
	[0] = {
        .name   = "bootloader_nor",
        .size   = 0x00040000,
		.offset	= 0,
	},
	[1] = {
        .name   = "root_nor",
        .offset = MTDPART_OFS_APPEND,
        .size   = MTDPART_SIZ_FULL, // 剩下的所有都是该分区
	}
};

static int s3c_nor_init(void)
{
    // 1.分配map_info结构体
    normap_info = kzalloc(sizeof(struct map_info), GFP_KERNEL);
    // 2.设置 物理基地址(phys)、大小(size)、位宽(bankwidth) 虚拟基地址(virt)
    //  内核看到的不同开发板最小的差别就是这些了
	normap_info->name = "s3c_nor";
	normap_info->phys = 0;          // nor启动时 物理地址为0
	normap_info->size = 0x1000000;  // 16M 一定>=nor的实际大小
	normap_info->bankwidth = 2;     // 2*Byte=16bit
	normap_info->virt = ioremap(normap_info->phys, normap_info->size);

	simple_map_init(&normap_info);  // 简单初始化

    // 3.使用 调用nor flash的协议层函数来识别
	normtd_info = do_map_probe("cfi_probe", &normap_info);
    if (normap_info)    // 这里只尝试两种模式cfi和jedec
        printk("use cfi_probe.\n");
    else {
        printk("use jedec_probe.\n");
	    normtd_info = do_map_probe("jedec_probe", &normap_info);
    }
    if (!normap_info) { // 不是这两种模式
        printk("mode cfi_probe or jedec_probe failed.\n");
        iounmap(normap_info->virt);
        kfree(normap_info);
        return -EIO;    // I/O error
    }
    // 4.添加分区,不是必须。add_mtd_partitions
    add_mtd_partitions(normtd_info, nor_part, 2);
    return 0;
}

static void s3c_nor_exit(void)
{
    del_mtd_partitions(normtd_info);
    iounmap(normap_info->virt);
    kfree(normap_info);
}
module_init(s3c_nor_init);
module_exit(s3c_nor_exit);
MODULE_LICENSE("GPL");
测试第二个程序 格式化 往nor分区写文件
- 编译 拷贝.ko
ls /dev/mtd*insmod .kols /dev/mtd*

- 格式化
flash eraseall -j /dev/mtd1
一般 nand用yaffs格式,nor用jffs2格式。 - 挂接
mount -t jffs2 /dev/mtdblock1 /mnt
可以写入一个文件测试以下,重启看还在不在。

用内存模拟MTD flash 只是介绍无实验
对于MTD,内核不关心是nand或者nor,只需要提供mtd_info结构体就ok。
flash协议层知道发什么,硬件相关知道怎么发。
参考drivers\mtd\devices\mtdram.c,直接设置mtd_info结构体并告知就行:
分配mtd_info结构体,
分配一块内存,
设置mtd_info结构体,提供rease write read,是内存所以直接memset memcpy,
add_mtd_device。
解析内核识别nor的过程
cfi模式

从do_map_probe函数分析,
normtd_info = do_map_probe("cfi_probe", &normap_info);
struct mtd_info *do_map_probe(const char *name, struct map_info *map)
{
	struct mtd_chip_driver *drv;
	struct mtd_info *ret;
	// ------------------------------------------------------------
	drv = get_mtd_chip_driver(name);
		list_for_each(pos, &chip_drvs_list) { 		// chip_drvs_list链表由register_mtd_chip_driver
		this = list_entry(pos, typeof(*this), list);// drivers\mtd\chips\chipreg.c

	ret = drv->probe(map); // 最会用cfi_probe
		cfi_probe(struct map_info *map)
			mtd_do_chip_probe(map, &cfi_chip_probe);
				cfi = genprobe_ident_chips(map, cp);
					genprobe_new_chip(map, cp, &cfi) // drivers\mtd\chips\gen_probe.c
						cp->probe_chip(map, 0, NULL, cfi) // cfi_chip_probe
							cfi_chip_probe  // drivers\mtd\chips\cfi_probe.c
								// 进入cfi模式
								cfi_send_gen_cmd(0x98, 0x55, base, map, cfi, cfi->device_type, NULL);
								// 看能否读出QRY
								qry_present(map,base,cfi)
}
上面设计到的函数,
drivers\mtd\chips\cfi_probe.c
static int __init cfi_probe_init(void)
{
	register_mtd_chip_driver(&cfi_chipdrv);
	return 0;
}

static void __exit cfi_probe_exit(void)
{
	unregister_mtd_chip_driver(&cfi_chipdrv);
}

drivers\mtd\chips\cfi_probe.c
xip_disable(); \
	cfi_send_gen_cmd(0xF0, 0, base, map, cfi, cfi->device_type, NULL); \
	cfi_send_gen_cmd(0xFF, 0, base, map, cfi, cfi->device_type, NULL); \
	cfi_send_gen_cmd(0x98, 0x55, base, map, cfi, cfi->device_type, NULL); \

drivers\mtd\chips\cfi_probe.c
static int __xipram qry_present(struct map_info *map, __u32 base,
				struct cfi_private *cfi)
{
	int osf = cfi->interleave * cfi->device_type;	// scale factor
	map_word val[3];
	map_word qry[3];

	qry[0] = cfi_build_cmd('Q', map, cfi);
	qry[1] = cfi_build_cmd('R', map, cfi);
	qry[2] = cfi_build_cmd('Y', map, cfi);

	val[0] = map_read(map, base + osf*0x10);
	val[1] = map_read(map, base + osf*0x11);
	val[2] = map_read(map, base + osf*0x12);

	if (!map_word_equal(map, qry[0], val[0]))
		return 0;

	if (!map_word_equal(map, qry[1], val[1]))
		return 0;

	if (!map_word_equal(map, qry[2], val[2]))
		return 0;

	return 1; 	// "QRY" found
}
jedec模式


 7111
7111

 被折叠的 条评论
为什么被折叠?


