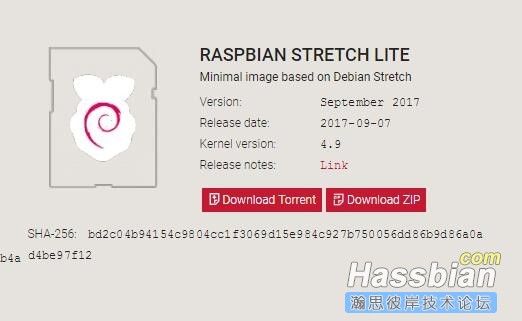
到树莓派官网下载最新版的镜像
https://www.raspberrypi.org/downloads/raspbian/

https://etcher.io/
下载etcher,用于刷镜像到sd卡

如果SD卡之前有东西,要注意备份。如果SD卡之前刷过其他系统的,也不用自己格式化什么的。直接flash就全部清空并分好区的。
刷好后,将读卡器从USB口拔出,再插回去!
在boot分区内新建一个空白文件,并且命名为 ssh【新版树莓派系统默认不开启ssh】

然后再断开,并拿出sd卡,插入树莓派。
接入网线、接上电源。
putty登陆ssh
1、更换系统的源
deb http://mirrors.aliyun.com/raspbian/raspbian/ stretch main non-free contrib
deb-src http://mirrors.aliyun.com/raspbian/raspbian/ stretch main non-free contrib
更换deb源
deb http://mirrors.aliyun.com/debian/ stretch main ui
2、 允许 apt 通过 HTTPS 使用镜像仓库:
3、安装docker
3-0 添加docker官方GPG key
3-1 添加 Docker CE 仓库
3-2 安装docker-ce
3-3 增加 Docker 仓库镜像
{
"registry-mirrors": [" https://registry.docker-cn.com "]
}
4、更换python源
粘贴以下内容并保存退出
[global]
trusted-host=mirrors.aliyun.com
index-url=http://mirrors.aliyun.com/pypi/simple
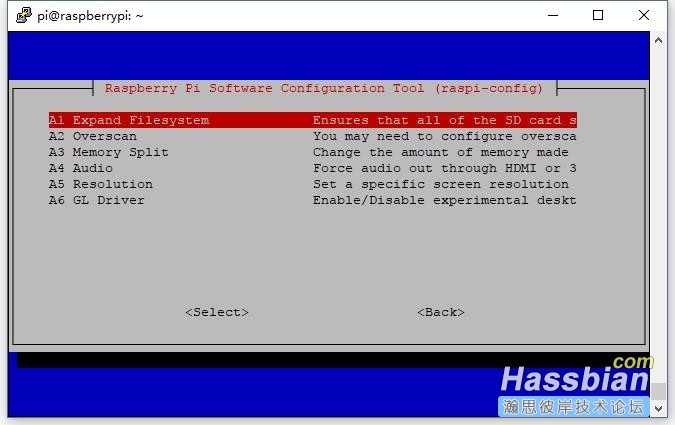
#配置时区,语言 更改用户密码等
sudo raspi-config
将空间扩展至整张sd卡

重启后生效
之后的跟八哥的帖子几乎没有区别了
https://bbs.hassbian.com/thread-956-1-1.html
3、更新源列表命令
sudo apt-get update
sudo apt-get upgrade -y
sudo apt-get dist-upgrade
4、如果debian系统安装过home-assistant、homebridge、mqtt服务,先执行以下命令原有服务
sudo systemctl daemon-reload
sudo systemctl disable homebridge
sudo systemctl stop homebridge
sudo systemctl disable home-assistant.service
sudo systemctl stop home-assistant.service
sudo systemctl disable mosquitto.service
sudo systemctl stop mosquitto.service
5、安装支持库文件
sudo apt-get install bash socat jq
7、安装Docker UI界面
docker pull portainer/portainer:latest
8、配置Docker UI设置
docker run -d -p 9000:9000 --name docker-portainer --restart=always -v /var/run/docker.sock:/var/run/docker.sock portainer/portainer
然后打开浏览器中输入树莓派IP地址:http://ip:9000
选择本地Docker socket to manage a local Docker engine (not available for Windows Containers (Windows Server 2016))
9、安装armhf-homeassistant镜像
docker pull homeassistant/armhf-homeassistant:latest
10、安装armhf-hassio-supervisor镜像
docker pull homeassistant/armhf-hassio-supervisor:latest
12、pi帐号进入,查看hassio-supervisor状态,看是否安装成功
sudo journalctl -fu hassio-supervisor.service
13、打开浏览器中输入树莓派IP地址:http://ip:8123,打开左侧面板的hassio界面中,添加以下地址
https://github.com/zoranke/addon-homebridge
在Hassio管理中安装homebridge
14、配置文件在以下目录
cd /usr/share/hassio
树莓派stretch安装docker参考文档
https://www.tomczhen.com/2017/09/13/learn-docker-on-raspberry-pi-part-1/
用国内源安装树莓派strectch docker
https://yeasy.gitbooks.io/docker_practice/install/raspberry-pi.html
各种系统安装dcoker,及docker教程 https://yeasy.gitbooks.io/docker_practice/content/install/raspberry-pi.html
hassio addon网址
https://github.com/danielperna84/hassio-addons
https://github.com/vkorn/hassio-addons
https://github.com/bestlibre/hassio-addons
https://github.com/gollo/hassio-addons
https://github.com/sunnythaper/sunnys-hassio
https://github.com/HerrHofrat/hassio-addons
https://github.com/balloob/hassio-addon-experiments
https://github.com/home-assistant/hassio-addons-example
https://github.com/ohmer1/hassio-addons
https://github.com/bramkragten/hassio-addons
https://github.com/adamrutt/hassio-addons
https://github.com/frenck/incubator
https://github.com/nalipaz/hassio-addons
https://github.com/odinuge/hassio-addons
https://github.com/hassio-addons/repository
https://www.raspberrypi.org/downloads/raspbian/

https://etcher.io/
下载etcher,用于刷镜像到sd卡

如果SD卡之前有东西,要注意备份。如果SD卡之前刷过其他系统的,也不用自己格式化什么的。直接flash就全部清空并分好区的。
刷好后,将读卡器从USB口拔出,再插回去!
在boot分区内新建一个空白文件,并且命名为 ssh【新版树莓派系统默认不开启ssh】

然后再断开,并拿出sd卡,插入树莓派。
接入网线、接上电源。
putty登陆ssh
1、更换系统的源
[Bash shell]
纯文本查看
复制代码
|
1
|
sudo
nano
/etc/apt/sources
.list
|
deb http://mirrors.aliyun.com/raspbian/raspbian/ stretch main non-free contrib
deb-src http://mirrors.aliyun.com/raspbian/raspbian/ stretch main non-free contrib
更换deb源
[Bash shell]
纯文本查看
复制代码
|
1
|
sudo
nano
/etc/apt/sources
.list.d
/raspi
.list
|
deb http://mirrors.aliyun.com/debian/ stretch main ui
2、 允许 apt 通过 HTTPS 使用镜像仓库:
[Bash shell]
纯文本查看
复制代码
|
1
2
3
4
5
6
|
sudo
apt-get
install
\
apt-transport-https \
ca-certificates \
curl \
gnupg2 \
software-properties-common
|
3、安装docker
3-0 添加docker官方GPG key
[Bash shell]
纯文本查看
复制代码
|
1
|
curl -fsSL https:
//download
.docker.com
/linux/
$(.
/etc/os-release
;
echo
"$ID"
)
/gpg
|
sudo
apt-key add -
|
3-1 添加 Docker CE 仓库
[Bash shell]
纯文本查看
复制代码
|
1
2
3
|
echo
"deb [arch=armhf] https:
//download
.docker.com
/linux/debian
\
$(lsb_release -cs) stable" | \
sudo
tee
/etc/apt/sources
.list.d
/docker
.list
|
3-2 安装docker-ce
[Bash shell]
纯文本查看
复制代码
|
1
2
3
|
sudo
apt-get update
sudo
apt-get
install
docker-ce
sudo
usermod
-aG docker $USER
|
3-3 增加 Docker 仓库镜像
[Bash shell]
纯文本查看
复制代码
|
1
|
sudo
nano
/etc/docker/daemon
.json
|
{
"registry-mirrors": [" https://registry.docker-cn.com "]
}
4、更换python源
[Bash shell]
纯文本查看
复制代码
|
1
2
3
|
cd
~
mkdir
.pip
sudo
nano ~/.pip
/pip
.conf
|
粘贴以下内容并保存退出
[global]
trusted-host=mirrors.aliyun.com
index-url=http://mirrors.aliyun.com/pypi/simple
#配置时区,语言 更改用户密码等
sudo raspi-config
将空间扩展至整张sd卡

重启后生效
[Bash shell]
纯文本查看
复制代码
|
1
|
sudo
reboot
|
之后的跟八哥的帖子几乎没有区别了
https://bbs.hassbian.com/thread-956-1-1.html
3、更新源列表命令
sudo apt-get update
sudo apt-get upgrade -y
sudo apt-get dist-upgrade
4、如果debian系统安装过home-assistant、homebridge、mqtt服务,先执行以下命令原有服务
sudo systemctl daemon-reload
sudo systemctl disable homebridge
sudo systemctl stop homebridge
sudo systemctl disable home-assistant.service
sudo systemctl stop home-assistant.service
sudo systemctl disable mosquitto.service
sudo systemctl stop mosquitto.service
5、安装支持库文件
sudo apt-get install bash socat jq
7、安装Docker UI界面
docker pull portainer/portainer:latest
8、配置Docker UI设置
docker run -d -p 9000:9000 --name docker-portainer --restart=always -v /var/run/docker.sock:/var/run/docker.sock portainer/portainer
然后打开浏览器中输入树莓派IP地址:http://ip:9000
选择本地Docker socket to manage a local Docker engine (not available for Windows Containers (Windows Server 2016))
9、安装armhf-homeassistant镜像
docker pull homeassistant/armhf-homeassistant:latest
10、安装armhf-hassio-supervisor镜像
docker pull homeassistant/armhf-hassio-supervisor:latest
11、安装hassio切换到root
sudo su
curl -sL https:
//raw
.githubusercontent.com
/home-assistant/hassio-build/master/install/hassio_install
|
bash
-s -- -m raspberrypi3
sudo journalctl -fu hassio-supervisor.service
13、打开浏览器中输入树莓派IP地址:http://ip:8123,打开左侧面板的hassio界面中,添加以下地址
https://github.com/zoranke/addon-homebridge
在Hassio管理中安装homebridge
14、配置文件在以下目录
cd /usr/share/hassio
树莓派stretch安装docker参考文档
https://www.tomczhen.com/2017/09/13/learn-docker-on-raspberry-pi-part-1/
用国内源安装树莓派strectch docker
https://yeasy.gitbooks.io/docker_practice/install/raspberry-pi.html
各种系统安装dcoker,及docker教程 https://yeasy.gitbooks.io/docker_practice/content/install/raspberry-pi.html
hassio addon网址
https://github.com/danielperna84/hassio-addons
https://github.com/vkorn/hassio-addons
https://github.com/bestlibre/hassio-addons
https://github.com/gollo/hassio-addons
https://github.com/sunnythaper/sunnys-hassio
https://github.com/HerrHofrat/hassio-addons
https://github.com/balloob/hassio-addon-experiments
https://github.com/home-assistant/hassio-addons-example
https://github.com/ohmer1/hassio-addons
https://github.com/bramkragten/hassio-addons
https://github.com/adamrutt/hassio-addons
https://github.com/frenck/incubator
https://github.com/nalipaz/hassio-addons
https://github.com/odinuge/hassio-addons
https://github.com/hassio-addons/repository


 1730
1730

 被折叠的 条评论
为什么被折叠?


