


 本文介绍了在Ubuntu18.04系统中,使用3块独立显卡(包括2张计算卡和1张GTX960)遇到的黑屏问题。当GTX960显卡从第一个PCIEx16插槽移动到第二个插槽后,系统无法正常显示图形界面。解决方案是通过英伟达X Server Settings找到显卡总线ID,并修改`/etc/X11/xorg.conf`配置文件,确保显卡标识与对应插槽的总线ID匹配,从而成功解决了黑屏和循环登录的问题。
我的环境
- 华南X99-F8主板
- Windows10+Ubuntu18.04双系统
- 3块独立显卡
遇到的问题
我的3块显卡包括两张计算卡(无VGA/HDMI等输出)和一张GTX960(HDMI用于输出)。X99-F8这块主板包含2个PCIEx16插槽 + 1个PCIEx4插槽。原来是把GTX960插在第一个PCIEx16插槽用于输出图形界面,一切正常。但是由于计算卡换了个散热器,很大,空间不够。一二插槽之间空隙大,二三插槽之间空隙小。所以只能交换GTX960到第二个插槽。可是当我把他放在第二个插槽用于输出图形界面的时候,重启登录变为了黑屏,有光,但是屏幕什么都没有。按照网络上的方法重装了好几变驱动也没用,更换到低版本驱动的话能到登录界面,但是会出现循环登录的问题。
解决方案
- 其实这是配置的问题,不需要重装驱动。
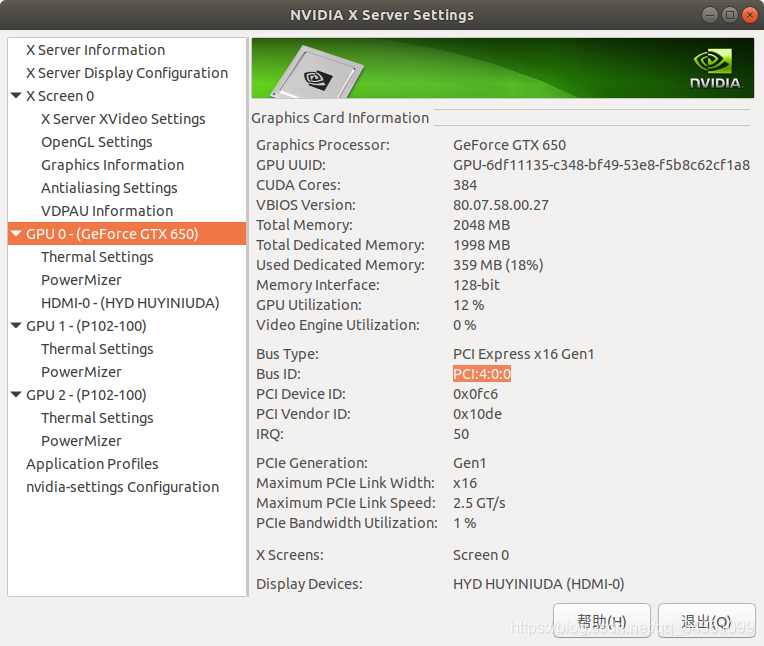
- 首先,通过英伟达的X Server Settings工具查看每张显卡的总线ID,这个非常重要,这个就代表着你目前每张显卡对接的PCIE槽位。
- 然后打开终端执行
sudo nautilus运行具有管理员权限的目录管理器,然后到etc/X11中打开xorg.conf(用文本编辑器)。配置你之后想要的效果:(比如我是↓)# nvidia-xconfig: X configuration file generated by nvidia-xconfig # nvidia-xconfig: version 440.82 Section "ServerLayout" Identifier "Layout0" Screen 0 "Screen0" InputDevice "Keyboard0" "CoreKeyboard" InputDevice "Mouse0" "CorePointer" EndSection Section "Files" EndSection Section "InputDevice" # generated from default Identifier "Mouse0" Driver "mouse" Option "Protocol" "auto" Option "Device" "/dev/psaux" Option "Emulate3Buttons" "no" Option "ZAxisMapping" "4 5" EndSection Section "InputDevice" # generated from default Identifier "Keyboard0" Driver "kbd" EndSection Section "Monitor" Identifier "Monitor0" VendorName "Unknown" ModelName "Unknown" Option "DPMS" EndSection Section "Monitor" Identifier "Monitor1" VendorName "Unknown" ModelName "Unknown" Option "DPMS" EndSection Section "Device" Identifier "Device0" Driver "nvidia" VendorName "NVIDIA Corporation" BoardName "P102-100" BusID "PCI:3:0:0" Option "Coolbits" "4" EndSection Section "Device" Identifier "Device1" Driver "nvidia" VendorName "NVIDIA Corporation" BoardName "GeForce GTX 650" BusID "PCI:4:0:0" EndSection Section "Device" Identifier "Device2" Driver "nvidia" VendorName "NVIDIA Corporation" BoardName "P102-100" BusID "PCI:1:0:0" Option "Coolbits" "4" EndSection Section "Screen" Identifier "Screen0" Device "Device1" Monitor "Monitor0" DefaultDepth 24 SubSection "Display" Depth 24 EndSubSection EndSection - 注意重点
Screen0的Device,这个要填你用来显示的显卡(可以是独显或者集显)的标志(identifier),比如我这里是GTX960的标志Device1。- 你用来显示的显卡的
BusID应该对应上你之后想要插在的槽位的总线ID,比如我的第二个槽位对应的总线ID就是PCI:4:0:0。
- 改完之后保存,重启,一切ok~~~


 4259
4259

 被折叠的 条评论
为什么被折叠?
被折叠的 条评论
为什么被折叠?
 到【灌水乐园】发言


