


1.解释执行和编译执行
编译执行(编译器):
将一段程序直接翻译成机器码(对于C/C++这种非跨平台的语言)或者中间码(Java这种跨平台语言,需要JVM再将字节码编译成机器码)。
编译执行是直接将所有语句都编译成了机器语言,并且保存成可执行的机器码。执行的时候,是直接进行执行机器语言,不需要再进行解释/编译。
解释执行(解释器):
在执行程序时,再将中间码(例如Java的字节码通过JVM解释成机器码)一行行的解释成机器码进行执行。这个运行过程是解释一行,执行一行。
Sun Classic VM:
1996年1月23日,Sun公司发布JDK1.0,Java语言首次拥有了商用的正式运行环境,它就是Classic VM。这是第一款商用的虚拟机,是JVM界的始祖。
这款虚拟机只能使用纯解释器方式来执行Java代码,如果要使用JIT编译器(Just In Time 即时编译器),就必须进行外挂。但是呢,如果外挂了JIT,那么就完全接管了解释器的工作,那就不能称作为Classic VM了。
这个阶段的虚拟机即使外挂了JIT编译器输出本地代码,执行效率也和传统的C/C++程序有很大差距,Java语言很慢的形象就是在这个时候开始在用户心中建立起来的。
Exact VM:
为了解决Sun Classic VM的慢,1998年在JDK 1.2发布时,曾在Solaris平台(Sun基于Unix分支自研的操作系统)上发布过一款名为Exact VM的虚拟机,是现代化高性能虚拟机的雏形,如热点探测、两级即时编译器、编译器与解释器混合工作模式等。
这块虚拟机只在Solaris平台牛刀小试,并未大规模使用,后被HotSpot取代。
2.静态解释器
AbstractInterpreter
解释器代码模块位置
hotspot/src/share/vm/interpreter,其中 C++解释器源文件是 cppIntepreter.cpp 、模板解释器源文件是 TemplateInterpreter.cpp。解释器的继承关系如下:
AbstractInterpreter        /interpreter/abstractInterpreter.hpp
     CppInterpreter
     TemplateInterpreter   /interpreter/templateInterpreter.hpp
            Interpreter    /interpreter/templateInterpreter.hpp
首先看解释器的顶层父类 AbstractInterpreter
封装了 MethodKinds,根据不同的方法类型生成对应的 entry_point。
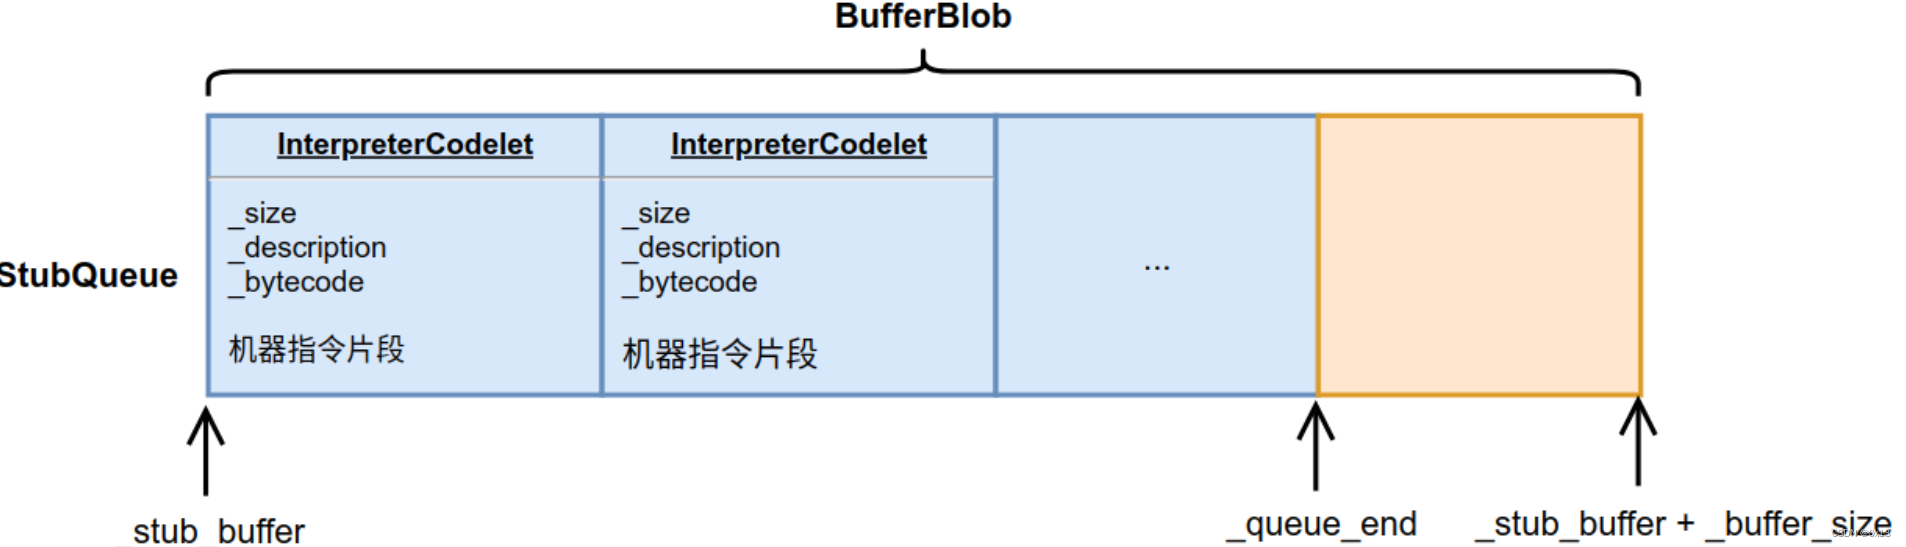
StubQueue* _code属性就是保存在Java函数调用时动态生成的 stub 机器代码片段,这是个队列结构,会在子类调用初始化时进行设置。
_entry_table 属性是一个 entry_point 数组,按照 MethodKind 类型保存入口点,例如普通方法的入口点为_entry_table[0]、同步的普通方法的入口点为_entry_table[1],这些_entry_table[0],_entry_table[1]指向的就是之前_code队列里面的例程。
子类会调用 generate_all()函数完成的 _entry_table 的设置。
/interpreter/abstractInterpreter.hpp 代码如下:
class AbstractInterpreter: AllStatic {
  // 封装的方法类型,根据不同类型生成每个类型的 entry_point
  enum MethodKind {
    // 省略
  };
  static StubQueue* _code; // 用来保存生成的汇编代码的
  static bool       _notice_safepoints;  // bool,是否激活了安全点机制
  static address    _native_entry_begin;   // JIT编译器产生的本地代码在内存中的起始位置
  static address    _native_entry_end;    // JIT编译器产生的本地代码在内存中的终止位置
  static address    _entry_table[number_of_method_entries];    // address数组,处理不同类型的方法的方法调用的入口地址,数组的长度就是枚举number_of_method_entries的值
  static address    _native_abi_to_tosca[number_of_result_handlers];  // address数组,处理不同类型的本地方法调用返回值的入口地址,数组的长度是枚举number_of_result_handlers的值,目前为10
  static address    _slow_signature_handler;  // 本地方法生成签名的入口地址
  static address    _rethrow_exception_entry;   // 重新抛出异常的入口地址
};
而他的两个子类:
* C++解释器 = bytecodeInterpreter* + cppInterpreter*
* 模板解释器 = templateTable* + templateInterpreter*
它们前者负责字节码的解释,后者负责解释器的运行时,共同完成解释功能。这些模块的初始化以及调用流程几个重要函数如下:
hotspot/src/share/vm/runtime/init.cpp init_globals()     =>    全局模块初始化入口
hotspot/src/share/vm/interpreter/interpreter.cpp interpreter_init()     =>    解释器初始化
hotspot/src/share/vm/interpreter/templateInterpreter.cpp  TemplateInterpreter::initialize()        =>     模板解释器初始化
hotspot/src/share/vm/interpreter/templateInterpreter TemplateInterpreterGenerator::generate_all()     =>    生成每中Java方法类型的entry_point
hotspot/src/share/vm/interpreter/templateInterpreter.cpp TemplateInterpreterGenerator::set_entry_points_for_all_bytes()    =>    循环对 DispatchTable 中的 Bytecodes::Code 调用 set_entry_points() 进行设置
hotspot/src/share/vm/interpreter/templateInterpreter.cpp TemplateInterpreterGenerator::set_entry_points()    =>    为每个字节码设置例程
hotspot/src/cpu/x86/vm/templateInterpreter_x86_64.cpp TemplateInterpreterGenerator::set_vtos_entry_points()     =>    将字节码指令生成汇编代码
3.模板解释器
TemplateInterpreter
接下来看第一个子类模板解释器 TemplateInterpreter,
在父类的基础上新增了更多的函数。抽象解释器定义了必要的例程,具体的解释器在这之上还有自己的特设的例程。
模板解释器就继承自抽象解释器,在那些例程之上还有自己的特设例程,例如上面定义的一些属性,保存了程序异常时的入口例程,其实还有许多为保存例程入口而定义的字段或数组。
里面使用了 TosState 枚举,这个枚举主要是标记字节码指令执行前后栈顶的值的类型,因为栈顶的值可能保存在一个或多个寄存器上需要通过类型来正确读取,将栈顶保存在寄存器中称为栈顶缓存计数。
里面 EntryPoint 就是封装的 address 数组。
class TemplateInterpreter: public AbstractInterpreter {
     // 省略
    friend class TemplateTable;
};
模板解释器 TemplateInterpreter 有个字段 TemplateTable,这个是模板表,他里面保存了各个字节码转换机器码片段的模板,通过他的函数名称就知道是和字节码指令 opcode 是对应的:
class TemplateTable: AllStatic {
  // 下面定义了每个字节码指令翻译成机器代码片段的模板,函数名称和字节码指令一致
  static void nop();
  static void aconst_null();
  static void iconst(int value);
  static void lconst(int value);
  static void fconst(int value);
  static void dconst(int value);
  // 省略 ...
};
这里以 aaload 指令为例查看看字节码指令到机器代码片段的生成流程,以x86_32 为例,templateTable_x86_64:
TemplateTable:: aaload()
void TemplateTable::aaload() {
  transition(itos, atos);
  __ pop_ptr(rdx);
  // eax: index
  // rdx: array
  index_check(rdx, rax); // kills rbx
  __ load_heap_oop(rax, Address(rdx, rax,
                                UseCompressedOops ? Address::times_4 : Address::times_8,
                                arrayOopDesc::base_offset_in_bytes(T_OBJECT)));
}
首先来看模板解释器初始化函数,会创建一个
StubQueue 来保存每一个生成的例程、并初始化解释器生成器 InterpreterGenerator
。
hotspot/src/share/vm/runtime/init.cpp init_globals() => 全局模块初始化入口
hotspot/src/share/vm/interpreter/interpreter.cpp interpreter_init() => 解释器初始化
hotspot/src/share/vm/interpreter/templateInterpreter.cpp TemplateInterpreter::initialize() => 模板解释器初始化
void TemplateInterpreter::initialize() {
    // 省略
  AbstractInterpreter::initialize();
  TemplateTable::initialize();
  // generate interpreter
  { ResourceMark rm;
    TraceTime timer("Interpreter generation", TraceStartupTime);
    int code_size = InterpreterCodeSize;
    NOT_PRODUCT(code_size *= 4;)  // debug uses extra interpreter code space
    // InterpreterCodelet 机器代码缓存队列
    _code = new StubQueue(new InterpreterCodeletInterface, code_size, NULL,"Interpreter");
    //初始化InterpreterGenerator,初始化的时候会生成所有的调用函数
    InterpreterGenerator g(_code);
    if (PrintInterpreter) print();
  }
  _active_table = _normal_table;
}
初始化函数 TemplateInterpreter::initialize() 会创建 StubQueue 对象,保存在 _code 属性,这个就是用来保存生成机器代码stub队列的,队列中保存的是 InterpreterCodelet 对象。
InterpreterCodelet 和 CodeletMark 两个类比较重要,机器代码就保存在 InterpreterCodelet 这里面。 InterpreterCodelet 是继承自 Stub 类。
每个InterpreterCodelet实例都代表一段机器指令(包含了字节码对应的机器指令片段以及一些调试和输出信息)。
如每个字节码都有一个InterpreterCodelet实例,所以在解释执行时,如果要执行某个字节码,则执行的就是由InterpreterCodelet实例代表的机器指令片段。
定义如下:
class InterpreterCodelet: public Stub {
  friend class VMStructs;
private:
  int         _size;                             // the size in bytes
  const char* _description;                      // a description of the codelet, for debugging & printing
  Bytecodes::Code _bytecode;                     // 对应的一个字节码指令
  DEBUG_ONLY(CodeStrings _strings;)              // Comments for annotating assembler output.
  // 这里就是保存机器指令片段的地址范围,这一片中间是 CodeEntryAlignment 也就是代表一段机器指令
  address code_begin() const                     { return (address)this + round_to(sizeof(InterpreterCodelet), CodeEntryAlignment); }
  address code_end() const                       { return (address)this + size(); }
};
每个
InterpreterCodelet 实例关键创建好之后就长这样子:
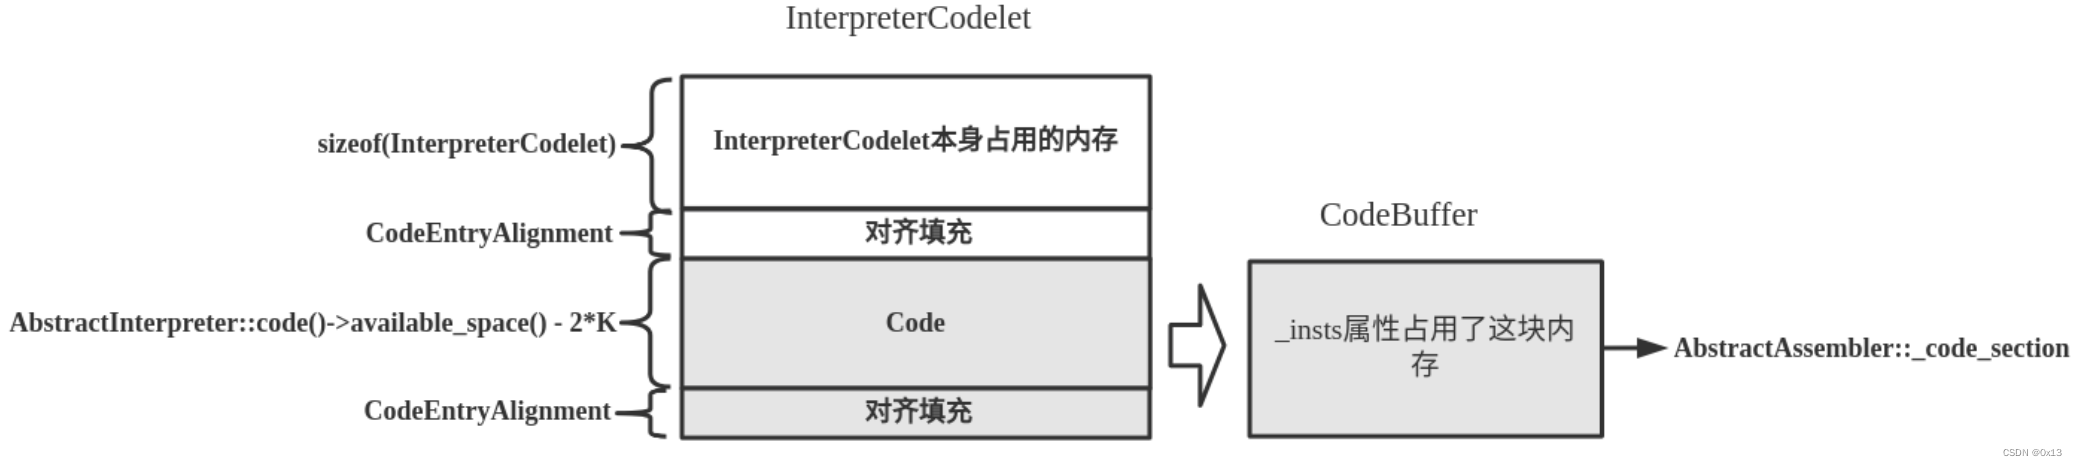
最终他们会写入到 stubQueue 队列中:
到这里我们再回到模板解释器初始化函数 TemplateInterpreter::initialize() 中,现在 stubQueue 队列已经有了,下一步就是填充他了于是调用了 InterpreterGenerator g(_code) 初始化模板解释器生成器。
也就是
Template
InterpreterGenerator,这个类的构造函数会触发
TemplateInterpreterGenerator::generate_all() 生成
许多字节码指令以及一些虚拟机辅助执行的机器指令片段。生成完成之后再进行设置、以及 entry_point 生成。
代码如下:
TemplateInterpreterGenerator::generate_all()    =>    生成一些字节码指令以及虚拟机辅助执行的机器指令片
{
    generate_trace_code()    =>
    generate_return_entry_for()    =>
    generate_earlyret_entry_for()   =>
    generate_deopt_entry_for()    =>
    generate_continuation_for()    =>
    generate_safept_entry_for()    =>
    generate_exception_handler()    =>
    generate_exception_handler()    =>
    generate_ArrayIndexOutOfBounds_handler()    =>
    generate_StackOverflowError_handler()    =>
    generate_method_entry()    =>   初始化 _entry_table
    TemplateInterpreterGenerator::set_entry_points_for_all_bytes() 为每个字节码指令设置机器代码片段,也就是设置例程
}
会生成一系列的重要例程,根据代码 generate_all() 注释如下,其中我们重点关注 set_entry_points_for_all_bytes() 生成的 字节码的入口例程:
error exits    当方法出现时会调用这个例程,进行出错时程序退出
bytecode tracing support    配置命令-XX:+TraceBytecodes后,进行字节码追踪
return entry points     函数返回入口
invoke return entry points    对于某些invoke字节码调用指令来说,需要一些特殊的返回入口
earlyret entry points     JVMTI的EarlyReturn入口
deoptimization entry points     从"逆优化"调用返回的入口
result handlers for native calls    本地方法调用返回值处理handlers
continuation entry points    continuation入口
safepoint entry points    safepoint入口,当执行字节码时,如果要求解释执行进入安全点,则会执行safepoint入口指定的机器指令片段
exception handling    异常处理例程
throw exception entrypoints    抛出异常的入口
all non-native method kinds    非本地方法的入口
all native method kinds    本地方法的入口
Bytecodes     字节码的入口,这一部分比较重要,由 set_entry_points_for_all_bytes()函数的实现、
在所有字节码指令生成机器代码之后,会最终调用
TemplateInterpreterGenerator::set_entry_points_for_all_bytes() 为每个字节码指令设置机器代码片段,也就是设置例程。
void TemplateInterpreterGenerator::set_entry_points_for_all_bytes() {
  for (int i = 0; i < DispatchTable::length; i++) {
    Bytecodes::Code code = (Bytecodes::Code)i;
    if (Bytecodes::is_defined(code)) {
        // 真正的设置
      set_entry_points(code);
    } else {
      set_unimplemented(i);
    }
  }
}
接下来就是模板解释器生成器调用
TemplateInterpreterGenerator::set_entry_points()
为每个字节码设置例程,可以看到这个函数的参数就是 Bytecodes::Code 表示一个字节码指令
:
void TemplateInterpreterGenerator::set_entry_points(Bytecodes::Code code) {
  CodeletMark cm(_masm, Bytecodes::name(code), code);
  // initialize entry points
  assert(_unimplemented_bytecode    != NULL, "should have been generated before");
  assert(_illegal_bytecode_sequence != NULL, "should have been generated before");
  address bep = _illegal_bytecode_sequence;
  address cep = _illegal_bytecode_sequence;
  address sep = _illegal_bytecode_sequence;
  address aep = _illegal_bytecode_sequence;
  address iep = _illegal_bytecode_sequence;
  address lep = _illegal_bytecode_sequence;
  address fep = _illegal_bytecode_sequence;
  address dep = _illegal_bytecode_sequence;
  address vep = _unimplemented_bytecode;
  address wep = _unimplemented_bytecode;
  // code for short & wide version of bytecode
  if (Bytecodes::is_defined(code)) {
    Template* t = TemplateTable::template_for(code);
    assert(t->is_valid(), "just checking");
    set_short_entry_points(t, bep, cep, sep, aep, iep, lep, fep, dep, vep);
  }
  if (Bytecodes::wide_is_defined(code)) {
    Template* t = TemplateTable::template_for_wide(code);
    assert(t->is_valid(), "just checking");
    set_wide_entry_point(t, wep);
  }
  // set entry points
  EntryPoint entry(bep, cep, sep, aep, iep, lep, fep, dep, vep);
  Interpreter::_normal_table.set_entry(code, entry);
  Interpreter::_wentry_point[code] = wep;
}
到这里模板解释器已经创建好了、不同类型的方法对应的 entry_point 以及 stub 代码也生成好了,就等 Java 函数的调用了,这里就回到了 call_helper() 函数了:
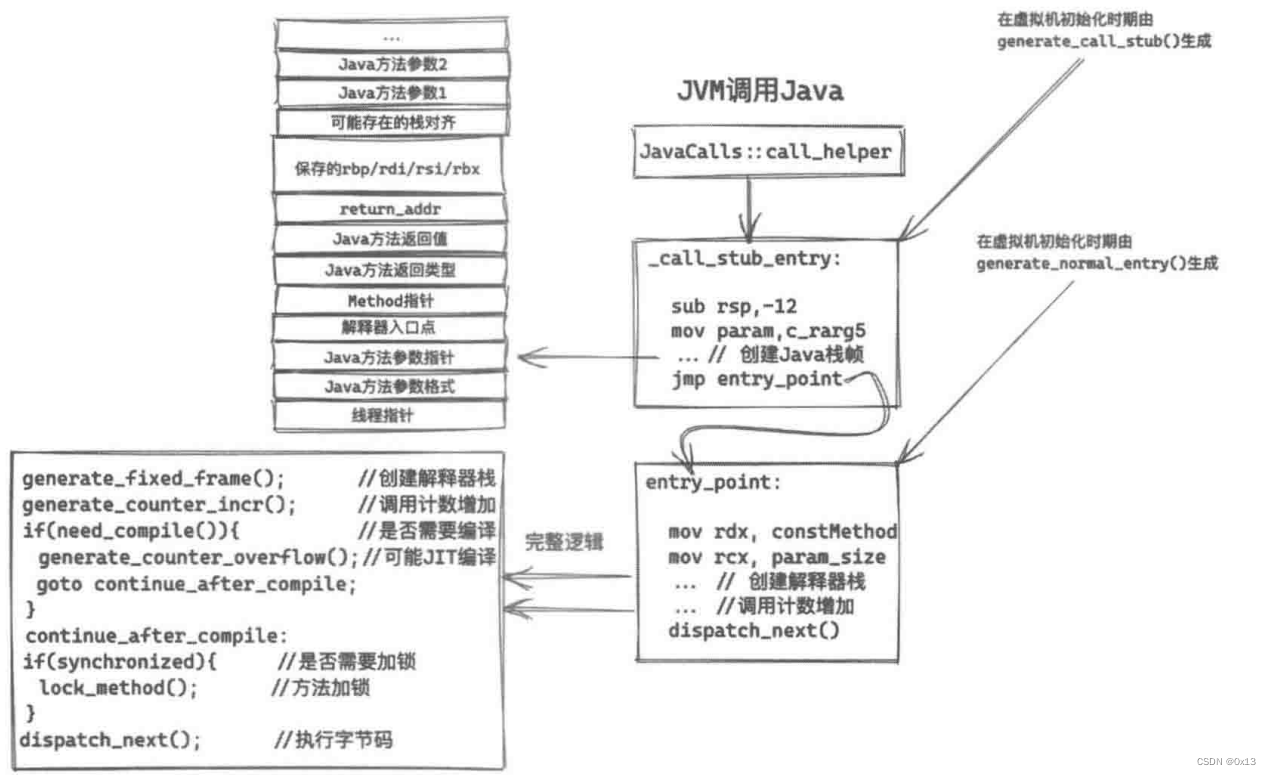
其中调用流程如下:
StubRoutines::call_stub()(
  (address)&link, // 类型为JavaCallWrapper
  // (intptr_t*)&(result->_value),
  result_val_address, // 函数返回值地址
  result_type,
  method(),  // 当前要执行的 Java Method,这里获取出来是元数据信息,里面包含字节码信息
  entry_point, // 用于后续帧开辟, entry_point 会从 method() 中获取出 Java Method 的第一个字节码命令(Opcode),也就是整个 Java Method 的调用入口
  args->parameters(), // 就是 Java Method 的函数参数
  args->size_of_parameters(), // 用函数调用Caller栈来传递,这个就是Java Method 的函数参数大小 size,占用内存大小(字节)
  CHECK // 用函数调用Caller栈来传递,CHECK是宏,定义的线程对象 thread
);
CallStub是一个函数指针并强制转换成为了 _call_stub_entry 类型并指向了 generate_call_stub() 函数。这个映射定义在 stubGenerator_x86_64.cpp文件中,由初始化进行设置:
void generate_initial() {
  // 省略
  StubRoutines::_call_stub_entry = generate_call_stub(StubRoutines::_call_stub_return_address);
}
接下来就进入
StubGenerator::
generate_call_stub() 这个函数了,这一步会根据前面传递的8个参数创建 Java Method 的栈、将6个参数入栈、暂存寄存器状态、调用 JavaMethod、保存返回值、退栈等全部流程。部分源码以及转换得到的汇编如下:
// call Java function
__ BIND(parameters_done);
__ movptr(rbx, method);             // 将method地址包含的数据接Method*拷贝到rbx中
__ movptr(c_rarg1, entry_point);    // 将解释器的入口地址拷贝到c_rarg1寄存器中
__ mov(r13, rsp);                   // 将rsp寄存器的数据拷贝到r13寄存器中
BLOCK_COMMENT("call Java function");
__ call(c_rarg1);    // 调用解释器的解释函数,从而调用Java方法,后续就是 entry_point 的工作啦。
生成的汇编代码如下:
mov     -0x18(%rbp),%rbx      // 将Method*送到%rbx中
mov     -0x10(%rbp),%rsi      // 将entry_point送到%rsi中
mov     %rsp,%r13    // 将调用者的栈顶指针保存到%r13中
callq   *%rsi    // 调用Java方法
4.C++解释器
早期的解释器就是switch做指令分派,为每个指令生成一段C++代码,也称为 switch-and-dispatch,模块为
cppInterpreter.cpp 文件。对应的 switch 代码如下:
bytecodeInterpreter.cpp:
run:
  opcode = *pc;  /* prefetch first opcode */
  while (1)
  {
      opcode = *pc;
      // 省略
      {
          CASE(_nop): .. }
          CASE(_aconst_null): .. }
          CASE(opcode):                                                     \ .. }
          CASE(_##opcname):                                                 \ .. }
          CASE(_bipush): .. }
          CASE(_sipush): .. }
          CASE(_aload): .. }
          CASE(_iload): .. }
          CASE(_fload): .. }
          CASE(_lload): .. }
          CASE(_dload): .. }
          CASE(_aload_##num):                                               \ .. }
          CASE(_iload_##num):                                               \ .. }
          CASE(_fload_##num):                                               \ .. }
          CASE(_lload_##num):                                               \ .. }
          CASE(_dload_##num):                                               \ .. }
          CASE(_astore): .. }
          CASE(_istore): .. }
          CASE(_fstore): .. }
          CASE(_lstore): .. }
          CASE(_dstore): .. }
          CASE(_wide): { .. }
          CASE(_astore_##num):                                              \ .. }
          CASE(_istore_##num):                                              \ .. }
          CASE(_fstore_##num):                                              \ .. }
          CASE(_dstore_##num):                                              \ .. }
          CASE(_lstore_##num):                                              \ .. }
          CASE(_pop):                /* Discard the top item on the stack */ .. }
          CASE(_pop2):               /* Discard the top 2 items on the stack */ .. }
          CASE(_dup):               /* Duplicate the top item on the stack */ .. }
          CASE(_dup2):              /* Duplicate the top 2 items on the stack */ .. }
          CASE(_dup_x1):    /* insert top word two down */ .. }
          CASE(_dup_x2):    /* insert top word three down  */ .. }
          CASE(_dup2_x1):   /* insert top 2 slots three down */ .. }
          CASE(_dup2_x2):   /* insert top 2 slots four down */ .. }
          CASE(_swap): {        /* swap top two elements on the stack */ .. }
          CASE(_i##opcname):                                                \ .. }
          CASE(_l##opcname):                                                \ .. }
          CASE(_d##opcname): {                                                 \ .. }
          CASE(_f##opcname):                                                   \ .. }
          CASE(_i##opcname):                                                \ .. }
          CASE(_l##opcname):                                                \ .. }
          CASE(_iinc): .. }
          CASE(_ineg): .. }
          CASE(_fneg): .. }
          CASE(_lneg): .. }
          CASE(_dneg): .. }
          // 省略
      }
  } /* while (1) interpreter loop */


 1732
1732


 被折叠的 条评论
为什么被折叠?
被折叠的 条评论
为什么被折叠?
 到【灌水乐园】发言


