


1 介绍
- 学习视频:https://www.bilibili.com/video/BV1aE41167Tu
- 笔记是B站狂神说相关视频的学习笔记
- Spring:IOC和AOP必须掌握
- SpringMVC:执行流程必须掌握
- 官网:https://docs.spring.io/spring/docs/current/spring-framework-reference/web.html
1.1 什么是MVC?
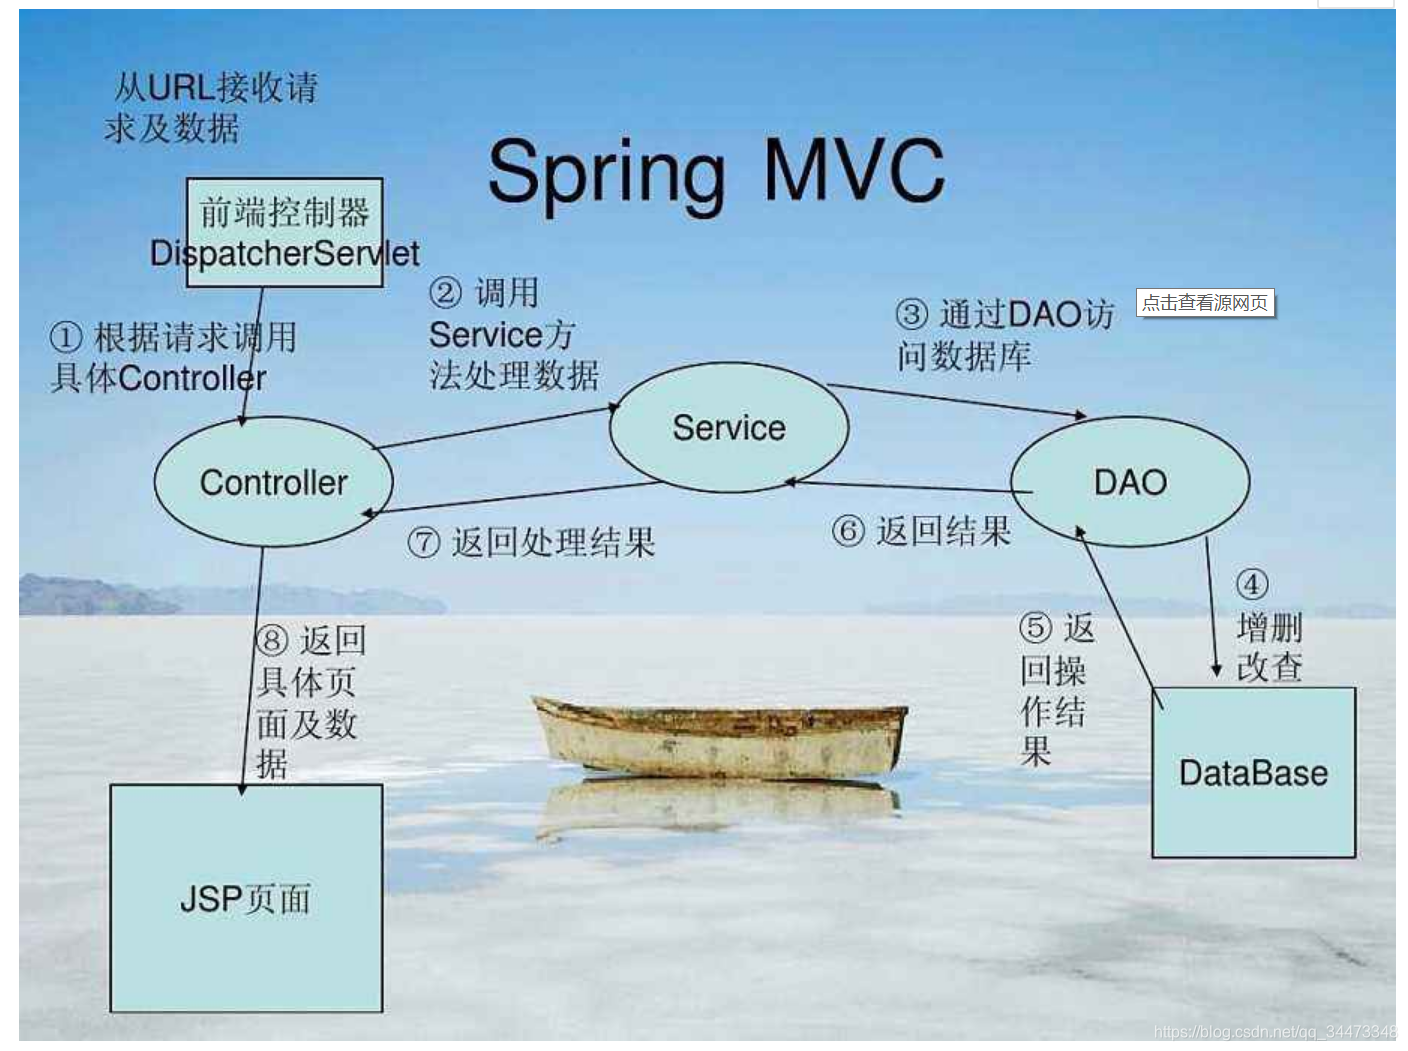
- Model:数据模型,提供要展示的数据,因此包含数据和行为,可以认为是领域模型或JavaBean组件(包含数据和行为),不过现在一般都分离开来:Value Object(数据Dao) 和 服务层(行为Service)。也就是模型提供了模型数据查询和模型数据的状态更新等功能,包括数据和业务。
- View:负责进行模型的展示,一般就是我们见到的用户界面,客户想看到的东西。
- Controller(调度员): 接收用户请求,委托给模型进行处理(状态改变),处理完毕后把返回的模型数据返回给视图,由视图负责展示。也就是说控制器做了个调度员的工作。
- 最常用的MVC:(Model)Bean +(view) Jsp +(Controller) Servlet
[外链图片转存失败,源站可能有防盗链机制,建议将图片保存下来直接上传(img-6GeCrArV-1596422947892)(E:\Java\markdown_notes\photos\image-20200423211601751.png)]
1.2 Model1时代
- 分为:视图层V和模型层M;由视图层的view来控制分发数据并展示给用户
- 缺点:JSP职责不单一,过重,不便于维护

1.3 Model2时代(MVC延续至今)
- 流程:分为了Contrller,Model,View
- 访问流程:
- 用户发请求
- Servlet接收请求数据,并调用对应的业务逻辑方法
- 业务处理完毕,返回更新后的数据给servlet
- servlet转向到JSP,由JSP来渲染页面
- 响应给前端更新后的页面
1.4 回顾Servlet创建
- 创建maven,父工程:pom.xml
<?xml version="1.0" encoding="UTF-8"?>
<project xmlns="http://maven.apache.org/POM/4.0.0"
         xmlns:xsi="http://www.w3.org/2001/XMLSchema-instance"
         xsi:schemaLocation="http://maven.apache.org/POM/4.0.0 http://maven.apache.org/xsd/maven-4.0.0.xsd">
    <modelVersion>4.0.0</modelVersion>

    <groupId>com.ssl</groupId>
    <artifactId>SpringMVC</artifactId>
    <packaging>pom</packaging>
    <version>1.0-SNAPSHOT</version>
    <!--父工程导入依赖-->
    <dependencies>
        <dependency>
            <groupId>junit</groupId>
            <artifactId>junit</artifactId>
            <version>4.12</version>
        </dependency>
        <dependency>
            <groupId>org.springframework</groupId>
            <artifactId>spring-webmvc</artifactId>
            <version>5.2.4.RELEASE</version>
        </dependency>
        <dependency>
            <groupId>javax.servlet</groupId>
            <artifactId>servlet-api</artifactId>
            <version>2.5</version>
        </dependency>
        <dependency>
            <groupId>javax.servlet.jsp</groupId>
            <artifactId>jsp-api</artifactId>
            <version>2.2</version>
        </dependency>
        <dependency>
            <groupId>javax.servlet</groupId>
            <artifactId>jstl</artifactId>
            <version>1.2</version>
        </dependency>
        <dependency>
            <groupId>org.projectlombok</groupId>
            <artifactId>lombok</artifactId>
            <version>1.18.12</version>
        </dependency>
        <dependency>
            <groupId>com.fasterxml.jackson.core</groupId>
            <artifactId>jackson-databind</artifactId>
            <version>2.10.0</version>
        </dependency>

        <dependency>
            <groupId>com.alibaba</groupId>
            <artifactId>fastjson</artifactId>
            <version>1.2.62</version>
        </dependency>

    </dependencies>

    <!--资源过滤器,防止导入资源失败问题,最好在父子pom.xml里都加入一下代码-->
    <build>
        <resources>
            <resource>
                <directory>src/main/resources</directory>
                <includes>
                    <include>**/*.properties</include>
                    <include>**/*.xml</include>
                </includes>
                <filtering>true</filtering>
            </resource>

            <resource>
                <directory>src/main/java</directory>
                <includes>
                    <include>**/*.properties</include>
                    <include>**/*.xml</include>
                </includes>
                <filtering>true</filtering>
            </resource>
        </resources>
    </build>

</project>
- 创建子工程,idea右键Add Framwork Support添加web支持
- 实现HelloServlet继承HttpServlet接口,并创建/WEB-INF/jsp/test.jsp
public class HelloServlet extends HttpServlet {

    @Override
    protected void doGet(HttpServletRequest req, HttpServletResponse resp) throws ServletException, IOException {
        //1 获得参数
        //2 调用业务层
        //3 视图转发或者重定向
        req.getRequestDispatcher("/WEB-INF/jsp/test.jsp").forward(req, resp);
    }

    @Override
    protected void doPost(HttpServletRequest req, HttpServletResponse resp) throws ServletException, IOException {
        super.doPost(req, resp);
    }
}
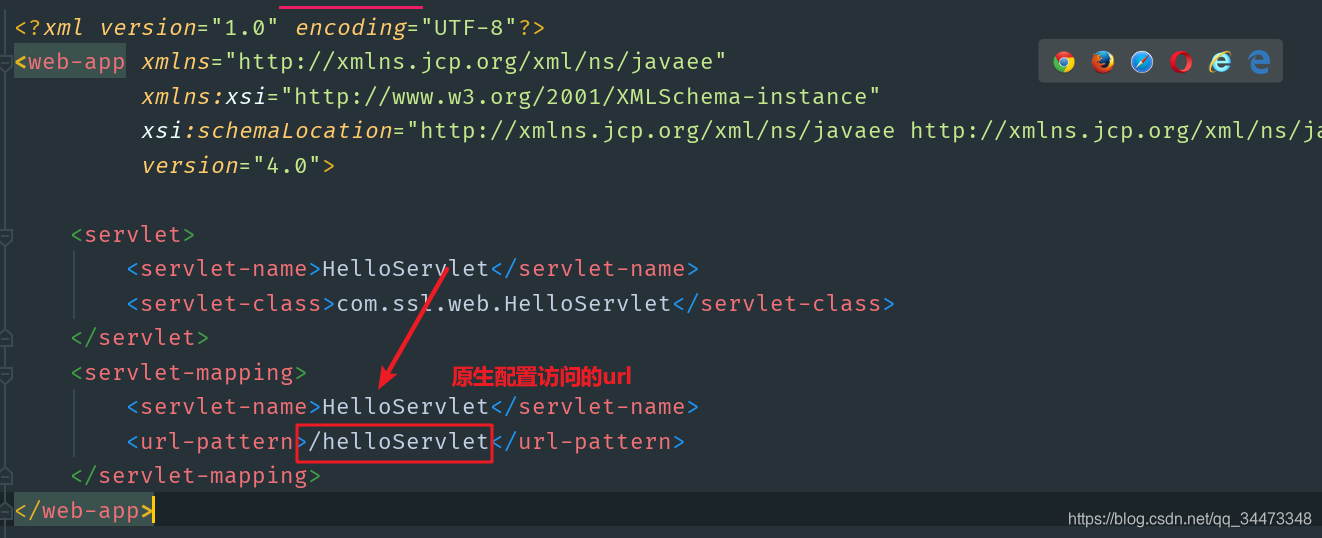
- web.xml中注册HelloServlet,测试跳转:http://localhost:8080/springmvc_01_servlet//helloServlet
<?xml version="1.0" encoding="UTF-8"?>
<web-app xmlns="http://xmlns.jcp.org/xml/ns/javaee"
         xmlns:xsi="http://www.w3.org/2001/XMLSchema-instance"
         xsi:schemaLocation="http://xmlns.jcp.org/xml/ns/javaee http://xmlns.jcp.org/xml/ns/javaee/web-app_4_0.xsd"
         version="4.0">

    <servlet>
        <servlet-name>HelloServlet</servlet-name>
        <servlet-class>com.ssl.web.HelloServlet</servlet-class>
    </servlet>
    <servlet-mapping>
        <servlet-name>HelloServlet</servlet-name>
        <url-pattern>/helloServlet</url-pattern>
    </servlet-mapping>
</web-app>
2 第一个SpringMVC
- 概念:SpringMVC是Spring框架中的一个分支,是基于Java实现MVC的轻量级Web框架
- 核心:Spring的web框架围绕DispatcherServlet [ 调度Servlet ] 设计的。
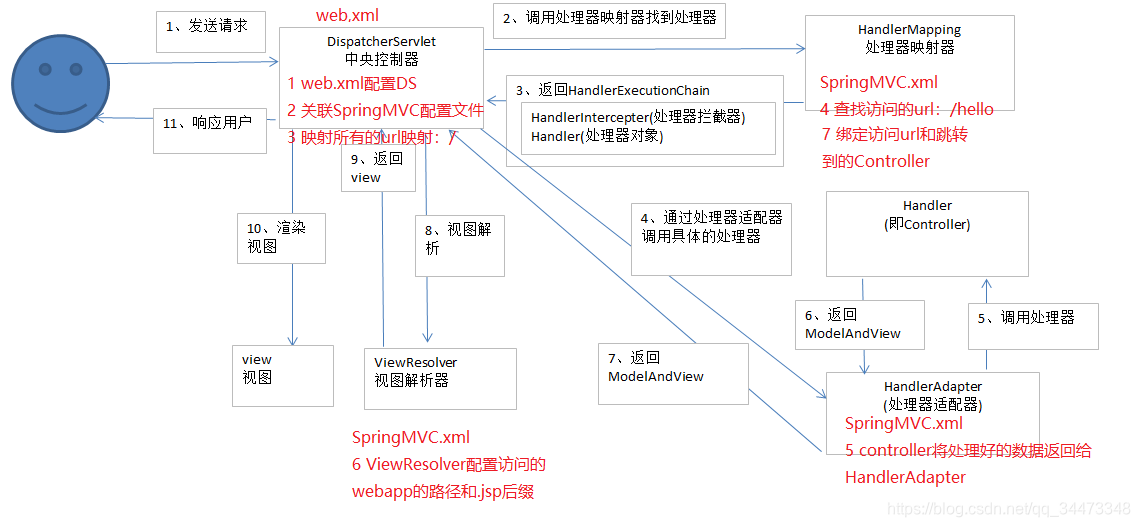
2.1 执行原理
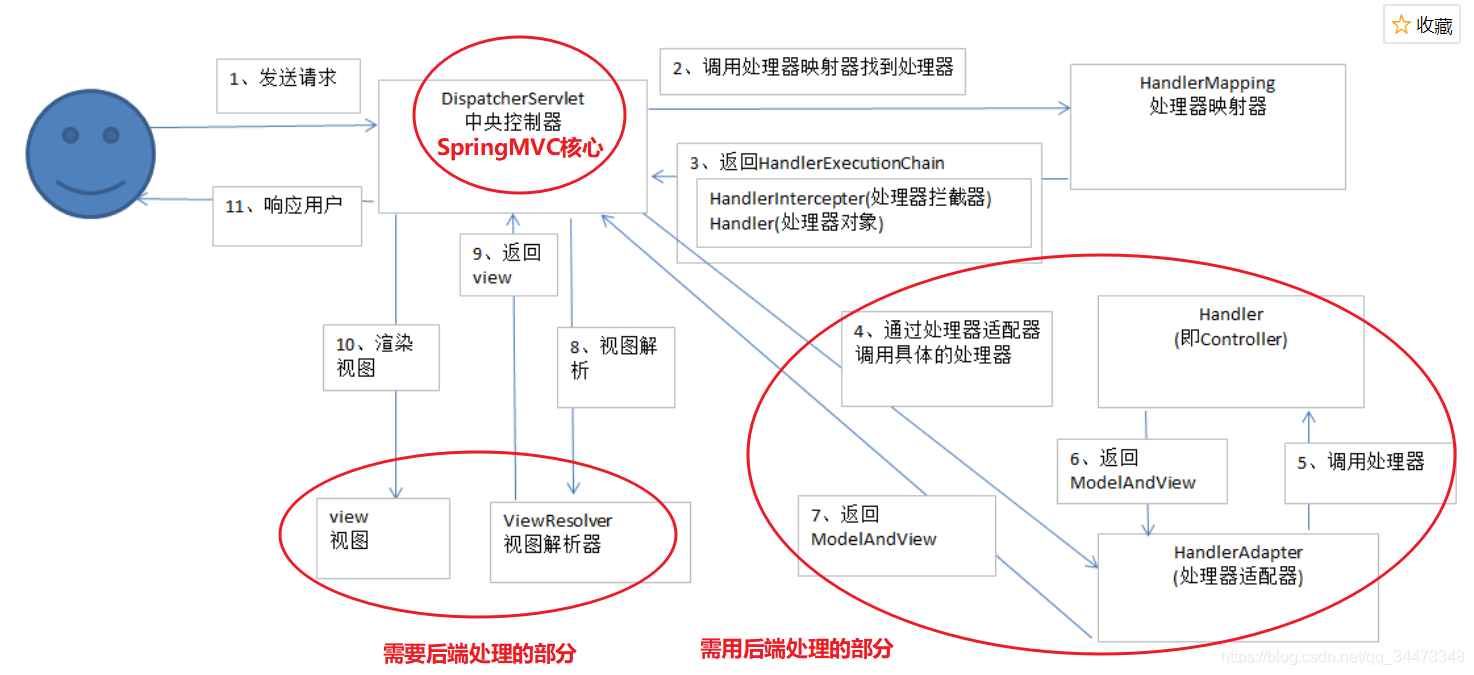
SpringMVC底层工作原理:
- DispatcherServlet表示前置控制器,是整个SpringMVC的控制中心。用户发出请求,DispatcherServlet接收请求并拦截请求。
- 假设url为 : http://localhost:8080/SpringMVC/hello
- 服务器域名:http://localhost:8080
- web站点:/SpringMVC
- hello表示控制器:/hello
- 通过分析,如上url表示为:请求位于服务器localhost:8080上的SpringMVC站点的hello控制器。
- HandlerMapping为处理器映射。DispatcherServlet调用HandlerMapping,HandlerMapping根据请求url查找Handler。
- HandlerExecution表示具体的Handler,其主要作用是根据url查找控制器,如上url被查找控制器为:hello。
- HandlerExecution将解析后的信息传递给DispatcherServlet,如解析控制器映射等。
- HandlerAdapter表示处理器适配器,其按照特定的规则去执行Handler。
- Handler让具体的Controller执行。
- Controller将具体的执行信息返回给HandlerAdapter,如ModelAndView。
- HandlerAdapter将视图逻辑名或模型传递给DispatcherServlet。
- DispatcherServlet调用视图解析器(ViewResolver)来解析HandlerAdapter传递的逻辑视图名。
- 视图解析器将解析的逻辑视图名传给DispatcherServlet。
- DispatcherServlet根据视图解析器解析的视图结果,调用具体的视图。
- 最终视图呈现给用户。
2.2 不使用注解开发
- 了解具体的执行过程=面试谈资。虽然开发中不会这么麻烦的使用,但必须看完-理解-继续学习
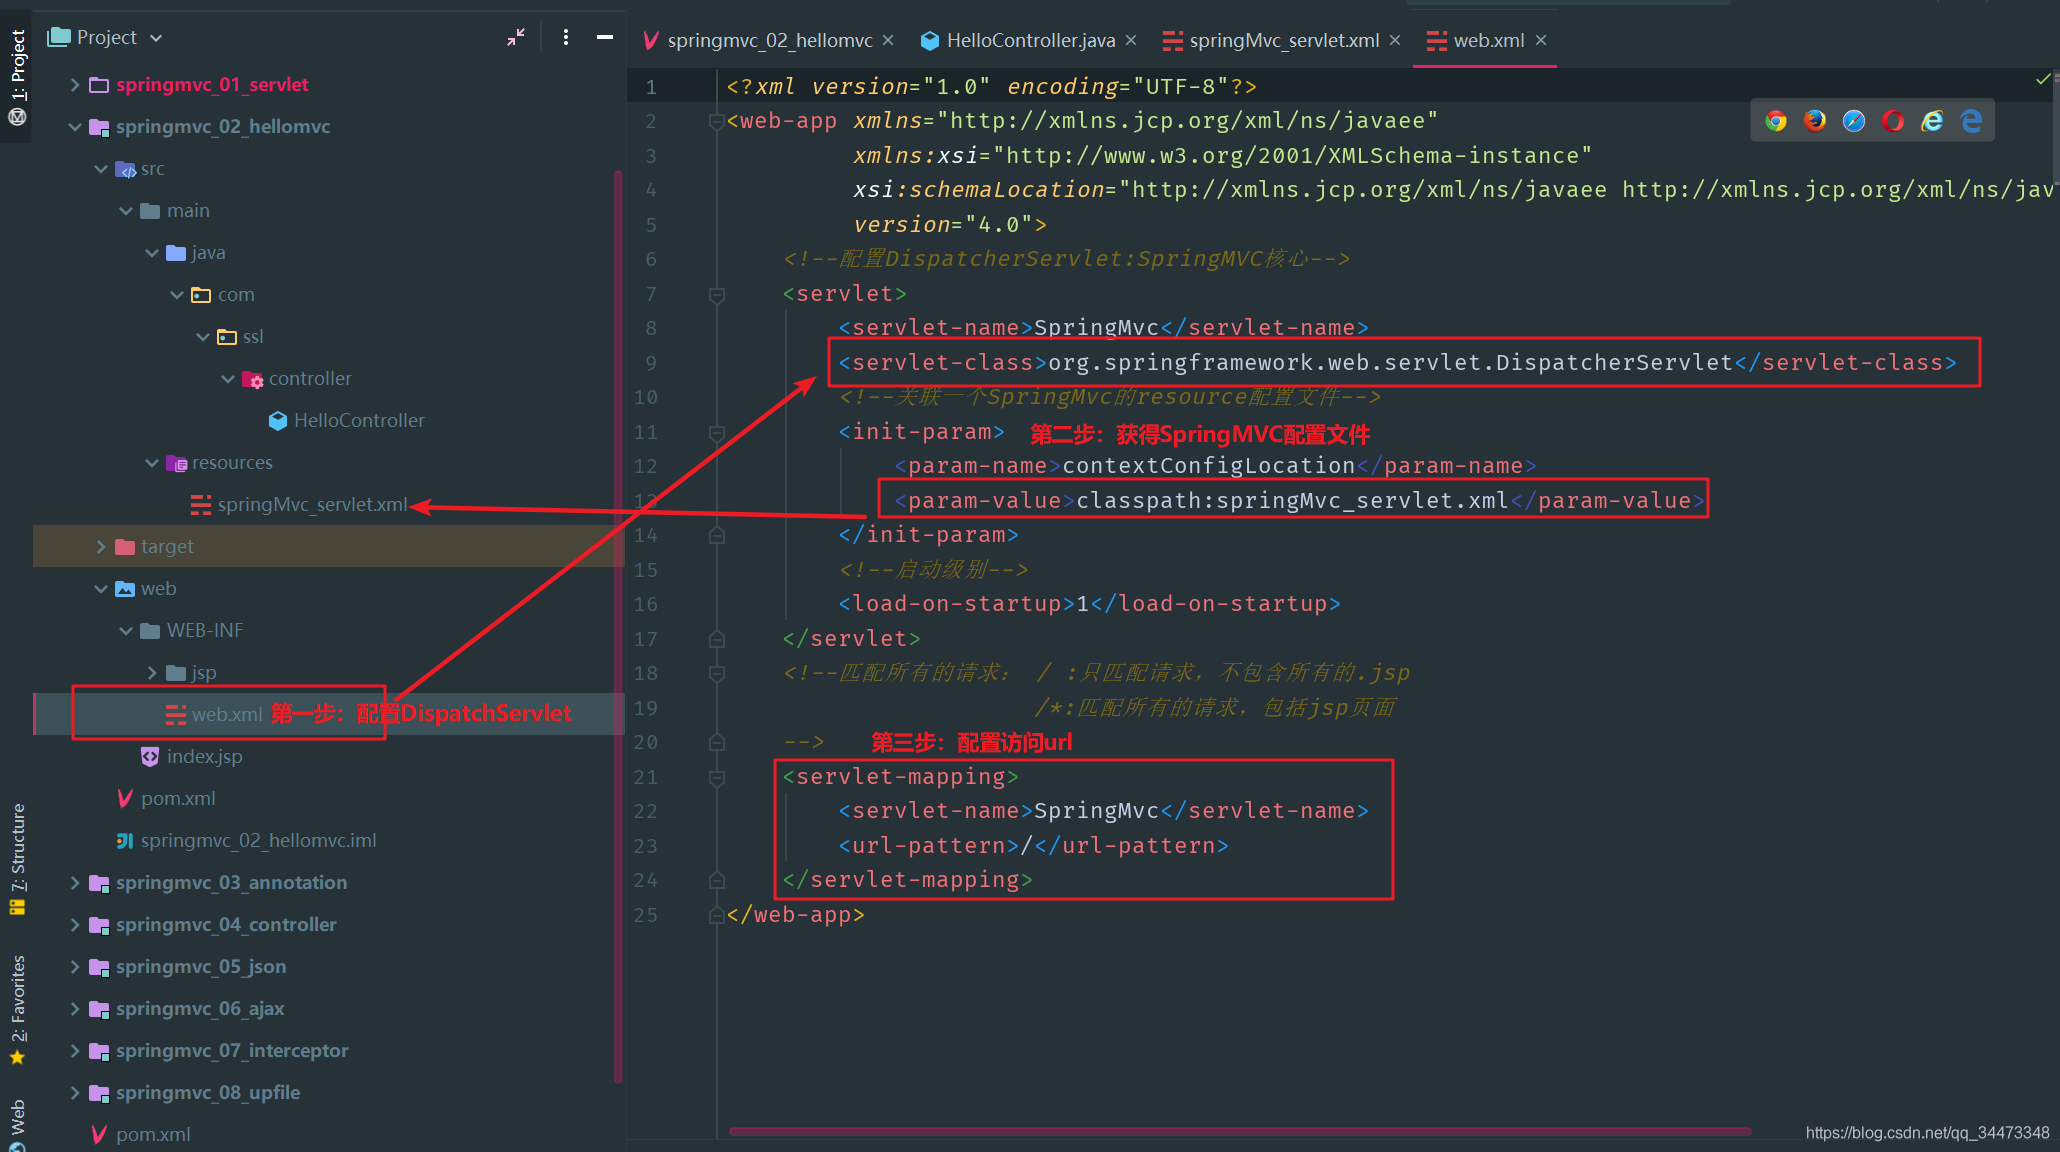
1 配置web.xml
- 完成DispatcherServlet,关联resource配置文件
<?xml version="1.0" encoding="UTF-8"?>
<web-app xmlns="http://xmlns.jcp.org/xml/ns/javaee"
         xmlns:xsi="http://www.w3.org/2001/XMLSchema-instance"
         xsi:schemaLocation="http://xmlns.jcp.org/xml/ns/javaee http://xmlns.jcp.org/xml/ns/javaee/web-app_4_0.xsd"
         version="4.0">
    <!--配置DispatcherServlet:SpringMVC核心-->
    <servlet>
        <servlet-name>SpringMvc</servlet-name>
        <servlet-class>org.springframework.web.servlet.DispatcherServlet</servlet-class>
        <!--关联一个SpringMvc的resource配置文件-->
        <init-param>
            <param-name>contextConfigLocation</param-name>
            <param-value>classpath:springMvc_servlet.xml</param-value>
        </init-param>
        <!--启动级别-->
        <load-on-startup>1</load-on-startup>
    </servlet>
    <!--匹配所有的请求: / :只匹配请求,不包含所有的.jsp
                      /*:匹配所有的请求,包括jsp页面
    -->
    <servlet-mapping>
        <servlet-name>SpringMvc</servlet-name>
        <url-pattern>/</url-pattern>
    </servlet-mapping>
</web-app>
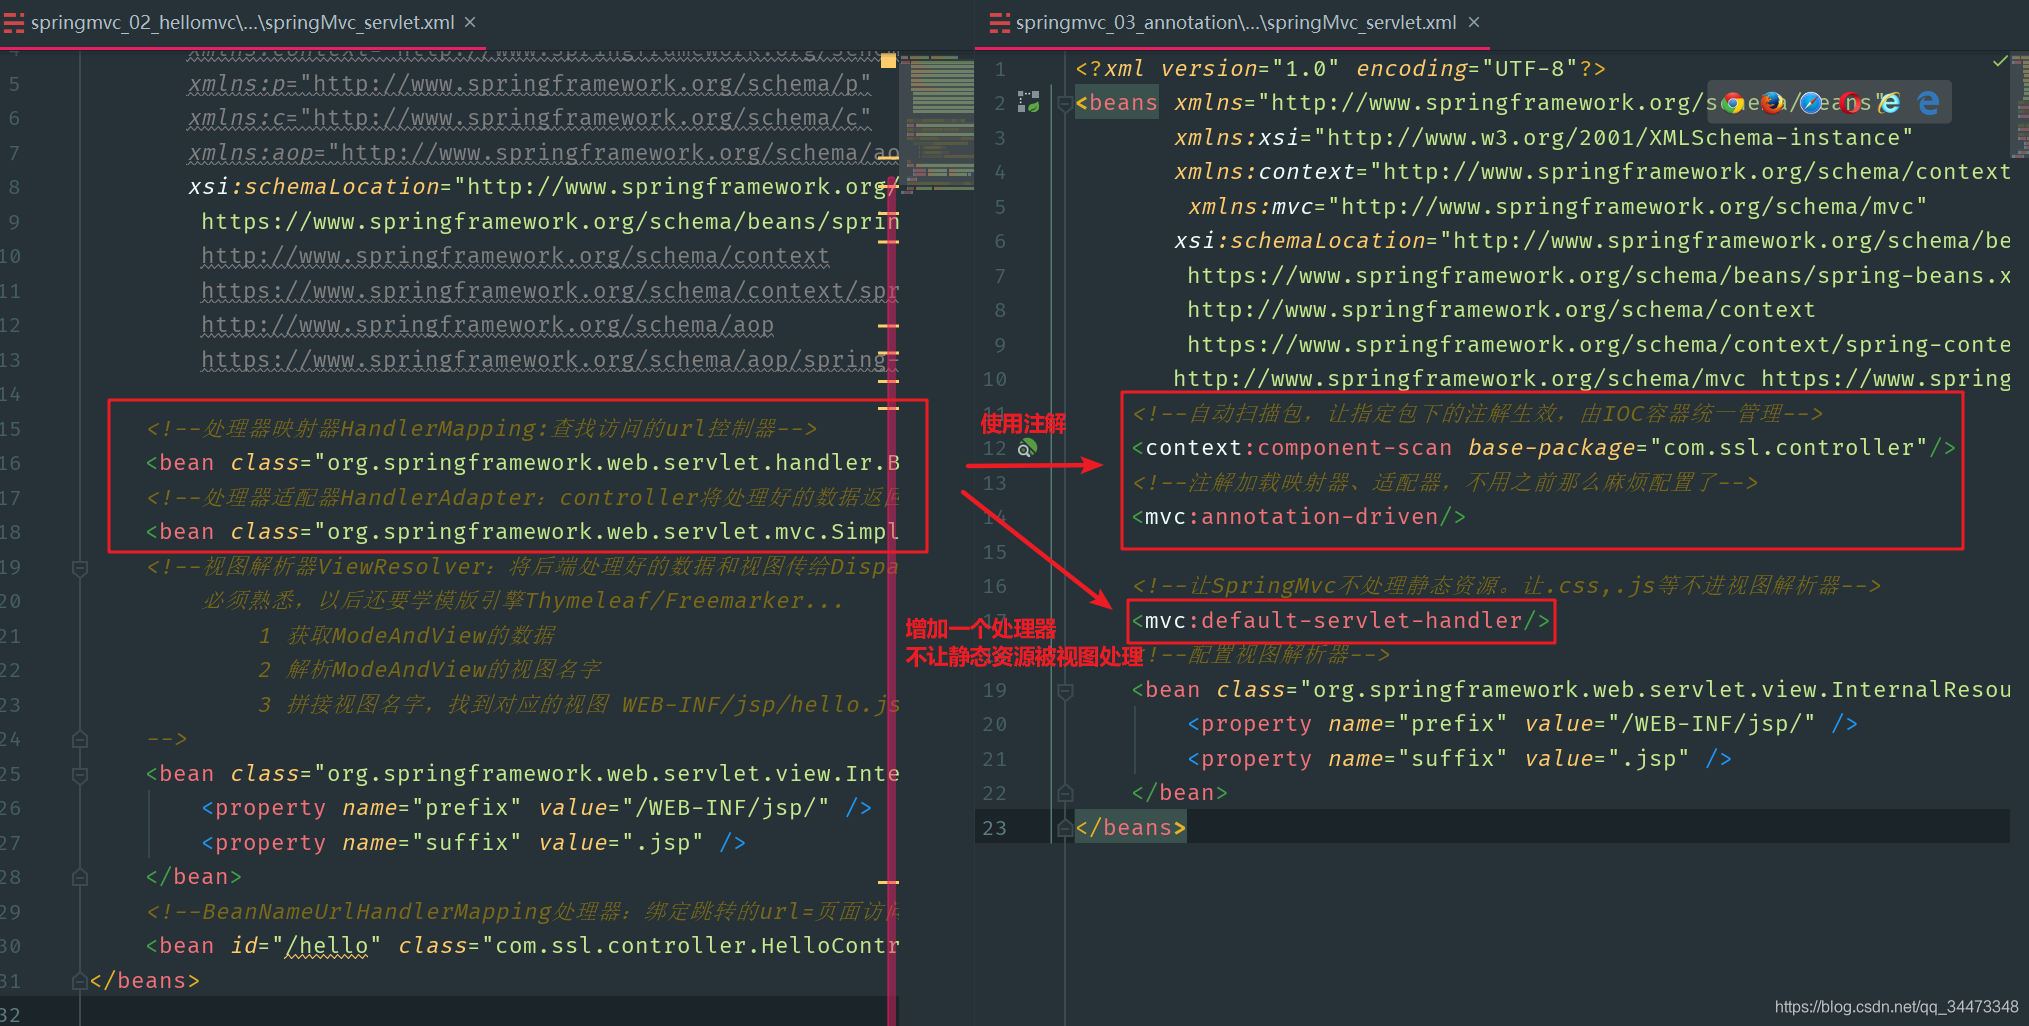
2 配置springMvc_servlet.xml
- 获得视图解析器、映射器、适配器,绑定跳转url
<?xml version="1.0" encoding="UTF-8"?>
<beans xmlns="http://www.springframework.org/schema/beans"
       xmlns:xsi="http://www.w3.org/2001/XMLSchema-instance"
       xmlns:context="http://www.springframework.org/schema/context"
       xmlns:p="http://www.springframework.org/schema/p"
       xmlns:c="http://www.springframework.org/schema/c"
       xmlns:aop="http://www.springframework.org/schema/aop"
       xsi:schemaLocation="http://www.springframework.org/schema/beans
        https://www.springframework.org/schema/beans/spring-beans.xsd
        http://www.springframework.org/schema/context
        https://www.springframework.org/schema/context/spring-context.xsd
        http://www.springframework.org/schema/aop
        https://www.springframework.org/schema/aop/spring-aop.xsd">

    <!--处理器映射器HandlerMapping:查找访问的url控制器-->
    <bean class="org.springframework.web.servlet.handler.BeanNameUrlHandlerMapping"/>
    <!--处理器适配器HandlerAdapter:controller将处理好的数据返回给HandlerAdapter-->
    <bean class="org.springframework.web.servlet.mvc.SimpleControllerHandlerAdapter"/>
    <!--视图解析器ViewResolver:将后端处理好的数据和视图传给DispatchServlet,DS再交给ViewResolver先解析一遍,确认无误再传给前端
        必须熟悉,以后还要学模版引擎Thymeleaf/Freemarker...
        1 获取ModeAndView的数据
        2 解析ModeAndView的视图名字
        3 拼接视图名字,找到对应的视图 WEB-INF/jsp/hello.jsp
    -->
    <bean class="org.springframework.web.servlet.view.InternalResourceViewResolver" id="internalResourceViewResolver">
        <property name="prefix" value="/WEB-INF/jsp/" />
        <property name="suffix" value=".jsp" />
    </bean>
    <!--BeanNameUrlHandlerMapping处理器:绑定跳转的url=页面访问的网址-->
    <bean id="/hello" class="com.ssl.controller.HelloController"/>
</beans>
3 /WEB-INF/jsp/hello.jsp
<%@ page contentType="text/html;charset=UTF-8" language="java" %>
<html>
<head>
    <title>hello</title>
</head>
<body>
<%--接受传递的参数--%>
${msg}
</body>
</html>
4 HelloController实现Controller
- 访问:http://localhost:8080/springmvc_02_hellomvc/hello
public class HelloController implements Controller {
    @Override
    public ModelAndView handleRequest(HttpServletRequest httpServletRequest, HttpServletResponse httpServletResponse) throws Exception {
        //1 创建modelAndView
        ModelAndView mv = new ModelAndView();
        //2 调用业务层,这里没有,就不写
        //3 封装对象,放在mv中添加
        mv.addObject("msg", "Hello SpringMvc");
        //4 封装要跳转的视图,WEB-INF/jsp/hello.jsp
        mv.setViewName("hello");
        return mv;
    }
}
5 SpringMVC原理回顾
- 反复观看,理解原理!
2.3 使用注解开发
1 web.xml
<?xml version="1.0" encoding="UTF-8"?>
<web-app xmlns="http://xmlns.jcp.org/xml/ns/javaee"
         xmlns:xsi="http://www.w3.org/2001/XMLSchema-instance"
         xsi:schemaLocation="http://xmlns.jcp.org/xml/ns/javaee http://xmlns.jcp.org/xml/ns/javaee/web-app_4_0.xsd"
         version="4.0">
  	<!--与前面一样-->
    <servlet>
        <servlet-name>springMvc</servlet-name>
        <servlet-class>org.springframework.web.servlet.DispatcherServlet</servlet-class>
        <init-param>
            <param-name>contextConfigLocation</param-name>
            <param-value>classpath:springMvc_servlet.xml</param-value>
        </init-param>
        <load-on-startup>1</load-on-startup>
    </servlet>

    <servlet-mapping>
        <servlet-name>springMvc</servlet-name>
        <url-pattern>/</url-pattern>
    </servlet-mapping>
</web-app>
2 springMvc_servlet.xml
- 注解省略了映射器、适配器,专注于写视图解析器;跳转的Controller也不用配置进Spring
<?xml version="1.0" encoding="UTF-8"?>
<beans xmlns="http://www.springframework.org/schema/beans"
       xmlns:xsi="http://www.w3.org/2001/XMLSchema-instance"
       xmlns:context="http://www.springframework.org/schema/context"
        xmlns:mvc="http://www.springframework.org/schema/mvc"
       xsi:schemaLocation="http://www.springframework.org/schema/beans
        https://www.springframework.org/schema/beans/spring-beans.xsd
        http://www.springframework.org/schema/context
        https://www.springframework.org/schema/context/spring-context.xsd
       http://www.springframework.org/schema/mvc https://www.springframework.org/schema/mvc/spring-mvc.xsd">
    <!--自动扫描包,让指定包下的注解生效,由IOC容器统一管理-->
    <context:component-scan base-package="com.ssl.controller"/>
    <!--让SpringMvc不处理静态资源。让.css,.js等不进视图解析器-->
    <mvc:default-servlet-handler/>
    <!--注解加载映射器、适配器,不用之前那么麻烦配置了-->
    <mvc:annotation-driven/>
    <!--配置视图解析器-->
    <bean class="org.springframework.web.servlet.view.InternalResourceViewResolver" id="internalResourceViewResolver">
        <property name="prefix" value="/WEB-INF/jsp/" />
        <property name="suffix" value=".jsp" />
    </bean>
</beans>
3 /WEB-INF/jsp/hello.jsp
<%@ page contentType="text/html;charset=UTF-8" language="java" %>
<html>
<head>
    <title>hello</title>
</head>
<body>
${msg}
</body>
</html>
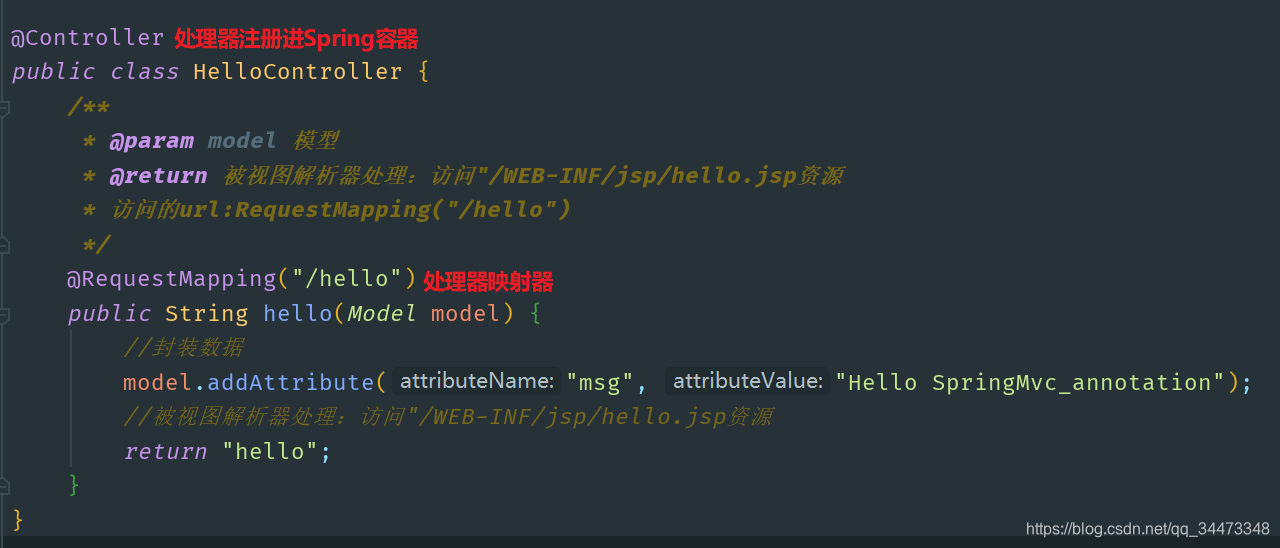
4 HelloController
- 简化了实现的接口,使用@注解配置映射器
- 访问:http://localhost:8080/springmvc_03_annotation/hello
@Controller
public class HelloController {
    /**
     * @param model 模型
     * @return 被视图解析器处理:访问"/WEB-INF/jsp/hello.jsp资源
     * 访问的url:RequestMapping("/hello")
     */
    @RequestMapping("/hello")
    public String hello(Model model) {
        //封装数据
        model.addAttribute("msg", "Hello SpringMvc_annotation");
        //被视图解析器处理:访问"/WEB-INF/jsp/hello.jsp资源
        return "hello";
    }
3 Controller和RestFul
- 配置web.xml
<?xml version="1.0" encoding="UTF-8"?>
<web-app xmlns="http://xmlns.jcp.org/xml/ns/javaee"
         xmlns:xsi="http://www.w3.org/2001/XMLSchema-instance"
         xsi:schemaLocation="http://xmlns.jcp.org/xml/ns/javaee http://xmlns.jcp.org/xml/ns/javaee/web-app_4_0.xsd"
         version="4.0">
    <servlet>
        <servlet-name>springMvc</servlet-name>
        <servlet-class>org.springframework.web.servlet.DispatcherServlet</servlet-class>
        <init-param>
            <param-name>contextConfigLocation</param-name>
            <param-value>classpath:spring_mvc_servlet.xml</param-value>
        </init-param>
    </servlet>
    <servlet-mapping>
        <servlet-name>springMvc</servlet-name>
        <url-pattern>/</url-pattern>
    </servlet-mapping>

   <!-- <filter>
        <filter-name>encode</filter-name>
        <filter-class>com.ssl.filter.EncodeFilter</filter-class>
    </filter>
    <filter-mapping>
        <filter-name>encode</filter-name>
        <url-pattern>/</url-pattern>
    </filter-mapping>-->
    <filter>
        <filter-name>encode</filter-name>
        <filter-class>org.springframework.web.filter.CharacterEncodingFilter</filter-class>
        <init-param>
            <param-name>encoding</param-name>
            <param-value>utf-8</param-value>
        </init-param>
    </filter>
    <filter-mapping>
        <filter-name>encode</filter-name>
        <url-pattern>/*</url-pattern>
    </filter-mapping>
</web-app>
- spring_mvc_servlet.xml
<?xml version="1.0" encoding="UTF-8"?>
<beans xmlns="http://www.springframework.org/schema/beans"
       xmlns:xsi="http://www.w3.org/2001/XMLSchema-instance"
       xmlns:context="http://www.springframework.org/schema/context"
       xmlns:mvc="http://www.springframework.org/schema/mvc"
       xsi:schemaLocation="http://www.springframework.org/schema/beans
        https://www.springframework.org/schema/beans/spring-beans.xsd
        http://www.springframework.org/schema/context
        https://www.springframework.org/schema/context/spring-context.xsd
       http://www.springframework.org/schema/mvc https://www.springframework.org/schema/mvc/spring-mvc.xsd">
    <!--自动扫描包,让指定包下的注解生效,由IOC容器统一管理-->
    <context:component-scan base-package="com.ssl.controller"/>
    <!--让SpringMvc不处理静态资源。让.css,.js等不进视图解析器-->
    <mvc:default-servlet-handler/>
    <!--注解加载映射器、适配器,不用之前那么麻烦配置了-->
    <mvc:annotation-driven/>
    <!--以上的是定死的代码,
        以下是配置视图解析器-->
    <bean class="org.springframework.web.servlet.view.InternalResourceViewResolver" id="internalResourceViewResolver">
        <property name="prefix" value="/WEB-INF/jsp/" />
        <property name="suffix" value=".jsp" />
    </bean>
    <!--不使用注解开发的适配器:/demo1,注意点是id需要配置/-->
    <bean id="/demo" class="com.ssl.controller.ControllerDemo1"/>
</beans>
3.1 Controller
- 不使用注解,极其不推荐使用,因为:
- 配置麻烦:
<bean id="/demo" class="com.ssl.controller.ControllerDemo1"/>,并且需要implements Controller - 不够灵活,太费力气,浪费时间
- 访问:http://localhost:8080/springmvc_04_controller/demo
- 配置麻烦:
public class ControllerDemo1 implements Controller {
    @Override
    public ModelAndView handleRequest(HttpServletRequest httpServletRequest, HttpServletResponse httpServletResponse) throws Exception {
        ModelAndView modelAndView = new ModelAndView();
        modelAndView.addObject("demo1","demo1:Controller会返回一个modelAndView");
        modelAndView.setViewName("demo1");
        return modelAndView;
    }
}
3.2 @Controller
- 使用注解开发,@Controller注册进Spring容器,如果返回值是String,并且有具体的页面可以跳转,那么就会被视图解析器解析
- 访问:http://localhost:8080/springmvc_04_controller/demo2
@Controller
public class ControllerDemo2 {
    @RequestMapping("/demo2")
    public String test1(Model model) {
        model.addAttribute("demo2", "demo2");
        return "demo2";
    }
}
3.3 @RequestMapping
- 可以在类和方法上配置url访问路径
- 访问:http://localhost:8080/springmvc_04_controller/controller/demo3
@Controller
@RequestMapping("/controller")
public class ControllerDemo3 {
    @RequestMapping("/demo3")
    public String test1(Model model) {
        model.addAttribute("demo3", "demo3");
        return "demo3";
    }
}
3.4 RestFul风格
- 优点:
- 最大的优势是安全,看不出源代码的参数和意义
- 实现地址复用,使得get和post访问url相同,框架会自动进行类型转换
- 高效:支持缓存
- 缺点:
- 不像原生的url见名知意,url理解不直观
- 实现方式:
- 1:url
@GetMapping("/addRest/{a}/{b}")+ 参数@PathVariable int a, @PathVariable int b- 访问:http://localhost:8080/springmvc_04_controller/addRest/1/2
- 2:url
@PostMapping("/addRest/{a}/{b}")+ 参数不变@PathVariable int a, @PathVariable int b- 使用Postman中的post访问:http://localhost:8080/springmvc_04_controller/addRest/1/2
- 1:url
@Controller
public class RestFulController {

    /**
     * 原生的url:http://localhost:8080/springmvc_04/add?a=1&b=1
     */
    @RequestMapping("/add")
    public String getAdd1(int a, int b, Model model) {
        int result = a + b;
        model.addAttribute("add", "原生的url:结果为" + result);
        return "add";
    }

    /**
     * RestFul方式一:method = get
     * RequestMapping("/addRest/{a}/{b}" method=requestMethod.GET) = @GetMapping()
     * http://localhost:8080/springmvc_04/addRest/1/1
     */
    @GetMapping("/addRest/{a}/{b}")
    public String getAdd2(@PathVariable int a, @PathVariable int b, Model model) {
        int result = a + b;
        model.addAttribute("add", "Rest的url:结果为" + result);
        return "addRest";
    }

    /**
     * 复用相同的url
     * RestFul方式二:method=post,使用RestFul的话,请求的url和GET就一样了
     */
    @PostMapping("/addRest/{a}/{b}")
    public String getAdd3(@PathVariable int a, @PathVariable int b, Model model) {
        int result = a + b;
        model.addAttribute("add", "Rest的url:结果为" + result);
        return "addRest";
    }
}
3.5 重定向和转发
- 可以使用原生的request转发或者response重定向
- 推荐使用SpringMvc的
return “forward:xxx”/"redirect:xxx"
@Controller
public class ModelTest1 {
    //原生的转发:返回值是void,没有经过视图解析器;原生的重定向同样如此,都不走视图解析器,直接重定向
    @RequestMapping("/test1")
    public void test1(HttpServletRequest request, HttpServletResponse response) throws ServletException, IOException {
        String id = request.getSession().getId();
        System.out.println(id);
        request.getRequestDispatcher("index.jsp").forward(request,response);
    }
    //SpringMvc转发:测试结果是不走视图解析器,url没变是转发
    @RequestMapping("/test2")
    public String test2(Model model) {
        model.addAttribute("demo1","这是test2中的Spring转发");
        return "forward:/WEB-INF/jsp/demo1.jsp";
    }
    //SpringMvc重定向:测试结果是不走视图解析器
    @RequestMapping("/test3")
    public String test3() {
        System.out.println("跳转回首页index.jsp");
        return "redirect:index.jsp";
    }
}
3.6 接受请求参数和数据回显
- 前端提交的name和后端映射器接受的形参名一样,则直接接受
- 前端提交的name和后端映射器接受的形参名不用一样,再形参前
@RequestParam("xxx")更改名称一致- 养成习惯:无论是否一样,都必须加上
@RequestParam
- 养成习惯:无论是否一样,都必须加上
- 后端参数封装如果成一个pojo,前端传过来的name会自动pojo中的成员属性,不匹配的属性=null/0
- 如何解决中文乱码问题?请看下节!
@Controller
public class UserController {
    /** http://localhost:8080/springmvc_04/t1?id=1&name=abc&age=18
     * @param user SpringMvc 会自动封装数据到参数里的pojo,不匹配的属性=null/0
     */
    @GetMapping("/t1")
    public String getUser(User user){
        System.out.println(user);
        return "test1";
    }
}
3.7 Model,ModelAndView等
- Model:精简版,适合初学者,大多数情况封装参数,设置转发视图层就够用
- ModelMap:继承了LinkedHashMap,有它的方法和特性
- ModelAndView:可以在存储数据的同时,可以进行设置返回的逻辑视图,进行控制展示层的跳转
- 怎么学习:用80%的时间学号基础,18%时间研究框架,2%学点英文,剩下不会的看官方文档
4 乱码问题
- 方法一:web.xml里面配置的SpringMvc自带的过滤器
CharacterEncodingFilter<url-pattern>/*</url-pattern>:因为要跳转到xxx.jsp页面,所以url是/*(≠/)
<?xml version="1.0" encoding="UTF-8"?>
<web-app xmlns="http://xmlns.jcp.org/xml/ns/javaee"
         xmlns:xsi="http://www.w3.org/2001/XMLSchema-instance"
         xsi:schemaLocation="http://xmlns.jcp.org/xml/ns/javaee http://xmlns.jcp.org/xml/ns/javaee/web-app_4_0.xsd"
         version="4.0">
    <!--配置SpringMVC-->
    <servlet>
        <servlet-name>springMvc</servlet-name>
        <servlet-class>org.springframework.web.servlet.DispatcherServlet</servlet-class>
        <init-param>
            <param-name>contextConfigLocation</param-name>
            <param-value>classpath:spring_mvc_servlet.xml</param-value>
        </init-param>
    </servlet>
    <servlet-mapping>
        <servlet-name>springMvc</servlet-name>
        <url-pattern>/</url-pattern>
    </servlet-mapping>

    <!--web容器解决中文乱码问题-->
    <filter>
        <filter-name>encode</filter-name>
        <filter-class>org.springframework.web.filter.CharacterEncodingFilter</filter-class>
        <init-param>
            <param-name>encoding</param-name>
            <param-value>utf-8</param-value>
        </init-param>
    </filter>
    <filter-mapping>
        <filter-name>encode</filter-name>
        <url-pattern>/*</url-pattern>
    </filter-mapping>
</web-app>
- 方法二:一劳永逸,但需要重启Tomcat服务器,修改Tomcat里面的server.xml配置文件:
URIEncoding = "UTF-8"
<Connector port="8080" protocol="HTTP/1.1"
           connectionTimeout="20000"
           redirectPort="8443"
           URIEncoding = "UTF-8"/>
<!-- A "Connector" using the shared thread pool-->
5 JSON
5.1 前端初识Json
- 前端展示两者数据,学会js和json互相转换
<%@ page contentType="text/html;charset=UTF-8" language="java" %>
<html>
<head>
    <title>json</title>
    <script type="text/javascript">
        //user是一个js对象
        var user = {
            name: "张三",
            age: 18,
            sex: "男"
        };
        //后端传的json其实是一个字符串,前端将后端传的json转换成js对象渲染在页面上
        //jsonUser:模拟后端传的json数据
        //js转换成json
        var jsonUser = JSON.stringify(user);
        console.log(jsonUser);
        //jsUser:js是一个对象
        //json转换成js
        var jsUser = JSON.parse(jsonUser);
        console.log(jsUser)
    </script>
</head>
<body>
</body>
</html>
5.2 Jackson Databind
- 使用 Jackson Databind可以快速生成json数据
1 导入依赖
<dependency>
    <groupId>com.fasterxml.jackson.core</groupId>
    <artifactId>jackson-databind</artifactId>
    <version>2.10.0</version>
</dependency>
- json=一个字符串,所以会有中文乱码问题,需要在springmvc.xml配置
<?xml version="1.0" encoding="UTF-8"?>
<beans xmlns="http://www.springframework.org/schema/beans"
       xmlns:xsi="http://www.w3.org/2001/XMLSchema-instance"
       xmlns:context="http://www.springframework.org/schema/context"
       xmlns:mvc="http://www.springframework.org/schema/mvc"
       xsi:schemaLocation="http://www.springframework.org/schema/beans
        https://www.springframework.org/schema/beans/spring-beans.xsd
        http://www.springframework.org/schema/context
        https://www.springframework.org/schema/context/spring-context.xsd
       http://www.springframework.org/schema/mvc https://www.springframework.org/schema/mvc/spring-mvc.xsd">
    <!--自动扫描包,让指定包下的注解生效,由IOC容器统一管理-->
    <context:component-scan base-package="com.ssl.controller"/>
    <!--让SpringMvc不处理静态资源。让.css,.js等不进视图解析器-->
    <mvc:default-servlet-handler/>

    <!--注解加载映射器、适配器,解决Json数据中文乱码问题-->
    <mvc:annotation-driven>
        <mvc:message-converters register-defaults="true">
            <bean class="org.springframework.http.converter.StringHttpMessageConverter">
                <constructor-arg value="UTF-8"/>
            </bean>
            <bean class="org.springframework.http.converter.json.MappingJackson2HttpMessageConverter">
                <property name="objectMapper">
                    <bean class="org.springframework.http.converter.json.Jackson2ObjectMapperFactoryBean">
                        <property name="failOnEmptyBeans" value="false"/>
                    </bean>
                </property>
            </bean>
        </mvc:message-converters>
    </mvc:annotation-driven>

    <!--配置视图解析器,明确json数据不走数据解析器,直接传给前端-->
    <bean class="org.springframework.web.servlet.view.InternalResourceViewResolver" id="internalResourceViewResolver">
        <property name="prefix" value="/WEB-INF/jsp/"/>
        <property name="suffix" value=".jsp"/>
    </bean>
</beans>
2 编写Controller
- @RestControoler:该类下所有方法不走视图解析器,返回一个json数据
- @ResponseBody:该方法不走视图解析器,返回一个json数据
- 访问:http://localhost:8080/springmvc_05_json/t1,页面显示一个json数据,不经过视图解析器
- 回顾日期:
new SimpleDateFormat("yyyy-MM-dd:HH:mm:ss")
@RestController
public class UserController {
    /*  概念:前后端分离的项目,后端代码不走视图解析器,后端传给前端的是json数据
        方法上:注解@ResponseBody指定该方法不走视图解析器,会直接返回一个String=json数据就是一个字符串
        类上:注解@RestController指定该类下的所有方法都不走视图解析器
        Json返回一个对象
     */
    @RequestMapping("/t1")
    public String json1() throws JsonProcessingException {
        User user = new User(1, "张三", 20);
        ObjectMapper jacksonMapper = new ObjectMapper();
        String str_user = jacksonMapper.writeValueAsString(user);
        //user.toString()是自己指定的String但是公司通常是允许的,通常是使用第三方工具来返回String
        //str_user有中文乱码问题,springMvc可以统一配置
        return str_user;
    }

    /**
     * Json返回一个List
     */
    @RequestMapping("/t2")
    public String json2() throws JsonProcessingException {
        User user1 = new User(1, "张三", 20);
        User user2 = new User(2, "张三", 21);
        User user3 = new User(3, "张三", 22);
        User user4 = new User(4, "张三", 23);
        List<User> list = new ArrayList<>();
        list.add(user1);
        list.add(user2);
        list.add(user3);
        list.add(user4);
        return new ObjectMapper().writeValueAsString(list);
    }

    /**
     *  json返回一个日期格式
     */
    @RequestMapping("/t3")
    public String json3() throws JsonProcessingException {
        //方式一:原始纯java日期转换:推荐使用
        // String date = new SimpleDateFormat("yyyy-MM-dd:HH-mm-ss").format(new Date());
        ObjectMapper objectMapper = new ObjectMapper();
        //方式二:使用mapper来制定日期格式,先关闭时间戳表示
        objectMapper.configure(SerializationFeature.WRITE_DATE_KEYS_AS_TIMESTAMPS, false);
        objectMapper.setDateFormat(new SimpleDateFormat("yyyy-MM-dd:HH:mm:ss"));
        Date date = new Date();
        return objectMapper.writeValueAsString(date);
    }

    @Test
    public void DateTest1() {
        //传统的java日期格式转换
        String date = new SimpleDateFormat("yyyy-MM-dd:HH:mm:ss").format(new Date());
        System.out.println(date);
    }
}
5.3 FastJson
- 阿里巴巴官方提供的,实现Json数据的另一个工具,比JackSon Databind更方便
1 导包
<dependency>
    <groupId>com.alibaba</groupId>
    <artifactId>fastjson</artifactId>
    <version>1.2.62</version>
</dependency>
2 编写Controller
- 比Jackson使用更方便
 @RequestMapping("/t4")
    public String json4() throws JsonProcessingException {
        User user1 = new User(1, "张三", 20);
        User user2 = new User(2, "张三", 21);
        User user3 = new User(3, "张三", 22);
        User user4 = new User(4, "张三", 23);
        List<User> list = new ArrayList<>();
        list.add(user1);
        list.add(user2);
        list.add(user3);
        list.add(user4);
        String jsonString = JSON.toJSONString(list);
        return jsonString;
    }
6 SSM整合
6.1 环境
- IDEA+Mysq5.7+Tomca5.7+Maven3.6
- 数据库
create database `ssmbuild`;
use `ssmbuild`;
CREATE TABLE `books` (
  `bookId` int(10) NOT NULL AUTO_INCREMENT COMMENT '书id',
  `bookName` varchar(100) NOT NULL COMMENT '书名',
  `bookCounts` int(11) NOT NULL COMMENT '数量',
  `detail` varchar(200) NOT NULL COMMENT '描述',
  KEY `bookId` (`bookId`)
) ENGINE=InnoDB AUTO_INCREMENT=4 DEFAULT CHARSET=utf8
- pom.xml
<?xml version="1.0" encoding="UTF-8"?>
<project xmlns="http://maven.apache.org/POM/4.0.0"
         xmlns:xsi="http://www.w3.org/2001/XMLSchema-instance"
         xsi:schemaLocation="http://maven.apache.org/POM/4.0.0 http://maven.apache.org/xsd/maven-4.0.0.xsd">
    <modelVersion>4.0.0</modelVersion>

    <groupId>com.ssl</groupId>
    <artifactId>ssmbuild</artifactId>
    <version>1.0-SNAPSHOT</version>
    <!--依赖:junit,数据库驱动,连接池,Servlet,jsp,mybatis,mybatis-mvc,Spring,SpringMVC-->
    <dependencies>
        <dependency>
            <groupId>junit</groupId>
            <artifactId>junit</artifactId>
            <version>4.12</version>
        </dependency>
        <dependency>
            <groupId>mysql</groupId>
            <artifactId>mysql-connector-java</artifactId>
            <version>5.1.47</version>
        </dependency>
        <dependency>
            <groupId>com.mchange</groupId>
            <artifactId>c3p0</artifactId>
            <version>0.9.5.2</version>
        </dependency>
        <dependency>
            <groupId>javax.servlet</groupId>
            <artifactId>servlet-api</artifactId>
            <version>2.5</version>
        </dependency>
        <dependency>
            <groupId>javax.servlet.jsp</groupId>
            <artifactId>jsp-api</artifactId>
            <version>2.2</version>
        </dependency>
        <dependency>
            <groupId>javax.servlet</groupId>
            <artifactId>jstl</artifactId>
            <version>1.2</version>
        </dependency>
        <dependency>
            <groupId>org.mybatis</groupId>
            <artifactId>mybatis</artifactId>
            <version>3.5.2</version>
        </dependency>
        <dependency>
            <groupId>org.mybatis</groupId>
            <artifactId>mybatis-spring</artifactId>
            <version>2.0.2</version>
        </dependency>
        <dependency>
            <groupId>org.springframework</groupId>
            <artifactId>spring-webmvc</artifactId>
            <version>5.2.4.RELEASE</version>
        </dependency>
        <dependency>
            <groupId>org.springframework</groupId>
            <artifactId>spring-jdbc</artifactId>
            <version>5.0.5.RELEASE</version>
        </dependency>
        <dependency>
            <groupId>org.projectlombok</groupId>
            <artifactId>lombok</artifactId>
            <version>1.18.12</version>
        </dependency>
    </dependencies>


    <!--Maven资源过滤设置-->
    <build>
        <resources>
            <resource>
                <directory>src/main/resources</directory>
                <includes>
                    <include>**/*.properties</include>
                    <include>**/*.xml</include>
                </includes>
                <filtering>true</filtering>
            </resource>

            <resource>
                <directory>src/main/java</directory>
                <includes>
                    <include>**/*.properties</include>
                    <include>**/*.xml</include>
                </includes>
                <filtering>true</filtering>
            </resource>
        </resources>
    </build>
</project>
6.2 开发流程
- 需求分析+设计数据库+业务+传给前端页面
- 整体效果:

6.3 整合Mybatis
- mybatis-config.xml
- 数据库连接交给Spring-dao.xml配置
<?xml version="1.0" encoding="UTF-8" ?>
<!DOCTYPE configuration
        PUBLIC "-//mybatis.org//DTD Config 3.0//EN"
        "http://mybatis.org/dtd/mybatis-3-config.dtd">
<!--核心配置文件-->
<configuration>
    <settings>
        <setting name="logImpl" value="STDOUT_LOGGING"/>
    </settings>
    <!--配置数据源,交给Spring去做-->
    <!--取别名-->
    <typeAliases>
        <!--resultMap:默认类名小写为使用id-->
        <package name="com.ssl.pojo"/>
    </typeAliases>
    <mappers>
        <mapper class="com.ssl.dao.BookMapper"/>
    </mappers>
</configuration>
# db.properties配置文件
driver=com.mysql.jdbc.Driver
url=jdbc:mysql://localhost:3306/ssmbuild?useSSL=false&useUnicode=true&characterEncoding=utf-8
username=root
password=123456
6.4 整合Spring
- 1 spring-dao.xml
- 数据库连接读取db.properties有bug,手动连接jdbcurl和user
<?xml version="1.0" encoding="UTF-8"?>
<beans xmlns="http://www.springframework.org/schema/beans"
       xmlns:xsi="http://www.w3.org/2001/XMLSchema-instance"
       xmlns:context="http://www.springframework.org/schema/context"
       xmlns:mvc="http://www.springframework.org/schema/mvc"
       xsi:schemaLocation="http://www.springframework.org/schema/beans
        https://www.springframework.org/schema/beans/spring-beans.xsd
        http://www.springframework.org/schema/context
        https://www.springframework.org/schema/context/spring-context.xsd
       http://www.springframework.org/schema/mvc https://www.springframework.org/schema/mvc/spring-mvc.xsd">
    <!--1 关联数据库配置文件-->
    <context:property-placeholder location="classpath:db.properties"/>
    <!--2 连接池 这次使用c3p0的连接池.常见的数据库:
    dbcp:半自动操作,不能自动连接
    c3p0:自动化操作,并且可以配置到对象中
    druid,hikari(SpringBoot)-->
    <bean id="dataSource" class="com.mchange.v2.c3p0.ComboPooledDataSource">
        <property name="driverClass" value="${driver}"/>
        <property name="jdbcUrl" value="${url}"/>
        <property name="user" value="${username}"/>
        <property name="password" value="${password}"/>
        <!--c3p0的私有属性-->
        <property name="maxPoolSize" value="30"/>
        <property name="minPoolSize" value="10"/>
        <!--关闭连接后,不自动commit-->
        <property name="autoCommitOnClose" value="false"/>
        <property name="checkoutTimeout" value="10000"/>
        <property name="acquireRetryAttempts" value="2"/>
     </bean>
    <!--3 sqlSessionFactory-->
    <bean id="sqlSessionFactory" class="org.mybatis.spring.SqlSessionFactoryBean">
        <!--绑定数据库-->
        <property name="dataSource" ref="dataSource"/>
        <!--绑定Mybatis的配置文件-->
        <property name="configLocation" value="classpath:mybatis-config.xml"/>
    </bean>
    <!--4 配置dao接口扫描包,动态的实现了dao接口可以注入到Spring容器中,不用写mapperImpl.xml-->
    <bean class="org.mybatis.spring.mapper.MapperScannerConfigurer">
        <!--注入sqlSessionFactory-->
        <property name="sqlSessionFactoryBeanName" value="sqlSessionFactory"/>
        <!--扫描要扫描的dao的包-->
        <property name="basePackage" value="com.ssl.dao"/>
    </bean>
</beans>
- 2 spring-service.xml
<?xml version="1.0" encoding="UTF-8"?>
<beans xmlns="http://www.springframework.org/schema/beans"
       xmlns:xsi="http://www.w3.org/2001/XMLSchema-instance"
       xmlns:context="http://www.springframework.org/schema/context"
       xmlns:mvc="http://www.springframework.org/schema/mvc"
       xsi:schemaLocation="http://www.springframework.org/schema/beans
        https://www.springframework.org/schema/beans/spring-beans.xsd
        http://www.springframework.org/schema/context
        https://www.springframework.org/schema/context/spring-context.xsd
       http://www.springframework.org/schema/mvc https://www.springframework.org/schema/mvc/spring-mvc.xsd">
    <!--1 扫描service下的包-->
    <context:component-scan base-package="com.ssl.service"/>
    <!--2 将我们的所有业务类,注入到Spring,这里使用bean配置,平时是使用注解-->
    <bean id="BookServiceImpl" class="com.ssl.service.BookServiceImpl">
        <property name="bookMapper" ref="bookMapper"/>
    </bean>
    <!--3  声明式事务配置-->
    <bean  id="transactionManager" class="org.springframework.jdbc.datasource.DataSourceTransactionManager">
        <property name="dataSource" ref="dataSource"/>
    </bean>
    <!--4 AOP横切事务,这里用不到-->
</beans>
- 3 application.xml
- 导入其他配置进spring主配置文件
<?xml version="1.0" encoding="UTF-8"?>
<beans xmlns="http://www.springframework.org/schema/beans"
       xmlns:xsi="http://www.w3.org/2001/XMLSchema-instance"
       xmlns:context="http://www.springframework.org/schema/context"
       xmlns:mvc="http://www.springframework.org/schema/mvc"
       xsi:schemaLocation="http://www.springframework.org/schema/beans
        https://www.springframework.org/schema/beans/spring-beans.xsd
        http://www.springframework.org/schema/context
        https://www.springframework.org/schema/context/spring-context.xsd
       http://www.springframework.org/schema/mvc https://www.springframework.org/schema/mvc/spring-mvc.xsd">

    <import resource="classpath:spring-dao.xml"/>
    <import resource="classpath:spring-service.xml"/>
    <import resource="classpath:spring-mvc.xml"/>
</beans>
6.5 整合SpringMVC
- 增加web项目的支持
- web.xml
<?xml version="1.0" encoding="UTF-8"?>
<web-app xmlns="http://xmlns.jcp.org/xml/ns/javaee"
         xmlns:xsi="http://www.w3.org/2001/XMLSchema-instance"
         xsi:schemaLocation="http://xmlns.jcp.org/xml/ns/javaee http://xmlns.jcp.org/xml/ns/javaee/web-app_4_0.xsd"
         version="4.0">
    <!--SpringMVC配置-->
    <!--1 DispatcherServlet-->
    <servlet>
        <servlet-name>springMVC</servlet-name>
        <servlet-class>org.springframework.web.servlet.DispatcherServlet</servlet-class>
        <init-param>
            <param-name>contextConfigLocation</param-name>
            <param-value>classpath:application.xml</param-value>
        </init-param>
        <load-on-startup>1</load-on-startup>
    </servlet>
    <servlet-mapping>
        <servlet-name>springMVC</servlet-name>
        <url-pattern>/</url-pattern>
    </servlet-mapping>
    <!--2 乱码过滤-->
    <filter>
        <filter-name>encodingFilter</filter-name>
        <filter-class>org.springframework.web.filter.CharacterEncodingFilter</filter-class>
        <init-param>
            <param-name>encoding</param-name>
            <param-value>utf-8</param-value>
        </init-param>
    </filter>
    <filter-mapping>
        <filter-name>encodingFilter</filter-name>
        <url-pattern>/*</url-pattern>
    </filter-mapping>
    <!--3 Session过期时间-->
    <session-config>
        <session-timeout>15</session-timeout>
    </session-config>

</web-app>
- spring-mvc.xml
<?xml version="1.0" encoding="UTF-8"?>
<beans xmlns="http://www.springframework.org/schema/beans"
       xmlns:xsi="http://www.w3.org/2001/XMLSchema-instance"
       xmlns:context="http://www.springframework.org/schema/context"
       xmlns:mvc="http://www.springframework.org/schema/mvc"
       xsi:schemaLocation="http://www.springframework.org/schema/beans
        https://www.springframework.org/schema/beans/spring-beans.xsd
        http://www.springframework.org/schema/context
        https://www.springframework.org/schema/context/spring-context.xsd
       http://www.springframework.org/schema/mvc https://www.springframework.org/schema/mvc/spring-mvc.xsd">
    <!--1 注解驱动-->
    <mvc:annotation-driven/>
    <!--2 静态资源过滤-->
    <mvc:default-servlet-handler/>
    <!--3 扫描包:Controller-->
    <context:component-scan base-package="com.ssl.controller"/>
    <!--4 视图解析器-->
    <bean class="org.springframework.web.servlet.view.InternalResourceViewResolver">
        <property name="prefix" value="/WEB-INF/jsp/"/>
        <property name="suffix" value=".jsp"/>
    </bean>
</beans>
6.6 dao层
- BookMapper接口和BookMapperMapper.xml
public interface BookMapper {
    //增加一本书
    int addBook(Books books);

    //删除一本书
    int deleteBookById(@Param("bookId") int id);

    //修改一本书
    int updateBook(Books books);

    //查询一本书根据id
    Books queryBookById(@Param("bookId")int id);

    //查询全部书
    List<Books> queryAllBook();

    Books queryBookByName(@Param("bookName") String bookName);
}
<?xml version="1.0" encoding="UTF-8" ?>
<!DOCTYPE mapper
        PUBLIC "-//mybatis.org//DTD Config 3.0//EN"
        "http://mybatis.org/dtd/mybatis-3-mapper.dtd">
<!--核心配置文件-->
<mapper namespace="com.ssl.dao.BookMapper">
    <insert id="addBook" parameterType="Books">
        insert into ssmbuild.books(bookName, bookCounts, detail)
        values (#{bookName},#{bookCounts},#{detail});
    </insert>
    <delete id="deleteBookById" parameterType="int">
        delete from ssmbuild.books where bookId = #{bookId}
    </delete>
    <update id="updateBook" parameterType="Books">
        update ssmbuild.books set
        bookName=#{bookName},
        bookCounts=#{bookCounts},
        detail=#{detail}
        where bookId=#{bookId};
    </update>
    <select id="queryBookById" parameterType="int" resultType="Books">
        select * from ssmbuild.books where bookId = #{bookId};
    </select>
    <select id="queryAllBook" resultType="Books">
        select * from ssmbuild.books;
    </select>

    <select id="queryBookByName" parameterType="String" resultType="Books">
         select * from ssmbuild.books where bookName=#{bookName}
    </select>
</mapper>
6.7 service层
public interface BookService {
    //增加一本书
    int addBook(Books books);

    //删除一本书
    int deleteBookById(int id);

    //修改一本书
    int updateBook(Books books);

    //查询一本书根据id
    Books queryBookById(int id);

    //查询全部书
    List<Books> queryAllBook();

    Books queryBookByName(String bookName);
}
public class BookServiceImpl implements BookService {
    //注入Dao层
    private BookMapper bookMapper;
    public void setBookMapper(BookMapper bookMapper) {
        this.bookMapper = bookMapper;
    }

    @Override
    public int addBook(Books books) {
        return bookMapper.addBook(books);
    }

    @Override
    public int deleteBookById(int id) {
        return bookMapper.deleteBookById(id);
    }

    @Override
    public int updateBook(Books books) {
        return bookMapper.updateBook(books);
    }

    @Override
    public Books queryBookById(int id) {
        return bookMapper.queryBookById(id);
    }

    @Override
    public List<Books> queryAllBook() {
        return bookMapper.queryAllBook();
    }

    @Override
    public Books queryBookByName(String bookName) {

        return bookMapper.queryBookByName(bookName);
    }
}
6.8 controller层
@Controller
@RequestMapping("/book")
public class BookController {

    @Autowired
    @Qualifier("BookServiceImpl")
    private BookService bookService;

    //查询全部的书籍,并且返回到一个书籍展示页面
    @RequestMapping("/allBook")
    public String list(Model model) {
        List<Books> books = bookService.queryAllBook();
        model.addAttribute("list", books);
        return "allBook";
    }

    //跳转到增加书籍页面
    @RequestMapping("/toAddBook")
    public String toAddBook() {
        return "addBook";
    }

    //添加书籍
    @RequestMapping("/addBook")
    public String addBook(Books books) {
        int result = bookService.addBook(books);
        if (result > 0) {
            System.out.println("添加书籍成功");
        }
        return "redirect:/book/allBook";
    }

    @RequestMapping("/toUpdateBook")
    public String toUpdate(int bookId, Model model) {
        Books books = bookService.queryBookById(bookId);
        model.addAttribute("book", books);
        return "updateBook";
    }

    /*
        没有提交事务操作,更新会失败
     */
    @RequestMapping("/updateBook")
    public String updateBook(Books books) {
        int result = bookService.updateBook(books);
        if (result > 0) {
            System.out.println("修改书籍成功");
        }
        return "redirect:/book/allBook";
    }

    /*
        删除书籍,回顾RestFul风格
     */
    @RequestMapping("/deleteBook/{bookId}")
    public String deleteBook(@PathVariable("bookId") int bookId) {
        int result = bookService.deleteBookById(bookId);
        if (result > 0) {
            System.out.println("删除书籍成功");
        }
        return "redirect:/book/allBook";
    }

    @RequestMapping("/queryBook")
    public String queryBook(String queryBookName, Model model) {
        Books books = bookService.queryBookByName(queryBookName);
        //复用,这样就显示一个
        List<Books> list = new ArrayList<>();
        list.add(books);
        if (books == null) {
            list= bookService.queryAllBook();
            model.addAttribute("errMsg","未查任何书籍");
        }
        model.addAttribute("list", list);
        return "allBook";
    }
}
6.9 前端页面
index.xml
<%@ page contentType="text/html;charset=UTF-8" language="java" %>
<html>
<head>
    <title>$Title$</title>
    <style>
        /*消除字体蓝色下划线*/
        a {
            text-decoration: none;
            color: black;
            font-size: 18px;
        }

        h3 {
            width: 180px;
            height: 38px;
            margin: 100px auto;
            text-align: center;
            line-height: 38px;
            background: deepskyblue;
            border-radius: 5px;
        }
    </style>
</head>
<body>
<h3>
    <a href="${pageContext.request.contextPath}/book/allBook">进入书籍展示页面</a>
</h3>
</body>
</html>
WEB-INF/jsp/addBook.jsp
<%@ page contentType="text/html;charset=UTF-8" language="java" %>
<html>
<head>
    <title>Title</title>
    <%--BootStrap美化界面--%>
    <link href="https://cdn.staticfile.org/twitter-bootstrap/3.3.7/css/bootstrap.min.css" rel="stylesheet">
    <div class="row clearfix">
        <%--屏幕分成12列--%>
        <div class="col-md-12 column">
            <div class="page-header">
                <h1>
                    <small>新增书籍</small>
                </h1>
            </div>
        </div>
    </div>
    <%--BootStrap官网拿"表单"数据  name属性保证pojo属性名称一致 required保证必须提交--%>
    <form action="${pageContext.request.contextPath}/book/addBook" method="post">
        <div class="form-group">
            <label for="bName">书籍名称:</label>
            <input type="text" name="bookName" class="form-control" id="bName" required>
        </div>
        <div class="form-group">
            <label for="bCount">书籍数量:</label>
            <input type="text" name="bookCounts" class="form-control" id="bCount" required>
        </div>
        <div class="form-group">
            <label for="bDesc">书籍描述:</label>
            <input type="text" name="detail" class="form-control" id="bDesc" required>
        </div>
        <div class="form-group">
            <input type="submit" class="form-control" value="添加">
        </div>

    </form>
</head>
<body>

</body>
</html>
WEB-INF/jsp/allBook.jsp
<%@ taglib prefix="c" uri="http://java.sun.com/jsp/jstl/core" %>
<%--
Created by IntelliJ IDEA.
User: 宋林
Date: 2020/3/31
Time: 20:50
To change this template use File | Settings | File Templates.
--%>
<%@ page contentType="text/html;charset=UTF-8" language="java" %>
<html>
<head>
<title>书籍展示页面</title>
<%--BootStrap美化界面--%>
<link href="https://cdn.staticfile.org/twitter-bootstrap/3.3.7/css/bootstrap.min.css" rel="stylesheet">
</head>
<body>
<div class="container">
<div class="row clearfix">
<%--屏幕分成12列--%>
<div class="col-md-12 column">
<div class="page-header">
<h1>
<small> 书籍列表——————————显示所有书籍</small>
</h1>
</div>
</div>
<div class="row">
<div class="col-md-4 column">
<a class="btn btn-primary" href="${pageContext.request.contextPath}/book/toAddBook">新增书籍</a>
<a class="btn btn-primary" href="${pageContext.request.contextPath}/book/allBook">显示全部书籍</a>
</div>
<div class="col-md-4 column"></div>
<div class="col-md-8 column">
<form action="${pageContext.request.contextPath}/book/queryBook" method="post" style="float: right">
<%--前端未传任何信息,就显示错误提示信息:未查任何书籍--%>
<span style="color: red;font-weight: bold">${errMsg}</span>
<%--class="form-inline"保证在同一行--%>
<input type="text" name="queryBookName" class="form-inline" placeholder="请输入要查询的书籍名称">
<input type="submit" value="查询" class="btn btn-primary">
</form>
</div>
</div>
</div>
<div class="row clearfix">
<div class="col-md-12 column">
<table class="table table-hover table-striped">
<thead>
<tr>
<th>书籍编号</th>
<th>书籍名称</th>
<th>书籍数量</th>
<th>书籍详情</th>
<th>操作</th>
</tr>
</thead>
<%--书籍从数据库中查询出来,从这个list中遍历出来,foreach--%>
<tbody>
<c:forEach var="book" items="${list}">
<tr>
<td>${book.bookId}</td>
<td>${book.bookName}</td>
<td>${book.bookCounts}</td>
<td>${book.detail}</td>
<td>
<a href="${pageContext.request.contextPath}/book/toUpdateBook?bookId=${book.bookId}">修改</a>
|
<a href="${pageContext.request.contextPath}/book/deleteBook/${book.bookId}">删除</a>
</td>
</tr>
</c:forEach>
</tbody>
</table>
</div>
</div>
</div>
</body>
</html>
WEB-INF/jsp/updateBook.jsp
<%@ page contentType="text/html;charset=UTF-8" language="java" %>
<html>
<head>
    <title>Title</title>
    <%--BootStrap美化界面--%>
    <link href="https://cdn.staticfile.org/twitter-bootstrap/3.3.7/css/bootstrap.min.css" rel="stylesheet">
    <div class="row clearfix">
        <%--屏幕分成12列--%>
        <div class="col-md-12 column">
            <div class="page-header">
                <h1>
                    <small>修改书籍</small>
                </h1>
            </div>
        </div>
    </div>
    <%--BootStrap官网拿"表单"数据  name属性保证pojo属性名称一致 required保证必须提交--%>
    <form action="${pageContext.request.contextPath}/book/updateBook" method="post">
        <%--提交失败:没有回显:问题:
            1. 事务没有提交
            2. sql执行失败,没有提交BookId,需要前端的隐藏域
        --%>
        <%--添加bookId的隐藏域--%>
        <input type="hidden" name="BookId" value="${book.bookId}">
        <div class="form-group">
            <label for="bName">书籍名称:</label>
            <input type="text" name="bookName" class="form-control" id="bName" value="${book.bookName}" required>
        </div>
        <div class="form-group">
            <label for="bCount">书籍数量:</label>
            <input type="text" name="bookCounts" class="form-control" id="bCount" value="${book.bookCounts}"required>
        </div>
        <div class="form-group">
            <label for="bDesc">书籍描述:</label>
            <input type="text" name="detail" class="form-control" id="bDesc" value="${book.detail}" required>
        </div>
        <div class="form-group">
            <input type="submit" class="form-control" value="添加">
        </div>

    </form>
</head>
<body>

</body>
</html>
7 Ajax
7.1 概念
- Ajax就是一个异步无刷新请求,无需更新整个页面就异步加载一些数据,交互性更强
- 模拟异步请求
 <!DOCTYPE html>
<html lang="en">
<head>
    <meta charset="UTF-8">
    <title>模拟Ajax异步请求</title>
    <script>
        function go() {
            var url = document.getElementById("url").value;
            document.getElementById("iframe1").src = url;
        }
    </script>
</head>
<body>
<div>
    <p>请输入地址:</p>
    <p>
        <input type="text" id="url">
        <input type="button" id="button" value="提交" onclick="go()">
    </p>
</div>
<div>
    <iframe id="iframe1" style="width:100%;height: 500px">
    </iframe>
</div>
</body>
</html>
7.2 使用JQ使用Ajax
1 初试Ajax
<%@ page contentType="text/html;charset=UTF-8" language="java" %>
<html>
<head>
    <title>$Title$</title>
    <%--加载动态的JQ资源--%>
    <script src="https://code.jquery.com/jquery-3.4.1.js"></script>
    <script>
        /*
        AJax后盾必须懂的东西:
        url:后端接受的地址
        data:后端接受到的请求参数,json数据格式=前后端分离时候,后端传的数据便于前端接受就是json数据
        success:后端接受成功返回的函数
        error:后盾失败接受返回的函数
        */
        function username() {
            $.post({
                url: "${pageContext.request.contextPath}/a1",
                data: {"name": $("#username").val()},
                success: function (data, status) {
                    console.log("data:" + data);
                    console.log("status:" + status);
                }
            })
        }

    </script>
</head>
<body>
<%--实现Ajax异步请求
    1 绑定单击事件
    2 单击事件函数使用Jq:$.post({})
--%>
用户名:<input type="text" id="username" onclick="username()">
</body>
</html>
2 Ajax实现异步加载
<%@ page contentType="text/html;charset=UTF-8" language="java" %>
<html>
<head>
    <title>Ajax</title>

    <script src="https://code.jquery.com/jquery-3.4.1.js"></script>
    <script>
        /*页面加载完*/
        $(function () {
            /*绑定btn单击事件*/
            $("#btn").click(function () {
                /*JQ使用Ajax异步请求*/
                $.post("${pageContext.request.contextPath}/a2", function (data) {
                    // data接受返回的值
                    //console.log(data);
                    var html = "";
                    for (let i = 0; i < data.length; i++) {
                        html += "<tr>" +
                            "<td>" + data[i].name + "</td>" +
                            "<td>" + data[i].age + "</td>" +
                            "<td>" + data[i].sex + "</td>" +
                            +"<tr>"
                    }
                    $("#content").html(html);
                });
            });

        })
    </script>
</head>
<body>
<input type="button" id="btn" value="加载数据">
<table>
    <tr>
        <td>姓名</td>
        <td>年龄</td>
        <td>性别</td>
    </tr>
    <tbody id="content">

    </tbody>

</table>
</body>
</html>
3 实现登录验证
<%@ page contentType="text/html;charset=UTF-8" language="java" %>
<html>
<head>
    <title>login</title>
    <script src="https://code.jquery.com/jquery-3.4.1.js"></script>
    <script>
        function nameFun() {
            $.post({
                url: "${pageContext.request.contextPath}/a3",
                data: {"name": $("#name").val()},
                success: function (data) {
                    //console.log(data);
                    if (data.toString() === "用户名成功") {
                        $("#userInfo").css("color", "green");
                    } else {
                        $("#userInfo").css("color", "red");
                    }
                    $("#userInfo").html(data);
                }
            })
        }

        function passwordFun() {
            $.post({
                url: "${pageContext.request.contextPath}/a3",
                data: {"password": $("#password").val()},
                success: function (data) {
                    if (data.toString() === "密码正确") {
                        $("#userPasswordInfo").css("color", "green");
                    }else {
                        $("#userPasswordInfo").css("color", "red");
                    }
                    $("#userPasswordInfo").html(data);
                }
            })
        }
    </script>
</head>
<body>
<p>
    用户名:<input type="text" id="name" onclick="nameFun()">
    <%--span提示信息--%>
    <span id="userInfo"></span>
</p>
<p>
    用户密码:<input type="password" id="password" onclick="passwordFun()">
    <span id="userPasswordInfo"></span>
</p>
</body>
</html>
appliacation.xml添加json乱码问题
<?xml version="1.0" encoding="UTF-8"?>
<beans xmlns="http://www.springframework.org/schema/beans"
       xmlns:xsi="http://www.w3.org/2001/XMLSchema-instance"
       xmlns:context="http://www.springframework.org/schema/context"
       xmlns:mvc="http://www.springframework.org/schema/mvc"
       xsi:schemaLocation="http://www.springframework.org/schema/beans
        https://www.springframework.org/schema/beans/spring-beans.xsd
        http://www.springframework.org/schema/context
        https://www.springframework.org/schema/context/spring-context.xsd
       http://www.springframework.org/schema/mvc https://www.springframework.org/schema/mvc/spring-mvc.xsd">
    <!--1 自动扫描包,让指定包下的注解生效,由IOC容器统一管理-->
    <context:component-scan base-package="com.ssl.controller"/>
    <!--2 注解驱动-->
    <mvc:annotation-driven/>
    <!--  使用JQ,使用静态资源过滤需要引用,动态就不需要-->
    <mvc:default-servlet-handler/>
    <!--注解加载映射器、适配器,解决Json数据中文乱码问题-->
    <mvc:annotation-driven>
        <mvc:message-converters register-defaults="true">
            <bean class="org.springframework.http.converter.StringHttpMessageConverter">
                <constructor-arg value="UTF-8"/>
            </bean>
            <bean class="org.springframework.http.converter.json.MappingJackson2HttpMessageConverter">
                <property name="objectMapper">
                    <bean class="org.springframework.http.converter.json.Jackson2ObjectMapperFactoryBean">
                        <property name="failOnEmptyBeans" value="false"/>
                    </bean>
                </property>
            </bean>
        </mvc:message-converters>
    </mvc:annotation-driven>
    <!--3 以上的是定死的代码,以下是配置视图解析器-->
    <bean class="org.springframework.web.servlet.view.InternalResourceViewResolver" id="internalResourceViewResolver">
        <property name="prefix" value="/WEB-INF/jsp/"/>
        <property name="suffix" value=".jsp"/>
    </bean>
</beans>
7.3 后端需要的前端知识
- HTML+CSS+Js(超级熟练)
- Js必会?:
- 函数闭包?
- DOM
- id,name.tag
- create,remove
- BOM:浏览器对象模型
- window
- document
8 拦截器
8.1 概念
- 数据独立性:Servlet中的是过滤器,而拦截器是SpringMVC框架独有的,独享request和response
- 拦截器只会拦截访问的控制器方法,如果访问的是jsp/html/css等式不会拦截的
- 拦截器是基于AOP思想的,和AOP实现是一样的,在application.xml中配置
  <!--拦截器配置-->
<mvc:interceptors>
    <mvc:interceptor>
        <!--
                /**是拦截之后所有的请求,比如/admin/a1/2131
            -->
        <mvc:mapping path="/**"/>
        <bean class="com.ssl.config.MyInterceptor"/>
    </mvc:interceptor>
</mvc:interceptors>
8.2 自定义拦截器
- 实现 HandlerInterceptor
public class MyInterceptor implements HandlerInterceptor {
    @Override
    public boolean preHandle(HttpServletRequest request, HttpServletResponse response, Object handler) throws Exception {
        //return true:执行下一个拦截器
        System.out.println("===========处理前,这里进行拦截处理=================");
        return true;
    }

    @Override
    public void postHandle(HttpServletRequest request, HttpServletResponse response, Object handler, ModelAndView modelAndView) throws Exception {
        System.out.println("===========处理后,通常进行日志管理=================");
    }

    @Override
    public void afterCompletion(HttpServletRequest request, HttpServletResponse response, Object handler, Exception ex) throws Exception {
        System.out.println("===========清洁中=================");
    }
}
- applica.xml配置
<!--拦截器配置-->
<mvc:interceptors>
    <mvc:interceptor>
        <!--
                /**是拦截之后所有的请求,比如/admin/a1/2131
            -->
        <mvc:mapping path="/**"/>
        <bean class="com.ssl.config.MyInterceptor"/>
    </mvc:interceptor>
</mvc:interceptors>
8.3 登录验证判断
public class LoginInterceptor implements HandlerInterceptor {
    @Override
    public boolean preHandle(HttpServletRequest request, HttpServletResponse response, Object handler) throws Exception {
        HttpSession session = request.getSession();
        request.getRequestURL();
        //URL:http://localhost:8080/springmvc_07_interceptor/user//main
        System.out.println("URL:" + request.getRequestURL());
        //URI:/springmvc_07_interceptor/user//main
        System.out.println("URI:" + request.getRequestURI());

        if (session.getAttribute("username") == null || session.getAttribute("password") == null) {
            request.getRequestDispatcher("/WEB-INF/jsp/login.jsp").forward(request, response);
        } else if (session.getAttribute("username").equals("admin") && session.getAttribute("password").equals("123456")) {
            return true;
        }
        if (request.getRequestURI().contains("ogin")) {
            return true;
        }
        request.getRequestDispatcher("/WEB-INF/jsp/login.jsp").forward(request, response);
        return false;
    }
}
@Controller
@RequestMapping("/user")
public class LoginController {

    @RequestMapping("/main")
    public String main() {
        //沒登陸就不等進入首頁
        return "main";
    }

    @RequestMapping("/goLogin")
    public String goLogin() {
        return "login";
    }


    @RequestMapping("/login")
    public String login(String username, String password, HttpSession session, Model model) {
        session.setAttribute("username", username);
        session.setAttribute("password", password);
        model.addAttribute("username", username);
        return "main";
    }

    @RequestMapping("/outUser")
    public String outUser(HttpSession session) {
        session.removeAttribute("username");
        session.removeAttribute("password");
        return "main";
    }
}
9 文件上传
- 前端form添加enctype=“multipart/form-data”,method=“post”
<form enctype="multipart/form-data" method="post" action="">

  </form>
- 后端pom导包
 <dependencies>
        <dependency>
            <groupId>commons-fileupload</groupId>
            <artifactId>commons-fileupload</artifactId>
            <version>1.4</version>
        </dependency>
        <!--导入高版本的api-->
        <dependency>
            <groupId>javax.servlet</groupId>
            <artifactId>javax.servlet-api</artifactId>
            <version>4.0.1</version>
        </dependency>
    </dependencies>
- Spring自带的文件上传,application.xml配置
 <!--4 文件上传配置-->
    <bean id="multipartResolver" class="org.springframework.web.multipart.commons.CommonsMultipartResolver">
        <property name="defaultEncoding" value="utf-8"/>
        <!--最大上传大小:单位是1字节-->
        <property name="maxUploadSize" value="10485760"/>
        <property name="maxInMemorySize" value="40960"/>
    </bean>
@RestController
public class FileController {
    @RequestMapping("/upFile")
    public String upFile(@RequestParam("file") CommonsMultipartFile file, HttpServletRequest request) throws IOException {
        //设置文件保存路径
        String path = request.getServletContext().getRealPath("/upload");
        System.out.println("path:" + path);
        File realPath = new File(path);
        if (!realPath.exists()) {
            realPath.mkdir();
        }
        System.out.println("上传的文件地址:" + realPath);
        //CommonsMultipartFile的方法写文件,简化
        file.transferTo(new File(realPath + "/" + file.getOriginalFilename()));
        return "redirect:/index.jsp";
    }
}
10 文件下载
- 方式一:写方法下载
  @RequestMapping(value = "/download")
    public String downLoad(HttpServletResponse response, HttpServletRequest request) throws IOException {
        //手动设置,要下载的图片地址
        String path = request.getServletContext().getRealPath("/upload");
        String fileName = "1.png";
        //设置响应头
        response.reset();//设置页面不缓存,清空buffer
        response.setCharacterEncoding("UTF-8");
        response.setContentType("multipart/form-data");//二进制传输数据
        response.setHeader("Content-Disposition", "attachment;fileName=" + URLEncoder.encode(fileName, "UTF-8"));
        File file = new File(path, fileName);
        //读取文件-输入流
        InputStream input = new FileInputStream(file);
        //写入文件-输出流
        OutputStream out = response.getOutputStream();
        byte[] buff = new byte[1024];
        int index = 0;
        while ((index = input.read(buff)) != -1) {
            out.write(buff,0,index);
            out.flush();
        }
        input.close();
        out.close();
        return "redirect:/index.jsp";
    }
- 方式二:标签直接web下静态获取
<a href="${pageContext.request.contextPath}/static/1.png">图片下载</a>


 779
779


 被折叠的 条评论
为什么被折叠?
被折叠的 条评论
为什么被折叠?
 到【灌水乐园】发言


