


HandlerThread简介

使用
请先熟悉上图的使用流程:
- Step 1 、Step 2 、 Step 3
  private fun init() {
        // step 1
        handlerThread = HandlerThread("SHandlerThread")
        // step 2
        handlerThread?.start()
        // step 3
        workHandler = WorkHandler(handlerThread?.looper)
    }
- Step 4 发送消息给handler
handlerThreadBtn.setOnClickListener(object : View.OnClickListener {
            override fun onClick(v: View?) {
            // step 4
                var msg = workHandler?.obtainMessage()
                msg?.arg1 = 1
                msg?.obj = "这是点击更新的文字__HandlerThread"
                workHandler?.sendMessage(msg)
            }
        })
- Step 5 在handleMessage中处理执行结果
final inner class WorkHandler : Handler {
        constructor(looper: Looper?) : super(looper)

        override fun handleMessage(msg: Message?) {
            super.handleMessage(msg)
            when (msg?.arg1) {
                1 -> {
                    val toString = msg.obj.toString()
                    // step 5 处理执行结果
                    uiHandler?.postDelayed(object : Runnable {
                        override fun run() {
                            handlerThread_text.text = toString
                        }

                    }, 1000)
                }
            }
        }
    }
- Step 6 退出looper & 清空消息
 fun quit() {
        // looper退出
        handlerThread?.quit()
        // 移除所有消息
        workHandler?.removeCallbacksAndMessages(null)
        // uiHandler?.removeCallbacksAndMessages(null)
    }
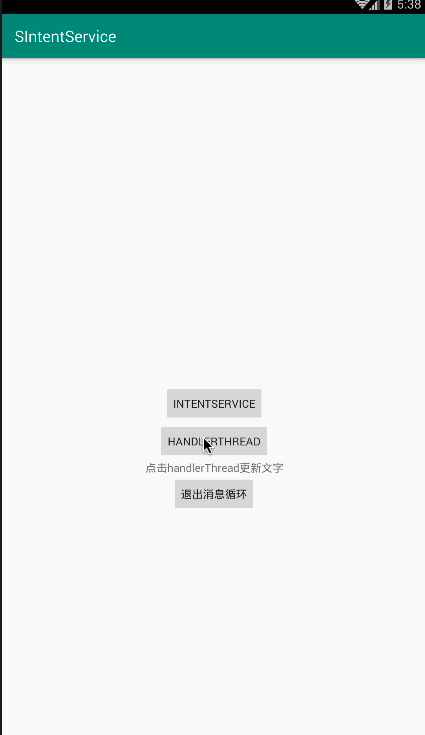
效果图:
源码分析
源码相关函数思维导图

具体分析
- HandlerThread构造方法
 public HandlerThread(String name) {
        super(name);
        // 默认线程的优先级
        mPriority = Process.THREAD_PRIORITY_DEFAULT;
    }

 public HandlerThread(String name, int priority) {
        super(name);
        //可以创建实例时指定优先级
        mPriority = priority;
    }
- run
HandlerThread继承Thread,创建HandlerThread后,调用start启动,会执行run函数
    @Override
    public void run() {
        mTid = Process.myTid();
        // 1. 初始化Looper
        Looper.prepare();
        synchronized (this) {
        //2. 获取looper
            mLooper = Looper.myLooper();
            notifyAll();
        }
        // 3. 设置优先级
        Process.setThreadPriority(mPriority);
        // 4. looper轮询之前回调
        onLooperPrepared();
        // 5. 开始轮询
        Looper.loop();
        mTid = -1;
    }
- quit / quitSafely 退出 /安全退出
public boolean quit() {
        Looper looper = getLooper();
        if (looper != null) {
            looper.quit();
            return true;
        }
        return false;
    }

    public boolean quitSafely() {
        Looper looper = getLooper();
        if (looper != null) {
            looper.quitSafely();
            return true;
        }
        return false;
    }
其他几个函数不在介绍,HandlerThread的源码不多,建议去看一下!
如有写的不对的地方,辛苦大佬指出!
有因必有果,你的报应就是我!记得点赞木木哒!


 885
885


 被折叠的 条评论
为什么被折叠?
被折叠的 条评论
为什么被折叠?
 到【灌水乐园】发言


