


GitLab WebHook 配置(基于事件去触发)
前面使用插件模拟了Jenkins如何触发流水线,现在使用Gitlab去触发Jenkins。进入项目设置, gitlab webhook的配置页面:(为你的项目创建webhook)

trigger下面是很多事件,push events就是提交之后的构建 。
事件分类:
- Push 提交事件
- Tag Push 创建事件
- MergeRequest 合并事件
- Issue 问题创建更新事件

这里选择的是代码提交事件, 过滤的分支是以feature开头的所有分支

当事件触发了,就会去使用URL去触发Jenkins。
Jenkins WebHook配置
新建一个“Gitlab-Webhook-Trigger”项目, 开启Generic webhook。 配置触发token 为作业名称gitlab-test-pipeline。现在在Jenkins启用触发器,并且填入token,token值为项目名字。
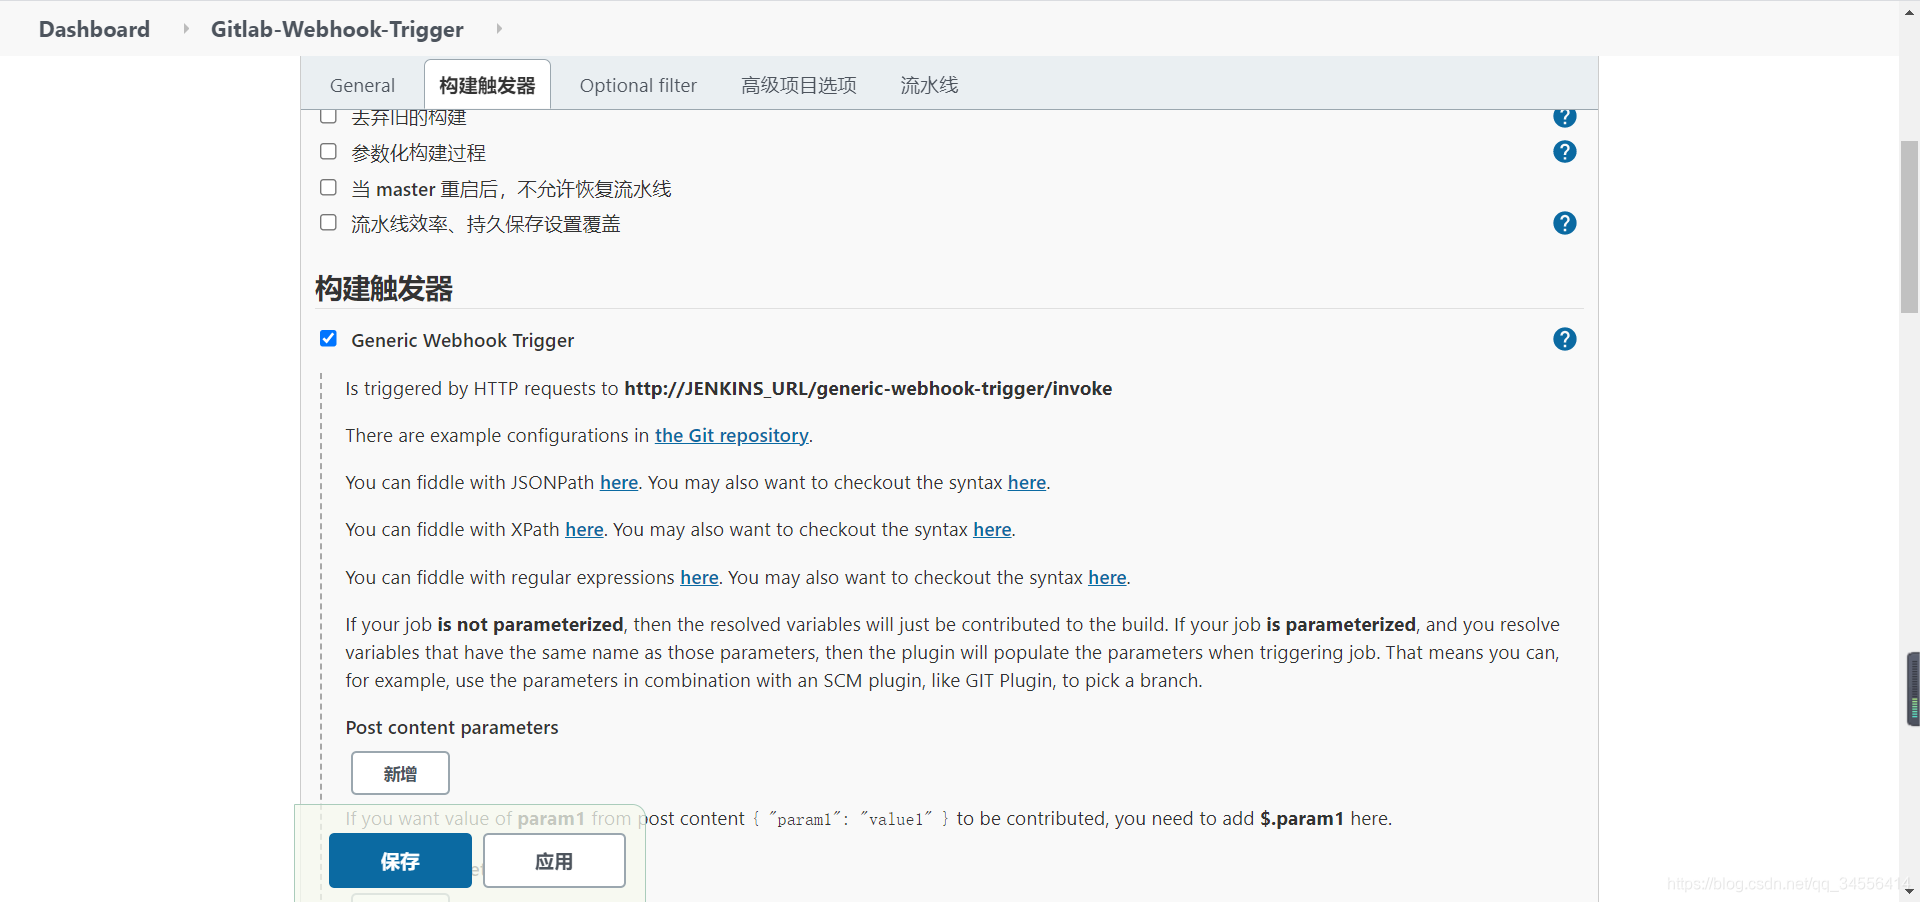

生成的触发URL
http://139.198.166.235:8080/generic-webhook-trigger/invoke?token=Gitlab-Webhook-TriggerGitLab WebHook 配置(相当于客户端向Jenkins发起post请求)
进入项目设置, gitlab webhook的配置页面:
当修改代码,提交之后,基于所有分支。那么gitlab会向上面配置的url里面发送一个post请求,然后触发Jenkins。


出现此FAQ:Url is blocked: Requests to the local network are not allowed
解决方法:进入admin管理页面设置 > network


找到"Outbound requests"勾选允许请求webhooks和服务。(更改后,重启触发即可)

模拟事件触发,点击test按钮选择push事件,此时去看下Jenkins是否成功被触发。

触发成功提示: Hook executed successfully: HTTP 200


触发之后,Jenkins拿到如下的数据,gitlab将数据发送给Jenkins了,后面需要什么信息在里面过滤就可以。
Generic Cause
Running in Durability level: MAX_SURVIVABILITY
[Pipeline] Start of Pipeline (hide)
GenericWebhookEnvironmentContributor
 Received:

{"object_kind":"push","event_name":"push","before":"0d9212b05a167d8c6e53f225402894456894ef1e","after":"236006b394466b614ca84fcd6a767329d3b9eea4","ref":"refs/heads/master","checkout_sha":"236006b394466b614ca84fcd6a767329d3b9eea4","message":null,"user_id":1,"user_name":"Administrator","user_username":"root","user_email":"","user_avatar":"https://www.gravatar.com/avatar/e64c7d89f26bd1972efa854d13d7dd61?s=80\u0026d=identicon","project_id":3,"project":{"id":3,"name":"devops-hello-service","description":"","web_url":"http://76c03cb0fea1/devops/devops-hello-service","avatar_url":null,"git_ssh_url":"git@76c03cb0fea1:devops/devops-hello-service.git","git_http_url":"http://76c03cb0fea1/devops/devops-hello-service.git","namespace":"devops","visibility_level":0,"path_with_namespace":"devops/devops-hello-service","default_branch":"master","ci_config_path":null,"homepage":"http://76c03cb0fea1/devops/devops-hello-service","url":"git@76c03cb0fea1:devops/devops-hello-service.git","ssh_url":"git@76c03cb0fea1:devops/devops-hello-service.git","http_url":"http://76c03cb0fea1/devops/devops-hello-service.git"},"commits":[{"id":"236006b394466b614ca84fcd6a767329d3b9eea4","message":"Update .gitlab-ci.yml file","title":"Update .gitlab-ci.yml file","timestamp":"2021-08-24T01:39:35+00:00","url":"http://76c03cb0fea1/devops/devops-hello-service/-/commit/236006b394466b614ca84fcd6a767329d3b9eea4","author":{"name":"Administrator","email":"admin@example.com"},"added":[],"modified":[],"removed":[]},{"id":"56cf4744926b013ac7ca1302e1214e44e90a8950","message":"Update .gitlab-ci.yml file","title":"Update .gitlab-ci.yml file","timestamp":"2021-08-24T01:37:29+00:00","url":"http://76c03cb0fea1/devops/devops-hello-service/-/commit/56cf4744926b013ac7ca1302e1214e44e90a8950","author":{"name":"Administrator","email":"admin@example.com"},"added":[],"modified":[".gitlab-ci.yml"],"removed":[]},{"id":"0d9212b05a167d8c6e53f225402894456894ef1e","message":"Add new file","title":"Add new file","timestamp":"2021-08-24T01:36:04+00:00","url":"http://76c03cb0fea1/devops/devops-hello-service/-/commit/0d9212b05a167d8c6e53f225402894456894ef1e","author":{"name":"Administrator","email":"admin@example.com"},"added":[".gitlab-ci.yml"],"modified":[],"removed":[]}],"total_commits_count":3,"push_options":{},"repository":{"name":"devops-hello-service","url":"git@76c03cb0fea1:devops/devops-hello-service.git","description":"","homepage":"http://76c03cb0fea1/devops/devops-hello-service","git_http_url":"http://76c03cb0fea1/devops/devops-hello-service.git","git_ssh_url":"git@76c03cb0fea1:devops/devops-hello-service.git","visibility_level":0}}
最后,如果你需要其他条件触发,还可以进行添加webhook(遇到多个分支去触发,多加一个webhook)

Webhook问题排查调试
进入webhook添加页面的最下方,点击你所创建的webhook的 Edit按钮

可以查看到webhook的历史记录, 可以看到本次提交是否正常产生了webhook事件。

点击 View details 可以看到此webhook发送给对端Jenkins的数据信息,和请求状态。
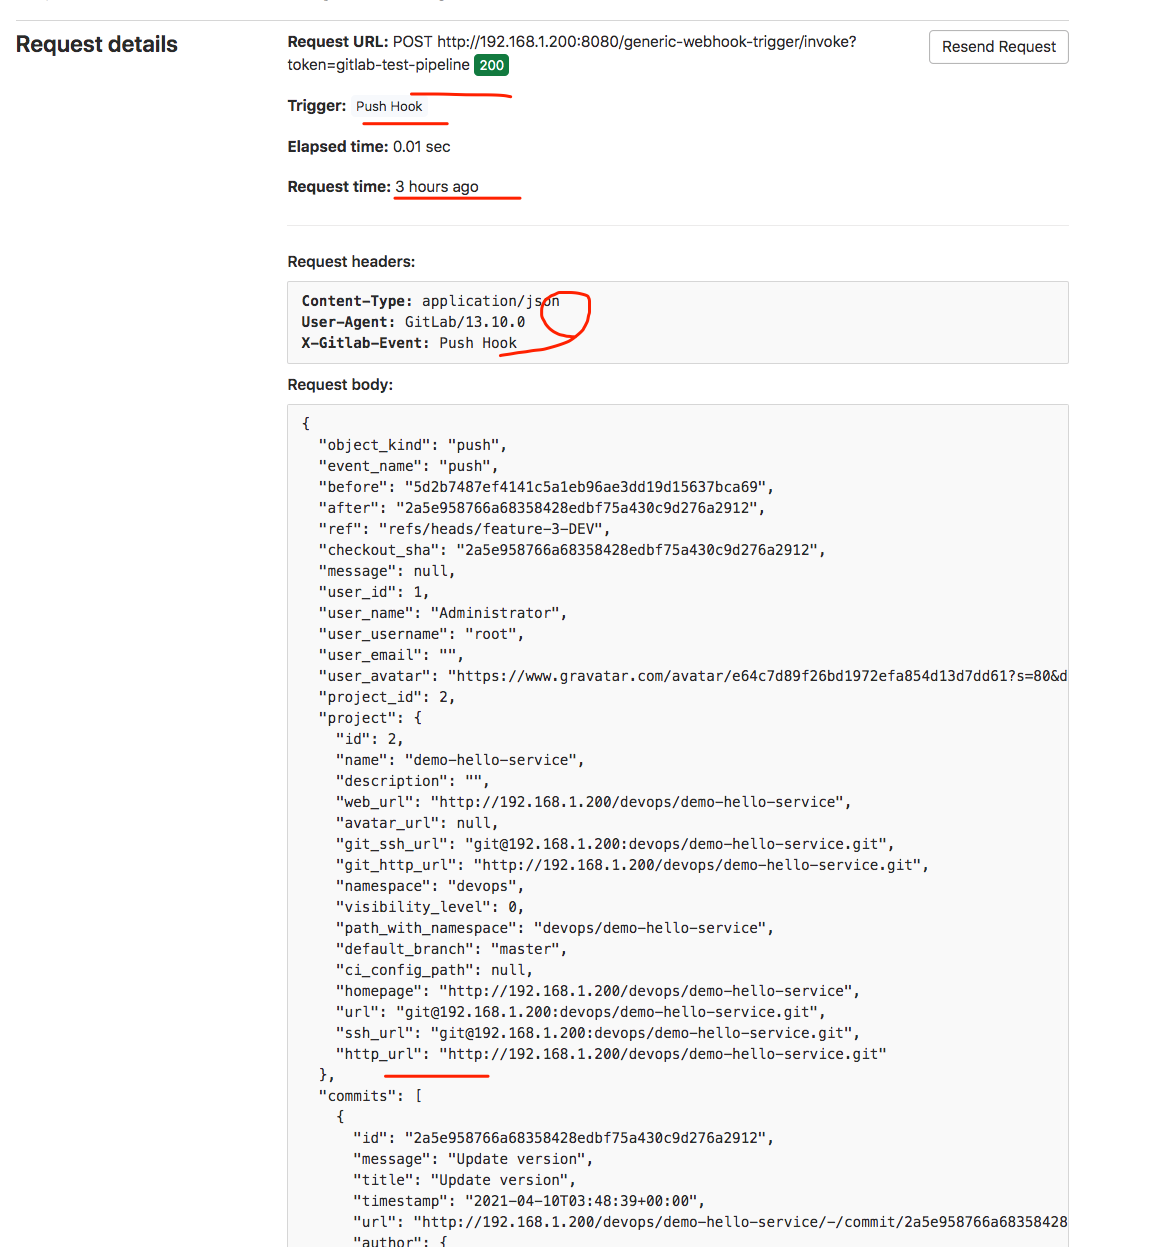
如果此次请求由于xxx原因导致没有触发jenkins构建, 可以在这里点击 Resend Request 按钮进行重新发送请求,而不是再次提交代码。

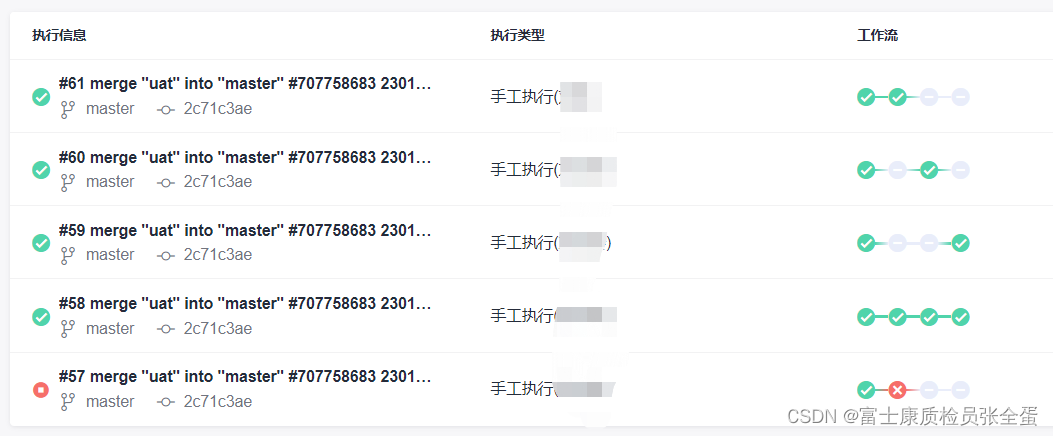
如果Jenkins触发成功了之后,我们可以在Jenkins的构建日志中查看效果。 这些数据就是gitlab post传递过来的。

到此:你基本上已经知道了Gitlab如何触发Jenkins的了。(多看几遍,多练习几遍)
补充


一个请求和响应的过程:

- Request 用户通过浏览器向我们的服务端发起请求。
- Response服务端将客户端请求的资源数据进行响应。
调用接口的方法
请求类型:
- GET 向指定的URL请求资源,可携带参数(明文)。
- POST 向指定的URL提交资源,表单数据提交,数据进行封装(比Get方法安全)。
- PUT 与POST类似,通常用于对资源数据的更新修改。
- DELETE 删除指定的资源。

def webHookData = readJSON text: "${allData}"
String userName = webHookData.user_name
String userEmail = webHookData.user_email

pipeline {
    agent any

    stages {
        stage('Hello') {
            steps {
               println("${webHookData}")
               println(userName)
               println(userEmail)
            }
        }
    }
}
[Pipeline] readJSON
[Pipeline] node
Running on build-01 in /data/cicd/jenkinsagent/workspace/jenkins/webhook-01
[Pipeline] {
[Pipeline] stage
[Pipeline] { (Hello)
[Pipeline] echo
[object_kind:push, event_name:push, before:efce8922637921394bd9509dc275a009901173aa, after:0a6725102ba2cf695565eed029f1939029147aa4, ref:refs/heads/master, checkout_sha:0a6725102ba2cf695565eed029f1939029147aa4, message:null, user_id:2, user_name:devop, user_username:devop, user_email:1239683670@qq.com, user_avatar:https://www.gravatar.com/avatar/dde905e7f79c53e01eadfc040c720816?s=80&d=identicon, project_id:4, project:[id:4, name:devops-hello-service, description:, web_url:http://76c03cb0fea1/dev/devops-hello-service, avatar_url:null, git_ssh_url:git@76c03cb0fea1:dev/devops-hello-service.git, git_http_url:http://76c03cb0fea1/dev/devops-hello-service.git, namespace:dev, visibility_level:0, path_with_namespace:dev/devops-hello-service, default_branch:master, ci_config_path:null, homepage:http://76c03cb0fea1/dev/devops-hello-service, url:git@76c03cb0fea1:dev/devops-hello-service.git, ssh_url:git@76c03cb0fea1:dev/devops-hello-service.git, http_url:http://76c03cb0fea1/dev/devops-hello-service.git], commits:[[id:0a6725102ba2cf695565eed029f1939029147aa4, message:Update Jenkinsfile, title:Update Jenkinsfile, timestamp:2021-08-30T00:37:27+00:00, url:http://76c03cb0fea1/dev/devops-hello-service/-/commit/0a6725102ba2cf695565eed029f1939029147aa4, author:[name:devop, email:1239683670@qq.com], added:[], modified:[Jenkinsfile], removed:[]], [id:0cbf76185c4b87558dbfcaa836c5ac8eb1e180f3, message:Update Jenkinsfile, title:Update Jenkinsfile, timestamp:2021-08-28T07:38:26+00:00, url:http://76c03cb0fea1/dev/devops-hello-service/-/commit/0cbf76185c4b87558dbfcaa836c5ac8eb1e180f3, author:[name:devop, email:1239683670@qq.com], added:[], modified:[Jenkinsfile], removed:[]], [id:efce8922637921394bd9509dc275a009901173aa, message:Update Jenkinsfile, title:Update Jenkinsfile, timestamp:2021-08-28T06:35:33+00:00, url:http://76c03cb0fea1/dev/devops-hello-service/-/commit/efce8922637921394bd9509dc275a009901173aa, author:[name:devop, email:1239683670@qq.com], added:[], modified:[Jenkinsfile], removed:[]]], total_commits_count:3, push_options:[:], repository:[name:devops-hello-service, url:git@76c03cb0fea1:dev/devops-hello-service.git, description:, homepage:http://76c03cb0fea1/dev/devops-hello-service, git_http_url:http://76c03cb0fea1/dev/devops-hello-service.git, git_ssh_url:git@76c03cb0fea1:dev/devops-hello-service.git, visibility_level:0]]
[Pipeline] echo
devop
[Pipeline] echo
1239683670@qq.com
[Pipeline] }
[Pipeline] // stage
[Pipeline] }
[Pipeline] // node
[Pipeline] End of Pipeline
Finished: SUCCESS
Request body:
{
  "object_kind": "push",
  "event_name": "push",
  "before": "efce8922637921394bd9509dc275a009901173aa",
  "after": "0a6725102ba2cf695565eed029f1939029147aa4",
  "ref": "refs/heads/master",
  "checkout_sha": "0a6725102ba2cf695565eed029f1939029147aa4",
  "message": null,
  "user_id": 2,
  "user_name": "devop",
  "user_username": "devop",
  "user_email": "1239683670@qq.com",
  "user_avatar": "https://www.gravatar.com/avatar/dde905e7f79c53e01eadfc040c720816?s=80&d=identicon",
  "project_id": 4,
  "project": {
    "id": 4,
    "name": "devops-hello-service",
    "description": "",
    "web_url": "http://76c03cb0fea1/dev/devops-hello-service",
    "avatar_url": null,
    "git_ssh_url": "git@76c03cb0fea1:dev/devops-hello-service.git",
    "git_http_url": "http://76c03cb0fea1/dev/devops-hello-service.git",
    "namespace": "dev",
    "visibility_level": 0,
    "path_with_namespace": "dev/devops-hello-service",
    "default_branch": "master",
    "ci_config_path": null,
    "homepage": "http://76c03cb0fea1/dev/devops-hello-service",
    "url": "git@76c03cb0fea1:dev/devops-hello-service.git",
    "ssh_url": "git@76c03cb0fea1:dev/devops-hello-service.git",
    "http_url": "http://76c03cb0fea1/dev/devops-hello-service.git"
  },
  "commits": [
    {
      "id": "0a6725102ba2cf695565eed029f1939029147aa4",
      "message": "Update Jenkinsfile",
      "title": "Update Jenkinsfile",
      "timestamp": "2021-08-30T00:37:27+00:00",
      "url": "http://76c03cb0fea1/dev/devops-hello-service/-/commit/0a6725102ba2cf695565eed029f1939029147aa4",
      "author": {
        "name": "devop",
        "email": "1239683670@qq.com"
      },
      "added": [

      ],
      "modified": [
        "Jenkinsfile"
      ],
      "removed": [

      ]
    },
    {
      "id": "0cbf76185c4b87558dbfcaa836c5ac8eb1e180f3",
      "message": "Update Jenkinsfile",
      "title": "Update Jenkinsfile",
      "timestamp": "2021-08-28T07:38:26+00:00",
      "url": "http://76c03cb0fea1/dev/devops-hello-service/-/commit/0cbf76185c4b87558dbfcaa836c5ac8eb1e180f3",
      "author": {
        "name": "devop",
        "email": "1239683670@qq.com"
      },
      "added": [

      ],
      "modified": [
        "Jenkinsfile"
      ],
      "removed": [

      ]
    },
    {
      "id": "efce8922637921394bd9509dc275a009901173aa",
      "message": "Update Jenkinsfile",
      "title": "Update Jenkinsfile",
      "timestamp": "2021-08-28T06:35:33+00:00",
      "url": "http://76c03cb0fea1/dev/devops-hello-service/-/commit/efce8922637921394bd9509dc275a009901173aa",
      "author": {
        "name": "devop",
        "email": "1239683670@qq.com"
      },
      "added": [

      ],
      "modified": [
        "Jenkinsfile"
      ],
      "removed": [

      ]
    }
  ],
  "total_commits_count": 3,
  "push_options": {
  },
  "repository": {
    "name": "devops-hello-service",
    "url": "git@76c03cb0fea1:dev/devops-hello-service.git",
    "description": "",
    "homepage": "http://76c03cb0fea1/dev/devops-hello-service",
    "git_http_url": "http://76c03cb0fea1/dev/devops-hello-service.git",
    "git_ssh_url": "git@76c03cb0fea1:dev/devops-hello-service.git",
    "visibility_level": 0
  }
}


 4146
4146


 被折叠的 条评论
为什么被折叠?
被折叠的 条评论
为什么被折叠?
 到【灌水乐园】发言


