


「设计模式(四) - 责任链模式」
一、能力越大责任越大
顾名思义,“责任链”就像是一根链条串联起来的一系列操作,每个操作都息息相关。请假的审批流程,报销流程等等依据不同职位对应的人员完成相应的审批操作;可以说是层层推进的。而我们最终关心的结果就是同意或者驳回。
二、责任链模式 Chain of Responsibility
当请求端Client发出请求时,为了降低请求者
Client与处理对象们Handlers之间的耦合;同时满足众多Handlers都能有机会参与到对请求的处理,将Handler对象组成一条链。而请求随着链不断传递,直到被处理并返回结果。
三、组成部分
通过定义可以发现,责任链主要有几个组成部分:
- 客户端请求类
Client:发起请求,相当于开启责任链,提交任务到责任链等待处理结果。 - 处理类的抽象接口
Handler或者抽象类:包含处理请求方法的定义,通常也包含后继链指向。 - 具体的
Handler的实现类ConcreteHandler:根据自身能力的大小对Client的请求的具体实现,有可能刚好匹配那么直接处理返回结果链的调用结束,否则将请求转发到后继链继续处理直到请求处理完成。 - 结构图如下:

四、简单的代码实现
1.设计一个文件的解析系统
文件解析的系统根据导入的文件格式,匹配不同的解析对象
Handler对其进行解析,通过链的开启,有可能第一次就匹配到合适的类那么链的调用结束并返回结果;当然如果是不支持的的文件类型-那么作为程序设计时是不是就可以简单的转化为当前对象无法处理这个请求,并且没有后续Handler,通俗的讲即此时请求到链尾且仍没有合适的Handler能够处理,则调用结束给出相应的报错信息或者其他操作反馈到请求者Client。
- 抽象的处理类
Handler:
/**
 * Created by Sai
 * on: 12/01/2022 23:53.
 * Description:
 */
public abstract class FileParser {
  //后继链
  private FileParser next;

  public void setNext(FileParser next) {
    this.next = next;
  }
  //文件的扩展信息
  protected abstract String getExtension();

  protected abstract void doParse(String fileName);

  public void read(String fileName) {
    if (fileName.endsWith(getExtension())) {
      this.doParse(fileName);
      return;
    }

    if (next != null) next.read(fileName);
    else System.out.println("the file type " + fileName + " is unsupported ");
  }
}
具体的文件解析实现类、如Excel、MarkDown、Word三个组成一条责任链。
Excle文件解析类
/**
 * Created by Sai
 * on: 12/01/2022 00:01.
 * Description:
 */
public class ExcelParser extends FileParser {
  @Override
  protected String getExtension() {
    return ".xls";
  }

  @Override
  protected void doParse(String fileName) {
    System.out.println("Parse the excel file...... ");
    System.out.println("-------------------------------------->");
  }
}
MarkDown文件解析具体实现类
/**
 * Created by Sai
 * on: 12/01/2022 00:03.
 * Description:
 */
public class MarkDownParser extends FileParser {
  @Override
  protected String getExtension() {
    return ".md";
  }

  @Override
  protected void doParse(String fileName) {
    System.out.println("Parse the markdown file......");
    System.out.println("---------------------------------------->");
  }
}
Word文件解析具体实现类
/**
 * Created by Sai
 * on: 12/01/2022 00:10.
 * Description:
 */
public class WordParser extends FileParser {
    @Override
    protected String getExtension() {
        return ".doc";
    }

    @Override
    protected void doParse(String fileName) {
        System.out.println("Parse the word file......");
        System.out.println("----------------------------------->");
    }
}
当然如果确定Client的请求比较明确,像此“文件”解析的系统,只需要导入文件,那么对于链的开启可以单独抽取出来。
- 实现解析工具类
/**
 * Created by Sai
 * on: 12/01/2022 00:13.
 * Description:
 */
public class FileParserFactory {

  public static FileParser getDataReaderChain() {
    var excelParser = new ExcelParser();
    var markDownParser = new MarkDownParser();
    var wordParser = new WordParser();

    wordParser.setNext(markDownParser);
    markDownParser.setNext(excelParser);
    return wordParser;
  }
}
Client测试类
/**
 * Created by Sai
 * on: 12/01/2022 00:15.
 * Description:
 */
public class Demo {

    public static void show() {
        var reader = FileParserFactory.getDataReaderChain();
        reader.read("file.xls");
        reader.read("file.md");
        reader.read("file.doc");
        reader.read("file.jpg");
    }

    public static void main(String[] args) {
        show();
    }
}
- 打印信息,显然对于
JPG格式系统是不支持,那么也给到了Client相应的反馈信息
Parse the excel file......
success......
-------------------------------------->
Parse the markdown file......
success......
---------------------------------------->
Parse the word file......
success......
----------------------------------->
the file type file.jpg is unsupported, failed

Process finished with exit code 0
2.简单的总结
Client作为请求发起者,如导入文件并解析出想要得到的结果。与处理类之间耦合程度低,Client端只管文件的导入,并不会关心最终由谁来处理。即使系统需要扩展新的解析类也是非常方便的,只需要继承Handler单独实现具体细节,是比较易于扩展的。但是同样也会伴随着系统的膨胀,跟职责的粒度有关。另外观察也可发现,如果责任链太过于长的话,调用栈势必会很深。系统的性能也会打折扣,当然这也是根据具体的业务具体来考虑的。该用的时候想好怎么用,不该用的时候没必要为了设计而设计。毕竟设计模式的本质仅仅是为了降低复杂度,降低耦合提高扩展性。
Client请求端与处理端Handler耦合度低。- 职责的分配可以根据业务需求灵活组合,而修改某一具体职责实现细节不影响整体系统的稳定。
- 易于扩展。
当然缺点也是存在的
- 当职责的增加,链的长度增加,调用栈深度加深则会影响系统的效率。
- 职责的具体实现类如果较多,增加了一定的维护成本,同时
Client端开启链时复杂度提高。
五、okHttp中的责任链模式
早期Java版本,okHttp3最新的版本为4.9.3,不知道从哪个版本起已经改为Kotlin实现,实现细节作出了调整,但对于拦截器责任链的主要流程变动很小。
OkHttpClient相当于我们网络的配置控制中心,包括一些基础的配置,连接池、重试、桥接、协议等,主要配置:Dispatcher(线程调度)设定了最大请求数,单个Host的最大请求数。Protocols支持的协议,HTTP/1.1、HTTP/2。ConnectionSpec对于Socket的设置信息,明确是明文传输的HTTP,还是TLS的HTTPS。
Interceptor,核心链,包含了几个重要的拦截器。当然还包括其他的一些基础参数。
1.newCall
从实际运用的例子入手:
private static void connectNet() {
       OkHttpClient client = new OkHttpClient();
       Request request = new Request.Builder()
               .url("https://www.baidu.com")
               .build();
        //异步请求
       client.newCall(request).enqueue(new Callback() {
           @Override
           public void onFailure(Call call, IOException e) {
               System.out.println("Failed----->" + e.getMessage());
           }

           @Override
           public void onResponse(Call call, Response response) throws IOException {
               System.out.println("Success----->" + response.toString());
           }
       });
   }
newCall(request)方法返回的是一个RealCall对象,实现了Call的接口,当调用RealCall.execute()时:
RealCall.getResponseWithInterceptorChain()会被调用,发起网络请求并拿到返回的响应值Response,同样的异步请求RealCall.enqueue()的调用也是大同小异,主要区别在于Dispatcher的介入,通过线程池的调用将请求加入后台,实际上也是对getResponseWithInterceptorChain()的调用。另外不同的是,对于请求队列的维护是不同的(Dispatcher)中。
getResponseWithInterceptorChain(),计数核心方法,也是OkHttp责任链模式的核心方法,主要的工作就是将多个Interceptor组装起来(List),创建一个RealInterceptorChain对象,而chain.proceed(request)一步步推荐链的执行。
2.Dispatcher
private int maxRequests = 64;
private int maxRequestsPerHost = 5;

private final Deque<AsyncCall> readyAsyncCalls = new ArrayDeque<>();

/** Running asynchronous calls. Includes canceled calls that haven't finished yet. */
private final Deque<AsyncCall> runningAsyncCalls = new ArrayDeque<>();

/** Running synchronous calls. Includes canceled calls that haven't finished yet. */
private final Deque<RealCall> runningSyncCalls = new ArrayDeque<>();
- 定义了最大异步请求数为64,而单个
Host最大的请求数为5,同时对于异步请求,实现了两个双端队列来保存请求runningAsyncCalls、readyAsyncCalls;这个很好理解,当我们的请求已经达到最大值64(或者Host为5),那么此时要是有新的请求过来当然是要将请求先保存起来。对于早期的处理逻辑,当有请求过来时,先判断是否达到请求阀值。决定将请求放入哪个队列当中,在新版本中这个逻辑已经被修改了。同样的对于同步请求是直接入队列runningSyncCalls。
//早期的异步请求入队列操作
synchronized void enqueue(AsyncCall call) {
  if (runningAsyncCalls.size() < maxRequests && runningCallsForHost(call) < maxRequestsPerHost) {
    runningAsyncCalls.add(call);
    getExecutorService().execute(call);
  } else {
    readyAsyncCalls.add(call);
  }
}
//后期版本中是直接先入到readyAsyncCalls中,当然主要逻辑还是一样的
void enqueue(AsyncCall call) {
  synchronized (this) {
    readyAsyncCalls.add(call);
    if (!call.get().forWebSocket) {
      AsyncCall existingCall = findExistingCallWithHost(call.host());
      if (existingCall != null) call.reuseCallsPerHostFrom(existingCall);
    }
  }
  //在此方法中处理判断是否达到阀值决定是否要加入到runningAsyncCalls。
  promoteAndExecute();
}

private boolean promoteAndExecute() {
    assert (!Thread.holdsLock(this));
    List<AsyncCall> executableCalls = new ArrayList<>();
    boolean isRunning;
    synchronized (this) {
      for (Iterator<AsyncCall> i = readyAsyncCalls.iterator(); i.hasNext(); ) {
        AsyncCall asyncCall = i.next();
				//Max capacity.
        if (runningAsyncCalls.size() >= maxRequests) break;
        //Host max capacity.
        if (asyncCall.callsPerHost().get() >= maxRequestsPerHost) continue;
        i.remove();
        asyncCall.callsPerHost().incrementAndGet();
        executableCalls.add(asyncCall);
        runningAsyncCalls.add(asyncCall);
      }
      isRunning = runningCallsCount() > 0;
    }

    for (int i = 0, size = executableCalls.size(); i < size; i++) {
      AsyncCall asyncCall = executableCalls.get(i);
      asyncCall.executeOn(executorService());
    }
    return isRunning;
  }
- 同步方法的调用,getResponseWithInterceptorChain(),直接请求返回Response。
@Override
public Response execute() throws IOException {
  synchronized (this) {
    if (executed) throw new IllegalStateException("Already Executed");
    executed = true;
  }
  transmitter.timeoutEnter();
  transmitter.callStart();
  try {
    client.dispatcher().executed(this);
    return getResponseWithInterceptorChain();
  } finally {
    client.dispatcher().finished(this);
  }
}
3.异步请求关键类-AsyncCall
- 当我们发起异步请求时:
client.newCall(request).enqueue();
@Override
public void enqueue(Callback responseCallback) {
  synchronized (this) {
    if (executed) throw new IllegalStateException("Already Executed");
    executed = true;
  }
  transmitter.callStart();
  //AsyncCall继承了抽象类NamedRunnable(实现了Runnable接口),其实就是线程的实现,对于run()方法中的具体逻辑,增加了抽象方法execute(),看看具体实现。
  client.dispatcher().enqueue(new AsyncCall(responseCallback));
}

	//AsyncCall#execute()
	@Override
  protected void execute() {
  boolean signalledCallback = false;
  transmitter.timeoutEnter();
  try {
    //无论异步请求还是同步请求,本质都是对getResponseWithInterceptorChain()调用,只是异步请求增加了线程的管理与调度。
    Response response = getResponseWithInterceptorChain();
    signalledCallback = true;
    responseCallback.onResponse(RealCall.this, response);
  } catch (IOException e) {
    if (signalledCallback) {
      //Do not signal the callback twice!
      Platform.get().log(INFO, "Callback failure for " + toLoggableString(), e);
    } else {
      responseCallback.onFailure(RealCall.this, e);
    }
  } catch (Throwable t) {
    cancel();
    if (!signalledCallback) {
      IOException canceledException = new IOException("canceled due to " + t);
      canceledException.addSuppressed(t);
      responseCallback.onFailure(RealCall.this, canceledException);
    }
    throw t;
  } finally {
    client.dispatcher().finished(this);
  }
}
4.关键方法-getResponseWithInterceptorChain()
- RealCall#getResponseWithInterceptorChain()
Response getResponseWithInterceptorChain() throws IOException {
  //Build a full stack of interceptors.
  //拦截器集合
  List<Interceptor> interceptors = new ArrayList<>();
  //用户可以自定拦截器,这里保存了用户自定义的拦截器
  interceptors.addAll(client.interceptors());
  //重试拦截器
  interceptors.add(new RetryAndFollowUpInterceptor(client));
  //桥接拦截器,包括gzip的压缩,host信息的设置等
  interceptors.add(new BridgeInterceptor(client.cookieJar()));
  //缓存请求
  interceptors.add(new CacheInterceptor(client.internalCache()));
  //这个拦截器的代码量很少,主要就是与服务器建立链接TCP链接或TCP-TLS链接
  interceptors.add(new ConnectInterceptor(client));
  if (!forWebSocket) {
    interceptors.addAll(client.networkInterceptors());
  }
  //责任链尾,实质上的请求与I/O操作,将请求数据写入Socket中,并从Socket读取响应数据(TCP/TCP-TLS对应的端口)。
  interceptors.add(new CallServerInterceptor(forWebSocket));
  Interceptor.Chain chain = new RealInterceptorChain(interceptors, transmitter, null, 0,
      originalRequest, this, client.connectTimeoutMillis(),
      client.readTimeoutMillis(), client.writeTimeoutMillis());
  boolean calledNoMoreExchanges = false;
  try {
    Response response = chain.proceed(originalRequest);
    if (transmitter.isCanceled()) {
      closeQuietly(response);
      throw new IOException("Canceled");
    }
    return response;
  } catch (IOException e) {
    calledNoMoreExchanges = true;
    throw transmitter.noMoreExchanges(e);
  } finally {
    if (!calledNoMoreExchanges) {
      transmitter.noMoreExchanges(null);
    }
  }
}
- 我们的
Response经过核心方法getResponseWithInterceptorChain()的包装,最终拿到了想要的结果,这里是OkHttp责任链模式的核心,设计的很巧妙。看看具体做了哪些操作。
5.RetryAndFollowUpInterceptor
- 拦截器都实现了统一的接口
Interceptor,看其中的关键方法:
//定义了默认最大重试次数20次
private static final int MAX_FOLLOW_UPS = 20;
@Override
public Response intercept(Chain chain) throws IOException {
Request request = chain.request();
RealInterceptorChain realChain = (RealInterceptorChain) chain;
Transmitter transmitter = realChain.transmitter();
int followUpCount = 0;
Response priorResponse = null;
while (true) {
transmitter.prepareToConnect(request);
if (transmitter.isCanceled()) {
throw new IOException("Canceled");
}
Response response;
boolean success = false;
try {
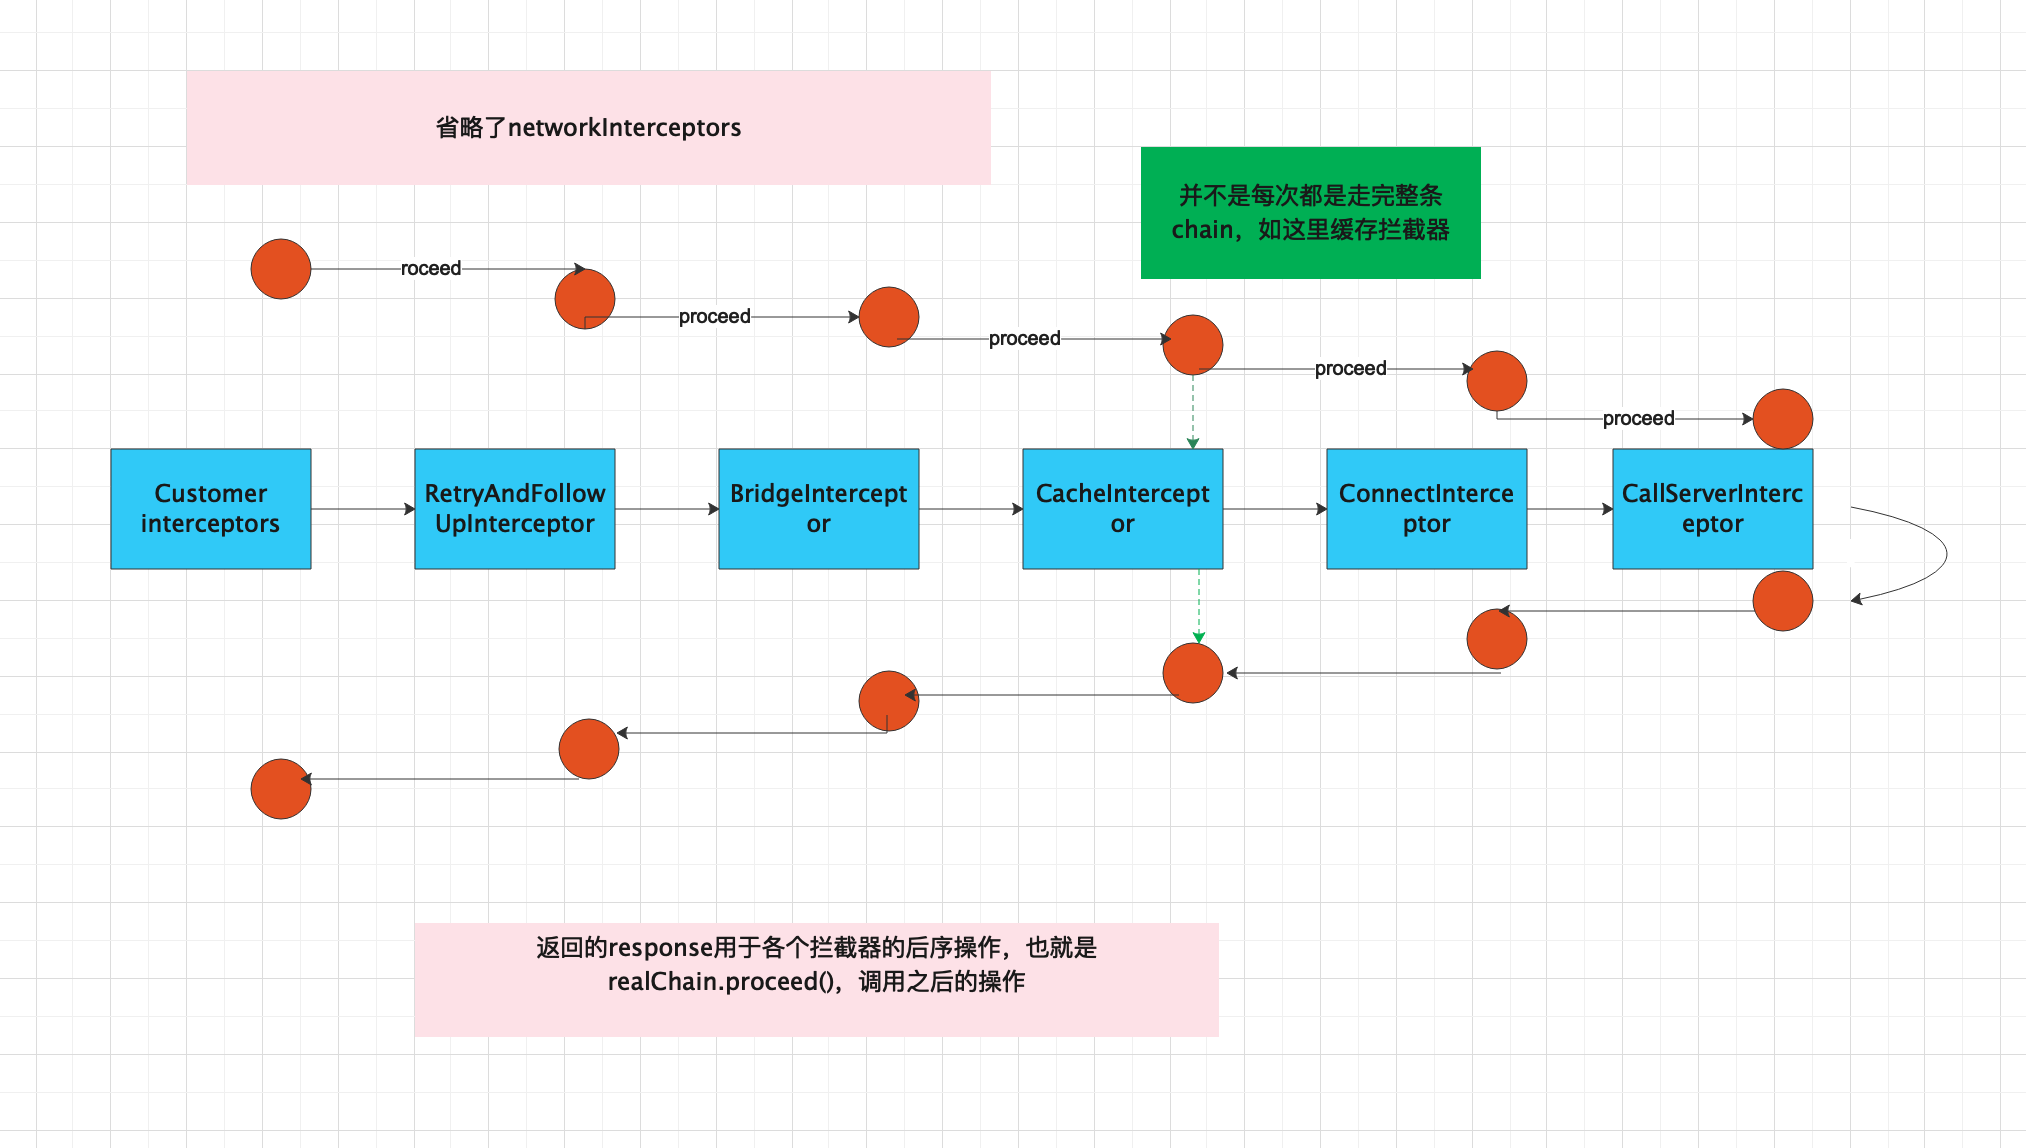
//分界点,包括其他的拦截器,在责任链传递之前所做的工作都是前序工作,之后将request继续下发
response = realChain.proceed(request, transmitter, null);
//此后便是拦截器的后序工作,需要注意的是,并不是每次都会走完所有的拦截器,如cacheInterceptor,当有缓存存在(开启缓存),那么之后的拦截就不在继续传递(分情况,会有一个比对的过程)。
success = true;
} catch (RouteException e) {
//The attempt to connect via a route failed. The request will not have been sent.
if (!recover(e.getLastConnectException(), transmitter, false, request)) {
throw e.getFirstConnectException();
}
continue;
} catch (IOException e) {
// An attempt to communicate with a server failed. The request may have been sent.
boolean requestSendStarted = !(e instanceof ConnectionShutdownException);
if (!recover(e, transmitter, requestSendStarted, request)) throw e;
continue;
} finally {
// The network call threw an exception. Release any resources.
if (!success) {
transmitter.exchangeDoneDueToException();
}
}
// Attach the prior response if it exists. Such responses never have a body.
if (priorResponse != null) {
response = response.newBuilder()
.priorResponse(priorResponse.newBuilder()
.body(null)
.build())
.build();
}
Exchange exchange = Internal.instance.exchange(response);
Route route = exchange != null ? exchange.connection().route() : null;
Request followUp = followUpRequest(response, route);
if (followUp == null) {
if (exchange != null && exchange.isDuplex()) {
transmitter.timeoutEarlyExit();
}
return response;
}
RequestBody followUpBody = followUp.body();
if (followUpBody != null && followUpBody.isOneShot()) {
return response;
}
closeQuietly(response.body());
if (transmitter.hasExchange()) {
exchange.detachWithViolence();
}
if (++followUpCount > MAX_FOLLOW_UPS) {
throw new ProtocolException("Too many follow-up requests: " + followUpCount);
}
request = followUp;
priorResponse = response;
}
}
- RealInterceptorChain关键方法
proceed,之前已经了解,在RealCall是整个链开始传递的起点:
//RealCall,可以看到index为0,我们所有的拦截都被保存在list集合之中,可以发现后序的取interceptor都是基于这个index自增来获取。
//这也是精妙之处
Interceptor.Chain chain = new RealInterceptorChain(interceptors, transmitter, null, 0,
       originalRequest, this, client.connectTimeoutMillis(),
       client.readTimeoutMillis(), client.writeTimeoutMillis());
//RealInterceptorChain#proceed()
public Response proceed(Request request, Transmitter transmitter, @Nullable Exchange exchange)
     throws IOException {
   if (index >= interceptors.size()) throw new AssertionError();
   calls++;
   //If we already have a stream, confirm that the incoming request will use it.
   if (this.exchange != null && !this.exchange.connection().supportsUrl(request.url())) {
     throw new IllegalStateException("network interceptor " + interceptors.get(index - 1)
         + " must retain the same host and port");
   }
   // If we already have a stream, confirm that this is the only call to chain.proceed().
   if (this.exchange != null && calls > 1) {
     throw new IllegalStateException("network interceptor " + interceptors.get(index - 1)
         + " must call proceed() exactly once");
   }
   //Call the next interceptor in the chain.
   //这里对index做了自增操作,因为每次实例化RealInterceptorChain,传入的都是初始的interceptor集合,当每次调用proceed时都对index操作,这样
   //我们的request就被一步步传递下去直到链尾。
   RealInterceptorChain next = new RealInterceptorChain(interceptors, transmitter, exchange,
       index + 1, request, call, connectTimeout, readTimeout, writeTimeout);
   Interceptor interceptor = interceptors.get(index);
   Response response = interceptor.intercept(next);
   // Confirm that the next interceptor made its required call to chain.proceed().
   if (exchange != null && index + 1 < interceptors.size() && next.calls != 1) {
     throw new IllegalStateException("network interceptor " + interceptor
         + " must call proceed() exactly once");
   }
   // Confirm that the intercepted response isn't null.
   if (response == null) {
     throw new NullPointerException("interceptor " + interceptor + " returned null");
   }
   if (response.body() == null) {
     throw new IllegalStateException(
         "interceptor " + interceptor + " returned a response with no body");
   }
   return response;
 }
6.ConnectInterceptor
- 主要就是与服务器建立链接TCP链接或TCP-TLS链接,这个比较特殊,之前提到拦截的前序操作基于调用方法
realChain.proceed()之前,但是这个是没有后序操作的:
/** Opens a connection to the target server and proceeds to the next interceptor. */
//代码量很少,建立链接
public final class ConnectInterceptor implements Interceptor {
  public final OkHttpClient client;
  public ConnectInterceptor(OkHttpClient client) {
    this.client = client;
  }
  @Override
  public Response intercept(Chain chain) throws IOException {
    RealInterceptorChain realChain = (RealInterceptorChain) chain;
    Request request = realChain.request();
    Transmitter transmitter = realChain.transmitter();
    //We need the network to satisfy this request. Possibly for validating a conditional GET.
    boolean doExtensiveHealthChecks = !request.method().equals("GET");
    Exchange exchange = transmitter.newExchange(chain, doExtensiveHealthChecks);
    //下发传递
    return realChain.proceed(request, transmitter, exchange);
  }
}
7.CallServerInterceptor
/** This is the last interceptor in the chain. It makes a network call to the server. */
public final class CallServerInterceptor implements Interceptor {
  private final boolean forWebSocket;
  public CallServerInterceptor(boolean forWebSocket) {
    this.forWebSocket = forWebSocket;
  }

  @Override
  public Response intercept(Chain chain) throws IOException {
    RealInterceptorChain realChain = (RealInterceptorChain) chain;
    Exchange exchange = realChain.exchange();
    Request request = realChain.request();
    long sentRequestMillis = System.currentTimeMillis();
    exchange.writeRequestHeaders(request);
    boolean responseHeadersStarted = false;
    Response.Builder responseBuilder = null;
    if (HttpMethod.permitsRequestBody(request.method()) && request.body() != null) {
      // If there's a "Expect: 100-continue" header on the request, wait for a "HTTP/1.1 100
      // Continue" response before transmitting the request body. If we don't get that, return
      // what we did get (such as a 4xx response) without ever transmitting the request body.
      if ("100-continue".equalsIgnoreCase(request.header("Expect"))) {
        exchange.flushRequest();
        responseHeadersStarted = true;
        exchange.responseHeadersStart();
        responseBuilder = exchange.readResponseHeaders(true);
      }
      if (responseBuilder == null) {
        if (request.body().isDuplex()) {
          // Prepare a duplex body so that the application can send a request body later.
          exchange.flushRequest();
          BufferedSink bufferedRequestBody = Okio.buffer(
              exchange.createRequestBody(request, true));
          request.body().writeTo(bufferedRequestBody);
        } else {
          // Write the request body if the "Expect: 100-continue" expectation was met.
          BufferedSink bufferedRequestBody = Okio.buffer(
              exchange.createRequestBody(request, false));
          request.body().writeTo(bufferedRequestBody);
          bufferedRequestBody.close();
        }
      } else {
        exchange.noRequestBody();
        if (!exchange.connection().isMultiplexed()) {
          // If the "Expect: 100-continue" expectation wasn't met, prevent the HTTP/1 connection
          // from being reused. Otherwise we're still obligated to transmit the request body to
          // leave the connection in a consistent state.
          exchange.noNewExchangesOnConnection();
        }
      }
    } else {
      exchange.noRequestBody();
    }
    if (request.body() == null || !request.body().isDuplex()) {
      exchange.finishRequest();
    }
    if (!responseHeadersStarted) {
      exchange.responseHeadersStart();
    }
    if (responseBuilder == null) {
      responseBuilder = exchange.readResponseHeaders(false);
    }
    Response response = responseBuilder
        .request(request)
        .handshake(exchange.connection().handshake())
        .sentRequestAtMillis(sentRequestMillis)
        .receivedResponseAtMillis(System.currentTimeMillis())
        .build();
    int code = response.code();
    if (code == 100) {
      // server sent a 100-continue even though we did not request one.
      // try again to read the actual response
      response = exchange.readResponseHeaders(false)
          .request(request)
          .handshake(exchange.connection().handshake())
          .sentRequestAtMillis(sentRequestMillis)
          .receivedResponseAtMillis(System.currentTimeMillis())
          .build();
      code = response.code();
    }
    exchange.responseHeadersEnd(response);
    if (forWebSocket && code == 101) {
      //Connection is upgrading, but we need to ensure interceptors see a non-null response body.
      response = response.newBuilder()
          .body(Util.EMPTY_RESPONSE)
          .build();
    } else {
      response = response.newBuilder()
          .body(exchange.openResponseBody(response))
          .build();
    }
    if ("close".equalsIgnoreCase(response.request().header("Connection"))
        || "close".equalsIgnoreCase(response.header("Connection"))) {
      exchange.noNewExchangesOnConnection();
    }
    if ((code == 204 || code == 205) && response.body().contentLength() > 0) {
      throw new ProtocolException(
          "HTTP " + code + " had non-zero Content-Length: " + response.body().contentLength());
    }
    return response;
  }
}
- 责任链尾,实质的请求与I/O操作,将请求数据写入Socket中,并从Socket读取响应数据(TCP/TCP-TLS对应的端口)。对于
I/O的操作是基于Okio,OkHttp的高效请求同样离不开Okio的支持。整理整个流程图就是:
六、能解决什么问题?
- 总结可以发现,对于同一个请求可以被一系列对象结合处理,但是具体由哪个对象处理是动态决定的(运行时),那么可以将对象结合组成链的形式,考虑是否可以使用责任链简化,使结构清晰。
- 对于接收者不明确的情况,但多个对象能够处理同一个请求,为了降低
Client与Handler之间的耦合,考虑使用责任链。


 2711
2711


 被折叠的 条评论
为什么被折叠?
被折叠的 条评论
为什么被折叠?
 到【灌水乐园】发言


