


Apache Shiro™ is a powerful and easy-to-use Java security framework that performs authentication, authorization, cryptography, and session management. With Shiro’s easy-to-understand API, you can quickly and easily secure any application – from the smallest mobile applications to the largest web and enterprise applications.
Apache Shiro™是一个强大且易用的Java安全框架,能够用于身份验证、授权、加密和会话管理。Shiro拥有易于理解的API,您可以快速、轻松地获得任何应用程序——从最小的移动应用程序到最大的网络和企业应用程序。
运用流程
认证与授权的执行流程分析
(1)认证流程

-
首先调用Subject.login(token)进行登录,其会自动委托给Security Manager,调用之前必须通过SecurityUtils. setSecurityManager()设置;
-
SecurityManager负责真正的身份验证逻辑;它会委托给Authenticator进行身份验证;
-
Authenticator才是真正的身份验证者,Shiro API中核心的身份认证入口点,此处可以自定义插入自己的实现;
-
Authenticator可能会委托给相应的AuthenticationStrategy进行多Realm身份验证,默认ModularRealmAuthenticator会调用AuthenticationStrategy进行多Realm身份验证;
-
Authenticator会把相应的token传入Realm,从Realm获取身份验证信息,如果没有返回/抛出异常表示身份验证失败了。此处可以配置多个Realm,将按照相应的顺序及策略进行访问。
(2)授权流程
-
首先调用Subject.isPermitted/hasRole接口,其会委托给Security-Manager,而SecurityManager接着会委托给Authorizer;
-
Authorizer是真正的授权者,如果我们调用如isPermitted(“user:view”),其首先会通过PermissionResolver把字符串转换成相应的Permission实例;
-
在进行授权之前,其会调用相应的Realm获取Subject相应的角色/权限用于匹配传入的角色/权限;
-
Authorizer会判断Realm的角色/权限是否和传入的匹配,如果有多个Realm,会委托给ModularRealmAuthorizer进行循环判断,如果匹配如isPermitted/hasRole会返回true,否则返回false表示 授权失败。
如下图:

可以看到:应用代码直接交互的对象是 Subject,也就是说 Shiro 的对外 API 核心就是 Subject;其每个 API 的含义:
Subject:主体,代表了当前 “用户”,这个用户不一定是一个具体的人,与当前应用交互的任何东西都是 Subject,如网络爬虫,机器人等;即一个抽象概念;所有 Subject 都绑定到 SecurityManager,与 Subject 的所有交互都会委托给 SecurityManager;可以把 Subject 认为是一个门面;SecurityManager 才是实际的执行者;
SecurityManager:安全管理器;即所有与安全有关的操作都会与 SecurityManager 交互;且它管理着所有 Subject;可以看出它是 Shiro 的核心,它负责与后边介绍的其他组件进行交互,如果学习过 SpringMVC,你可以把它看成 DispatcherServlet 前端控制器;
Realm:域,Shiro 从 Realm 获取安全数据(如用户、角色、权限),就是说 SecurityManager 要验证用户身份,那么它需要从 Realm 获取相应的用户进行比较以确定用户身份是否合法;也需要从 Realm 得到用户相应的角色 / 权限进行验证用户是否能进行操作;可以把 Realm 看成 DataSource,即安全数据源。
简单的一个 Shiro 应用:
-
应用代码通过 Subject 来进行认证和授权,而 Subject 又委托给 SecurityManager;
- 我们需要给 Shiro 的 SecurityManager 注入 Realm,从而让 SecurityManager 能得到合法的用户及其权限进行判断。
从以上也可以看出,Shiro 不提供维护用户 / 权限,而是通过 Realm 让开发人员自己注入。
接下来我们来从 Shiro 内部来看下 Shiro 的架构,如下图所示:

- Subject:主体,可以看到主体可以是任何可以与应用交互的 “用户”;
- SecurityManager:相当于 SpringMVC 中的 DispatcherServlet 或者 Struts2 中的 FilterDispatcher;是 Shiro 的心脏;所有具体的交互都通过 SecurityManager 进行控制;它管理着所有 Subject、且负责进行认证和授权、及会话、缓存的管理。
- Authenticator:认证器,负责主体认证的,这是一个扩展点,如果用户觉得 Shiro 默认的不好,可以自定义实现;其需要认证策略(Authentication Strategy),即什么情况下算用户认证通过了;
- Authorizer:授权器,或者访问控制器,用来决定主体是否有权限进行相应的操作;即控制着用户能访问应用中的哪些功能;
- Realm:可以有 1 个或多个 Realm,可以认为是安全实体数据源,即用于获取安全实体的;可以是 JDBC 实现,也可以是 LDAP 实现,或者内存实现等等;由用户提供;注意:Shiro 不知道你的用户 / 权限存储在哪及以何种格式存储;所以我们一般在应用中都需要实现自己的 Realm;
- SessionManager:如果写过 Servlet 就应该知道 Session 的概念,Session 呢需要有人去管理它的生命周期,这个组件就是 SessionManager;而 Shiro 并不仅仅可以用在 Web 环境,也可以用在如普通的 JavaSE 环境、EJB 等环境;所以呢,Shiro 就抽象了一个自己的 Session 来管理主体与应用之间交互的数据;这样的话,比如我们在 Web 环境用,刚开始是一台 Web 服务器;接着又上了台 EJB 服务器;这时想把两台服务器的会话数据放到一个地方,这个时候就可以实现自己的分布式会话(如把数据放到 Memcached 服务器);
- SessionDAO:DAO 大家都用过,数据访问对象,用于会话的 CRUD,比如我们想把 Session 保存到数据库,那么可以实现自己的 SessionDAO,通过如 JDBC 写到数据库;比如想把 Session 放到 Memcached 中,可以实现自己的 Memcached SessionDAO;另外 SessionDAO 中可以使用 Cache 进行缓存,以提高性能;
- CacheManager:缓存控制器,来管理如用户、角色、权限等的缓存的;因为这些数据基本上很少去改变,放到缓存中后可以提高访问的性能
- Cryptography:密码模块,Shiro 提供了一些常见的加密组件用于如密码加密 / 解密的。
Shiro常见的过滤器
Shiro提供多个默认的过滤器,我们可以用这些过滤器来配置控制指定URL的权限,

- 注:anon,authcBasic,auchc,user是认证过滤器,perms,roles,ssl,rest,port是授权过滤器
Shiro与Spring的整合(shiro的认证功能)
搭建基于ini的运行环境
- 1.引入依赖:
<dependencies>
        <dependency>
            <groupId>org.apache.shiro</groupId>
            <artifactId>shiro-core</artifactId>
            <version>1.3.2</version>
        </dependency>
        <dependency>
            <groupId>junit</groupId>
            <artifactId>junit</artifactId>
            <version>4.12</version>
            <scope>test</scope>
        </dependency>
</dependencies>- 2.在resource目录下创建shiro的ini配置文件构造模拟数据(shiro.ini)
[users]
#模拟从数据库查询的用户
#数据格式  用户名=密码,角色1,角色2..
zhangsan=123456,role1,role2
lisi=654321,role2
[roles]
#模拟从数据库查询的角色和权限列表
#数据格式  角色名=权限1,权限2
role1=user:save,user:update
role2=user:update,user.delete
role3=user.find- 3.测试用户认证与授权
public class ShiroTest1 {
  @Test
  public void testLogin() throws Exception{
    //1.加载ini配置文件创建SecurityManager
    Factory<SecurityManager> factory = new
IniSecurityManagerFactory("classpath:shiro.ini");
    //2.获取securityManager
    SecurityManager securityManager = factory.getInstance();
    //3.将securityManager绑定到当前运行环境
    SecurityUtils.setSecurityManager(securityManager);

    //4.创建主体(此时的主体还为经过认证)
    Subject subject = SecurityUtils.getSubject();

    /**
    * 模拟登录,和传统等不同的是需要使用主体进行登录
    */
    //5.构造主体登录的凭证(即用户名/密码)
    //第一个参数:登录用户名,第二个参数:登录密码
    UsernamePasswordToken upToken = new UsernamePasswordToken("lisi","654321");
    //6.主体登录
    subject.login(upToken);

    //7.用户认证成功之后才可以完成授权工作
    boolean hasPerm = subject.isPermitted("user:save");
    System.out.println("用户是否具有save权限="+hasPerm);

     }
}-
4.自定义Realm
SecurityManager要验证用户身份,那么它需要从Realm获取相应的用户进行比较以确定用户身份是否合法;也需要从Realm得到用户相应的角色/权限进行验证用户是否能进行操作;可以把Realm看成DataSource,即安全数据源
4.1自定义Realm
/**
* 自定义realm,需要继承AuthorizingRealm父类
*   重写父类中的两个方法
*     doGetAuthorizationInfo   :授权
*     doGetAuthenticationInfo   :认证
*/
public class PermissionRealm extends AuthorizingRealm {
  @Override
  public void setName(String name) {
    super.setName("permissionRealm");
 }
  /**
  * 授权:授权的主要目的就是查询数据库获取用户的所有角色和权限信息
  */
  protected AuthorizationInfo doGetAuthorizationInfo(PrincipalCollection
principalCollection) {
    // 1.从principals获取已认证用户的信息
    String username = (String) principalCollection.getPrimaryPrincipal();
    /**
    * 正式系统:应该从数据库中根据用户名或者id查询
    *     这里为了方便演示,手动构造
    */
    // 2.模拟从数据库中查询的用户所有权限
    List<String> permissions = new ArrayList<String>();
    permissions.add("user:save");// 用户的创建
    permissions.add("user:update");// 商品添加权限
    // 3.模拟从数据库中查询的用户所有角色
    List<String> roles = new ArrayList<String>();
    roles.add("role1");
    roles.add("role2");
    // 4.构造权限数据
    SimpleAuthorizationInfo simpleAuthorizationInfo = new
SimpleAuthorizationInfo();
    // 5.将查询的权限数据保存到simpleAuthorizationInfo
    simpleAuthorizationInfo.addStringPermissions(permissions);
    // 6.将查询的角色数据保存到simpleAuthorizationInfo
    simpleAuthorizationInfo.addRoles(roles);
    return simpleAuthorizationInfo;
 }
  /**
  * 认证:认证的主要目的,比较用户输入的用户名密码是否和数据库中的一致
  */
  protected AuthenticationInfo doGetAuthenticationInfo(AuthenticationToken
authenticationToken) throws AuthenticationException {
    //1.获取登录的upToken
    UsernamePasswordToken upToken = (UsernamePasswordToken)authenticationToken;
    //2.获取输入的用户名密码
    String username = upToken.getUsername();
    String password = new String(upToken.getPassword());
    /**
    * 3.验证用户名密码是否正确
    * 正式系统:应该从数据库中查询用户并比较密码是否一致
    *     为了测试,只要输入的密码为123456则登录成功
    */
    if(!password.equals("123456")) {
      throw  new RuntimeException("用户名或密码错误");//抛出异常表示认证失败
   }else{
      SimpleAuthenticationInfo info = new SimpleAuthenticationInfo(username,
password,
          this.getName());
      return info;
   }
 }
}- 4.2 配置shiro的ini配置文件(shiro-realm.ini)
[main]
#声明realm
permReam=com.demo.shiro.PermissionRealm
#注册realm到securityManager中
securityManager.realms=$permReam- 4.3运用
public class ShiroTest2 {
  private SecurityManager securityManager;
  @Before
  public void init() throws Exception{
    //1.加载ini配置文件创建SecurityManager
    Factory<SecurityManager> factory = new
IniSecurityManagerFactory("classpath:shiro-realm.ini");
    //2.获取securityManager
    SecurityManager securityManager = factory.getInstance();
    //13.将securityManager绑定到当前运行环境
    SecurityUtils.setSecurityManager(securityManager);
 }
  @Test
  public void testLogin() throws Exception{
    //1.创建主体(此时的主体还为经过认证)
    Subject subject = SecurityUtils.getSubject();
    //2.构造主体登录的凭证(即用户名/密码)
    UsernamePasswordToken upToken = new UsernamePasswordToken("lisi","123456");
    //3.主体登录
    subject.login(upToken);
    //登录成功验证是否具有role1角色
    //System.out.println("当前用户具有role1="+subject.hasRole("role3"));
    //登录成功验证是否具有某些权限
    System.out.println("当前用户具有user:save权限="+subject.isPermitted("user:save"));
 }
}
Shiro与Spring的整合(shiro的认证功能)
引入依赖
<dependency>
  <groupId>org.apache.shiro</groupId>
  <artifactId>shiro-all</artifactId>
  <version>1.3.2</version>
</dependency>- 在web.xml配置一个过滤器代理
<filter>
  <filter-name>shiroFilter</filter-name>
  <filter-class>org.springframework.web.filter.DelegatingFilterProxy</filter-class>
</filter>
<filter-mapping>
  <filter-name>shiroFilter</filter-name>
  <url-pattern>/*</url-pattern>
</filter-mapping>- 配置shiro的一个过滤器bean (applicationContext-shiro.xml)
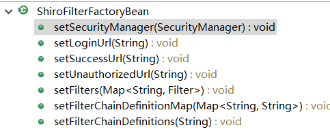
url拦截规则中除去验证码、登录页面、登陆以及一些静态的资源(js、image、css、json)、配置登出Url、其余全部拦截。
<?xml version="1.0" encoding="UTF-8"?>
<beans xmlns="http://www.springframework.org/schema/beans"
       xmlns:xsi="http://www.w3.org/2001/XMLSchema-instance" xmlns:p="http://www.springframework.org/schema/p"
       xmlns:context="http://www.springframework.org/schema/context" xmlns:aop="http://www.springframework.org/schema/aop" xmlns:tx="http://www.springframework.org/schema/tx"
       xmlns:dubbo="http://code.alibabatech.com/schema/dubbo" xmlns:mvc="http://www.springframework.org/schema/mvc"
       xsi:schemaLocation="http://www.springframework.org/schema/beans http://www.springframework.org/schema/beans/spring-beans.xsd
        http://www.springframework.org/schema/mvc http://www.springframework.org/schema/mvc/spring-mvc.xsd
        http://code.alibabatech.com/schema/dubbo http://code.alibabatech.com/schema/dubbo/dubbo.xsd
        http://www.springframework.org/schema/aop
      http://www.springframework.org/schema/aop/spring-aop-4.0.xsd
        http://www.springframework.org/schema/context http://www.springframework.org/schema/context/spring-context.xsd">


    <!-- 配置shiro的过滤器bean -->
    <bean id="shiroFilter" class="org.apache.shiro.spring.web.ShiroFilterFactoryBean">
        <property name="securityManager" ref="securityManager"></property>
        <!-- 登录页面路径 -->
        <property name="loginUrl" value="/login.jsp"/>
        <!-- 登录成功后显示的路径 -->
        <property name="successUrl" value="/index.jsp"></property>
        <!-- 未授权的页面提示
             如果授权失败 不会跳转到此页面 (bug)
             那么如何 解决呢?使用springmvc的异常拦截器 处理
         -->
        <property name="unauthorizedUrl" value="/unauthorize.jsp"></property>
        <!-- url拦截规则  -->
        <property name="filterChainDefinitions">
            <value>
                /validatecode.jsp* = anon
                /login.jsp = anon
                /sysUser/login.action = anon
                /js/** = anon
                /images/** = anon
                /css/** = anon
                /json/* = anon
                /logout.action = logout
                /** = authc
            </value>
        </property>
    </bean>

    <bean id="securityManager" class="org.apache.shiro.web.mgt.DefaultWebSecurityManager">

    </bean>
</beans>
添加登陆Action
@RequestMapping(value = "login.action",method = {RequestMethod.POST,RequestMethod.GET})
public String login(SysUser sysUser,@RequestParam String checkcode,HttpServletRequest request){

    Object key = request.getSession().getAttribute("key");
    //1.检验验证码
    if(StringUtils.isNotBlank(checkcode) && null != key){
        if(checkcode.equals((String) key)){
            //2.进行shiro登录
            UsernamePasswordToken usernamePasswordToken = new UsernamePasswordToken(sysUser.getUsername(), MD5Utils.text2md5(sysUser.getPassword()));
            Subject subject = SecurityUtils.getSubject();
            try {
                subject.login(usernamePasswordToken);
                //登录成功
                SysUser sysUserLogined= (SysUser)subject.getPrincipal();

                request.getSession().setAttribute("loginUser",sysUserLogined);

                return "common/index";
            }catch (RuntimeException e){
                logger.info("登录失败,用户名:{},错误信息{}",sysUser.getUsername(),e.getMessage());
            }

        }
    }

    request.getSession().setAttribute("errorMsg","登录失败 请重新登录");
    return "redirect:/login.jsp";
}
自定义一个Rleam,然后在spring的DefaultWebSecurityManager中注入Realm
@Component
public class ZjsRealm extends AuthorizingRealm {


    @Autowired
    private SysUserMapper sysUserMapper;

    @Override
    protected AuthorizationInfo doGetAuthorizationInfo(PrincipalCollection principalCollection) {
        return null;
    }

    //登录验证
    protected AuthenticationInfo doGetAuthenticationInfo(AuthenticationToken authenticationToken) throws AuthenticationException {

        UsernamePasswordToken usernamePasswordToken=(UsernamePasswordToken) authenticationToken;

        String username = usernamePasswordToken.getUsername();

        //查询数据库
        SysUserExample sysUserExample = new SysUserExample();
        sysUserExample.createCriteria().andUsernameEqualTo(username);
        List<SysUser> sysUsers = this.sysUserMapper.selectByExample(sysUserExample);
        if(sysUsers.size()>=1){
            SysUser sysUser = sysUsers.get(0);
            return new SimpleAuthenticationInfo(sysUser, sysUser.getPassword(), getName());
        }
        //如果没有返回 AuthorizationInfo 及其子类,就代表验证失败
        return null;
    }
}
在securityMananger中配置一个realm
<bean id="securityManager" class="org.apache.shiro.web.mgt.DefaultWebSecurityManager">
   <property name="realm" ref="zjsRealm"></property>
</bean>
<bean id="zjsRealm" class="com.zjs.realm.ZjsRealm"></bean>
Shiro的授权功能
perms,roles,ssl,rest,port是授权过滤器
在spring的filterChainDefinitions多配置一个路径的访问权限
在ZjsRealm中的授权方法中,进行授权
	//授权方法
	@Override
	protected AuthorizationInfo doGetAuthorizationInfo(PrincipalCollection principals) {
		SimpleAuthorizationInfo info = new SimpleAuthorizationInfo();
		info.addStringPermission("staff");
		return info;
	}


 532
532


 被折叠的 条评论
为什么被折叠?
被折叠的 条评论
为什么被折叠?
 到【灌水乐园】发言


