Android中的 单选按钮和复选框

在Adnroid中,单选按钮和复选框都继承了普通按钮。因此它们都可以使用普通按钮支持的各种属性和方法。不同的是,它们提供了可以选中的功能,下面是对单选按钮的和复选框的进行详细的介绍。


在Android中 可以使用两种方法向屏幕添加单选按钮:

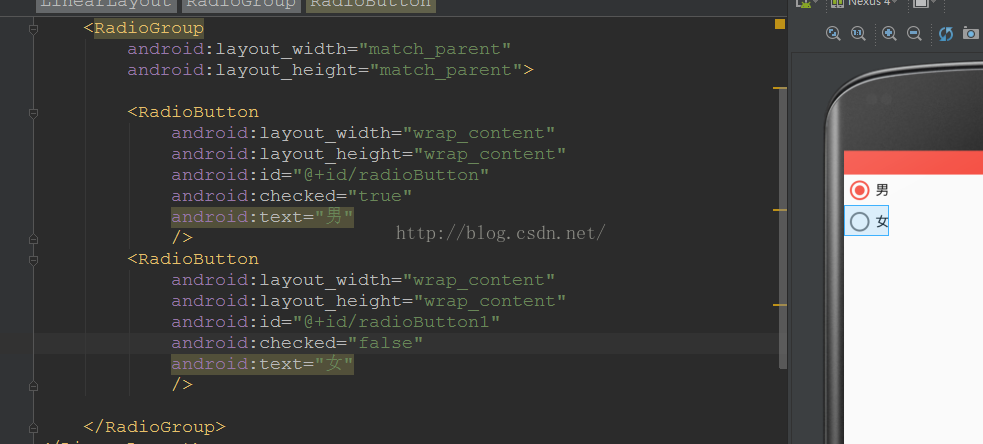
1.通过XML布局文件中使用<RadioButton> 标记添加,

2.在Java文件。通过new 关键字来创建

推荐第一种方法。

adnroid:checked=“”“true|false”

属性指定选中状态,

默认为false 表示不选中 


 下面做个案列演示

1.单选框(RadioButton)

package com.example.radiobutton;


import Android.os.Bundle;
import android.app.Activity;
import android.view.Menu;
import android.widget.RadioButton;
import android.widget.RadioGroup;
import android.widget.Toast;
/*
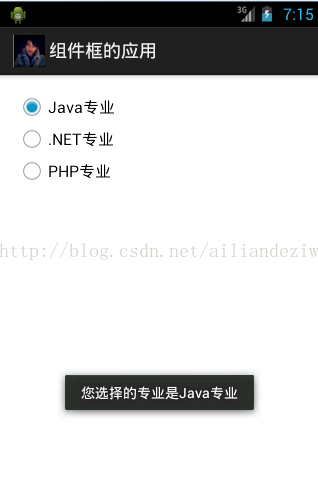
 * 要完成单选框显示,我们需要使用到RadioGroup和RadioButton(单选框),RadioGroup用于对单选框进行分组,相同组内的单选框只有一个单选框能被选中。(例子代码请见下方备注栏)
 RadioGroup.check(R.id.dotNet);将id名为dotNet的单选框设置成选中状态。
(RadioButton) findViewById(radioGroup.getCheckedRadioButtonId());//获取被选中的单选框。
RadioButton.getText();//获取单选框的值
调用setOnCheckedChangeListener()方法,处理单选框被选择事件,把RadioGroup.OnCheckedChangeListener实例作为参数传入
 */
public class MainActivity extends Activity {
private RadioGroup group_temo;
   private RadioButton checkRadioButton;
   
@Override
protected void onCreate(Bundle savedInstanceState) {
super.onCreate(savedInstanceState);
setContentView(R.layout.activity_main);
group_temo = (RadioGroup)findViewById(R.id.radioGroup1);
//改变默认的选项
group_temo.check(R.id.radio1);
//获取默认被被选中值
checkRadioButton = (RadioButton) group_temo.findViewById(group_temo.getCheckedRadioButtonId());
//
//注册事件
group_temo.setOnCheckedChangeListener(new RadioGroup.OnCheckedChangeListener() {

@Override
public void onCheckedChanged(RadioGroup group, int checkedId) {

//点击事件获取的选择对象
checkRadioButton = (RadioButton) group_temo.findViewById(checkedId);

Toast.makeText(getApplicationContext(), "您选择的专业是"+checkRadioButton.getText(), Toast.LENGTH_LONG).show();
}
});
}


二.复选框 多选框(CheckBox)

在Android中 复选框可以选个多个,每个选择都提供“”“选中”和“”“不选中”两种状态。


初始化CheckBox 必须是final的。

因为在下面监听代码中 CheckBox在局部内部类、匿名内部类访问的局部变量必须使用final修饰,这个是Java基础语法。


  • 0
    点赞
  • 14
    收藏
    觉得还不错? 一键收藏
  • 0
    评论
好的,下面是一个简单的 Android 项目示例,其包含三个页面布局、listview 控件和 Fragment: 首先,创建一个名为 "MyApp" 的新 Android 项目,然后在 res/layout 文件夹创建三个 XML 布局文件和一个 Fragment 类。 1. activity_main.xml 布局文件 该布局文件包含一个文本框、一个编辑框、一个单选按钮和一个复选按钮。 ```xml <LinearLayout xmlns:android="http://schemas.android.com/apk/res/android" android:layout_width="match_parent" android:layout_height="match_parent" android:orientation="vertical"> <TextView android:id="@+id/textView" android:layout_width="wrap_content" android:layout_height="wrap_content" android:text="Enter Your Name:" /> <EditText android:id="@+id/editText" android:layout_width="match_parent" android:layout_height="wrap_content" android:hint="Name" /> <RadioGroup android:id="@+id/radioGroup" android:layout_width="match_parent" android:layout_height="wrap_content" android:orientation="horizontal"> <RadioButton android:id="@+id/maleRadio" android:layout_width="wrap_content" android:layout_height="wrap_content" android:text="Male" /> <RadioButton android:id="@+id/femaleRadio" android:layout_width="wrap_content" android:layout_height="wrap_content" android:text="Female" /> </RadioGroup> <CheckBox android:id="@+id/checkBox" android:layout_width="wrap_content" android:layout_height="wrap_content" android:text="Agree to terms and conditions" /> <Button android:id="@+id/nextButton" android:layout_width="wrap_content" android:layout_height="wrap_content" android:text="Next" /> </LinearLayout> ``` 2. listview_layout.xml 布局文件 该布局文件包含一个 ListView 控件。 ```xml <ListView xmlns:android="http://schemas.android.com/apk/res/android" android:id="@+id/listView" android:layout_width="match_parent" android:layout_height="match_parent" /> ``` 3. fragment_layout.xml 布局文件 该布局文件包含一个文本框。 ```xml <LinearLayout xmlns:android="http://schemas.android.com/apk/res/android" android:layout_width="match_parent" android:layout_height="match_parent" android:gravity="center" android:orientation="vertical"> <TextView android:id="@+id/textViewFragment" android:layout_width="wrap_content" android:layout_height="wrap_content" android:text="This is a fragment" /> </LinearLayout> ``` 4. MyFragment.java Fragment 类 该类包含一个 onCreateView 方法,该方法返回 fragment_layout.xml 布局文件的根视图。 ```java public class MyFragment extends Fragment { @Nullable @Override public View onCreateView(@NonNull LayoutInflater inflater, @Nullable ViewGroup container, @Nullable Bundle savedInstanceState) { View rootView = inflater.inflate(R.layout.fragment_layout, container, false); return rootView; } } ``` 最后,在 MainActivity.java 文件实现整个应用程序逻辑。MainActivity 类继承了 AppCompatActivity 类,并且包含了三个页面布局和一个 Fragment。 ```java public class MainActivity extends AppCompatActivity { private EditText nameEditText; private RadioGroup genderRadioGroup; private CheckBox agreeCheckBox; private ListView listView; private Button nextButton; @Override protected void onCreate(Bundle savedInstanceState) { super.onCreate(savedInstanceState); setContentView(R.layout.activity_main); // 获取视图控件 nameEditText = findViewById(R.id.editText); genderRadioGroup = findViewById(R.id.radioGroup); agreeCheckBox = findViewById(R.id.checkBox); nextButton = findViewById(R.id.nextButton); listView = findViewById(R.id.listView); // 设置 ListView 适配器 String[] items = {"Item 1", "Item 2", "Item 3", "Item 4", "Item 5"}; ArrayAdapter<String> adapter = new ArrayAdapter<>(this, android.R.layout.simple_list_item_1, items); listView.setAdapter(adapter); // 设置 Next 按钮点击事件 nextButton.setOnClickListener(new View.OnClickListener() { @Override public void onClick(View v) { // 获取用户输入 String name = nameEditText.getText().toString(); boolean isMale = genderRadioGroup.getCheckedRadioButtonId() == R.id.maleRadio; boolean agreed = agreeCheckBox.isChecked(); // 检查用户输入是否有效 if (name.isEmpty()) { Toast.makeText(MainActivity.this, "Please enter your name", Toast.LENGTH_SHORT).show(); return; } if (!agreed) { Toast.makeText(MainActivity.this, "Please agree to terms and conditions", Toast.LENGTH_SHORT).show(); return; } // 启动下一个活动 Intent intent = new Intent(MainActivity.this, SecondActivity.class); intent.putExtra("name", name); intent.putExtra("isMale", isMale); startActivity(intent); } }); // 设置 ListView 点击事件 listView.setOnItemClickListener(new AdapterView.OnItemClickListener() { @Override public void onItemClick(AdapterView<?> parent, View view, int position, long id) { // 创建并显示 Fragment FragmentManager fragmentManager = getSupportFragmentManager(); FragmentTransaction fragmentTransaction = fragmentManager.beginTransaction(); MyFragment fragment = new MyFragment(); fragmentTransaction.replace(R.id.fragment_container, fragment); fragmentTransaction.commit(); } }); } } ``` 这样,我们就完成了一个简单的 Android 应用程序,其包含三个页面布局、listview 控件和 Fragment。

“相关推荐”对你有帮助么?

  • 非常没帮助
  • 没帮助
  • 一般
  • 有帮助
  • 非常有帮助
提交
评论
添加红包

请填写红包祝福语或标题

红包个数最小为10个

红包金额最低5元

当前余额3.43前往充值 >
需支付:10.00
成就一亿技术人!
领取后你会自动成为博主和红包主的粉丝 规则
hope_wisdom
发出的红包
实付
使用余额支付
点击重新获取
扫码支付
钱包余额 0

抵扣说明:

1.余额是钱包充值的虚拟货币,按照1:1的比例进行支付金额的抵扣。
2.余额无法直接购买下载,可以购买VIP、付费专栏及课程。

余额充值