


随着互联网的发展,之前的单体架构已经不满足于解决当前的挑战,所以一些企业开始对项目结构进行优化,分布式,微服务等等,这些项目结构的升级确实解决了一部分的问题,但是同样也带来了新的挑战,比如今天博客的主题——安全。安全,是一个随着架构演化,越来越重要的东西。之前的单体应用,大多会采用shiro这个安全框架,而摈弃spring security,因为shiro的功能已经基本上满足企业的要求,而spring security功能全但笨重,所有一些架构师们认为对项目架构来说是一种负担,但是,当架构演化到分布式以后,存在多个系统时,shiro本身的功能就受到了限制,在笔者的认知里,shiro是基于session来做认证授权的,所以当多个子系统时,session无法共享,当然,也有部分项目采用缓存的方式,把session放到共享缓存中,多个子系统共享这个session,没错,这是解决了当下的问题,但仅仅是当下,因为可能这几个子系统是一个公司的产品,他们可以很方便的使用共享缓存,但是当有别的公司的系统接入时,之前的问题又会再次产生。为了彻底解决这个问题,产生了一种单点登录的解决方案,单点登录中最重要的元素就是token,我今天聊到的解决方案也将用到它,今天我们先不聊单点登录,只讲前后端分离如何保证系统安全。以上言论仅代表笔者个人想法,有不同意见可以互相讨论。
下面进入正题吧,之前的项目是前后一体的,页面也是后台渲染的,所以页面的权限完全的被后台控制,所以权限设计方面比较方便,笔者第一次做一个小项目甚至没有使用任何的权限框架,而是用一个过滤器来控制。不过当你看过框架的原理后,其实发现和我的做法大致相似,不过是更完备罢了。首先,我先来讲一下大致的思路:由于系统采用前后端分离,后端与前端只进行数据交互,后端的部分逻辑(包括权限部分)都交给了前端控制,前端三大框架中Angular就有守卫路由的概念(vue最近刚接触,但是也看到了类似的东西),有了守卫路由,就能解决部分的权限问题,但是有些细粒度的东西还是需要具体的信息来控制(比如某个按钮事件,不同的权限可能有不同的展示效果),所以,我们需要在登录时从后台拿到当前用户的所有信息,这个数据可以配置成守卫路由的形式,把守卫路由利用起来,这个数据可以根据系统的安全级别进行加解密等等操作,这些信息可以放在前端的缓存中,例如浏览器的local storage,移动端可以使用嵌入式数据库sqlite。至此前端的权限控制基本已经实现,但是对于后端来说,前端是不可信的,所以后端的校验也不可缺少,虽然会损耗部分性能,但是为了安全,还是值得的。
附上项目结构图:
这里我具体介绍这个方案中用到的技术栈和工具,因为是体现思路,所以前端采用postman来进行模拟,后端采用的技术栈是springboot,spring security,mybatis,jwt,fastjson,数据库使用的是mysql。附上我的pom文件:
<?xml version="1.0" encoding="UTF-8"?>
<project xmlns="http://maven.apache.org/POM/4.0.0" xmlns:xsi="http://www.w3.org/2001/XMLSchema-instance"
         xsi:schemaLocation="http://maven.apache.org/POM/4.0.0 https://maven.apache.org/xsd/maven-4.0.0.xsd">
    <modelVersion>4.0.0</modelVersion>
    <parent>
        <groupId>org.springframework.boot</groupId>
        <artifactId>spring-boot-starter-parent</artifactId>
        <version>2.4.1</version>
        <relativePath/> <!-- lookup parent from repository -->
    </parent>
    <groupId>com.maochd</groupId>
    <artifactId>security</artifactId>
    <version>0.0.1-SNAPSHOT</version>
    <name>security</name>
    <description>Demo project for Spring Boot</description>

    <properties>
        <java.version>1.8</java.version>
        <fastjson.version>1.2.73</fastjson.version>
        <jwtt.version>0.9.0</jwtt.version>
    </properties>

    <dependencies>
        <dependency>
            <groupId>org.springframework.boot</groupId>
            <artifactId>spring-boot-starter-web</artifactId>
        </dependency>
        <dependency>
            <groupId>org.mybatis.spring.boot</groupId>
            <artifactId>mybatis-spring-boot-starter</artifactId>
            <version>2.1.4</version>
        </dependency>

        <dependency>
            <groupId>mysql</groupId>
            <artifactId>mysql-connector-java</artifactId>
            <scope>runtime</scope>
        </dependency>
        <dependency>
            <groupId>org.projectlombok</groupId>
            <artifactId>lombok</artifactId>
            <optional>true</optional>
        </dependency>
        <dependency>
            <groupId>org.springframework.boot</groupId>
            <artifactId>spring-boot-starter-test</artifactId>
            <scope>test</scope>
        </dependency>
        <dependency>
            <groupId>org.springframework.boot</groupId>
            <artifactId>spring-boot-starter-security</artifactId>
        </dependency>
        <dependency>
            <groupId>io.jsonwebtoken</groupId>
            <artifactId>jjwt</artifactId>
            <version>${jwtt.version}</version>
        </dependency>

        <dependency>
            <groupId>com.alibaba</groupId>
            <artifactId>fastjson</artifactId>
            <version>${fastjson.version}</version>
        </dependency>
    </dependencies>

    <build>
        <plugins>
            <plugin>
                <groupId>org.springframework.boot</groupId>
                <artifactId>spring-boot-maven-plugin</artifactId>
                <configuration>
                    <excludes>
                        <exclude>
                            <groupId>org.projectlombok</groupId>
                            <artifactId>lombok</artifactId>
                        </exclude>
                    </excludes>
                </configuration>
            </plugin>
        </plugins>
    </build>

</project>
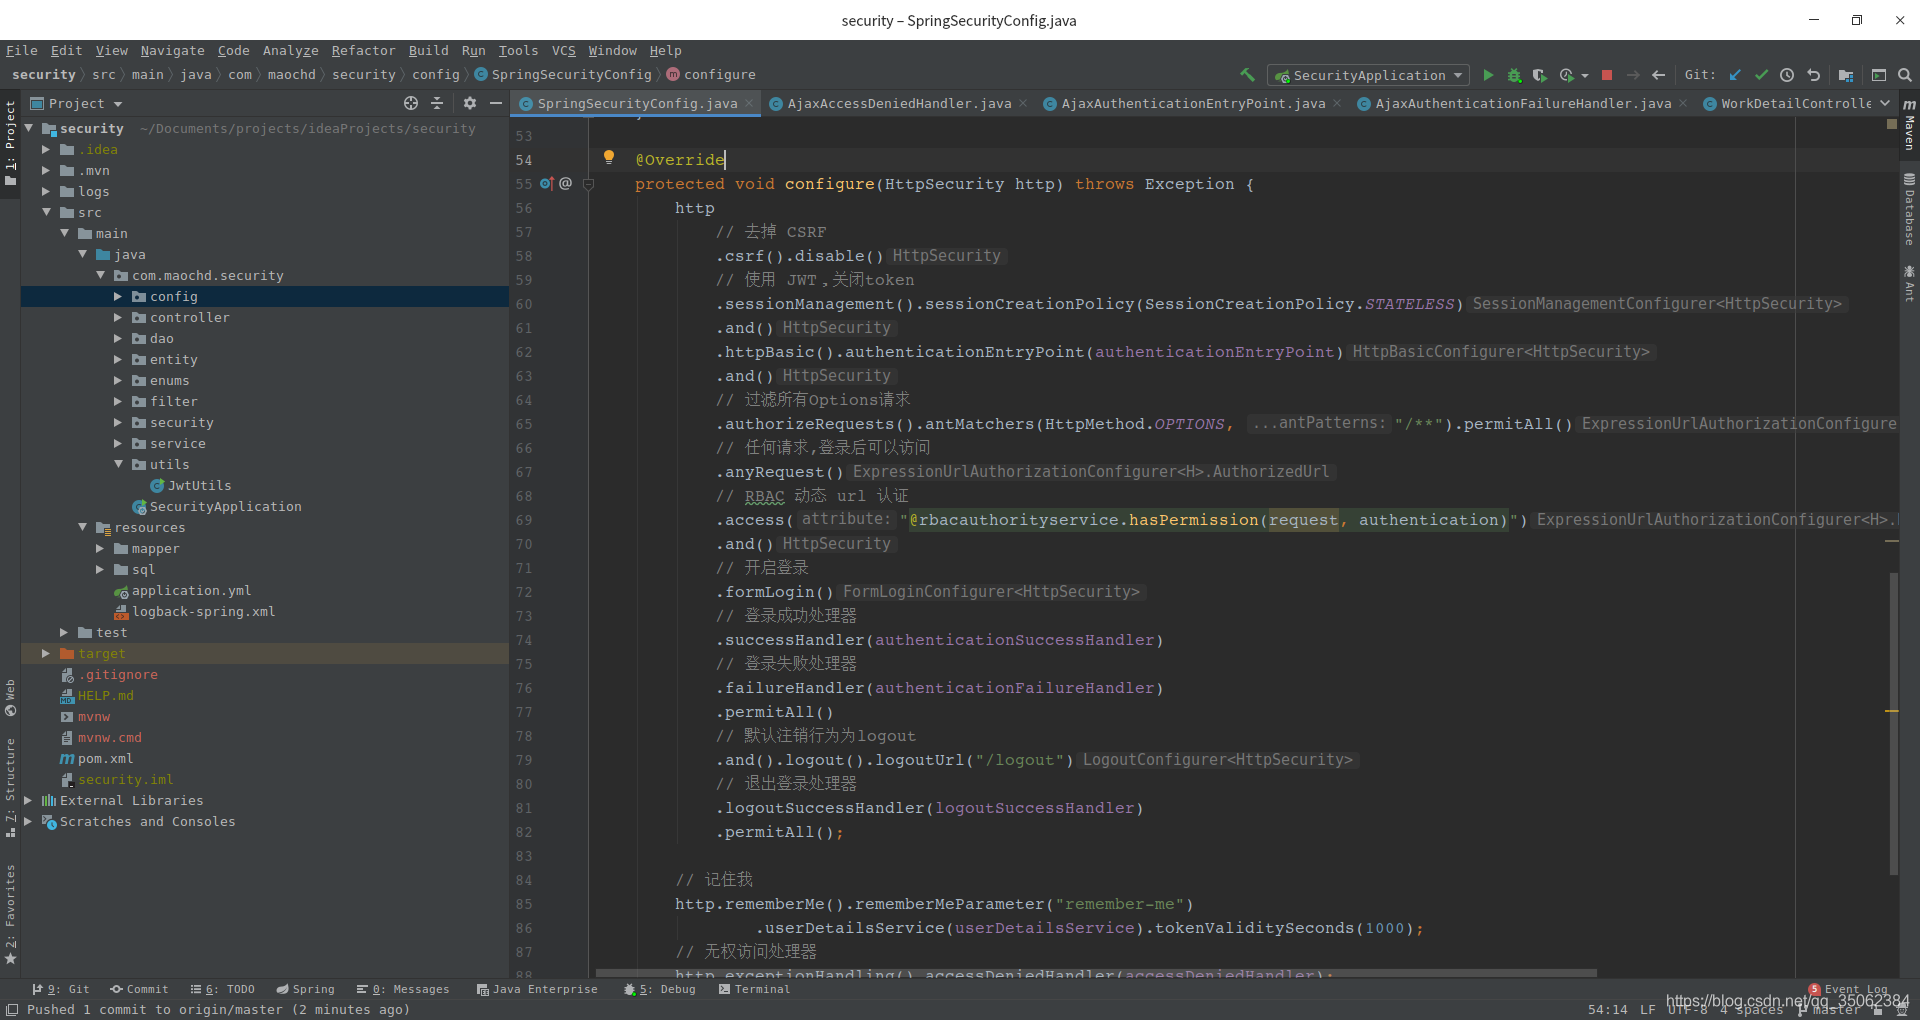
springboot只是一个快速搭建项目的工具,这里我就不过多介绍了,spring security 我这里就不讲他的原理了(本人虽然拜读过部分源码,但是还是有不理解的地方,等我基本理解的时候,我会出一个新的文章来详细的介绍),现在我只讲他是如何实现我们的项目的。spring security的核心在于他的过滤链和多个处理器,我们这里放上他的配置文件:
package com.maochd.security.config;

import com.maochd.security.filter.JwtAuthenticationTokenFilter;
import com.maochd.security.security.*;
import com.maochd.security.service.impl.SelfUserDetailsServiceImpl;
import org.springframework.beans.factory.annotation.Autowired;
import org.springframework.context.annotation.Configuration;
import org.springframework.http.HttpMethod;
import org.springframework.security.config.annotation.authentication.builders.AuthenticationManagerBuilder;
import org.springframework.security.config.annotation.web.builders.HttpSecurity;
import org.springframework.security.config.annotation.web.configuration.WebSecurityConfigurerAdapter;
import org.springframework.security.config.http.SessionCreationPolicy;
import org.springframework.security.crypto.bcrypt.BCryptPasswordEncoder;
import org.springframework.security.web.authentication.UsernamePasswordAuthenticationFilter;


/**
 * security 配置类
 *
 * @author maochd
 */
@Configuration
public class SpringSecurityConfig extends WebSecurityConfigurerAdapter {

    @Autowired
    private AjaxAuthenticationEntryPoint authenticationEntryPoint;

    @Autowired
    private AjaxAuthenticationSuccessHandler authenticationSuccessHandler;

    @Autowired
    private AjaxAuthenticationFailureHandler authenticationFailureHandler;

    @Autowired
    private AjaxLogoutSuccessHandler logoutSuccessHandler;

    @Autowired
    private AjaxAccessDeniedHandler accessDeniedHandler;

    @Autowired
    private SelfUserDetailsServiceImpl userDetailsService;

    @Autowired
    private JwtAuthenticationTokenFilter jwtAuthenticationTokenFilter;

    @Override
    protected void configure(AuthenticationManagerBuilder auth) throws Exception {
        // 加入自定义的安全认证
        // auth.authenticationProvider(provider);

        auth.userDetailsService(userDetailsService).passwordEncoder(new BCryptPasswordEncoder());
    }

    @Override
    protected void configure(HttpSecurity http) throws Exception {
        http
            // 去掉 CSRF
            .csrf().disable()
            // 使用 JWT,关闭token
            .sessionManagement().sessionCreationPolicy(SessionCreationPolicy.STATELESS)
            .and()
            .httpBasic().authenticationEntryPoint(authenticationEntryPoint)
            .and()
            // 过滤所有Options请求
            .authorizeRequests().antMatchers(HttpMethod.OPTIONS, "/**").permitAll()
            // 任何请求,登录后可以访问
            .anyRequest()
            // RBAC 动态 url 认证
            .access("@rbacauthorityservice.hasPermission(request, authentication)")
            .and()
            // 开启登录
            .formLogin()
            // 登录成功处理器
            .successHandler(authenticationSuccessHandler)
            // 登录失败处理器
            .failureHandler(authenticationFailureHandler)
            .permitAll()
            // 默认注销行为为logout
            .and().logout().logoutUrl("/logout")
            // 退出登录处理器
            .logoutSuccessHandler(logoutSuccessHandler)
            .permitAll();

        // 记住我
        http.rememberMe().rememberMeParameter("remember-me")
                .userDetailsService(userDetailsService).tokenValiditySeconds(1000);
        // 无权访问处理器
        http.exceptionHandling().accessDeniedHandler(accessDeniedHandler);
        // JWT过滤器
        http.addFilterBefore(jwtAuthenticationTokenFilter, UsernamePasswordAuthenticationFilter.class);

    }
}
这里我们完全抛弃session,改用jwt,然后加载一下处理器,这些处理器我们对他进行重写,来满足自己的需求,每个处理器我都加上了注释,基本都是返回一个json串,json中包含各种结果的处理。
package com.maochd.security.security;

import com.alibaba.fastjson.JSON;
import com.maochd.security.entity.ResultInfo;
import com.maochd.security.enums.ResultEnum;
import org.springframework.security.access.AccessDeniedException;
import org.springframework.security.web.access.AccessDeniedHandler;
import org.springframework.stereotype.Component;

import javax.servlet.ServletException;
import javax.servlet.http.HttpServletRequest;
import javax.servlet.http.HttpServletResponse;
import java.io.IOException;

/**
 * 无权访问处理器
 *
 * @author maochd
 */
@Component
public class AjaxAccessDeniedHandler implements AccessDeniedHandler {
    @Override
    public void handle(HttpServletRequest httpServletRequest, HttpServletResponse httpServletResponse, AccessDeniedException e) throws IOException {
        httpServletResponse.getWriter().write(JSON.toJSONString(ResultInfo.result(ResultEnum.USER_NO_ACCESS, false)));
    }
}
package com.maochd.security.security;

import com.alibaba.fastjson.JSON;
import com.maochd.security.entity.ResultInfo;
import com.maochd.security.enums.ResultEnum;
import org.springframework.security.core.AuthenticationException;
import org.springframework.security.web.AuthenticationEntryPoint;
import org.springframework.stereotype.Component;

import javax.servlet.ServletException;
import javax.servlet.http.HttpServletRequest;
import javax.servlet.http.HttpServletResponse;
import java.io.IOException;

/**
 * 未登陆处理器
 *
 * @author maochd
 */
@Component
public class AjaxAuthenticationEntryPoint implements AuthenticationEntryPoint {

    @Override
    public void commence(HttpServletRequest httpServletRequest, HttpServletResponse httpServletResponse, AuthenticationException e) throws IOException {
        httpServletResponse.getWriter().write(JSON.toJSONString(ResultInfo.result(ResultEnum.USER_NEED_AUTHORITIES, false)));
    }
}
package com.maochd.security.security;

import com.alibaba.fastjson.JSON;
import com.maochd.security.entity.ResultInfo;
import com.maochd.security.enums.ResultEnum;
import org.springframework.security.core.AuthenticationException;
import org.springframework.security.web.authentication.AuthenticationFailureHandler;
import org.springframework.stereotype.Component;

import javax.servlet.ServletException;
import javax.servlet.http.HttpServletRequest;
import javax.servlet.http.HttpServletResponse;
import java.io.IOException;

/**
 * 登录失败处理器
 *
 * @author maochd
 */
@Component
public class AjaxAuthenticationFailureHandler implements AuthenticationFailureHandler {

    @Override
    public void onAuthenticationFailure(HttpServletRequest httpServletRequest, HttpServletResponse httpServletResponse, AuthenticationException e) throws IOException {
        httpServletResponse.getWriter().write(JSON.toJSONString(ResultInfo.result(ResultEnum.USER_LOGIN_FAILED, false)));
    }

}
package com.maochd.security.security;

import com.alibaba.fastjson.JSON;
import com.maochd.security.entity.ResultInfo;
import com.maochd.security.entity.UserInfo;
import com.maochd.security.enums.ResultEnum;
import com.maochd.security.utils.JwtUtils;
import org.springframework.security.core.Authentication;
import org.springframework.security.web.authentication.AuthenticationSuccessHandler;
import org.springframework.stereotype.Component;

import javax.servlet.ServletException;
import javax.servlet.http.HttpServletRequest;
import javax.servlet.http.HttpServletResponse;
import java.io.IOException;

/**
 * 登录成功处理器
 *
 * @author maochd
 */
@Component
public class AjaxAuthenticationSuccessHandler implements AuthenticationSuccessHandler {
    @Override
    public void onAuthenticationSuccess(HttpServletRequest httpServletRequest, HttpServletResponse httpServletResponse, Authentication authentication) throws IOException {
        UserInfo userDetails = (UserInfo) authentication.getPrincipal();

        String jwtToken = JwtUtils.generateToken(userDetails.getUsername(), userDetails.getUserId());

        httpServletResponse.getWriter().write(JSON.toJSONString(ResultInfo.result(ResultEnum.USER_LOGIN_SUCCESS, jwtToken, true)));
    }
}
package com.maochd.security.security;

import com.alibaba.fastjson.JSON;
import com.maochd.security.entity.ResultInfo;
import com.maochd.security.enums.ResultEnum;
import org.springframework.security.core.Authentication;
import org.springframework.security.web.authentication.logout.LogoutSuccessHandler;
import org.springframework.stereotype.Component;

import javax.servlet.ServletException;
import javax.servlet.http.HttpServletRequest;
import javax.servlet.http.HttpServletResponse;
import java.io.IOException;

/**
 * 退出登录处理器
 *
 * @author maochd
 */
@Component
public class AjaxLogoutSuccessHandler implements LogoutSuccessHandler {
    @Override
    public void onLogoutSuccess(HttpServletRequest httpServletRequest, HttpServletResponse httpServletResponse, Authentication authentication) throws IOException {
        httpServletResponse.getWriter().write(JSON.toJSONString(ResultInfo.result(ResultEnum.USER_LOGOUT_SUCCESS, true)));
    }

}
这里代码可能比较多,基本都是一样的,这里我重点讲一下登录成功处理器AjaxAuthenticationSuccessHandler,因为登录操作已经通过,所以我们可以拿到他的用户信息,然后我们需要把用户信息带入新创建的token中,这里我们还可以把权限等信息封装进行,这里我只是演示,所以只有用户名等信息,这里的逻辑可以根据业务重写。
接下来,我们来实现下自定义的认证逻辑
package com.maochd.security.service.impl;

import com.maochd.security.dao.RbacAuthorityDao;
import com.maochd.security.dao.SystemManagementDao;
import com.maochd.security.entity.UserInfo;
import org.springframework.beans.factory.annotation.Autowired;
import org.springframework.security.core.GrantedAuthority;
import org.springframework.security.core.authority.SimpleGrantedAuthority;
import org.springframework.security.core.userdetails.UserDetails;
import org.springframework.security.core.userdetails.UserDetailsService;
import org.springframework.security.core.userdetails.UsernameNotFoundException;
import org.springframework.stereotype.Component;

import java.util.HashSet;
import java.util.List;
import java.util.Set;

/**
 * security认证实现类
 *
 * @author maochd
 */
@Component
public class SelfUserDetailsService implements UserDetailsService {

    @Autowired
    private RbacAuthorityDao rbacAuthorityDao;

    @Override
    public UserDetails loadUserByUsername(String username) throws UsernameNotFoundException {

        UserInfo user = rbacAuthorityDao.getUser(username);
        if (user == null) {
            throw new UsernameNotFoundException("该用户不存在");
        }
        List<String> roles = rbacAuthorityDao.getRoles(user);

        Set<GrantedAuthority> authoritiesSet = new HashSet<>();
        roles.forEach(role -> authoritiesSet.add(new SimpleGrantedAuthority(role)));

        user.setAuthorities(authoritiesSet);

        return user;
    }
}
package com.maochd.security.filter;

import com.maochd.security.service.impl.SelfUserDetailsServiceImpl;
import com.maochd.security.utils.JwtUtils;
import org.springframework.beans.factory.annotation.Autowired;
import org.springframework.security.authentication.UsernamePasswordAuthenticationToken;
import org.springframework.security.core.context.SecurityContextHolder;
import org.springframework.security.core.userdetails.UserDetails;
import org.springframework.security.web.authentication.WebAuthenticationDetailsSource;
import org.springframework.stereotype.Component;
import org.springframework.web.filter.OncePerRequestFilter;

import javax.servlet.FilterChain;
import javax.servlet.ServletException;
import javax.servlet.http.HttpServletRequest;
import javax.servlet.http.HttpServletResponse;
import java.io.IOException;

/**
 * JWT 过滤器
 *
 * @author maochd
 */
@Component
public class JwtAuthenticationTokenFilter extends OncePerRequestFilter {
    @Autowired
    SelfUserDetailsServiceImpl userDetailsService;

    @Override
    protected void doFilterInternal(HttpServletRequest request, HttpServletResponse response, FilterChain filterChain) throws ServletException, IOException {
        String authHeader = request.getHeader("Authorization");

        if (authHeader != null && authHeader.startsWith("Bearer ")) {
            String authToken = authHeader.substring("Bearer ".length());

            String username = JwtUtils.parseToken(authToken, "_secret");

            if (username != null && SecurityContextHolder.getContext().getAuthentication() == null) {

                UserDetails userDetails = userDetailsService.loadUserByUsername(username);
                if (userDetails != null) {
                    UsernamePasswordAuthenticationToken authentication =
                            new UsernamePasswordAuthenticationToken(userDetails, null, userDetails.getAuthorities());
                    authentication.setDetails(new WebAuthenticationDetailsSource().buildDetails(request));

                    SecurityContextHolder.getContext().setAuthentication(authentication);
                }
            }
        }

        filterChain.doFilter(request, response);
    }
}
我们先来讲解JwtAuthenticationTokenFilter这个过滤器,他是我们写的代码里的第一道拦截,这里会截取http请求头中的认证信息,方式可以自定义,主要是为了拿到token,如果没拿到,那么就直接进入后面的流程,最后进入用户未登录的处理器,如果拿到token,我们会对其进行解析,拿到用户名,然后把角色信息封装到用户实体中,然后对用户实体进行包装后放入security的上下文中,最后进入后面的流程。
SelfUserDetailsService主要是重写security的登录逻辑,我们这里获取了他实时的角色,并封装到用户实体中,都是为了满足自己的业务。
经过过滤器后,我们在配置文件里重写了权限校验逻辑,采用动态校验,即实时从数据库中取出权限信息,这里暂时使用数据库,动态的权限信息可以保存在不同介质中,我觉得放到缓存中也是个不错的选择,毕竟当请求流量过大时,能减小对数据库的压力。
package com.maochd.security.service.impl;

import com.maochd.security.dao.RbacAuthorityDao;
import com.maochd.security.entity.UserInfo;
import com.maochd.security.service.RbacAuthorityService;
import org.springframework.beans.factory.annotation.Autowired;
import org.springframework.security.core.Authentication;
import org.springframework.security.core.userdetails.UserDetails;
import org.springframework.stereotype.Component;

import javax.servlet.http.HttpServletRequest;
import java.util.List;

/**
 * security授权实现类
 *
 * @author maochd
 */
@Component("rbacauthorityservice")
public class RbacAuthorityServiceImpl implements RbacAuthorityService {

    @Autowired
    private RbacAuthorityDao rbacAuthorityDao;

    @Override
    public boolean hasPermission(HttpServletRequest request, Authentication authentication) {
        Object userInfo = authentication.getPrincipal();
        boolean hasPermission = false;
        if (userInfo instanceof UserInfo) {
            String username = ((UserDetails) userInfo).getUsername();
            List<String> urls = rbacAuthorityDao.getUrlsByUsername(username);
            hasPermission = urls.stream().anyMatch(url -> request.getRequestURI().contains(url));
        }
        return hasPermission;
    }
}
项目中其他的文件都是业务,这里为了方便演示,没有把security部分抽成一个单独的模块,而是采用紧耦合的方式,后期可以把security抽成一个单独的模块,或者与网关等模块进行紧耦合,共同完成对系统的安全保证。业务文件我就不再写出,可以访问我的项目地址,把代码down到本地进行运行。项目工程地址在顶部已经给出。
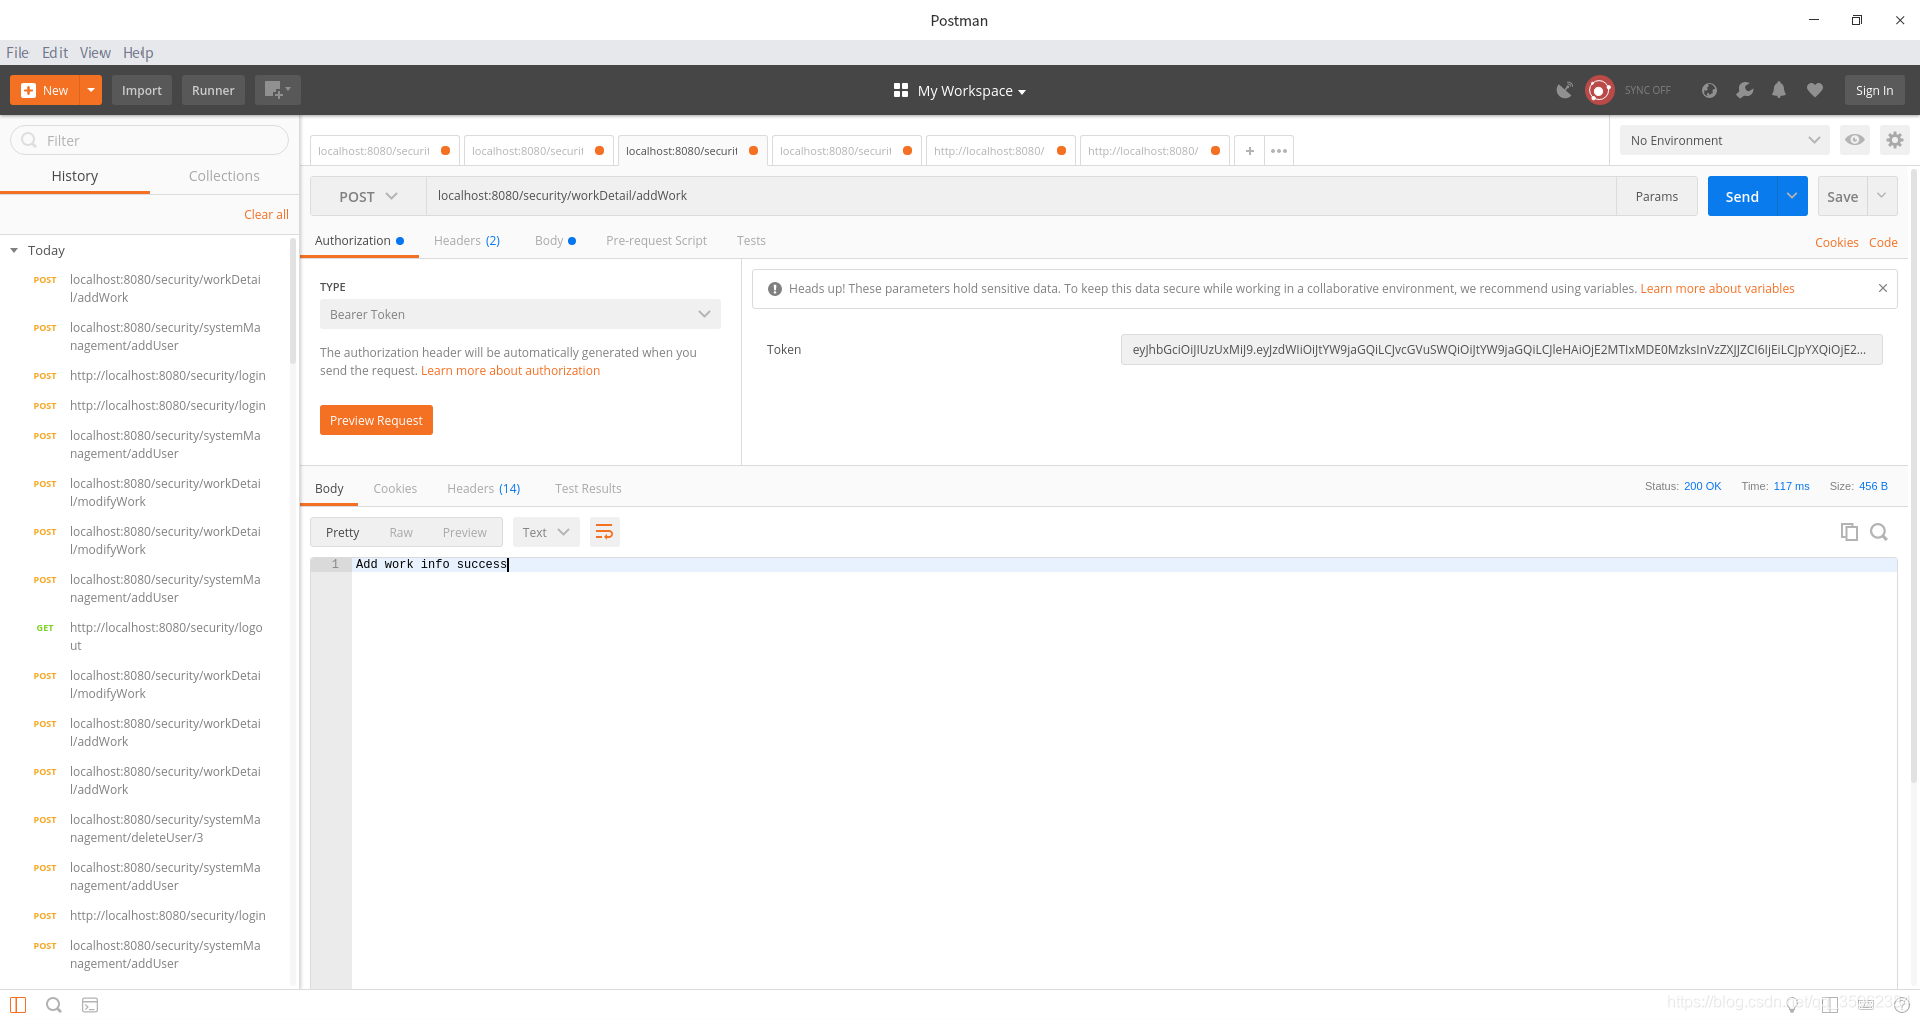
这里就展示下在postman下的各个情况:
1.未登录

2.登录失败

3. 登录成功

4.无权访问

5.执行业务成功


 187
187


 被折叠的 条评论
为什么被折叠?
被折叠的 条评论
为什么被折叠?
 到【灌水乐园】发言


