


目录
引言
h5页面底部显示tabbar,大部分页面是不需要展示tabber的,为了提高开发效率,可用如下办法进行:
一、解决办法
通过监听路由,判断是否该页面为tabbar页面,如果不为tabbar页面,隐藏tab组件;否则,展示tabbar组件
1、App.vue
state.isShowTab 用来判断是否展示tab组件
<template>
  <div class="container">
    <!-- 自定义组件 顶部的title -->
    <my-header />

    <!-- 路由出口 -->
    <router-view />

    <div class="tab-wrap">
      <!-- 底部tabbar -->
      <van-tabbar v-model="active" route v-if="state.isShowTab">
        <van-tabbar-item icon="home-o" to="/home">首页</van-tabbar-item>
        <van-tabbar-item icon="video-o" to="/video">视频</van-tabbar-item>
        <van-tabbar-item icon="contact" to="/mine">我的</van-tabbar-item>
      </van-tabbar>
    </div>
  </div>
</template>

<script>
import { ref, watch, reactive } from "vue";
import { useRoute } from "vue-router";
import myHeader from "../components/myHeader.vue";

export default {
  components: { myHeader },
  setup() {
    const active = ref(0);
    const route = useRoute();

    const state = reactive({
      isShowTab: true, //默认展示底部的tab
    });

    // 监听路由中的信息是否为tab页,如果为tab页,展示,否则,不展示底部tab
    watch(
      () => route.meta,
      (val) => {
        state.isShowTab = val.isTab;
      }
    );
    return { active, state };
  },
};
</script>
2、myHeader.vue
统一封装顶部的head
<template>
  <van-nav-bar
    :title="barTitle"
    :left-arrow="!isShowBackArrow"
    @click-left="onClickLeft"
  />
</template>
<script setup>
import { useRouter } from "vue-router";
import { reactive, watch, computed } from "vue";
const router = useRouter();
const state = reactive({
  routeObj: {},
});

// 监听当前路由
watch(
  () => router.currentRoute.value,
  (newValue) => {
    // console.log("newValue", newValue);
    state.routeObj = newValue;
  },
  { immediate: true }
);

const barTitle = computed(() => {
  return state.routeObj.meta.title;
});

const isShowBackArrow = computed(() => {
  return state.routeObj.meta.isTab;
});

const onClickLeft = () => {
  history.back();
};
</script>
3、mine.vue
我的页面
<template>
  <div class="page-container">
    <div class="card">
      <div class="img-wrap">
        <van-image
          round
          fit="cover"
          width="80"
          height="80"
          :src="state.personObj.avatar"
        />
      </div>
      <div class="content">
        <van-cell
          :title="state.personObj.personName"
          value="个人资料"
          :label="state.personObj.roleName"
          is-link
          @click="handleClick"
        />
      </div>
    </div>

    <van-cell-group inset>
      <van-cell title="单元格" value="内容" />
      <van-cell title="单元格" value="内容" label="描述信息" />
    </van-cell-group>
  </div>
</template>
<script setup>
import { useRouter } from "vue-router";
import { personApi } from "@/api/personApi.js";
import { reactive } from "vue";
const router = useRouter();
const state = reactive({
  personObj: {},
});

const handleClick = () => {
  console.log("点击:");
  router.push({
    path: "/mine/info",
    query: {
      id: 1,
    },
  });
};

const getPersonData = () => {
  personApi().then((res) => {
    console.log("个人信息:", res);
    const { code, data } = res;
    if (code == 200) {
      state.personObj = data;
    }
  });
};

getPersonData();
</script>
<style scoped>
.card {
  margin: 15px 30px;
  /* border-radius: 0.05333rem;
  border: 0.01333rem solid #ebeef5; */

  overflow: hidden;
  color: #303133;
  box-shadow: 0 2px 12px 0 rgba (0, 0, 0, 0.1);
  transition: 0.3s;
  padding: 15px 10px;
  display: flex;

  background: var(--van-coupon-background);
  border-radius: var(--van-coupon-radius);
  box-shadow: var(--van-coupon-shadow);
}
.content {
  flex: 1;
}
</style>
4、info.vue
个人详情页
<template>
  <div class="page-container">
    <van-cell-group inset>
      <van-cell title="姓名" :value="state.personInfoObj['personName']" />
      <van-cell title="年龄" :value="state.personInfoObj['age']" />
      <van-cell title="爱好" :value="state.personInfoObj['hobby']" />
      <van-cell title="家庭住址" :value="state.personInfoObj['address']" />
    </van-cell-group>
  </div>
</template>

<script setup>
import { useRoute } from "vue-router";
import { reactive } from "vue";
import { personInfoApi } from "@/api/personApi.js";
const route = useRoute();
const state = reactive({
  queryObj: {},
  personInfoObj: {},
});

state.queryObj = route.query;
console.log("route:", route.query);

const getPersonInfo = () => {
  personInfoApi({ id: state.queryObj.id }).then((res) => {
    console.log("详情:", res);
    const { code, data } = res;
    if (code == 200) {
      state.personInfoObj = data;
    }
  });
};

getPersonInfo();
</script>
5、路由处理
meta.title是顶部的title,meta.isTab 是用来判断是否为tabbar页面,true-表示为tabbar页面,false-表示非tabbar页面
import {
  createRouter,
  createWebHistory,
  createWebHashHistory,
} from "vue-router";

const router = createRouter({
  // history: createWebHistory(import.meta.env.BASE_URL),
  // 解决:无报错,js加载了,但是页面空白(router-view没有渲染任何内容)

  history: createWebHashHistory(),
  routes: [
    {
      path: "/",
      name: "index",
      component: () => import("../views/index.vue"),
      redirect: "/home",
      children: [
        {
          path: "/home",
          name: "home",
          meta: {
            title: "首页",
            isTab: true,
          },
          component: () => import("@/views/home/index.vue"),
        },
        {
          path: "/video",
          name: "video",
          meta: {
            title: "视频",
            isTab: true,
          },
          component: () => import("../views/video/index.vue"),
        },
        {
          path: "/mine",
          name: "mine",
          meta: {
            title: "我的",
            isTab: true,
          },
          component: () => import("../components/myRouterView.vue"),
          redirect: "/mine/list",
          children: [
            {
              path: "/mine/list",
              name: "personalList",
              meta: {
                title: "我的",
                isTab: true,
              },
              component: () => import("../views/mine/index.vue"),
            },
            {
              path: "/mine/info",
              name: "personalInfo",
              meta: {
                title: "个人资料",
                isTab: false,
              },
              component: () => import("../views/personalInfo/index.vue"),
            },
          ],
        },
        {
          path: "/goodList",
          name: "goodList",
          meta: {
            title: "商品列表",
            isTab: false,
          },
          component: () => import("../views/goodManage/goodList/index.vue"),
        },
        {
          path: "/goodInfo",
          name: "goodInfo",
          meta: {
            title: "商品详情",
            isTab: false,
          },
          component: () => import("../views/goodManage/goodDetail/index.vue"),
        },
      ],
    },
  ],
});

export default router;
二、运行效果
经过如上的处理,非tabbar页面则可以不展示tab组件,而tabbar页面展示,运行效果如下图所示:
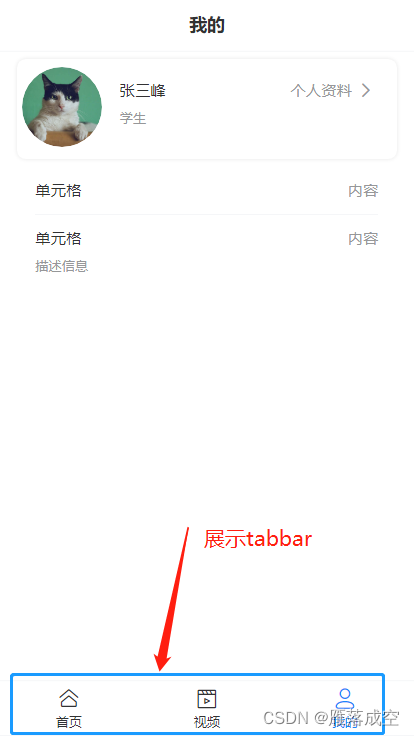
图一 展示tabbar
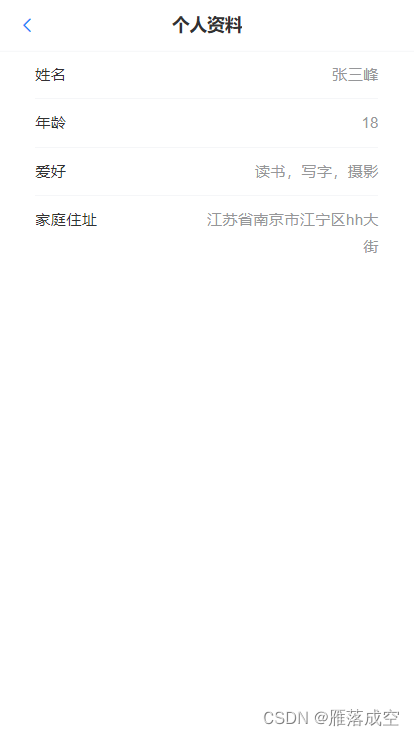
图二 不展示tabbar


 994
994


 被折叠的 条评论
为什么被折叠?
被折叠的 条评论
为什么被折叠?
 到【灌水乐园】发言


