


redis自增
一, 引入依赖:
<dependency>
    <groupId>org.springframework.boot</groupId>
    <artifactId>spring-boot-starter-data-redis</artifactId>
    <version>2.6.5</version>
</dependency>
二, 配置信息:
spring:
  redis:
    # 地址
    host: localhost
    # 端口号
    port: 6379
    # 密码
    password:
    # 超时时间,单位毫秒
    timeout: 3000
    # 数据库编号
    database: 0
JedisConfig:
package org.com.spi.config;

import com.fasterxml.jackson.annotation.JsonAutoDetect;
import com.fasterxml.jackson.annotation.PropertyAccessor;
import com.fasterxml.jackson.databind.ObjectMapper;
import org.springframework.context.annotation.Bean;
import org.springframework.context.annotation.Configuration;
import org.springframework.data.redis.connection.RedisConnectionFactory;
import org.springframework.data.redis.core.RedisTemplate;
import org.springframework.data.redis.core.StringRedisTemplate;
import org.springframework.data.redis.serializer.Jackson2JsonRedisSerializer;

@Configuration
public class JedisConfig {
    @Bean
    public RedisTemplate<String, String> redisTemplate(RedisConnectionFactory factory) {
        StringRedisTemplate template = new StringRedisTemplate(factory);
        //定义key序列化方式
        //RedisSerializer<String> redisSerializer = new StringRedisSerializer();//Long类型会出现异常信息;需要我们上面的自定义key生成策略,一般没必要
        //定义value的序列化方式
        Jackson2JsonRedisSerializer jackson2JsonRedisSerializer = new Jackson2JsonRedisSerializer(Object.class);
        ObjectMapper om = new ObjectMapper();
        om.setVisibility(PropertyAccessor.ALL, JsonAutoDetect.Visibility.ANY);
        om.enableDefaultTyping(ObjectMapper.DefaultTyping.NON_FINAL);
        jackson2JsonRedisSerializer.setObjectMapper(om);

        // template.setKeySerializer(redisSerializer);
        template.setValueSerializer(jackson2JsonRedisSerializer);
        template.setHashValueSerializer(jackson2JsonRedisSerializer);
        template.afterPropertiesSet();
        return template;
    }
}
三, redis配置类RedisUtils:
package org.com.spi.utils;

import org.springframework.data.redis.core.RedisTemplate;
import org.springframework.stereotype.Component;

import javax.annotation.Resource;

@Component
public class RedisUtils {
    @Resource
    private RedisTemplate<String, Object> redisTemplate; //这里使用的是redisTemplate

    /**
     * redis 自增
     * @param key 键
    //     * @param by 要增加几(大于0)
     * @return
     */
    public long incr(String key, long delta){
        if(delta<0){
            throw new RuntimeException("递增因子必须大于0");
        }
        return redisTemplate.opsForValue().increment(key, delta);
    }
}
4, 编写接口controller:
@Autowired
RedisUtils redisUtils;
/**
 * 根据数据库ID自增生成主键
 * 缺点在于数据库不能集群,只能单机搞,不适合ID作为业务传递的场景
 */
@PostMapping("/redisInc")
public Long redisInc(){
    return redisUtils.incr("generate2",1);
}
特点: redis自增仅适合单业务场景,对于多模块、复杂业务场景不太适用;另外,redis的两种持久化机制都有一定的弊端: RDB方式-宕机存在丢失的风险, AOF方式-宕机能恢复数据,但数据恢复时间较长,在并发量大的时候可能导致ID重复的情况.
------------------------------------------------------------------------------------------------
雪花算法
主要类: IdWorker
package org.com.spi.config;

import org.springframework.stereotype.Component;

import java.lang.management.ManagementFactory;
import java.net.InetAddress;
import java.net.NetworkInterface;
import java.net.UnknownHostException;

@Component
public class IdWorker {
    //起始时间戳( 2020-12-26 00:00:00 )
    private static final long START_STAMP = 1608912000000L;

    //序列号占用位数
    private static final long SEQUENCE_BIT = 12;

    //机器标识占用位数
    private static final long MACHINE_BIT = 5;

    //数据中心占用位数
    private static final long DATACENTER_BIT = 5;

    //序列号最大值
    private static final long MAX_SEQUENCE = -1L ^ (-1L << 12); // 4095

    /**
     * 偏移量
     **/
    private static final long MACHINE_LEFT = SEQUENCE_BIT;

    private static final long DATACENTER_LEFT = SEQUENCE_BIT + MACHINE_BIT;

    private static final long TIMESTAMP_LEFT = DATACENTER_LEFT + DATACENTER_BIT;

    private static long dataCenterId; //0,  数据中心(0-31)
    private static long machineId; //0,  机器标识(0-31)

    private static long sequence; //序列号  range(0 ~ 4095)
    private static long lastStamp; //上一次时间戳

    private final String POD_IP = getPodIp();
    private final int lastThreeCount=3;
    private final int lastOneCount=1;

    public IdWorker(){
//        this.dataCenterId = getDatacenterId(MAX_DATA_CENTER_NUM);
//        this.machineId = getMaxWorkerId(dataCenterId, MAX_MACHINE_NUM);
        this.dataCenterId = getLastCount(lastOneCount);
        this.machineId = getLastCount(lastThreeCount);
    }

    /**
     * <p>
     * 数据标识id部分
     * </p>
     */
    public static long getDatacenterId(long maxDatacenterId) {
        long id = 0L;
        try {
            InetAddress ip = InetAddress.getLocalHost();
            NetworkInterface network = NetworkInterface.getByInetAddress(ip);
            if (network == null) {
                id = 1L;
            } else {
                byte[] mac = network.getHardwareAddress();
                id = ((0x000000FF & (long) mac[mac.length - 1])
                        | (0x0000FF00 & (((long) mac[mac.length - 2]) << 8))) >> 6;
                id = id % (maxDatacenterId + 1);
            }
        } catch (Exception e) {
            System.out.println(" getDatacenterId: " + e.getMessage());
        }
        return id;
    }

    /**
     * <p>
     * 获取 maxWorkerId
     * </p>
     */
    public static long getMaxWorkerId(long datacenterId, long maxWorkerId) {
        StringBuffer mpid = new StringBuffer();
        mpid.append(datacenterId);
        String name = ManagementFactory.getRuntimeMXBean().getName();
        if (!name.isEmpty()) {
            /*
             * GET jvmPid
             */
            mpid.append(name.split("@")[0]);
        }
        /*
         * MAC + PID 的 hashcode 获取16个低位
         */
        return (mpid.toString().hashCode() & 0xffff) % (maxWorkerId + 1);
    }

    /**
     * 产生下一个ID
     */
    public static synchronized long nextId() {
        long currentStamp = System.currentTimeMillis();
        if (currentStamp < lastStamp) {
            throw new IllegalArgumentException("时间被回退,不能继续产生id");
        }
        if (currentStamp == lastStamp) {
            //相同毫秒内,序列号自增
            sequence = (sequence + 1) & MAX_SEQUENCE;
            if (sequence == 0L) {
                //序列号已经到最大值
                System.out.println("序列号已经到达最大值");
                //使用下一个时间戳
                currentStamp = getNextStamp();
            }
        } else {
            //不同毫秒,序列号重置
            sequence = 0L;
        }
        lastStamp = currentStamp;//当前时间戳存档,用于判断下次产生id时间戳是否相同
        return (currentStamp - START_STAMP) << TIMESTAMP_LEFT
                | dataCenterId << DATACENTER_LEFT
                | machineId << MACHINE_LEFT
                | sequence;
    }

    public static long getNextStamp() {
        long newStamp = getCurrentStamp();
        while (newStamp <= lastStamp) {
            newStamp = getCurrentStamp();
        }
        return newStamp;
    }
    /**
     * 获取当前时间戳
     *
     * @return
     */
    public static long getCurrentStamp() {
        return System.currentTimeMillis();
    }

    private long getNextMill() {
        long mill = getNewStamp();
        while (mill <= lastStamp) {
            mill = getNewStamp();
        }
        return mill;
    }

    public String getPodIp(){
        try {
            InetAddress localHost = InetAddress.getLocalHost();
            return localHost.getHostAddress().replaceAll("\\.", "");
        } catch (UnknownHostException e) {
            e.printStackTrace();
        }
        return "0";
    }

    /**
     * 截取ip数
     * @param lastCount
     * @return
     */
    public Long getLastCount(int lastCount){
        return Long.valueOf(POD_IP.substring(POD_IP.length() - lastCount));
    }

    private long getNewStamp() {
        return System.currentTimeMillis();
    }

    public static void main(String[] args) {
//        IdWorker snowFlake = new IdWorker();
//        long start = System.currentTimeMillis();
//        for (int i = 0; i < 10; i++) {
//            System.out.println(snowFlake.nextId());
//            System.out.println("dataId:"+ snowFlake.dataCenterId);
//            System.out.println("workId:"+ snowFlake.machineId);
//        }
//        System.out.println(snowFlake.getLastCount(4));
//        System.out.println(snowFlake.getLastCount(1));
//        System.out.println(System.currentTimeMillis() - start);
        System.out.println(MAX_SEQUENCE);
    }
}
特点: 雪花算法对于NIO多并发环境下如果用它本身的datacenterId和workId的方法可能在多pod环境下出现ID重复的情况,可以自定义根据IP后几位来生成datacenterId和workId的方式.另外,如果出现时钟回拨,也会导致ID重复.
------------------------------------------------------------------------------------
滴滴Tiny
基于号段模式原理实现的与Leaf如出一辙,每个服务获取一个号段(1000,2000]、(2000,3000]、(3000,4000]
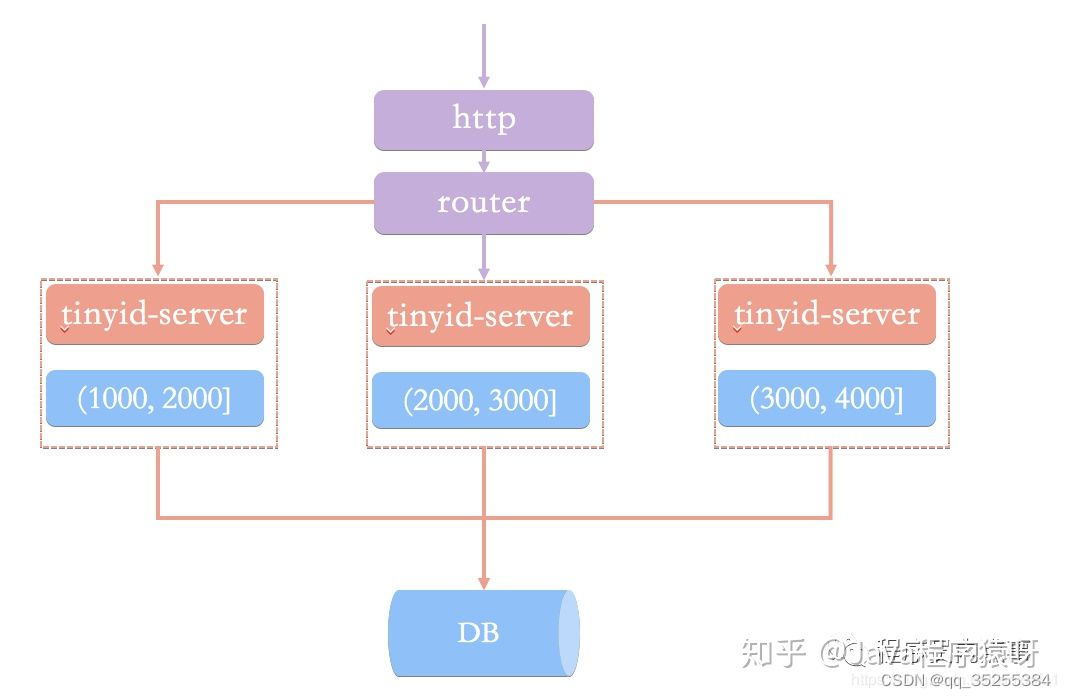
Tinyid提供http和tinyid-client两种方式接入
Http方式接入
(1)导入Tinyid源码:
git clone https://github.com/didi/tinyid.git
(2)创建数据表:
CREATE TABLE `tiny_id_info` (
  `id` bigint(20) unsigned NOT NULL AUTO_INCREMENT COMMENT '自增主键',
  `biz_type` varchar(63) NOT NULL DEFAULT '' COMMENT '业务类型,唯一',
  `begin_id` bigint(20) NOT NULL DEFAULT '0' COMMENT '开始id,仅记录初始值,无其他含义。初始化时begin_id和max_id应相同',
  `max_id` bigint(20) NOT NULL DEFAULT '0' COMMENT '当前最大id',
  `step` int(11) DEFAULT '0' COMMENT '步长',
  `delta` int(11) NOT NULL DEFAULT '1' COMMENT '每次id增量',
  `remainder` int(11) NOT NULL DEFAULT '0' COMMENT '余数',
  `create_time` timestamp NOT NULL DEFAULT '2010-01-01 00:00:00' COMMENT '创建时间',
  `update_time` timestamp NOT NULL DEFAULT '2010-01-01 00:00:00' COMMENT '更新时间',
  `version` bigint(20) NOT NULL DEFAULT '0' COMMENT '版本号',
  PRIMARY KEY (`id`),
  UNIQUE KEY `uniq_biz_type` (`biz_type`)
) ENGINE=InnoDB AUTO_INCREMENT=1 DEFAULT CHARSET=utf8 COMMENT 'id信息表';

CREATE TABLE `tiny_id_token` (
  `id` int(11) unsigned NOT NULL AUTO_INCREMENT COMMENT '自增id',
  `token` varchar(255) NOT NULL DEFAULT '' COMMENT 'token',
  `biz_type` varchar(63) NOT NULL DEFAULT '' COMMENT '此token可访问的业务类型标识',
  `remark` varchar(255) NOT NULL DEFAULT '' COMMENT '备注',
  `create_time` timestamp NOT NULL DEFAULT '2010-01-01 00:00:00' COMMENT '创建时间',
  `update_time` timestamp NOT NULL DEFAULT '2010-01-01 00:00:00' COMMENT '更新时间',
  PRIMARY KEY (`id`)
) ENGINE=InnoDB AUTO_INCREMENT=1 DEFAULT CHARSET=utf8 COMMENT 'token信息表';

INSERT INTO `tiny_id_info` (`id`, `biz_type`, `begin_id`, `max_id`, `step`, `delta`, `remainder`, `create_time`, `update_time`, `version`)
VALUES
    (1, 'test', 1, 1, 100000, 1, 0, '2018-07-21 23:52:58', '2018-07-22 23:19:27', 1);

INSERT INTO `tiny_id_info` (`id`, `biz_type`, `begin_id`, `max_id`, `step`, `delta`, `remainder`, `create_time`, `update_time`, `version`)
VALUES
    (2, 'test_odd', 1, 1, 100000, 2, 1, '2018-07-21 23:52:58', '2018-07-23 00:39:24', 3);


INSERT INTO `tiny_id_token` (`id`, `token`, `biz_type`, `remark`, `create_time`, `update_time`)
VALUES
    (1, '0f673adf80504e2eaa552f5d791b644c', 'test', '1', '2017-12-14 16:36:46', '2017-12-14 16:36:48');

INSERT INTO `tiny_id_token` (`id`, `token`, `biz_type`, `remark`, `create_time`, `update_time`)
VALUES
    (2, '0f673adf80504e2eaa552f5d791b644c', 'test_odd', '1', '2017-12-14 16:36:46', '2017-12-14 16:36:48');
(3)配置数据库:
datasource.tinyid.names=primary
datasource.tinyid.primary.driver-class-name=com.mysql.jdbc.Driver
datasource.tinyid.primary.url=jdbc:mysql://ip:port/databaseName?autoReconnect=true&useUnicode=true&characterEncoding=UTF-8
datasource.tinyid.primary.username=root
datasource.tinyid.primary.password=123456
(4)启动tinyid-server后测试
获取分布式自增ID: http://localhost:9999/tinyid/id/nextIdSimple?bizType=test&token=0f673adf80504e2eaa552f5d791b644c'
返回结果: 3

批量获取分布式自增ID:
http://localhost:9999/tinyid/id/nextIdSimple?bizType=test&token=0f673adf80504e2eaa552f5d791b644c&batchSize=10'
返回结果:  4,5,6,7,8,9,10,11,12,13
Java客户端方式接入
重复Http方式的(2)(3)操作
引入依赖

配置文件

test 、tinyid.token是在数据库表中预先插入的数据,test 是具体业务类型,tinyid.token表示可访问的业务类型

Github地址:https://github.com/didi/tinyid。
特点: 可以独立项目作为ID服务中心,对外提供http接口获取ID,但这种方式会影响性能;如果需要性能最大化,就需要根据源码进行二次开发,在项目中直接拷贝源码进行相应修改.与美团相比,最大特点是 支持多节点部署。
------------------------------------------------------------------------------
美团Leaf
同时支持号段模式和snowflake算法模式,可以切换使用
号段模式
先导入源码 https://github.com/Meituan-Dianping/Leaf ,在建一张表leaf_alloc
DROP TABLE IF EXISTS `leaf_alloc`;

CREATE TABLE `leaf_alloc` (
  `biz_tag` varchar(128)  NOT NULL DEFAULT '' COMMENT '业务key',
  `max_id` bigint(20) NOT NULL DEFAULT '1' COMMENT '当前已经分配了的最大id',
  `step` int(11) NOT NULL COMMENT '初始步长,也是动态调整的最小步长',
  `description` varchar(256)  DEFAULT NULL COMMENT '业务key的描述',
  `update_time` timestamp NOT NULL DEFAULT CURRENT_TIMESTAMP ON UPDATE CURRENT_TIMESTAMP COMMENT '数据库维护的更新时间',
  PRIMARY KEY (`biz_tag`)
) ENGINE=InnoDB;
然后在项目中开启号段模式,配置对应的数据库信息,并关闭snowflake模
leaf.name=com.sankuai.leaf.opensource.test
leaf.segment.enable=true
leaf.jdbc.url=jdbc:mysql://localhost:3306/leaf_test?useUnicode=true&characterEncoding=utf8&characterSetResults=utf8
leaf.jdbc.username=root
leaf.jdbc.password=root

leaf.snowflake.enable=false
#leaf.snowflake.zk.address=
#leaf.snowflake.port=
启动leaf-server 模块的 LeafServerApplication项目就跑起来了
号段模式获取分布式自增ID的测试url :http://localhost:8080/api/segment/get/leaf-segment-test
监控号段模式:http://localhost:8080/cache
snowflake模式
Leaf的snowflake模式依赖于ZooKeeper,不同于原始snowflake算法也主要是在workId的生成上,Leaf中workId是基于ZooKeeper的顺序Id来生成的,每个应用在使用Leaf-snowflake时,启动时都会都在Zookeeper中生成一个顺序Id,相当于一台机器对应一个顺序节点,也就是一个workId。

snowflake模式获取分布式自增ID的测试url:http://localhost:8080/api/snowflake/get/test
github地址:https://github.com/Meituan-Dianping/Leaf
特点: 可以独立项目作为ID服务中心,对外提供http接口获取ID,但这种方式会影响性能;如果需要性能最大化,就需要根据源码进行二次开发,在项目中直接拷贝源码进行相应修改.在百度uid generator基础上优化的,可以独立一个服务来提供访问


 636
636


 被折叠的 条评论
为什么被折叠?
被折叠的 条评论
为什么被折叠?
 到【灌水乐园】发言


