


文章目录
一、 HTTP协议与WebSocket区别
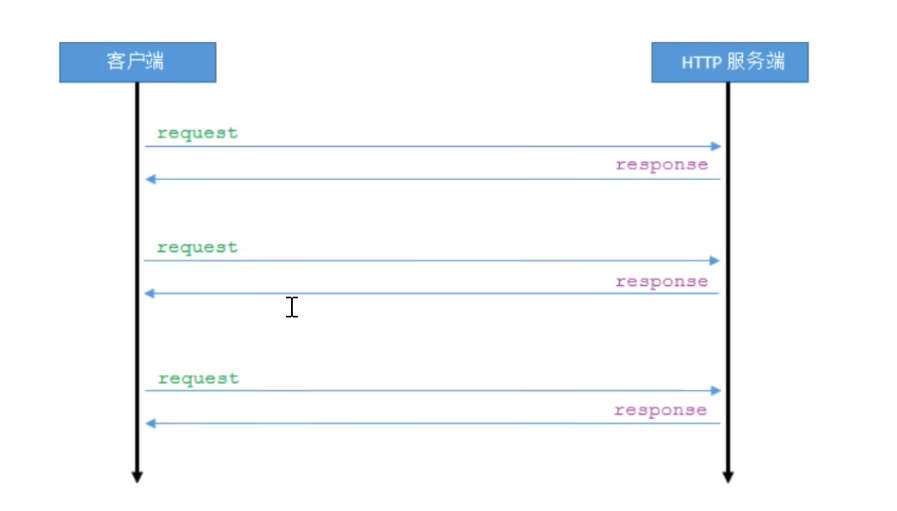
HTTP协议是一种无状态的、无连接的、单向的应用层协议- 它采用了请求/响应模型
- 通信请求只能由客户端发起,服务端对请求做出应答处理
- 这种通信模型有一个弊端:HTTP协议无法实现服务器主动向客户端发起消息
- http协议
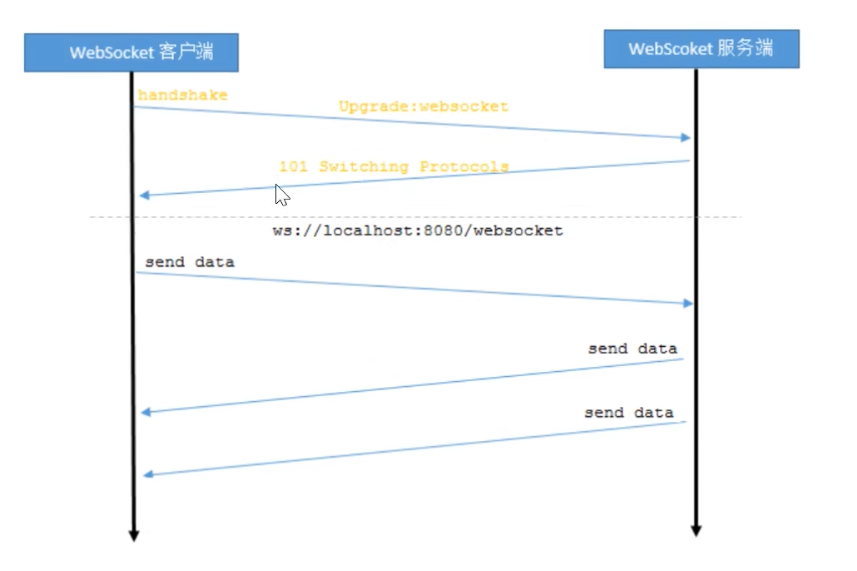
- WebSocket是一种网络通信协议
- WebSocket是HTML5开始提供的一种在单个TCP连接上进行双工通讯的协议
- websocket协议
二、客户端(浏览器)实现
简单介绍下前端,不做代码方面内容
1、websocket对象
- 实现 WebSockets 的 Web 浏览器将通过 WebSocket 对象公开所有必需的客户端功能(主要指支持 Htm15的浏览器)
- 以下API用于创建 WebSocket对象:
var ws = new webSocket(url);
参数url格式说明:ws://ip地址:端口号/资源名称
2、websocket事件
| 事件 | 事件处理 | 描述 |
|---|---|---|
| open | websocket对象.open | 连接建立时触发 |
| message | websocket对象.message | 客户端接收服务端数据时触发 |
| error | websocket对象.error | 通信发生错误时触发 |
| close | websocket对象.close | 连接关闭时触发 |
3、WebSocket方法
| 方法 | 描述 |
|---|---|
| send() | 使用连接发送数据 |
三、服务端实现
- Tomcat的7.0.5版本开始支持WebSocket,并且实现了Java WebSocket规范(JSR356)
- Java WebSocket应用由一系列的
WebSocketEndpoint组成Endpoint是一个java对象,代表WebSocket链接的一端- 对于服务端,我们可以视为处理具体webSocket消息的接口,就像Servlet之与http请求一样
- 我们可以通过两种方式定义Endpoint:
- 第一种是编程式,即
继承类 javax.websocket.Endpoint并实现其方法 - 第二种是注解式,即定义一个POJO,并添加
@ServerEndpoint相关注解
- 第一种是编程式,即
1、连接过程
- Endpoint实例在WebSocket
握手时创建,并在客户端与服务端链接过程中有效,最后在链接关闭时结束 - 在Endpoint接口中明确定义了与其生命周期相关的方法
- 规范实现者确保生命周期的各个阶段调用实例的相关方法
- 生命周期方法如下:
| 方法 | 描述 | 注解 |
|---|---|---|
| onOpen() | 当开启一个新的会话时调用,该方法是客户端与服务端握手成功后调用的方法 | @OnOpen |
| onClose() | 当会话关闭时调用 | @OnClose |
| onError() | 当连接过程异常时调用 | @OnError |
| OnMessage() | 当连接过程异常时调用 | @OnMessage |
2、服务端接收客户端消息
- 当采用注解方式定义Endpoint时
- 可以通过@OnMessage注解指定接收消息的方法
3、服务端推送消息给客户端
- 发送消息则由RemoteEndpoint完成,其实例由session维护
- 我们可以通过Session.getBasicRemote获取
同步消息发送的实例 - 也可以Session.getAsyncRemote获取
异步消息发送的实例 - 然后调用其sendXxx()方法就可以发送消息
四、后端功能实现
- springboot项目导入websocket包
<dependency>
    <groupId>org.springframework.boot</groupId>
    <artifactId>spring-boot-starter-websocket</artifactId>
</dependency>
- websocket的配置信息
@Configuration
public class WebSocketConfig {
    @Bean
    public ServerEndpointExporter serverEndpointExporter() {
        return new ServerEndpointExporter();
    }
}
- websocket的处理类,作用相当于HTTP请求中的controller
@Component
@Slf4j
@ServerEndpoint("/api/pushMessage/{userId}")
public class WebSocketServer {

    /**静态变量,用来记录当前在线连接数*/
    private static final AtomicInteger onlineCount = new AtomicInteger(0);
    /**concurrent包的线程安全Set,用来存放每个客户端对应的WebSocket对象。*/
    private static final ConcurrentHashMap<String, WebSocketServer> webSocketMap = new ConcurrentHashMap<>();
    /**与某个客户端的连接会话,需要通过它来给客户端发送数据*/
    private Session session;
    /**接收userId*/
    private String userId;

    /**
     * 连接建立成功调用的方法
     */
    @OnOpen
    public void onOpen(Session session, @PathParam("userId") String userId) {
        this.session = session;
        this.userId = userId;
        if (webSocketMap.containsKey(userId)) {
            webSocketMap.remove(userId);
            // 加入map中
            webSocketMap.put(userId, this);
        } else {
            // 加入map中
            webSocketMap.put(userId, this);
            // 在线数加1
            onlineCount.incrementAndGet();
        }
        log.info("用户连接:" + userId + ",当前在线人数为:" + onlineCount);
        sendMessage("连接成功");
    }

    /**
     * 连接关闭调用的方法
     */
    @OnClose
    public void onClose() {
        if (webSocketMap.containsKey(userId)) {
            webSocketMap.remove(userId);
            // 在线人数减1
            onlineCount.decrementAndGet();
        }
        log.info("用户退出:" + userId + ",当前在线人数为:" + onlineCount);
    }

    /**
     * 收到客户端消息后调用的方法
     **/
    @OnMessage
    public void onMessage(String message, Session session) {
        log.info("用户消息:" + userId + ",报文:" + message);
        // 解析发送的报文
        JSONObject jsonObject = JSON.parseObject(message);
        // 获取需要转发的用户id
        String toUserId = jsonObject.getString("toUserId");
        // 传送给对应toUserId用户的websocket
        if (StringUtils.isNotBlank(toUserId) && webSocketMap.containsKey(toUserId)) {
            webSocketMap.get(toUserId).sendMessage(message);
        } else {
            log.error("请求的userId:" + toUserId + "不在该服务器上");
        }
    }


    /**
     * 发生异常调用方法
     */
    @OnError
    public void onError(Session session, Throwable error) {
        log.error("用户错误:" + this.userId + ",原因:" + error.getMessage());
        error.printStackTrace();
    }

    /**
     * 实现服务器主动推送
     */
    public void sendMessage(String message) {
        this.session.getAsyncRemote().sendText(message);
    }

    /**
     *发送自定义消息
     **/
    public static void sendInfo(String message, String userId) {
        log.info("发送消息到:" + userId + ",报文:" + message);
        if (StringUtils.isNotBlank(userId) && webSocketMap.containsKey(userId)) {
            webSocketMap.get(userId).sendMessage(message);
        } else {
            log.error("用户" + userId + ",不在线!");
        }
    }
}
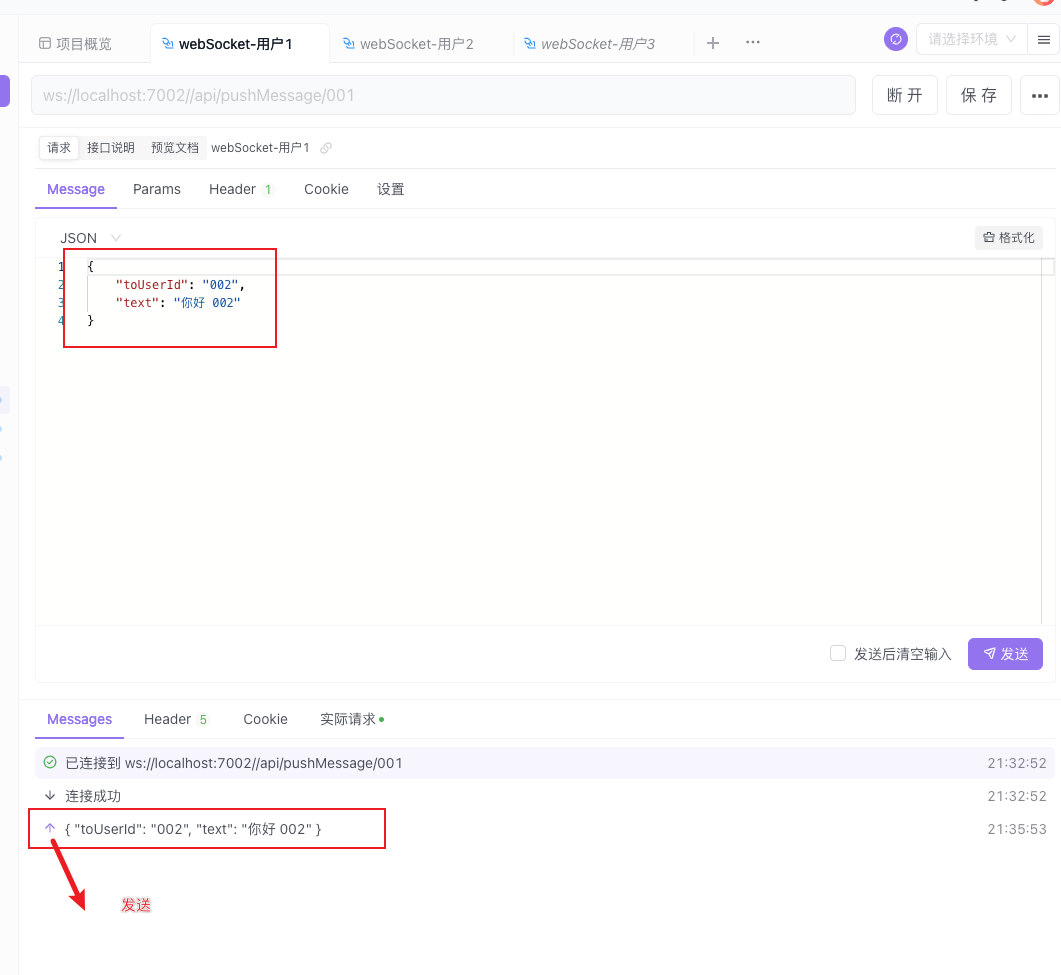
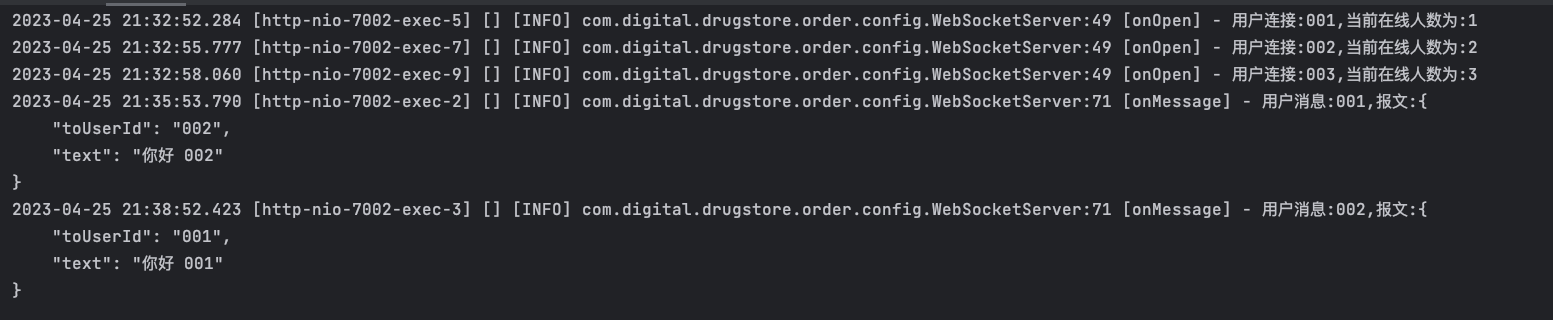
- 测试
- 前端模拟连接开启三个用户

- 后端用户连接成功,在线3人

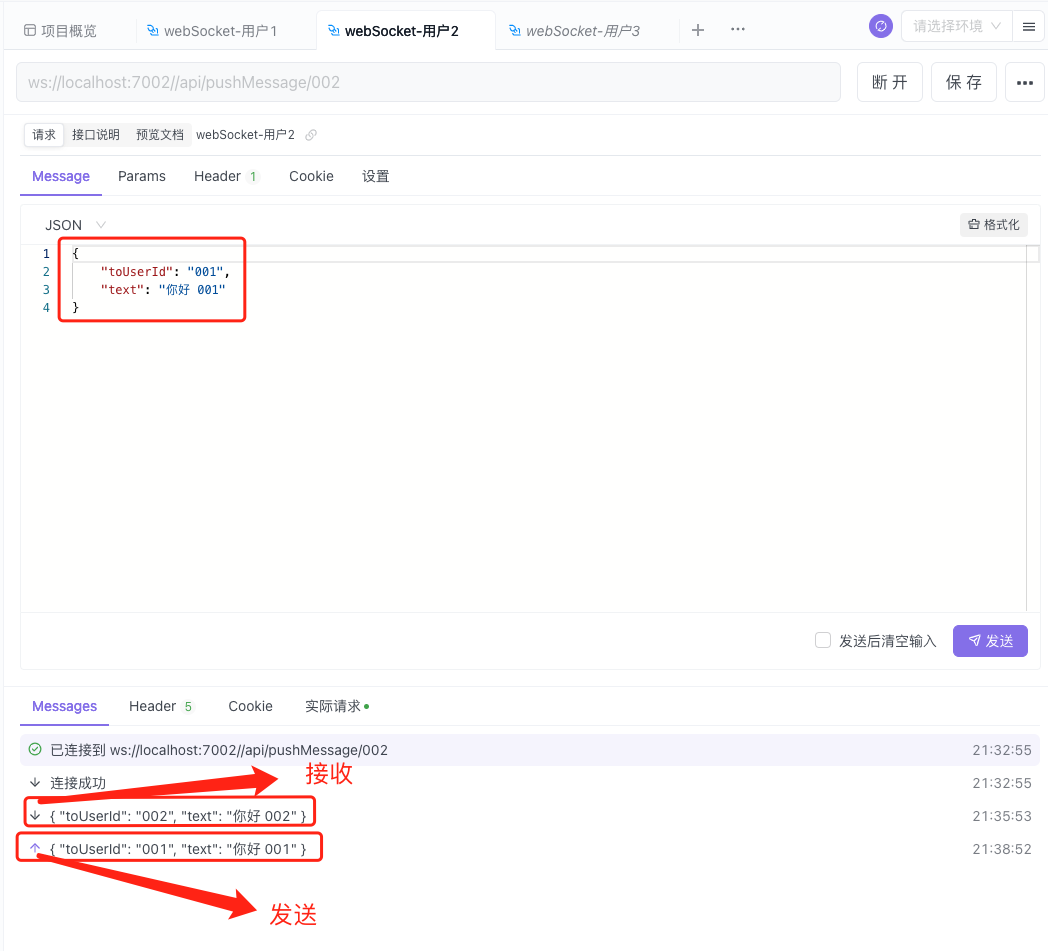
- 用户1发送消息给用户2
- 用户1发送消息给用户2,用户2并回应用户1
- 后台日志


 991
991

 被折叠的 条评论
为什么被折叠?
被折叠的 条评论
为什么被折叠?
 到【灌水乐园】发言


