


文章目录
前言
什么是WebSocket,WebSocket 是 HTML5 开始提供的一种在单个 TCP 连接上进行全双工(full-duplex)通讯的协议。没有了 Request 和 Response 的概念,两者地位完全平等,连接一旦建立,就建立了持久性连接,双方可以通过WebSocket随时向对方发送数据。
WebSocket在 2009 年诞生,于 2011 年被 IETF 定为标准 RFC 6455 通信标准。并由 RFC7936 补充规范。WebSocket API 也被 W3C 定为标准。
一、WebSocket是什么?
WebSocket 是 HTML5 开始提供的一种在单个 TCP 连接上进行全双工(full-duplex)通讯的协议。没有了 Request 和 Response 的概念,两者地位完全平等,连接一旦建立,就建立了持久性连接,双方可以通过WebSocket随时向对方发送数据。你来我往的这种形式。传统的http协议,是通过浏览器发出请求,通过三次握手四次挥手与服务器连接,仅一请求一应答的tcp连接,无状态的协议。
WebSocket在 2009 年诞生,于 2011 年被 IETF 定为标准 RFC 6455 通信标准。并由 RFC7936 补充规范。WebSocket API 也被 W3C 定为标准。
WebSocket有如下特性:
- 伴随着HTML5而出现 Web端的Socket
- 服务器端和客户端可相互发送消息
- 本质上是TCP连接
- 为解决客户端与服务端实时通信而产生的技术
WebSocket 应用场景:
- 即时通讯:WebSocket可用于实现聊天应用、在线客服系统等,用户可以实时地发送和接收消息。
- 实时数据展示:通过WebSocket可以实时地推送数据给前端,比如实时股票行情、实时天气更新等。
- 多人游戏:WebSocket可以实现多人在线游戏,玩家可以实时地进行交互、通信。
- 实时协作:比如实时协同编辑器,多个用户可以同时编辑一个文档,并实时地看到其他用户的操作。
- 数据监控:WebSocket可以用于实时监控系统的运行状态、日志更新等,便于及时发现和解决问题。

二、后端整合WebSocket
2.1 pom.xml 引入相应依赖库
代码如下:
<!--WebSocket-->
<dependency>
    <groupId>org.springframework.boot</groupId>
    <artifactId>spring-boot-starter-websocket</artifactId>
</dependency>
2.2 websocket配置类
代码如下:
package com.example.hospital.api.config;

import org.springframework.context.annotation.Bean;
import org.springframework.context.annotation.Configuration;
import org.springframework.web.socket.server.standard.ServerEndpointExporter;

/**
 * websocket配置类
 * 往spring容器中注入 ServerEndpointExporter
 */
@Configuration
public class WebSocketConfig {
    @Bean
    public ServerEndpointExporter serverEndpointExporter() {
        return new ServerEndpointExporter();
    }
}
说明一下:
为什么这里要注入ServerEndpointExporter呢?
因为它 implements SmartInitializingSingleton 接口,实现了该接口则在单例预实例化阶段的末尾调用,保证所有常规单例beans已经创建。最后会执行afterSingletonsInstantiated() 方法,相关源代码如下:
package org.springframework.web.socket.server.standard;
import java.util.Arrays;
import java.util.Iterator;
import java.util.LinkedHashSet;
import java.util.List;
import java.util.Map;
import java.util.Set;
import javax.servlet.ServletContext;
import javax.websocket.DeploymentException;
import javax.websocket.server.ServerContainer;
import javax.websocket.server.ServerEndpoint;
import javax.websocket.server.ServerEndpointConfig;
import org.springframework.beans.factory.InitializingBean;
import org.springframework.beans.factory.SmartInitializingSingleton;
import org.springframework.context.ApplicationContext;
import org.springframework.lang.Nullable;
import org.springframework.util.Assert;
import org.springframework.web.context.support.WebApplicationObjectSupport;
public class ServerEndpointExporter extends WebApplicationObjectSupport implements InitializingBean, SmartInitializingSingleton {
@Nullable
private List<Class<?>> annotatedEndpointClasses;
@Nullable
private ServerContainer serverContainer;
public ServerEndpointExporter() {
}
public void setAnnotatedEndpointClasses(Class<?>... annotatedEndpointClasses) {
this.annotatedEndpointClasses = Arrays.asList(annotatedEndpointClasses);
}
public void setServerContainer(@Nullable ServerContainer serverContainer) {
this.serverContainer = serverContainer;
}
@Nullable
protected ServerContainer getServerContainer() {
return this.serverContainer;
}
protected void initServletContext(ServletContext servletContext) {
if (this.serverContainer == null) {
this.serverContainer = (ServerContainer)servletContext.getAttribute("javax.websocket.server.ServerContainer");
}
}
protected boolean isContextRequired() {
return false;
}
public void afterPropertiesSet() {
Assert.state(this.getServerContainer() != null, "javax.websocket.server.ServerContainer not available");
}
/**
* 在单例预实例化阶段的末尾调用,保证所有常规单例beans已经创建。
*
*/
public void afterSingletonsInstantiated() {
this.registerEndpoints();
}
protected void registerEndpoints() {
// 存储加了@ServerEndpoint 注解的 类信息
Set<Class<?>> endpointClasses = new LinkedHashSet();
if (this.annotatedEndpointClasses != null) {
endpointClasses.addAll(this.annotatedEndpointClasses);
}
ApplicationContext context = this.getApplicationContext();
if (context != null) {
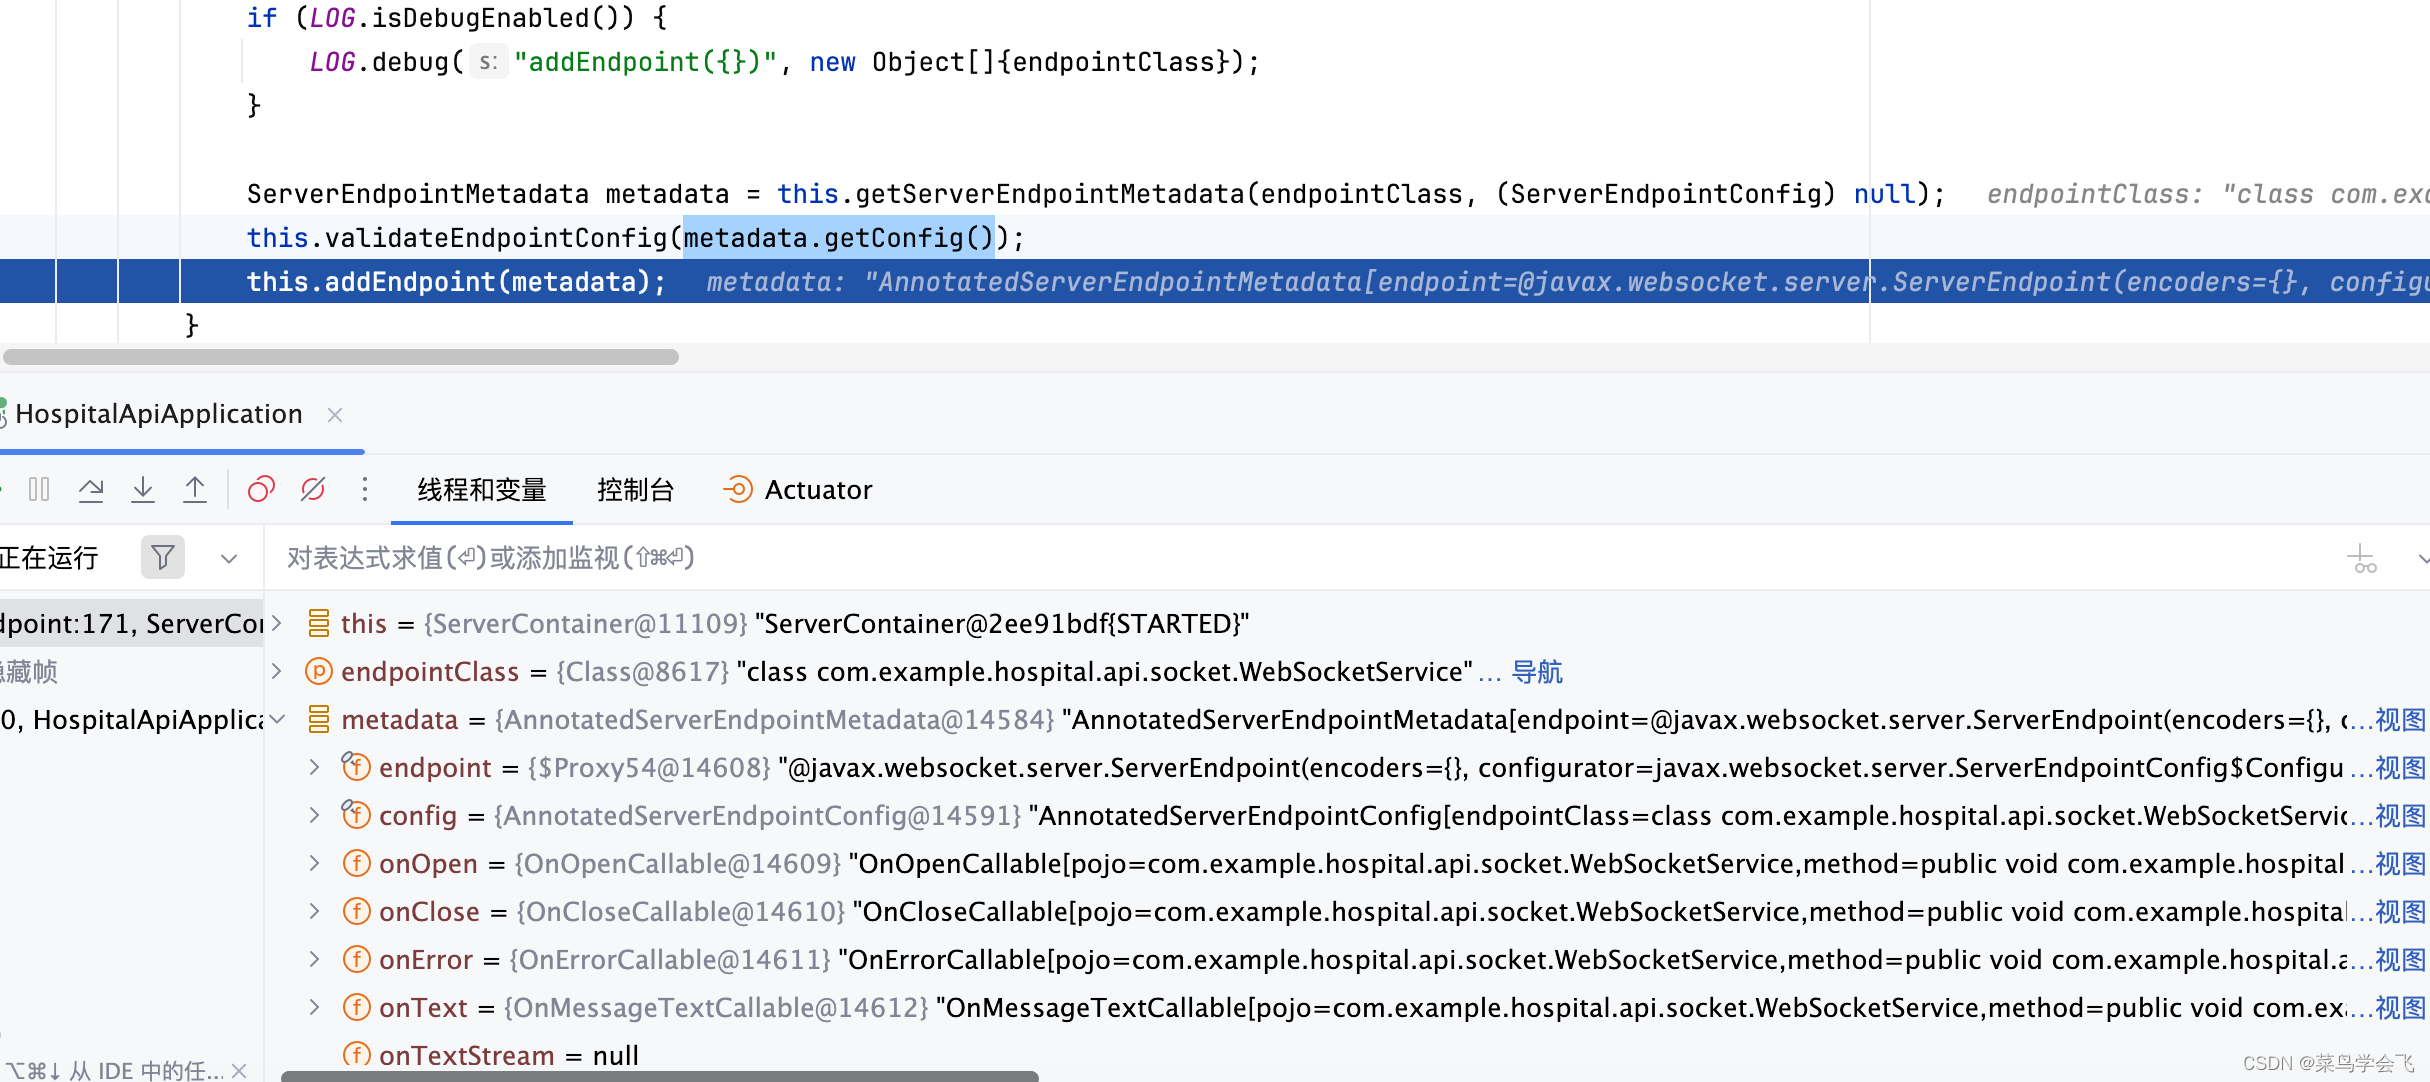
// 注意:这儿会获取到 在类上加了@ServerEndpoint 注解的类名,下面断点截图也可以得到印证
String[] endpointBeanNames = context.getBeanNamesForAnnotation(ServerEndpoint.class);
String[] var4 = endpointBeanNames;
int var5 = endpointBeanNames.length;
for(int var6 = 0; var6 < var5; ++var6) {
String beanName = var4[var6];
endpointClasses.add(context.getType(beanName));
}
}
Iterator var8 = endpointClasses.iterator();
while(var8.hasNext()) {
Class<?> endpointClass = (Class)var8.next();
// 注册各个端点的元数据信息 @OnOpen、@OnClose、@OnMessage等信息
this.registerEndpoint(endpointClass);
}
if (context != null) {
Map<String, ServerEndpointConfig> endpointConfigMap = context.getBeansOfType(ServerEndpointConfig.class);
Iterator var11 = endpointConfigMap.values().iterator();
while(var11.hasNext()) {
ServerEndpointConfig endpointConfig = (ServerEndpointConfig)var11.next();
this.registerEndpoint(endpointConfig);
}
}
}
private void registerEndpoint(Class<?> endpointClass) {
ServerContainer serverContainer = this.getServerContainer();
Assert.state(serverContainer != null, "No ServerContainer set. Most likely the server's own WebSocket ServletContainerInitializer has not run yet. Was the Spring ApplicationContext refreshed through a org.springframework.web.context.ContextLoaderListener, i.e. after the ServletContext has been fully initialized?");
try {
if (this.logger.isDebugEnabled()) {
this.logger.debug("Registering @ServerEndpoint class: " + endpointClass);
}
serverContainer.addEndpoint(endpointClass);
} catch (DeploymentException var4) {
DeploymentException ex = var4;
throw new IllegalStateException("Failed to register @ServerEndpoint class: " + endpointClass, ex);
}
}
private void registerEndpoint(ServerEndpointConfig endpointConfig) {
ServerContainer serverContainer = this.getServerContainer();
Assert.state(serverContainer != null, "No ServerContainer set");
try {
if (this.logger.isDebugEnabled()) {
this.logger.debug("Registering ServerEndpointConfig: " + endpointConfig);
}
serverContainer.addEndpoint(endpointConfig);
} catch (DeploymentException var4) {
DeploymentException ex = var4;
throw new IllegalStateException("Failed to register ServerEndpointConfig: " + endpointConfig, ex);
}
}
}
说明一下:
获取到我们项目中所有加了@ServerEndpoint的类

注册端点信息
2.3 webSocket 对应具体实现
java代码示例如下:
package com.example.hospital.api.socket;

import cn.dev33.satoken.stp.StpUtil;
import cn.hutool.core.map.MapUtil;
import cn.hutool.core.util.StrUtil;
import cn.hutool.json.JSONObject;
import cn.hutool.json.JSONUtil;
import lombok.extern.slf4j.Slf4j;
import org.springframework.stereotype.Component;

import javax.websocket.*;
import javax.websocket.server.ServerEndpoint;
import java.util.Map;
import java.util.concurrent.ConcurrentHashMap;
/**
 * ServerEndpoint
 * <p>
 * 使用springboot的唯一区别是要@Component声明下,而使用独立容器是由容器自己管理websocket的,
 * 但在springboot中连容器都是spring管理的。
 * <p>
 * 虽然@Component默认是单例模式的,但springboot还是会为每个websocket连接初始化一个bean,所以可以用一个静态set保存起来。
 *
 * @author gaol
 * @since 2024/06/05
 */

@Slf4j
// WebSocket客户端建立连接的地址
@ServerEndpoint(value = "/socket")
@Component
public class WebSocketService {
    // 存活的session集合(使用线程安全的map保存)
    public static ConcurrentHashMap<String, Session> sessionMap = new ConcurrentHashMap<>();

    /**
     * 创建连接之后 执行的回调函数
     * @param session 与客户端的WebSocket连接会话
     */
    @OnOpen
    public void onOpen(Session session){
        log.info("创建连接之后 执行的回调函数");
    }

    /**
     * 关闭连接之后 执行的回调函数
     * @param session
     */
    @OnClose
    public void onClose(Session session) {
        Map map=session.getUserProperties();
        if(map.containsKey("userId")){
            String userId= MapUtil.getStr(map,"userId");
            sessionMap.remove(userId);
        }
        log.info("关闭连接之后 执行的回调函数");
    }

    /**
     * 浏览器发送消息给服务端,服务端接收到消息后 执行的回调函数
     * @param message   客户端传过来的消息
     * @param session   对应的session
     */
    @OnMessage
    public void onMessage(String message, Session session) {
        log.info("浏览器发送消息给服务端,服务端接收到消息后 执行的回调函数");

        // 把接收到的字符串消息解析成json对象
        JSONObject json = JSONUtil.parseObj(message);
        // opt参数代表要执行的行为(自己约定的,属于自定义参数)
        String opt = json.getStr("opt");
        // websocket有超时时间,过了超时时间会被服务端断开连接,为了不让服务端断开连接,浏览器会定时发送心跳请求
        if("ping".equals(opt)){ // 心跳请求无需处理
            return;
        }

        // 因为不是http请求,无法从请求头中获取token数据,所以将token放入在json中传给后端
        String token=json.getStr("token");
        String userId= StpUtil.stpLogic.getLoginIdByToken(token).toString();
        Map map=session.getUserProperties();
        // 把userid缓存到websocket的session中,给onclose函数使用
        if(!map.containsKey("userId")){
            map.put("userId",userId);
        }
        // 因为无法区别当前的session是之前连接上的,还是后来断开后连接上的,所以每次收到消息后都把session缓存到map中,
        // 因为当前的连接肯定是有效的
        if(sessionMap.containsKey(userId)){
            sessionMap.replace(userId,session);
        }
        else{
            sessionMap.put(userId,session);
        }
        // 给浏览器返回应答消息
        sendInfo("ok",userId);
    }

    /**
     * 发生错误的回调方法
     *
     * @param session
     * @param error
     */
    @OnError
    public void onError(Session session, Throwable error) {
        log.error("发生错误", error);
    }

    /**
     * 给浏览器返回应答消息
     * @param message
     * @param userId
     */
    public static void sendInfo(String message,String userId){
        if(StrUtil.isNotBlank(userId) && sessionMap.containsKey(userId)){
            Session session=sessionMap.get(userId);
            sendMessage(message,session);
        }
    }

    /**
     * 单独发送消息
     *
     * @param session
     * @param message
     */
    private static void sendMessage(String message,Session session){
        try {
            session.getBasicRemote().sendText(message);
        }catch (Exception e){
            log.error("执行异常",e);
        }
    }
}
说明一下:
@ServerEndpoint可以注解到任何类上,但是想实现服务端的完整功能,还需要配合几个生命周期的注解使用,这些生命周期注解只能注解在方法上:
@OnOpen 建立连接时触发。
@OnClose 关闭连接时触发。
@OnError 发生异常时触发。
@OnMessage 接收到消息时触发。
三、前端整合WebSocket
3.1 package.json 加入相应依赖
{
  "name": "hospital-vue",
  "version": "0.0.0",
  "scripts": {
    "dev": "vite",
    "build": "vite build"
  },
  "dependencies": {
    "vue-native-websocket-vue3": "3.1.6"
  },
}
说明一下:
vue-native-websocket-vue3 插件:仅支持vue3的websocket插件
3.2 main.js 挂载使用WebSocket
//使用WebSocket,后端项目给前端页面推送通知
import VueNativeSock from "vue-native-websocket-vue3";
app.use(VueNativeSock, "ws://localhost:8001/socket",
{
	"format": "json"
});
说明一下:
- app.use() 用于全局挂载使用。
- 使用插件时,第二个参数为必填项,是你的
websocket服务端连接地址。 - 在使用插件时,第三个参数就是用户可以传配置项,它为一个对象类型,在对象中加入
format属性,值为导入的json值。即启用JSON消息传递,开启后数据发送与接收均采用json作为数据格式。
3.3 vue页面中使用
<script>
export default {
	data: function() {
		return {

		};
	},
	created() {
		let that = this;
		// optionsAPI用法 消息监听,即创建websocket连接
		that.$options.sockets.onopen = function(resp) {
			//发送心跳检测,避免超时后服务端切断连接
			setInterval(function() {
				// optionsAPI用法 发送消息,向服务端推送消息
				that.$socket.sendObj({ opt: 'ping' });
			}, 3* 1000);
		};

		// 移除消息监听
		delete this.$options.sockets.onmessage
	}
}
</script>
说明一下:
插件暴露的函数如下:
send发送非json类型的数据(使用插件时不能启用JSON消息传递)sendObj发送json类型的数据(必须在使用插件时启用JSON消息传递)$connect连接websocket服务器(必须在使用插件时启用手动管理连接选项)onmessage收到服务端推送消息时的监听$disconnect断开websocket连接
注意:上述方法均支持在optionsAPI与CompositionAPI中使用,具体的用法请查阅相关函数的文档。
总结
以上就是今天要讲的内容,本文分别介绍了前后端项目对webSocket的整合使用,后端的一些源码的简单剖析,以及前端的插件vue-native-websocket-vue3针对vue3版本生效,使用的时候注意一下。以上均为个人的独自见解,如有不当之处,也欢迎的大家指正。
WebSocket的官网是:http://www.websocket.org
插件源码项目的GitHub仓库:vue-native-websocket-vue3


 6924
6924

 被折叠的 条评论
为什么被折叠?
被折叠的 条评论
为什么被折叠?
 到【灌水乐园】发言


