原文链接: Selenium 简单入门
上一篇: G6 关系数据可视化图形库 简单使用
下一篇: 使用selenium 登录沪江英语
安装
pip install selenium版本查找
https://sites.google.com/a/chromium.org/chromedriver/downloads
驱动下载
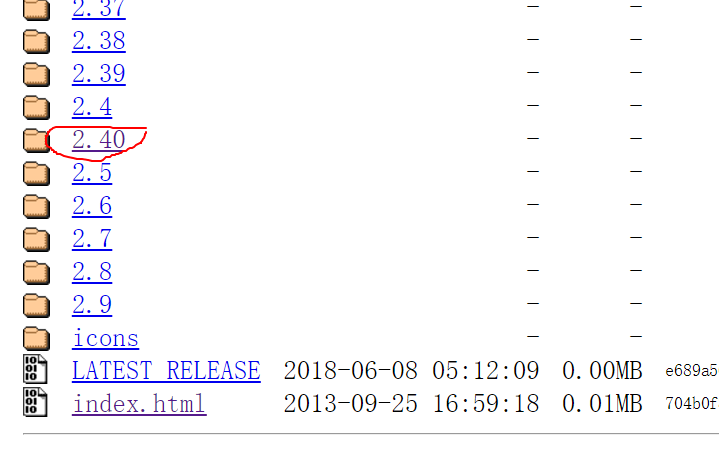
https://chromedriver.storage.googleapis.com/index.html
下载最新的驱动,放入path中,可以放入Python的scripts目录下,也可以放入Chrome安装目录,并添加新的环境变量,需要重新启动pycharm
C:\Program Files (x86)\Google\Chrome\Application 
运行后会自动打开Chrome并跳转至所需要的页面
from selenium import webdriver

options = webdriver.ChromeOptions()
# 忽视缺证书警告
options.add_argument('test-type')
options.add_experimental_option("excludeSwitches", ["ignore-certificate-errors"])
browser = webdriver.Chrome(chrome_options=options)
browser.get('https://cn.bing.com')
元素选取
关于元素的选取,有如下的API
单个元素选取
- find_element_by_id
- find_element_by_name
- find_element_by_xpath
- find_element_by_link_text
- find_element_by_partial_link_text
- find_element_by_tag_name
- find_element_by_class_name
- find_element_by_css_selector
多个元素选取
- find_elements_by_name
- find_elements_by_xpath
- find_elements_by_link_text
- find_elements_by_partial_link_text
- find_elements_by_tag_name
- find_elements_by_class_name
页面等待
这是非常重要的一部分,现在的网页越来越多采用了 Ajax 技术,这样程序便不能确定何时某个元素完全加载出来了。这会让元素定位困难而且会提高产生 ElementNotVisibleException 的概率。
所以 Selenium 提供了两种等待方式,一种是隐式等待,一种是显式等待。
隐式等待是等待特定的时间,显式等待是指定某一条件直到这个条件成立时继续执行。
显式等待
显式等待指定某个条件,然后设置最长等待时间。如果在这个时间还没有找到元素,那么便会抛出异常了。
| 1 2 3 4 5 6 7 8 9 10 11 12 13 | from selenium import webdriver from selenium.webdriver.common.by import By from selenium.webdriver.support.ui import WebDriverWait from selenium.webdriver.support import expected_conditions as EC
driver = webdriver.Chrome() driver.get("http://somedomain/url_that_delays_loading") try: element = WebDriverWait(driver, 10).until( EC.presence_of_element_located((By.ID, "myDynamicElement")) ) finally: driver.quit() |
程序默认会 500ms 调用一次来查看元素是否已经生成,如果本来元素就是存在的,那么会立即返回。
下面是一些内置的等待条件,你可以直接调用这些条件,而不用自己写某些等待条件了。
- title_is
- title_contains
- presence_of_element_located
- visibility_of_element_located
- visibility_of
- presence_of_all_elements_located
- text_to_be_present_in_element
- text_to_be_present_in_element_value
- frame_to_be_available_and_switch_to_it
- invisibility_of_element_located
- element_to_be_clickable – it is Displayed and Enabled.
- staleness_of
- element_to_be_selected
- element_located_to_be_selected
- element_selection_state_to_be
- element_located_selection_state_to_be
- alert_is_present
| 1 2 3 4 | from selenium.webdriver.support import expected_conditions as EC
wait = WebDriverWait(driver, 10) element = wait.until(EC.element_to_be_clickable((By.ID,'someid'))) |
隐式等待
隐式等待比较简单,就是简单地设置一个等待时间,单位为秒。
| 1 2 3 4 5 6 | from selenium import webdriver
driver = webdriver.Chrome() driver.implicitly_wait(10) # seconds driver.get("http://somedomain/url_that_delays_loading") myDynamicElement = driver.find_element_by_id("myDynamicElement") |
当然如果不设置,默认等待时间为0。
设置移动端标识
#coding=utf-8
from selenium import webdriver

option = webdriver.ChromeOptions()
option.add_argument('--user-agent=iphone')

driver = webdriver.Chrome(chrome_options=option)
driver.get('http://www.taobao.com/')
不加载图片
option = webdriver.ChromeOptions()

prefs = {"profile.managed_default_content_settings.images": 2}
option.add_experimental_option("prefs", prefs)

driver = webdriver.Chrome(chrome_options=option)
安装拓展
#coding=utf-8
from selenium import webdriver

option = webdriver.ChromeOptions()
option.add_extension('d:\crx\AdBlock_v2.17.crx') #自己下载的crx路径

driver = webdriver.Chrome(chrome_options=option)
driver.get('http://www.taobao.com/')
selenium启动浏览器时常用的属性
from selenium.webdriver.chrome.options import Options
chrome_options = Options()
chrome_options.add_argument('window-size=1920x3000') #指定浏览器分辨率
chrome_options.add_argument('--disable-gpu') #谷歌文档提到需要加上这个属性来规避bug
chrome_options.add_argument('--hide-scrollbars') #隐藏滚动条, 应对一些特殊页面
chrome_options.add_argument('blink-settings=imagesEnabled=false') #不加载图片, 提升速度
chrome_options.add_argument('--headless') #浏览器不提供可视化页面. linux下如果系统不支持可视化不加这条会启动失败
chrome_options.binary_location = r'/Applications/Google Chrome Canary.app/Contents/MacOS/Google Chrome Canary' #手动指定使用的浏览器位置
selenium如何连接到已经开启的浏览器?
需要在打开浏览器后, 获取浏览器的 command_executor url , 以及 session_id
opener.command_executor._url, opener.session_id #opener为webdriver对象 之后通过 remote 方式链接
from selenium import webdriver
opener = webdriver.Remote(command_executor=_url,desired_capabilities={}) #_url为上面的_url
opener.close() #这时会打开一个全新的浏览器对象, 先把新的关掉
opener.session_id = session_id #session_id为上面的session_id
之后对 opener 的任何操作都会反映在之前的浏览器上.
selenium 的 desired_capabilities 如何传递 --headless 这样的浏览器参数
from selenium.webdriver.common.desired_capabilities import DesiredCapabilities
capabilities = DesiredCapabilities.CHROME
capabilities.setdefault('chromeOptions', {'args':['--headless', '--disable-gpu']})
selenium 使用 crontab等环境启动时提示 chromedriver not in PATH
初始化的时候, 传入chromedriver绝对路径
opener = webdriver.Chrome(r'/usr/local/bin/chromedriver', chrome_options=chrome_options)selenium使用cookies
- 获得cookies
opener.get_cookies() - 写入cookies
opener.add_cookie(cookie) #需要先访问该网站产生cookies后再进行覆写
selenium 等待页面所有异步函数完成
opener.implicitly_wait(30) #30是最长等待时间
selenium 打开新标签页
偏向使用js函数来执行
opener.execute_script('''window.open("http://baidu.com","_blank");''')selenium 获得页面的网络请求信息
有些时候页面在你点击后会异步进行请求, 完成一些操作, 这时可能就会生成输出数据的url, 只要抓到这个url就可以跳过token验证等安全监测, 直接获得数据.
script =  "var performance = window.performance || window.mozPerformance || window.msPerformance || window.webkitPerformance || {}; var network = performance.getEntries() || {}; return network;"
performances = opener.execute_script(script)
script里是js代码, 一般用来进行性能检查, 网络请求状况, 使用selenium执行这段js就可以获得所有的请求信息.
常用设置和配置信息
https://www.cnblogs.com/xmlbw/p/4498113.html
一些Chrome的地址栏命令(这些命令会不停的变动,所有不一定都是好用的)
在Chrome的浏览器地址栏中输入以下命令,就会返回相应的结果。这些命令包括查看内存状态,浏览器状态,网络状态,DNS服务器状态,插件缓存等等。
about:version - 显示当前版本
about:memory - 显示本机浏览器内存使用状况
about:plugins - 显示已安装插件
about:histograms - 显示历史记录
about:dns - 显示DNS状态
about:cache - 显示缓存页面
about:gpu -是否有硬件加速
about:flags -开启一些插件 //使用后弹出这么些东西:“请小心,这些实验可能有风险”,不知会不会搞乱俺的配置啊!
chrome://extensions/ - 查看已经安装的扩展
chrome://inspect - 调试手机
其他的一些关于Chrome的实用参数及简要的中文说明(使用方法同上,当然也可以在shell中使用)
–user-data-dir=”[PATH]” 指定用户文件夹User Data路径,可以把书签这样的用户数据保存在系统分区以外的分区。
–disk-cache-dir=”[PATH]“ 指定缓存Cache路径
–disk-cache-size= 指定Cache大小,单位Byte
–first run 重置到初始状态,第一次运行
–incognito 隐身模式启动
–disable-javascript 禁用Javascript
--omnibox-popup-count="num" 将地址栏弹出的提示菜单数量改为num个。我都改为15个了。
--user-agent="xxxxxxxx" 修改HTTP请求头部的Agent字符串,可以通过about:version页面查看修改效果
--disable-plugins 禁止加载所有插件,可以增加速度。可以通过about:plugins页面查看效果
--disable-javascript 禁用JavaScript,如果觉得速度慢在加上这个
--disable-java 禁用java
--start-maximized 启动就最大化
--no-sandbox 取消沙盒模式
--single-process 单进程运行
--process-per-tab 每个标签使用单独进程
--process-per-site 每个站点使用单独进程
--in-process-plugins 插件不启用单独进程
--disable-popup-blocking 禁用弹出拦截
--disable-plugins 禁用插件
--disable-images 禁用图像
--incognito 启动进入隐身模式
--enable-udd-profiles 启用账户切换菜单
--proxy-pac-url 使用pac代理 [via 1/2]
--lang=zh-CN 设置语言为简体中文
--disk-cache-dir 自定义缓存目录
--disk-cache-size 自定义缓存最大值(单位byte)
--media-cache-size 自定义多媒体缓存最大值(单位byte)
--bookmark-menu 在工具 栏增加一个书签按钮
--enable-sync 启用书签同步


 1万+
1万+

 被折叠的 条评论
为什么被折叠?


