


我在学习Android第一行代码的时候按照书上第四章的代码练习的时候遇到一些疑惑。首先贴上主布局:
<?xml version="1.0" encoding="utf-8"?>
<LinearLayout xmlns:android="http://schemas.android.com/apk/res/android"
    android:layout_width="match_parent"
    android:layout_height="match_parent">

   <fragment
       android:id="@+id/left_fragment"
       android:layout_width="0dp"
       android:layout_height="match_parent"
       android:name="com.example.leslie.fragmenttest.LeftFragment"
       android:layout_weight="1"/>
    <!--<FrameLayout
        android:id="@+id/right_layout"
        android:layout_width="0dp"
        android:layout_height="match_parent"
        android:layout_weight="1"
        >-->
    <fragment
        android:id="@+id/right_fragment"
        android:layout_width="0dp"
        android:layout_height="match_parent"
        android:layout_weight="1"
        android:name="com.example.leslie.fragmenttest.RightFragment" />

</LinearLayout>
可以看出主布局很简单,就是一个线性布局下2个Fragment.下面贴出主活动中的代码:
public class MainActivity extends AppCompatActivity implements View.OnClickListener {

    @Override
    protected void onCreate(Bundle savedInstanceState) {
        super.onCreate(savedInstanceState);
        setContentView(R.layout.activity_main);
        Button button=(Button)findViewById(R.id.button);
        button.setOnClickListener(this);
    }
    public void onClick(View view){
        switch (view.getId()){
            case R.id.button:
                AnotherRightFragment fragment=new AnotherRightFragment();
                FragmentManager fragmentManager=getFragmentManager();
                FragmentTransaction transaction=fragmentManager.beginTransaction();
                transaction.replace(R.id.right_fragment,fragment);
                transaction.commit();
                break;
            default:break;
        }
代码的逻辑也很简单,就是希望点击左边的fragment中的按钮,能够更换右边的fragment。为此制作了右边的2个fragment布局文件如下
这是right_fragment布局文件:
<?xml version="1.0" encoding="utf-8"?>
<LinearLayout xmlns:android="http://schemas.android.com/apk/res/android"
    android:layout_width="match_parent"
    android:layout_height="match_parent"
    android:orientation="vertical"
    android:background="#00ff00">
    <TextView
        android:layout_width="wrap_content"
        android:layout_height="wrap_content"
        android:layout_gravity="center_horizontal"
        android:textSize="20sp"
        android:text="This is right fragment"/>

</LinearLayout>
这是another_right_fragment布局文件:
<?xml version="1.0" encoding="utf-8"?>
<LinearLayout xmlns:android="http://schemas.android.com/apk/res/android"
    android:layout_width="match_parent"
    android:layout_height="match_parent"
    android:background="#ffff00"
    android:orientation="vertical">
    <TextView
        android:layout_width="wrap_content"
        android:layout_height="wrap_content"
        android:layout_gravity="center_horizontal"
        android:textSize="20dp"
        android:text="This is another right fragment"/>

</LinearLayout>
两者并无太大不同。仅仅显示的text不同而已,运行结果并没有像我想象的那样右边的fragment完全覆盖住,而是仅仅覆盖了非TextView部分。
如图所示: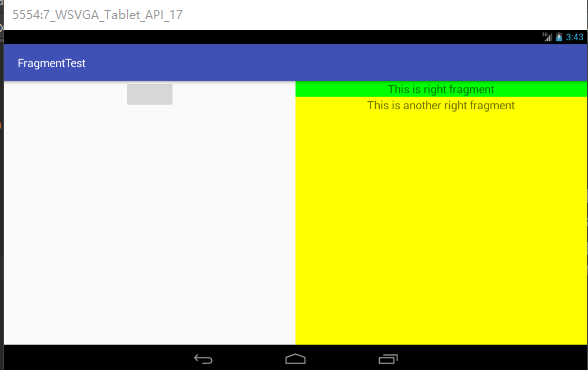
这让我百思不得其解。
网上搜索到的答案是用FrameLayout做被替代的fragment的父容器就可以了。我自己暂时还不知道为什么要这么做。为什么不用FrameLayout只能替代一部分导致还有一部分可见。


 1万+
1万+


 被折叠的 条评论
为什么被折叠?
被折叠的 条评论
为什么被折叠?
 到【灌水乐园】发言


