


第一次搭建es集群,使用的是CentOs 6.5 , es 6.2.2 ,jdk 1.8-181
为防止奇怪的的bug出现,先卸载linux自带的 openjdk
查询有哪些 openjdk
rpm -qa | grep java
一般会有三个,分别为 1.5、1.6、1.7
卸载命令    rpm -e --nodeps java-1.7.0-openjdk-1.7.0.141-2.6.10.5.el7.x86_64
JDK安装过程与环境变量配置教程略过
明确一点:es在linux中不得以root用户身份启动,所以必须新建用户,而且es相关的文件夹所有者都要是该用户,所以我们在接下来操作中都使用新建的用户去操作,当报权限不够的错误时,切回root用户,做完这个操作,再切回新建的用户
我这里是准备搭建三个节点的集群,所以准备了3台虚拟机,xshell将命令同时发送至3台服务器
#创建用户组
groupadd hadoop
# 新建用户并指定用户组为 hadoop用户组,并自动建立登录目录
useradd zax -g hadoop -n -m
# 设置zax用户密码
passwd zax
建议在zax用户文件夹下新建个app的文件夹,存放es与kibana
mkdir app #软件安装目录
上传es安装包,记得查看文件所有者是不是zax,这里可以在别的机器上使用scp命令将安装包传送至指定用户的指定文件夹
scp elasticsearch-6.2.2.tar.gz zax@192.168.101.131:/home/zax三台服务器都将这个安装包放在同一位置后,此步骤结束
切到zax用户,解压安装包后,建议将解压后的文件夹移动至app目录下
现在我们来修改es相关的配置,在config文件夹下的 elasticsearch.yml 文件里面
# ======================== Elasticsearch Configuration =========================
#
# NOTE: Elasticsearch comes with reasonable defaults for most settings.
#       Before you set out to tweak and tune the configuration, make sure you
#       understand what are you trying to accomplish and the consequences.
#
# The primary way of configuring a node is via this file. This template lists
# the most important settings you may want to configure for a production cluster.
#
# Please consult the documentation for further information on configuration options:
# https://www.elastic.co/guide/en/elasticsearch/reference/index.html
#
# ---------------------------------- Cluster -----------------------------------
#
# Use a descriptive name for your cluster:
#
#cluster.name: my-application
#你的集群名称,所有节点名称必须一样
cluster.name: lhnode
#:
# ------------------------------------ Node ------------------------------------
#
# Use a descriptive name for the node:
#
#node.name: node-1
#你的节点名称。每个节点必须不一样,且强烈建议将名称设置为你的机器名(我的机器名就是 lhnode1)
node.name: lhnode1
#当主节点挂了后,是否有资格被竞选为主节点
node.master: true
#是否为数据节点(能否存储数据)
node.data: true
# Add custom attributes to the node:
#
#node.attr.rack: r1
#
# ----------------------------------- Paths ------------------------------------
#
# Path to directory where to store the data (separate multiple locations by comma):
#
#path.data: /path/to/data
#存放数据的文件夹(这个需要手动新建文件夹,默认不存在)
path.data: /home/zax/app/elasticsearch/data
#存放日志的文件夹
path.logs: /home/zax/app/elasticsearch/logs
# Path to log files:
#
#path.logs: /path/to/logs
#
# ----------------------------------- Memory -----------------------------------
#
# Lock the memory on startup:
#
#bootstrap.memory_lock: true
#不检测SecComp
bootstrap.system_call_filter: false
# Make sure that the heap size is set to about half the memory available
# on the system and that the owner of the process is allowed to use this
# limit.
#
# Elasticsearch performs poorly when the system is swapping the memory.
#
# ---------------------------------- Network -----------------------------------
#
# Set the bind address to a specific IP (IPv4 or IPv6):
#
#network.host: 192.168.0.1
#这样设置所有ip都可以访问此es(不设置只有本地能访问)
#如果这样设置访问不到或者es启动报错,试试将此ip换成本机的ip
network.host: 0.0.0.0
#使用浏览器访问es的端口(我是这么理解的)
http.port: 9200
#使用项目以及节点之间互相发现的端口(我是这么理解的)
transport.tcp.port: 9300
#
# Set a custom port for HTTP:
#
#http.port: 9200
#
# For more information, consult the network module documentation.
#
# --------------------------------- Discovery ----------------------------------
#
# Pass an initial list of hosts to perform discovery when new node is started:
# The default list of hosts is ["127.0.0.1", "[::1]"]
#
#节点地址
discovery.zen.ping.unicast.hosts: ["192.168.101.131:9300", "192.168.101.132:9300", "192.168.101.133:9300"]
#以下三个配置的意思是:每隔30秒向主节点发送一次心跳监测,120秒之内如果没有回应,则算超时
#连续超时6次,则认为主节点已经挂了
discovery.zen.fd.ping_timeout: 120s
discovery.zen.fd.ping_retries: 6
discovery.zen.fd.ping_interval: 30s
#ping节点的响应时间
client.transport.ping_timeout : 60s
#俗称的脑裂问题,参数意义是一个节点需要看到几个具有被竞选为主节点资格的节点正常工作时,
#它才能在集群中正常操作。官方推荐为(N/2)+1
discovery.zen.minimum_master_nodes: 2
#discovery.zen.ping.unicast.hosts: ["host1", "host2"]
#
# Prevent the "split brain" by configuring the majority of nodes (total number of master-eligible nodes / 2 + 1):
#
#discovery.zen.minimum_master_nodes:
#
# For more information, consult the zen discovery module documentation.
#
# ---------------------------------- Gateway -----------------------------------
#
# Block initial recovery after a full cluster restart until N nodes are started:
#
#gateway.recover_after_nodes: 3
#
# For more information, consult the gateway module documentation.
#
# ---------------------------------- Various -----------------------------------
#
# Require explicit names when deleting indices:
#
#action.destructive_requires_name: true
三台机器都配置好后,再进行系统的设置。请特别注意你的机器名与节点名是不是一样的。
vim /etc/security/limits.conf
将以下配置加进去 zax为我的用户名
zax soft nofile 65536
zax hard nofile 65536
zax soft nproc 16384
zax hard nproc 16384
zax soft stack 10240
zax soft memlock unlimited
zax hard memlock unlimited

vim /etc/sysctl.conf
vm.max_map_count = 655360

再将防火墙的端口开放
vim /etc/sysconfig/iptables

-A INPUT -m state --state NEW -m tcp -p tcp --dport 9200 -j ACCEPT
-A INPUT -m state --state NEW -m tcp -p tcp --dport 9300 -j ACCEPT
重启防火墙,检查防火墙重启是否成功
service iptables restart
至此,es的集群配置与系统配置完成,需要重启机器
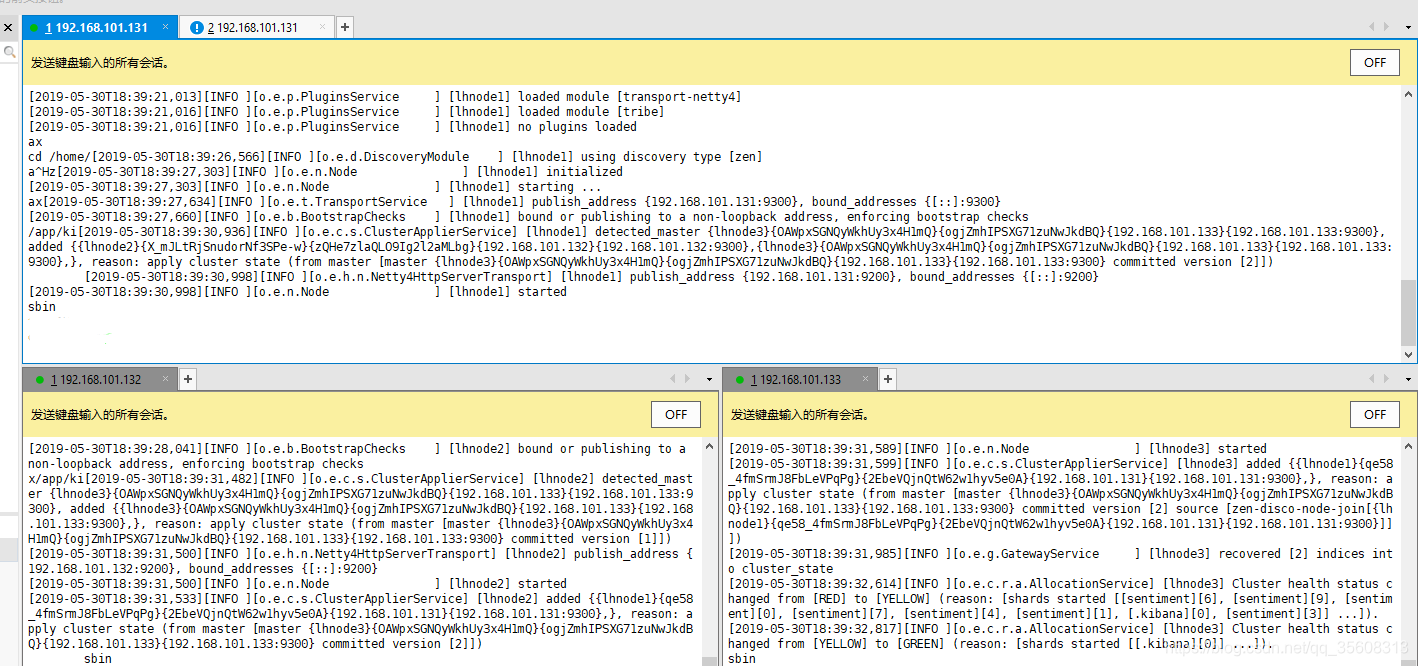
机器重启好后,就可以启动es了,在bin目录,./elasticsearch ,如果想在后台启动 加个参数 -d 记得别用root用户启动!!!
es集群至少要启动两个节点。不然会一直报错,启动成功如图
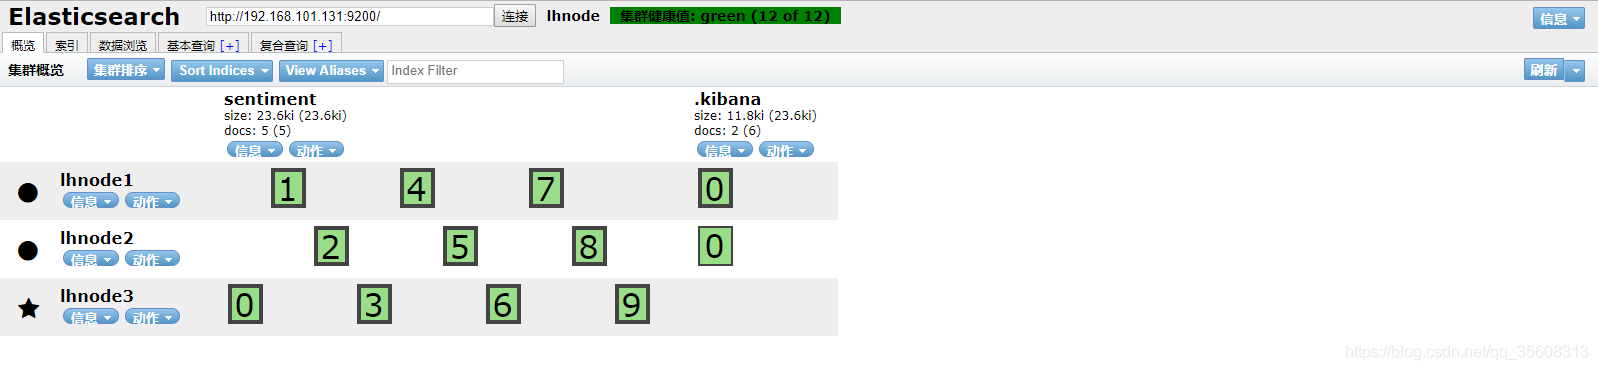
在谷歌浏览器的插件商店下载个 elasticsearch head ,连接到任意一个节点,就可以发现集群
其中绿色的表示分片
接下来介绍kibana怎么搭建。(为养成良好习惯。此处也用新建的用户进行操作)
同样上传kinana 6.6.2的安装包,解压后移动至app文件夹下
在config的kibana.yml配置文件里面,增加两行配置
server.host: "192.168.101.131"
elasticsearch.url: "http://192.168.101.131:9200"
当然默认的 5601端口也可以修改。
然后将5601端口开放防火墙,重启防火墙服务,启动kibana
nohup ./kibana &
使用此命令依然会打印日志,但运行 Ctrl+C 后不会关闭进程, 不可直接关闭shell窗口,须运行 exit命令退出shell窗口
启动成功后访问kibana , 也能看到集群的相关信息了


 5789
5789

 被折叠的 条评论
为什么被折叠?
被折叠的 条评论
为什么被折叠?
 到【灌水乐园】发言


