


在上一个项目中,我们的团队在数据库中有一个表。每次请求修改我们应用程序中的特定内容时,我们都需要创建一个条目来详细说明更改。AuditEntityAudit
我们需要提供时间戳、修改、和一些和字段。我们的应用程序有许多端点,这些端点实施了很多更改。因此,我们在各个地方创建和保存条目。有时我们在 Controller 中创建条目,有时在 .我们没有时间进行重构,因此我们从未确定一个统一的模式。TypeAuthorBeforeAfterAuditAuditEntity
我们一定有办法在远离核心业务逻辑的单个位置创建这些条目。Audit
答案在于 Interceptors。
侦听器允许您单步执行 Entity Framework Core 操作。创建一个继承自 的具体类可能非常强大。公开允许您修改保存过程的方法。SaveChangesInterceptorSaveChangesInterceptor
在我们的示例中,我们将创建一个存储 Employees 信息的应用程序。该应用程序将允许我们创建、读取、更新和删除员工。为简单起见,我们将使用 SQLite 数据库和 _SQL 的数据库浏览器_来读取数据。
从头开始创建应用程序
在开始之前,我们需要安装以允许我们运行 dotnet 命令。在终端中运行以下命令:dotnet tool
dotnet tool install --global dotnet-ef
在命令行中运行。如果您得到肯定的响应,那么您已经安装了它。dotnet ef
创建一个名为 的新文件夹。在 bash 终端中,导航到该文件夹并输入以下命令:EmployeeInterceptor
cd EmployeeInterceptor
dotnet new sln -n EmployeeInterceptor
现在,我们将创建一个空的 Console 应用程序,并从头开始构建我们的 Minimal API。在文件夹内创建一个新的 Console App:EmployeeInterceptor
// The -n flag sets the name of our Console App
dotnet new console -n EmployeeInterceptor.Api
最后,我们需要将这个新项目附加到我们的解决方案中。在与解决方案文件相同的级别,输入以下命令:
dotnet sln EmployeeInterceptor.sln add EmployeeInterceptor.Api/EmployeeInterceptor.Api.csproj
您现在可以启动文本编辑器并打开新创建的项目解决方案。
要将控制台应用程序转换为 Web API,请打开该文件并附加到项目 SDK 类型。EmployeeInterceptor.Api.csproj.Web
如果您难以找到文件,请将 Solution Explorer 切换到 'Folder View'(或'File System')。在那里您将能够查看所有文件。.csproj
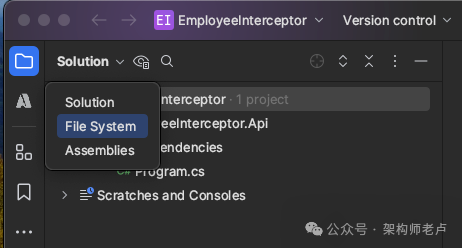
切换到 File System 视图// EmployeeInterceptor.Api.csproj
// EmployeeInterceptor.Api.csproj

<Project Sdk="Microsoft.NET.Sdk">
 //
</Project>

// --> change into -->

<Project Sdk="Microsoft.NET.Sdk.Web">  <-- here
 //
</Project>
删除所有代码并添加以下内容:Program.cs
var builder = WebApplication.CreateBuilder();

// configure your app

var app = builder.Build();

// build your app

app.Run();
现在,我们拥有启动 Minimal API 所需的一切。

设置实体框架核心和SQLite
首先,我们需要为 Entity Framework Core 安装所需的 Nuget 包。同样,在命令行中运行以下命令。确保您与文件处于同一项目级别*.csproj
cd EmployeeInterceptor.Api/dotnet add package Microsoft.EntityFrameworkCore
dotnet add package Microsoft.EntityFrameworkCore.Design
dotnet add package Microsoft.EntityFrameworkCore.Sqlite
安装 Entity Framework Core 和 SQLite 后,我们现在设置一个连接字符串。
在项目的根目录中创建一个名为 的新文件。在您的文件中添加以下配置:EmployeeInterceptor.Apiappsettings.jsonappsettings.json
{
  "ConnectionStrings": {
    "DefaultConnection": "Data Source=sqlite.db"
  }
}
与大多数其他 SQL 数据库不同,SQLite 不使用单独的服务器进程。SQLite 读取和写入计算机上的文件。
按照我们在上面的代码中所做的那样添加数据源会将新文件保存到项目的根目录。文件的名称将为 。稍后,我们将使用 DB Browser for SQLite 来查看数据。.dbsqlite.db
接下来,我们要创建我们的 Entities。将两个新文件夹添加到项目的根目录:和 .在 里面创建一个名为 then in the following fields 的新文件:InterfacesEntitiesEntitiesEmployee
public class Employee
{
  public int Id { get; set; }
  public string FirstName { get; set; }
  public string LastName { get; set; }
  public string Department { get; set; }
  public string JobTitle { get; set; }
}
然后在 中创建一个名为 的新接口。对于这个演示,类将保持为空,但无论如何我都想介绍这个想法。InterfacesIAuditable
IAuditable将帮助我们的 Interceptor 知道要跟踪哪些 Entities。另一种选择是在此文件中添加审计字段。然后,我们可以通过继承将它们公开给 Entity。不是每个 Entity 都有一个字段,而是将其存储在接口中。减少过程中的代码。CreatedAt
public interface IAuditable
{

}
然后 have inherit .导入任何语句以帮助代码编译:EmployeeIAuditableusing
public class Employee : IAuditable
{
  public int Id { get; set; }
  //
}
要使 Entity Framework 正常工作,我们的应用程序需要一个文件。将应用程序中定义的实体和关系映射到数据库中的表。DbContextDbContext
在项目的根目录下添加一个新文件夹,并将其命名为 。在 里面添加一个名为 which will inherit from 的新文件 :DataDataContextDbContext
public class DataContext : DbContext
{
  public DataContext(DbContextOptions\<DataContext> options) : base(options)
  {

  }
}
我们必须公开一个 take 作为参数的 public 构造函数。包含配置 .当我们在 中注册时,我们将了解为什么这很有帮助。DbContextDbContextOptionsDbContextOptionsDbContextDbContextProgram.cs
如前所述,DbContext 将我们的实体映射到数据库中的表。我们通过使用 a 并传入我们的 Entity 来实现这一点。使用以下代码将实体添加到数据库:DbSetEmployee
public class DataContext : DbContext
{
  public DataContext(DbContextOptions<DataContext> options) : base(options)
  {

  }

  public DbSet<Employee> Employees { get; set; }
}
返回并注册 。我们将告诉 to use 并将其指向我们的连接字符串。我们之前的公共构造函数允许我们进行这些修改。Program.csDbContextDbContextSQLite
var builder = WebApplication.CreateBuilder();

// configure your app

builder.Services.AddDbContext<DataContext>(
 options => options.UseSqlite(
  builder.Configuration.GetConnectionString("DefaultConnection")));

var app = builder.Build();

//
创建实体并注册 DbContext 后,我们现在创建一个 Migration。确保您位于项目的根目录下,并在命令行中输入以下内容:
dotnet ef migrations add InitialMigration
现在,您的应用程序中将出现一个文件夹。在此文件夹中,我们可以查看此迁移的计划。在 Migration 文件中,我们可以看到 an 和 a method。该方法详细说明了我们打算创建的内容。该方法表示如果我们执行回滚将会发生什么。MigrationsUpDownUpDown
现在让我们使用以下命令更新我们的数据库。如果数据库不存在,它还将创建数据库:
dotnet ef database update
要查看新创建的数据库,我们可以使用 DB Browser for SQLite。您可以在此处安装 DB Browser for SQLite。安装后,打开 SQL 的 DB 浏览器,选择左上角的“打开数据库”并找到您的数据库文件。您的数据库文件将位于您的工程文件夹中。打开后,选择 'Browse Data'。您现在应该能够看到您的数据库。Employees
该项目应如下所示:
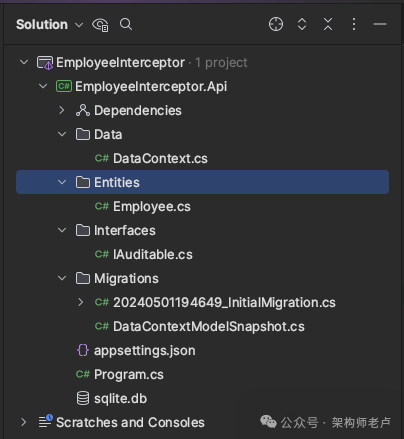
项目架构截图
最后,我们需要确保我们的应用程序在 Development 模式下启动。创建一个名为 的新文件夹,并在其中添加一个名为 的文件。将以下样板代码添加到文件中:PropertieslaunchSettings.json
{
  "profiles": {
    "IIS Express": {
      "commandName": "IISExpress",
      "launchBrowser": true,
      "environmentVariables": {
        "ASPNETCORE_ENVIRONMENT": "Development"
      }
    },
    "ProjectName": {
      "commandName": "Project",
      "launchBrowser": true,
      "applicationUrl": "https://localhost:5001;http://localhost:5000",
      "environmentVariables": {
        "ASPNETCORE_ENVIRONMENT": "Development"
      }
    }
  }
}
第 #1 部分向我们展示了如何从头开始创建新的 .NET Minimal API。我们更进一步,使用 SQLite 和 Entity Framework Core 创建了一个新数据库。除了新的 Employee 实体外,我们还拥有继续构建端点所需的一切。


 3885
3885

 被折叠的 条评论
为什么被折叠?
被折叠的 条评论
为什么被折叠?
 到【灌水乐园】发言


