AlexNet基于MNIST数据集的代码实现
鉴于原论文中使用的数据集过于庞大,分类过多,目前手头的设备运行是在过于缓慢,折中考虑尝试使用MNIST的数据集实现AlexNet
import torch, torchvision
import torchvision.transforms as transforms
import torch.nn as nn
from torch import optim
import matplotlib.pyplot as plt
%matplotlib inline
import copy
# 超参数设置
EPOCH = 10
BATCH_SIZE = 64
LR = 0.01
transform = transforms.ToTensor()
数据集
通过torchvision下载数据集
trainset = torchvision.datasets.MNIST(root='../data', train=True, download=True, transform=transform)

testset = torchvision.datasets.MNIST(root='../data', train=True, transform=transform)
C:\Users\Administrator\AppData\Roaming\Python\Python36\site-packages\torchvision\datasets\mnist.py:498: UserWarning: The given NumPy array is not writeable, and PyTorch does not support non-writeable tensors. This means you can write to the underlying (supposedly non-writeable) NumPy array using the tensor. You may want to copy the array to protect its data or make it writeable before converting it to a tensor. This type of warning will be suppressed for the rest of this program. (Triggered internally at  ..\torch\csrc\utils\tensor_numpy.cpp:180.)
  return torch.from_numpy(parsed.astype(m[2], copy=False)).view(*s)
trainloader = torch.utils.data.DataLoader(trainset, batch_size=BATCH_SIZE, shuffle=True)

testloader = torch.utils.data.DataLoader(testset, batch_size=BATCH_SIZE, shuffle=False)
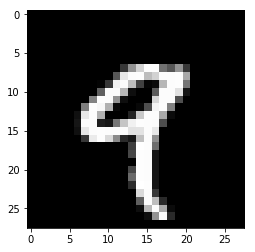
绘图查看
plt.imshow(trainset[4][0][0], cmap='gray')
<matplotlib.image.AxesImage at 0x1a3c510cc18>

查看数据格式
trainset[0][0].shape
torch.Size([1, 28, 28])
为了通用,设置一个device,如果有显卡并配置好了cuda环境,那么就选择为cuda,否则为cpu
device = torch.device('cuda' if torch.cuda.is_available() else 'cpu')
device
device(type='cpu')
AlexNet
同样地,仿照AlexNet,设置了五个卷积层和三个全连接层构建一个深度卷积神经网络,网络的定义是重写nn.Module实现的,卷积层和全连接层之间将数据通过view拉平[1]
class AlexNet(nn.Module):

    def __init__(self,width_mult=1):

        super(AlexNet, self).__init__()

        self.layer1 = nn.Sequential(
            nn.Conv2d(1, 32, kernel_size=3, padding=1), # 32*28*28
            nn.MaxPool2d(kernel_size=2, stride=2), # 32*14*14
            nn.ReLU(inplace=True),
            )

        self.layer2 = nn.Sequential(
            nn.Conv2d(32, 64, kernel_size=3, padding=1), # 64*14*14
            nn.MaxPool2d(kernel_size=2, stride=2), # 64*7*7
            nn.ReLU(inplace=True),
            )

        self.layer3 = nn.Sequential(
            nn.Conv2d(64, 128, kernel_size=3, padding=1), # 128*7*7
            )

        self.layer4 = nn.Sequential(
            nn.Conv2d(128, 256, kernel_size=3, padding=1), # 256*7*7
            )


		self.layer5 = nn.Sequential(

            nn.Conv2d(256, 256, kernel_size=3, padding=1), # 256*7*7
            nn.MaxPool2d(kernel_size=3, stride=2), # 256*3*3
            nn.ReLU(inplace=True),
            )

        self.fc1 = nn.Linear(256*3*3, 1024)
        self.fc2 = nn.Linear(1024, 512)
        self.fc3 = nn.Linear(512, 10)


    def forward(self, x):

        x = self.layer1(x)
        x = self.layer2(x)
        x = self.layer3(x)
        x = self.layer4(x)
        x = self.layer5(x)
        x = x.view(-1, 256*3*3)
        x = self.fc1(x)
        x = self.fc2(x)
        x = self.fc3(x)
        return x
设置超参数
EPOCH = 5
BATCH_SIZE = 128
LR = 0.01
def validate(model, data):
    total = 0
    correct = 0
    for i, (images, labels) in enumerate(data):
        images = images.to(device)
        x = net(images)
        value, pred = torch.max(x,1)
        pred = pred.data.cpu()
        total += x.size(0)
        correct += torch.sum(pred == labels)

    return correct*100./total
初始化模型并将模型放到device上,如果有显卡就在cuda上,如果没有,那么在cpu
如果是纯cpu训练,速度十分感人
net = AlexNet().to(device)
# alexnet训练
def train():
    # 定义损失函数为交叉熵损失,优化方法为SGD
    criterion = nn.CrossEntropyLoss()
    optimizer = optim.SGD(net.parameters(), lr=LR, momentum=0.9)
    max_accuracy=0
    accuracies=[]
    for epoch in range(EPOCH):
        for i, (images,labels) in enumerate(trainloader):
            images = images.to(device)
            labels = labels.to(device)
            optimizer.zero_grad()
            outputs = net(images)
            loss = criterion(outputs, labels)
            loss_item = loss.item()
            loss.backward()
            optimizer.step()

        accuracy = float(validate(criterion, testloader))
        accuracies.append(accuracy)
        print("Epoch %d accuracy: %f loss: %f" % (epoch, accuracy, loss_item))
        if accuracy > max_accuracy:
            best_model = copy.deepcopy(criterion)
            max_accuracy = accuracy
            print("Saving Best Model with Accuracy: ", accuracy)
        print('Epoch:', epoch+1, "Accuracy :", accuracy, '%')
    plt.plot(accuracies)
    return best_model
这一行代码是调用之前的train函数训练神经网络,初始化设置的epoch是5,大概也可以训练一个准确度较高的模型
alexnet = train()
为了防止断点或者bug导致jupyter重启之后重新训练模型,这一点经常遇到,本代码是在google的colab上训练的,为了保存训练的结果,还是将模型保存为pkl文件,这样本地就不用训练,直接调用训练之后的模型,之前尝试直接保存整个模型,但是会有莫名其妙的bug,暂时没有解决。这里尝试了另一种保存模型的方式[2],直接保存模型的参数,然后将参数传递到初始化的模型架构中,如下所示:
# 保存模型参数
torch.save(alexnet, '../models/alexnet.pkl')
# 加载模型
alexnet = AlexNet()
alexnet.load_state_dict(torch.load('../models/alexnet.pkl'))
AlexNet(
  (layer1): Sequential(
    (0): Conv2d(1, 32, kernel_size=(3, 3), stride=(1, 1), padding=(1, 1))
    (1): MaxPool2d(kernel_size=2, stride=2, padding=0, dilation=1, ceil_mode=False)
    (2): ReLU(inplace=True)
  )
  (layer2): Sequential(
    (0): Conv2d(32, 64, kernel_size=(3, 3), stride=(1, 1), padding=(1, 1))
    (1): MaxPool2d(kernel_size=2, stride=2, padding=0, dilation=1, ceil_mode=False)
    (2): ReLU(inplace=True)
  )
  (layer3): Sequential(
    (0): Conv2d(64, 128, kernel_size=(3, 3), stride=(1, 1), padding=(1, 1))
  )
  (layer4): Sequential(
    (0): Conv2d(128, 256, kernel_size=(3, 3), stride=(1, 1), padding=(1, 1))
  )
  (layer5): Sequential(
    (0): Conv2d(256, 256, kernel_size=(3, 3), stride=(1, 1), padding=(1, 1))
    (1): MaxPool2d(kernel_size=3, stride=2, padding=0, dilation=1, ceil_mode=False)
    (2): ReLU(inplace=True)
  )
  (fc1): Linear(in_features=2304, out_features=1024, bias=True)
  (fc2): Linear(in_features=1024, out_features=512, bias=True)
  (fc3): Linear(in_features=512, out_features=10, bias=True)
)
为直观的查看效果,选择一组测试集图片查看分类效果
plt.figure(figsize=(14, 14))
for i, (image, label) in enumerate(testloader):
    predict = torch.argmax(alexnet(image), axis=1)
    print((predict == label).sum()/label.shape[0])
    for j in range(image.shape[0]):
        plt.subplot(8, 8, j+1)
        plt.imshow(image[j, 0], cmap='gray')
        plt.title(predict[j].item())
        plt.axis('off')
    if i==1:
        break
tensor(1.)


 831
831


 被折叠的 条评论
为什么被折叠?


