


为什么要学设计模式
- 方便交流
设计模式作为一种术语, 经常会出现在开发者和程序员之间的交流沟通中, 如果自己不了解, 很多时候都听不懂也无法加入交流 - 提高代码质量
好的代码具有很好的可读性, 可复用性以及可扩展性, 设计模式的本质是解决程序的解耦, 代码的可复用性及扩展性, 它往往遵循一些原则 - 面试需要
面试过程中, 很多时候面试官都会问一些设计模式相关的问题, 这就需要我们去了解相关知识
Go 是一个面向对象语言吗
面向对象的语言一般会提供封装(类与对象), 继承, 多态三个特性, Go 本身没有类, 对象, 继承这些概念, 但是 Go 可以模拟 类, 对象, 继承和多态这些特性
- Go 并不是一个纯面向对象的编程语言
- Go 可以进行面向对象的变成
Go 面向对象(OOP)基础
- 类与对象
- Go中用结构体模拟类与对象
// 定义结构体, 类
type Bike struct {
	color string // 首字母小写表示属性私有
	Name  string // 首字母大写表示属性共有
}

// 定义结构体的方法, 首字母大写表示方法对外公开
func (b *Bike) Move() string {
	return fmt.Sprintf("%s的自行车正在行驶", b.color)
}

func main() {

	// 实例化, 对象
	b := &Bike{
		color: "green",
		Name:  "哈罗单车",
	}

	fmt.Println(b.Move())
}
- 三大基本特性
- 封装
首字母大小写方式代表公有私有权限
// 封装
type Person struct {
	Name string // 首字母大写表示属性共有
}

// 定义结构体的方法, 首字母大写表示方法对外公开
func (p *Person) Walk() string {
	return fmt.Sprintf("%s正在行走", p.Name)
}
- 继承
使用内嵌的方式, 对结构体struct进行组合
// 继承
type Person struct {
	Name string // 首字母大写表示属性共有
}

// 结构体嵌套
type Chinese struct {
	p    Person
	skin string
}

func (c *Chinese) GetSkin() string {
	return c.skin
}

// 定义结构体的方法, 首字母大写表示方法对外公开
func (p *Person) Walk() string {
	return fmt.Sprintf("%s正在行走", p.Name)
}

func main() {
	// 实例化, 对象
	w := &Chinese{
		p:    Person{
			Name: "chao",
		},
		skin: "黄皮肤",
	}

	// 可以调用嵌套结构体的方法
	fmt.Println(w.GetSkin(), w.p.Walk()) // 黄皮肤 chao正在行走
}
- 多态
使用接口 interface 来实现
// 多态
// 定义接口
type Human interface {
	Speak()
}

// 实现接口中的所有方法, 则实现该接口
type Person struct {
	Name string // 首字母大写表示属性共有
}

// 定义结构体的方法, 首字母大写表示方法对外公开
func (p *Person) Speak() {
	fmt.Println("hello", p.Name)
}

func main() {
	// 定义一个接口变量, 接口本质是指针
	var h Human

	// 实例化对象
	p := &Person{Name: "chao"}

	// 结构体可以直接存储在接口变量中
	h = p

	// 接口变量调用结构体的方法
	h.Speak() // hello chao
}
- 五大基本原则
- 单一功能原则
对象应该具有单一功能这个概念, 即方法中的功能要单一, 如果有其他功能就要去创建新的方法, 将某一功能外的其他功能抽离出来 - 开闭原则
不管是类还是方法, 对扩展是开放的, 对于修改是关闭的, 即最好是可外部扩展功能, 而不是内部修改逻辑 - 里式替换原则
子类对象可以替换父类对象, 而程序逻辑不变, Go 是面向接口开发, 替换还是比较方便的 - 接口隔离原则
保证接口的最小化, 接口不能滥用, 根据业务来划分接口, 保持合适的接口 - 依赖反转原则
不要依赖具体的实现, 要面向接口去开发
// 定义结构体
type Person struct {
	Name string // 首字母大写表示属性共有
}

type Car struct{}
type Bike struct{}

func (c Car) Move()  {}
func (b Bike) Move() {}

// 定义结构体的方法, 首字母大写表示方法对外公开
func (p *Person) By(name string) {
	switch name {
	case "bike":
		bike := Bike{}
		bike.Move()
	case "car":
		car := Car{}
		car.Move()
	}
}
优化一下, 更容易扩展其他功能, 直接新创建方法即可
// 定义结构体
type Person struct {
	Name string // 首字母大写表示属性共有
}

type Car struct{}
type Bike struct{}

func (c Car) Move()  {}
func (b Bike) Move() {}

func (p *Person) ByCar(car Car) {
	car.Move()
}

func (p *Person) ByBike(bike Bike) {
	bike.Move()
}
// 定义结构体
type V6Engine struct{}

func (v6 *V6Engine) Run() string {
	return "V6Engine run"
}

// 结构体嵌套, 继承
type BMWCar struct {
	engine V6Engine
}

// 子类重写父类方法
func (car *BMWCar) RunEngine() string {
	return "BMWCard" + car.engine.Run()
}
过于依赖具体的实现, 优化一下, 要面向接口开发
// 定义接口
type engine interface {
	Run() string
}

// 结构体嵌套接口, 面向接口开发. 而不是依赖具体的实现, 后续可以直接使用实现了该接口的其他结构体方法
type BMWCar struct {
	engine engine
}

type V6Engine struct {}
func (v6 *V6Engine) Run() string {
	return "V6Engine"
}

type V8Engine struct {}
func (v8 *V8Engine) Run() string {
	return "V8Engine"
}

// 由于继承的是接口, 后续可以换成任意实现了该接口的结构体
func (car *BMWCar) RunEngine() string {
	car.engine = &V6Engine{}
	car.engine = &V8Engine{}
	return "BMWCard" + car.engine.Run()
}
设计模式
是一套被反复使用, 多数人知晓的, 经过分类的, 代码设计经验的总结
设计模式分类
- 创建型 ( 单例模式, 简单工厂模式, 工厂方法模式, 抽象工厂模式, 建造者模式, 原型模式 )
- 结构型 ( 代理模式, 适配器模式, 装饰模式, 桥接模式, 组合模式, 享元模式, 外观模式 )
- 行为型 ( 观察者模式, 模板方法模式, 命令模式, 状态模式, 职责链模式, 解释器模式, 中介者模式, 访问者模式, 策略模式, 备忘录模式, 迭代器模式 )
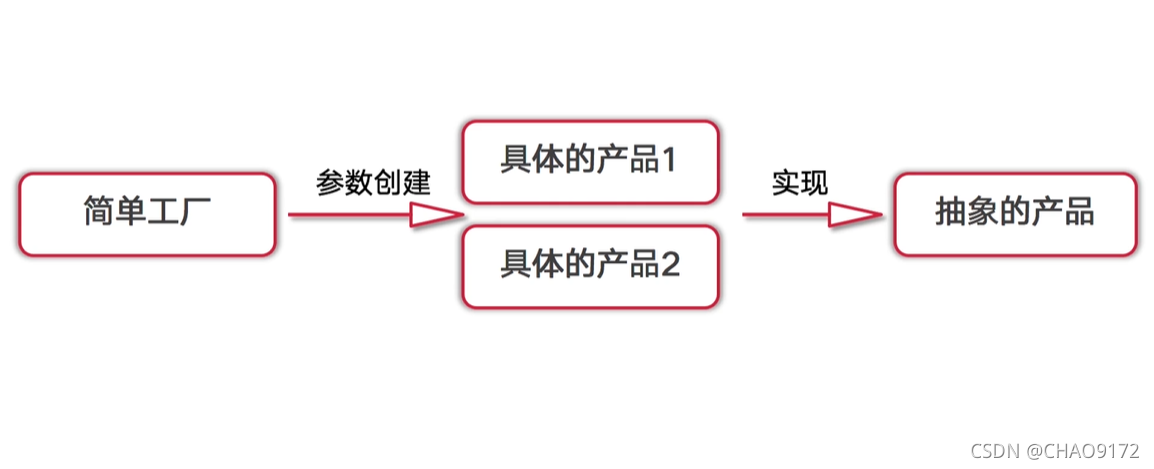
简单工厂模式
- 概念
- 属于创建型模式, 又叫做静态工厂方法模式, 但不属于23种GOF设计模式之一
- 在简单工厂模式中, 可以根据参数的不同返回不同类的实例
- 简单工厂模式专门定义一个类来负责创建其他类的实例, 被创建的实例通常都具有共同的父类
- 结构
- 代码简单推演
// 创建一个抽象的产品, 使用接口
type Product interface {
	SetName(string)
	GetName() string
}

// 创建具体的产品: 产品1
type Product1 struct {
	name string
}

func (p1 *Product1) SetName(name string) {
	p1.name = name
}

func (p1 *Product1) GetName() string {
	return "产品1: " + p1.name
}

// 创建具体的产品: 产品2
type Product2 struct {
	name string
}

func (p2 *Product2) SetName(name string) {
	p2.name = name
}

func (p2 *Product2) GetName() string {
	return "产品2: " + p2.name
}

//
type productType int

const (
	p1 productType = iota // 0
	p2                    // 1
)

// 创建简单工厂类
type productFactory struct {
}

// 返回接口类型
func (pf *productFactory) Create(pt productType) Product {
	switch pt {
	case p1:
		return &Product1{}
	case p2:
		return &Product1{}
	}
	return nil
}

// 手动创建
func TestNormalCreate(t *testing.T) {
	//
	product1 := &Product1{}
	product1.SetName("p1")
	fmt.Println(product1.GetName())

	product2 := &Product2{}
	product2.SetName("p2")
	fmt.Println(product2.GetName())
}

// 简单工厂模式创建
func TestFactoryCreate(t *testing.T) {
	// 实例化工厂类
	productFac := &productFactory{}

	product1 := productFac.Create(p1)
	product2 := productFac.Create(p2)

	product1.SetName("p1")
	product2.SetName("p2")

	fmt.Println(product1.GetName(), product2.GetName())

}
- 实战模拟
简单工厂模式实现一个缓存库, 支持set, get方法, 同时模拟支持Redis和Memcache
// 创建一个Cache接口, 作为父类, 发约束方法
type Cache interface {
	Set(key, value string)
	Get(key string) string
}

// 实现具体的Cache: RedisCache
type RedisCache struct {
	data map[string]string
}

// 实现接口的方法
func (redis *RedisCache) Set(key, value string) {
	redis.data[key] = value
}
func (redis *RedisCache) Get(key string) string {
	return redis.data[key]
}

// 实现具体的Cache: Memcache
type MemCache struct {
	data map[string]string
}

// 实现接口的方法
func (mem *MemCache) Set(key, value string) {
	mem.data[key] = value
}
func (mem *MemCache) Get(key string) string {
	return mem.data[key]
}

type cacheType int

const (
	redis cacheType = iota
	mem
)

// 实现Cache的简单工厂类
type CacheFactory struct{}

// 返回接口类型, 解耦, 可扩展
func (cf *CacheFactory) Create(cacheType cacheType) (Cache, error) {

	// map要记得先初始化, 否则写入会报错 assignment to entry in nil map
	switch cacheType {
	case redis:
		return &RedisCache{data: make(map[string]string)}, nil
	case mem:
		return &MemCache{data: make(map[string]string)}, nil
	}

	return nil, errors.New("cache type error")
}

func TestCacheFactory(t *testing.T) {
	cacheFactory := CacheFactory{}
	cache, err := cacheFactory.Create(redis)
	if err != nil {
		t.Fatal(err)
	}
	cache.Set("k1", "v1")
	fmt.Println(cache.Get("k1"))
}
- 优点: 实现了解耦 ( 简单工厂模式返回的是接口, 面向接口的开发可以很好实现解耦, 易于扩展 )
- 缺点: 违背了开闭原则 ( 更改或者新增, 需要修改工厂类的创建方法 )
- 适合: 创建的对象比较少
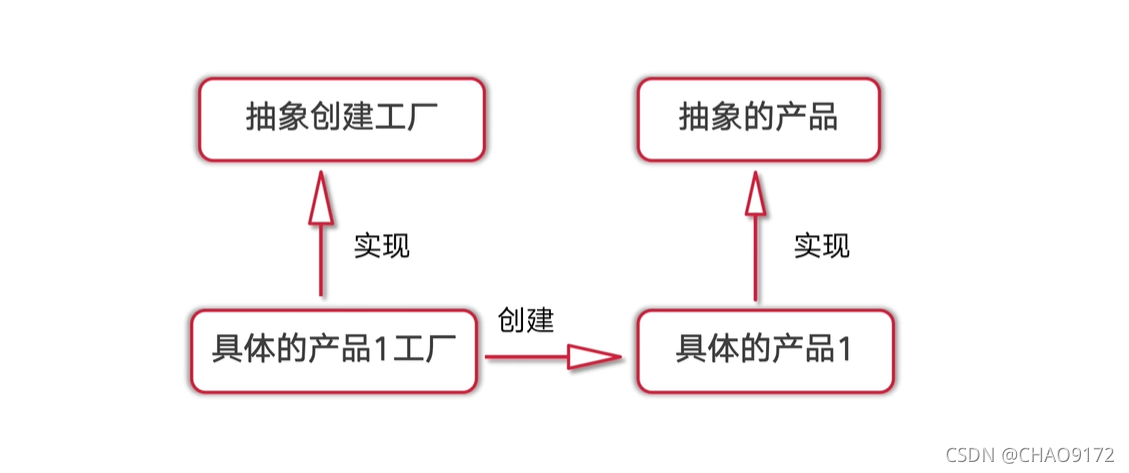
工厂方法模式
- 概念
- 工厂方法模式又称为工厂模式, 也叫虚拟构造器模式或者多态工厂模式, 它属于类创建型模式
- 在工厂方法模式中, 工厂父类负责定义创建产品对象的公共接口, 而工厂子类则负责生成具体的产品对象
- 结构
- 代码简单推演
// 创建一个抽象的产品, 使用接口
type Product interface {
	SetName(string)
	GetName() string
}

// 创建具体的产品: 产品1
type Product1 struct {
	name string
}

func (p1 *Product1) SetName(name string) {
	p1.name = name
}

func (p1 *Product1) GetName() string {
	return "产品1: " + p1.name
}

// 创建具体的产品: 产品2
type Product2 struct {
	name string
}

func (p2 *Product2) SetName(name string) {
	p2.name = name
}

func (p2 *Product2) GetName() string {
	return "产品2: " + p2.name
}

// 创建一个抽象的工厂
type ProductFactory interface {
	Create() Product
}

// 创建一个具体的工厂去实现抽象的工厂: 产品1的工厂
type Product1Factory struct{}

func (p1f *Product1Factory) Create() Product {
	return &Product1{}
}

// 创建一个具体的工厂去实现抽象的工厂: 产品2的工厂
type Product2Factory struct{}

func (p2f *Product2Factory) Create() Product {
	return &Product2{}
}

func TestCacheFactory(t *testing.T) {
	// 产品1的工厂
	product1Factory := &Product1Factory{}
	// 产品1的工厂生产出产品1
	product1 := product1Factory.Create()
	product1.SetName("p1")
	fmt.Println(product1.GetName()) // 产品1: p1

	// 产品2的工厂
	product2Factory := &Product2Factory{}
	// 产品2的工厂生产出产品2
	product2 := product2Factory.Create()
	product2.SetName("p2")
	fmt.Println(product2.GetName()) // 产品2: p2
}
- 实战模拟
简单工厂模式实现一个缓存库, 支持set, get方法, 同时模拟支持Redis和Memcache
// 创建一个Cache接口, 作为父类, 发约束方法
type Cache interface {
	Set(key, value string)
	Get(key string) string
}

// 实现具体的Cache: RedisCache
type RedisCache struct {
	data map[string]string
}

// 实现接口的方法
func (redis *RedisCache) Set(key, value string) {
	redis.data[key] = value
}
func (redis *RedisCache) Get(key string) string {
	return redis.data[key]
}

// 实现具体的Cache: Memcache
type MemCache struct {
	data map[string]string
}

// 实现接口的方法
func (mem *MemCache) Set(key, value string) {
	mem.data[key] = value
}
func (mem *MemCache) Get(key string) string {
	return mem.data[key]
}

// 定义Cache的抽象工厂
type CacheFactory interface {
	Create() Cache
}

// 实现具体的工厂: redis的工厂
type RedisCacheFactory struct{}

func (rcf *RedisCacheFactory) Create() Cache {
	// map 记得要初始化, 默认为nil, 无法写入
	return &RedisCache{data: make(map[string]string)}
}

// 实现具体的工厂: memcache的工厂
type MemCacheFactory struct{}

func (mcf *MemCacheFactory) Create() Cache {
	// map 记得要初始化, 默认为nil, 无法写入
	return &MemCache{data: make(map[string]string)}
}

func TestCacheFactory(t *testing.T) {
	// redis工厂
	var redisCacheFactory CacheFactory
	redisCacheFactory = &RedisCacheFactory{}
	r := redisCacheFactory.Create()
	r.Set("k1", "v1")
	fmt.Println(r.Get("k1"))

	// memCache工厂
	var memCacheFactory CacheFactory
	memCacheFactory = &MemCacheFactory{}
	m := memCacheFactory.Create()
	m.Set("k2", "v2")
	fmt.Println(m.Get("k2"))
}
- 优点: 保持了简单工厂模式的优点, 而且克服了它的缺点 ( 违背开闭原则 )
- 缺点: 在添加新产品时, 一定程度上增加了系统的复杂的度 ( 需要创建工厂并实现抽象工厂, 创建产品并实现抽象产品 )
- 适合: 客户端不需要知道具体产品类的类名, 只需要知道对应的工厂即可 ( 而简单工厂模式, 需要知道传入的参数, 根据参数的不同返回不同的实例 )
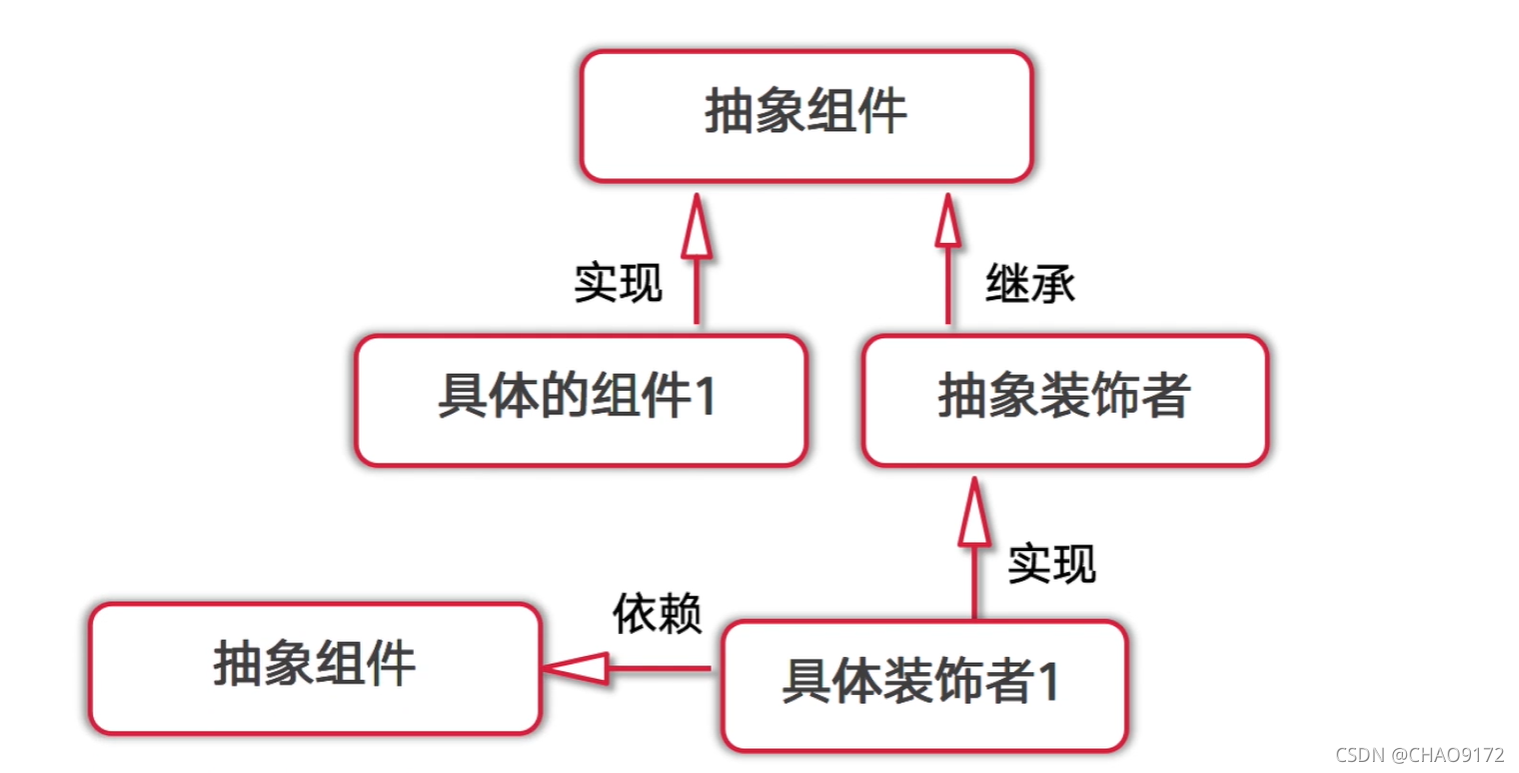
装饰模式
- 概念
- 一种动态的向类中添加新的行为的设计模式
- 就功能而言, 修饰模式相比生成子类更加灵活, 这样可以给某个对象而不是整个类添加一些功能
- 它是一种对象结构型模式
- 结构
- 简单代码推演
// 装饰模式

// 创建一个抽象组件
type Component interface {
	Operate()
}

// 组件实现1
type Component1 struct{}

func (c1 *Component1) Operate() {
	fmt.Println("component1 operate")
}

// 创建抽象装饰者, 继承抽象组件
type Decorate interface {
	Component
	Do() // 这是个额外的方法
}

// 具体的装饰者
type Decorate1 struct {
	// 需要依赖抽象组件
	c Component
}

func (d1 *Decorate1) Do() {
	fmt.Println("decorate1 do")
}
func (d1 *Decorate1) Operate() {
	// 增加新的行为
	d1.Do()
	d1.c.Operate()
	// 增加新的行为
	d1.Do()
}

func TestDecorate(t *testing.T) {
	// 常规的
	c1 := &Component1{}
	c1.Operate()

	// 利用装饰模式
	d1 := Decorate1{}
	d1.c = c1
	d1.Operate() // 不改变具体组件的方法, 额外增加了新的方法
}
- 实战模拟
- 实现http中间件记录请求的url, 方法
- 实现http中间件记录请求的网络地址
- 实现http中间件记录请求的耗时
func traceURL(next http.Handler) http.Handler {
	// http.Handler 为接口类型, http.HandlerFunc实现了该接口
	return http.HandlerFunc(func(w http.ResponseWriter, r *http.Request) {
		// 记录请求的url和方法
		log.Printf("URL start url: %s, 方法: %s\n", r.URL, r.Method) // url: /, 方法: GET
		next.ServeHTTP(w, r)
		log.Println("URL end")
	})
}

func traceAddr(next http.Handler) http.Handler {
	return http.HandlerFunc(func(w http.ResponseWriter, r *http.Request) {
		// 记录请求的网络地址
		log.Println("网络 start 地址: ", r.RemoteAddr) // 网络地址:  127.0.0.1:61539
		next.ServeHTTP(w, r)
		log.Println("网络 end")
	})
}

func traceTime(next http.Handler) http.Handler {
	return http.HandlerFunc(func(w http.ResponseWriter, r *http.Request) {

		log.Println("Time statr")
		startTime := time.Now()

		next.ServeHTTP(w, r)

		keepTime := time.Since(startTime)
		// 记录请求的耗时
		log.Println("Time end 耗时: ", keepTime) // 耗时:  0s
	})
}

// 实现一个 handle 方法, 用来处理请求
func handleFunc(w http.ResponseWriter, r *http.Request) {
	// 实现中间件的功能
	fmt.Fprintln(w, "Hello World")
}

/*
	2021/11/14 20:58:58 URL start url: /, 方法: GET
	2021/11/14 20:58:58 网络 start 地址:  127.0.0.1:56316
	2021/11/14 20:58:58 Time statr
	2021/11/14 20:58:58 Time end 耗时:  0s
	2021/11/14 20:58:58 网络 end
	2021/11/14 20:58:58 URL end
*/
func TestHttpServer(t *testing.T) {

	// 实现一个 http server 服务
	http.Handle("/", traceURL(traceAddr(traceTime(http.HandlerFunc(handleFunc)))))

	// 开启监听
	t.Log("http server start")
	http.ListenAndServe(":8080", nil)

}
优点:
- 可以通过一种动态的方式来扩展一个对象的功能
- 可以使用多个具体装饰类来装饰同一对象, 增加其功能
- 具体的组件类和具体的装饰类可以独立变化 ( 具体的组件类实现组件接口, 具体的装饰类实现装饰接口, 以及依赖组件接口, 面向接口开发 ), 符合"开闭原则"
缺点:
- 对于多次装饰的对象, 易于出错, 排错也很困难
- 对于产生很多具体装饰类, 增加系统的复杂度以及理解成本
适合:
- 需要给一个对象增加功能, 这些功能可以动态的撤销
- 需要给一批兄弟类增加或者改装功能
策略模式
- 概念
- 指对象有某个行为, 但在不同的场景中, 该行为有不同的实现算法, 比如每个人都要交个人所得税, 但是在不同的国家有不同的算税方法
- 一种对象行为型模式
- 结构
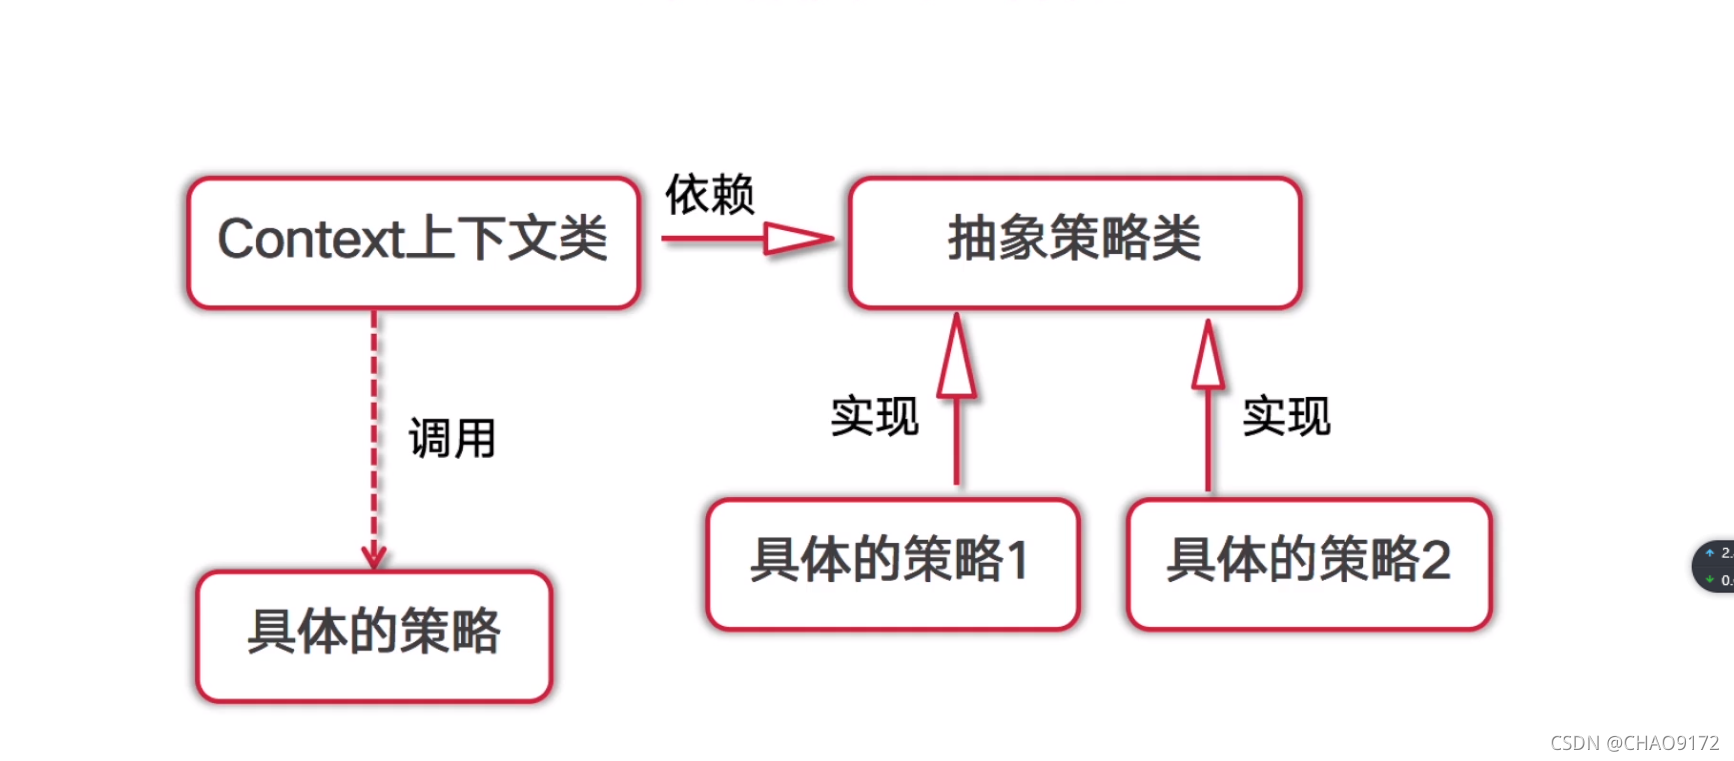
- 简单代码推演
// 实现一个上下文类, 依赖抽象策略
type Context struct {
	Strategy
}

// 定义一个抽象策略
type Strategy interface {
	Do()
}

// 实现一个具体的抽象策略对象
type Strategy1 struct {
}

func (s1 *Strategy1) Do() {
	fmt.Println("s1 do...")
}

type Strategy2 struct {
}

func (s2 *Strategy2) Do() {
	fmt.Println("s2 do...")
}

func TestStrategy(t *testing.T) {
	// 接口类型, 本质是指针
	c := &Context{}
	c.Strategy = &Strategy1{}
	c.Do() // s1 do...
	c.Strategy = &Strategy2{}
	c.Do() // s2 do...
}
- 实战模拟
- 实现一个日志记录器, 满足: 文件记录和数据库记录2种方式
// 实现一个日志记录器, ( 相当于上下文类 ), 依赖抽象日志记录接口 ( 提供相关的方法 )
type LogManage struct {
	Logging
}

// 构造方法
func NewLogManage(logging Logging) *LogManage {
	return &LogManage{
		logging,
	}
}

// 定义一个抽象日志记录接口
type Logging interface {
	Info()
	Error()
}

// 实现一个具体的日志记录对象: 文件
type FileLogging struct {
}

func (fl *FileLogging) Info() {
	fmt.Println("文件Info日志")
}

func (fl *FileLogging) Error() {
	fmt.Println("文件Error日志")
}

type DBLogging struct {
}

func (dl *DBLogging) Info() {
	fmt.Println("数据库Info日志")
}
func (dl *DBLogging) Error() {
	fmt.Println("数据库Error日志")
}

func TestStrategy(t *testing.T) {
	// 接口类型, 本质是指针
	fileLog := &FileLogging{}
	dbLog := &DBLogging{}
	// 参数为接口类型, 实现该接口的结构体变量都可以作为参数
	fl := NewLogManage(fileLog)
	fl.Info()  // 文件Info日志
	fl.Error() // 文件Error日志

	//
	fl.Logging = dbLog
	fl.Info()  // 数据库Info日志
	fl.Error() // 数据库Error日志
}
优点
- 对 “开闭原则” 的完美支持 ( 面向接口开发, 增加策略只需要去实现策略接口即可 )
- 避免使用多重条件转移语句
- 提供了管理相关的算法族的方法
确定:
- 客户端必须知道所有的策略类, 并自己觉得使用哪一个策略类
- 策略模式将造成产生很多策略类
适合:
- 一个系统需要动态的在几种算法或行为中选择一种
- 多个类区别仅在于它们的行为或算法不同的场景


 1169
1169

 被折叠的 条评论
为什么被折叠?
被折叠的 条评论
为什么被折叠?
 到【灌水乐园】发言


