


体现了具体项目工程里面的分层,dao,daoImpl,service,serviceImpl,action。让你真正的理解这为啥分层。
毕竟当年我刚刚毕业的时候,再找工作我就不是很清楚为什么有这么几层。
只是知道,昂!就是有这么几层。不就是逻辑清楚些嘛。
这回答只是皮毛的皮毛而已!!!
哎,好傻。毕竟我不是Java专业的,虽然也是计算机专业的学生。
到新公司的时候,发现serviceImpl和daoImpl直接没有啦,很简单就是controler,service,Repository。
原来这些东西都是和注解挂钩的。
要真正理解这些个东西,就得了解下spring的配置文件,是如何去注入bean的,各个不同的注解,都是干嘛的。
当然这个例子就是使用xml配置文件,实现设值依赖注入。暂时不牵扯到注解的使用。
分几个文件,如下:
先是各个组件,dao,daoImpl,service,serviceImpl,action。
1.PersonDao
- package lxk.test.spring.mvc;
- interface PersonDao {
- void savePerson();
- void updatePerson();
- }
- package lxk.test.spring.mvc;
- public class PersonDaoImpl implements PersonDao {
- public void savePerson() {
- System.out.println("save person");
- }
- public void updatePerson() {
- System.out.println("update person");
- }
- }
- package lxk.test.spring.mvc;
- /**
- * Access can be package-private 所以可以省略接口的public声明
- */
- interface PersonService {
- //接口内部默认都是public的
- void savePerson();
- void updatePerson();
- }
- package lxk.test.spring.mvc;
- public class PersonServiceImpl implements PersonService {
- private PersonDao personDao;
- public PersonDao getPersonDao() {
- return personDao;
- }
- public void setPersonDao(PersonDao personDao) {
- this.personDao = personDao;
- }
- public void savePerson() {
- this.personDao.savePerson();
- }
- public void updatePerson() {
- this.personDao.updatePerson();
- }
- }
- package lxk.test.spring.mvc;
- public class PersonAction {
- private PersonService personService;
- public PersonService getPersonService() {
- return personService;
- }
- public void setPersonService(PersonService personService) {
- this.personService = personService;
- }
- public void savePerson() {
- this.personService.savePerson();
- }
- public void updatePerson() {
- this.personService.updatePerson();
- }
- }
然后是main方法和xml配置文件
6.main
- package lxk.test.spring.mvc;
- import org.springframework.context.ApplicationContext;
- import org.springframework.context.support.FileSystemXmlApplicationContext;
- public class MainTest {
- public static void main(String[] args) {
- //ApplicationContext context = new ClassPathXmlApplicationContext("file:E:/xxx/intellij_work/TrunkNew/src/main/java/lxk/test/spring/mvc/applicationContext.xml");
- //ApplicationContext context = new FileSystemXmlApplicationContext("file:E:/xxx/intellij_work/TrunkNew/src/main/java/lxk/test/spring/mvc/applicationContext.xml");
- ApplicationContext context = new FileSystemXmlApplicationContext("src/main/java/lxk/test/spring/mvc/applicationContext.xml");
- PersonAction personAction = (PersonAction) context.getBean("personAction");
- personAction.updatePerson();
- }
- }
- <?xml version="1.0" encoding="UTF-8"?>
- <beans xmlns="http://www.springframework.org/schema/beans"
- xmlns:xsi="http://www.w3.org/2001/XMLSchema-instance"
- xsi:schemaLocation="http://www.springframework.org/schema/beans
- http://www.springframework.org/schema/beans/spring-beans-2.5.xsd">
- <!--
- 将如下的三个bean纳入到spring容器管理,
- (实际注入的是各个接口的实现类,毕竟 只有实现类才真正实现具体方法(虽然在bean中看起来是接口形式声明的属性))
- personAction
- personServiceImpl (面向接口编程:所以简写为接口名称)
- personDaoImpl (面向接口编程:所以简写为接口名称)
- -->
- <bean id="personDao" class="lxk.test.spring.mvc.PersonDaoImpl"/>
- <bean id="personService" class="lxk.test.spring.mvc.PersonServiceImpl">
- <property name="personDao" ref="personDao"/>
- </bean>
- <bean id="personAction" class="lxk.test.spring.mvc.PersonAction">
- <property name="personService" ref="personService"/>
- </bean>
- </beans>
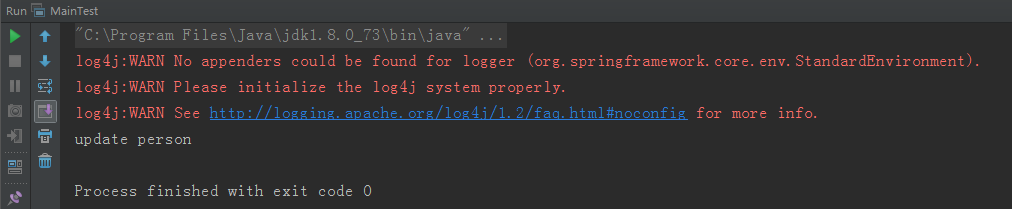
然后就是执行结果图:
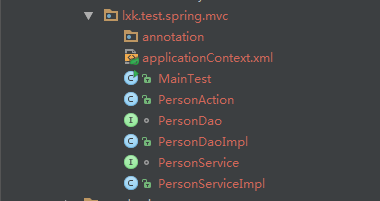
文件的位置图:
最后就是对上面的代码做一些说明:
因为要用到依赖注入---DI(IOC---控制反转)的设值注入模式,所以,
要使用的三个bean在对应的文件里面都有对应的setter和getter,这是容器在设值注入的时候需要使用的,
在下次使用注解来注入的时候,这些getter和setter都可以省略了,代码看起来也就简洁多啦。
而且,配置文件中也不需要配置那么多的bean啦,一个扫描搞定。这种注入也是实际开发使用的。当然还会多一点点的引入文件


 487
487

 被折叠的 条评论
为什么被折叠?
被折叠的 条评论
为什么被折叠?
 到【灌水乐园】发言


