


Linux字符设备驱动
Linux实现了一套字符设备驱动框架,编写字符设备驱动就按照框架进行编写。
字符设备驱动结构框图:
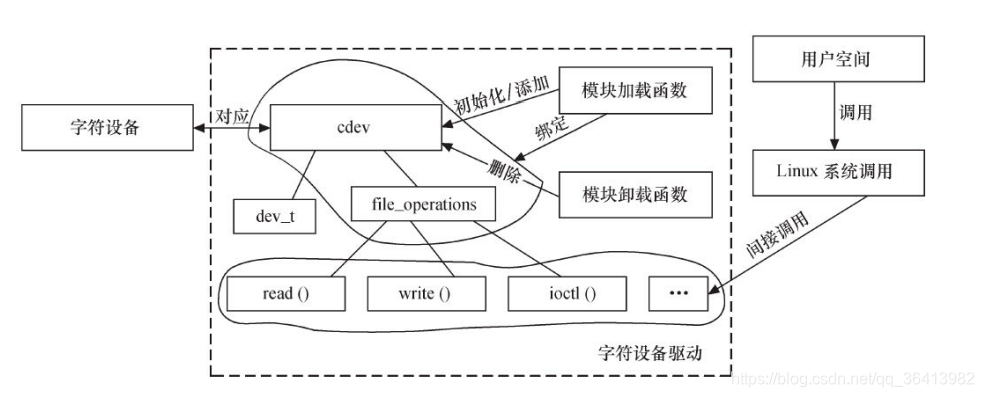
图片来自 – 《Linux设备驱动开发详解》
最很重要的就是实现struct file_operations该结构中的函数。
struct file_operations 结构体定义了字符设备驱动提供给虚拟文件系统的接口函数
struct file_operations结构体定义:
struct file_operations {
	struct module *owner;
	loff_t (*llseek) (struct file *, loff_t, int);
	ssize_t (*read) (struct file *, char __user *, size_t, loff_t *);
	ssize_t (*write) (struct file *, const char __user *, size_t, loff_t *);
	ssize_t (*read_iter) (struct kiocb *, struct iov_iter *);
	ssize_t (*write_iter) (struct kiocb *, struct iov_iter *);
	int (*iterate) (struct file *, struct dir_context *);
	int (*iterate_shared) (struct file *, struct dir_context *);
	unsigned int (*poll) (struct file *, struct poll_table_struct *);
	long (*unlocked_ioctl) (struct file *, unsigned int, unsigned long);
	long (*compat_ioctl) (struct file *, unsigned int, unsigned long);
	int (*mmap) (struct file *, struct vm_area_struct *);
	int (*open) (struct inode *, struct file *);
	int (*flush) (struct file *, fl_owner_t id);
	int (*release) (struct inode *, struct file *);
	int (*fsync) (struct file *, loff_t, loff_t, int datasync);
	int (*fasync) (int, struct file *, int);
	int (*lock) (struct file *, int, struct file_lock *);
	ssize_t (*sendpage) (struct file *, struct page *, int, size_t, loff_t *, int);
	unsigned long (*get_unmapped_area)(struct file *, unsigned long, unsigned long, unsigned long, unsigned long);
	int (*check_flags)(int);
	int (*flock) (struct file *, int, struct file_lock *);
	ssize_t (*splice_write)(struct pipe_inode_info *, struct file *, loff_t *, size_t, unsigned int);
	ssize_t (*splice_read)(struct file *, loff_t *, struct pipe_inode_info *, size_t, unsigned int);
	int (*setlease)(struct file *, long, struct file_lock **, void **);
	long (*fallocate)(struct file *file, int mode, loff_t offset,
			  loff_t len);
	void (*show_fdinfo)(struct seq_file *m, struct file *f);
#ifndef CONFIG_MMU
	unsigned (*mmap_capabilities)(struct file *);
#endif
	ssize_t (*copy_file_range)(struct file *, loff_t, struct file *,
			loff_t, size_t, unsigned int);
	int (*clone_file_range)(struct file *, loff_t, struct file *, loff_t,
			u64);
	ssize_t (*dedupe_file_range)(struct file *, u64, u64, struct file *,
			u64);
};
结构体中的函数指针和系统的system call 名字很类似
LED字符设备驱动实验
1、查看手册和原理图得到可操作LED连接GPIO组的相关寄存器
#define  CCM_CCGR1                0x20C406C
#define  MUX_PAD_GPIO1_IO04       0x20E006C

#define  GPIO1_DR                 0x209C000
#define  GPIO1_GDIR               0x209C004
2、定义struct file_operations led_drv结构体并填充成员
static struct file_operations led_drv = {
	.owner	 = THIS_MODULE,
	.open    = led_drv_open,
	.read    = led_drv_read,
	.write   = led_drv_write,
	.release = led_drv_close,
};
.owner成员值一般设置为THIS_MODULE
3、实现file_operations结构填充的函数
static unsigned int __iomem *_CCM_CCGR1;
static unsigned int __iomem *_MUX_PAD_GPIO1_IO04;
static unsigned int __iomem *_GPIO1_DR;
static unsigned int __iomem *_GPIO1_GDIR;

static int major = 0;
static struct class *led_class;

static int led_drv_open (struct inode *node, struct file *file)
{
    int val;

	 printk("open %s %s line %d\n", __FILE__, __FUNCTION__, __LINE__);

    _CCM_CCGR1 = ioremap(CCM_CCGR1, 4);                        //重映射物理地址为虚拟地址
	_MUX_PAD_GPIO1_IO04 = ioremap(MUX_PAD_GPIO1_IO04, 4);
    _GPIO1_DR = ioremap(GPIO1_DR, 4);
    _GPIO1_GDIR = ioremap(GPIO1_GDIR, 4);

    val = ioread32(_CCM_CCGR1);
    val &= ~(3 << 26);
    val |= (3 << 26);
    iowrite32(val, _CCM_CCGR1);

    val = 0;
    val = ioread32(_MUX_PAD_GPIO1_IO04);
    val &= ~(0xf << 0);
    val |= (0x5 << 0);
    iowrite32(val, _MUX_PAD_GPIO1_IO04);

    val = 0;
    val = ioread32(_GPIO1_GDIR);
    val |= (0x1 << 4);
    iowrite32(val, _GPIO1_GDIR);

	return 0;
}

static ssize_t led_drv_read (struct file *file, char __user *buf, size_t size, loff_t *offset)
{
	printk("read %s %s line %d\n", __FILE__, __FUNCTION__, __LINE__);
	return 0;
}

/* write(fd, &val, 1); */
static ssize_t led_drv_write (struct file *file, const char __user *buf, size_t size, loff_t *offset)
{
	int err;
	char status;
  	int val = 0;

	printk("write %s %s line %d\n", __FILE__, __FUNCTION__, __LINE__);

	err = copy_from_user(&status, buf, 1);

	if (status)
    {
        val &= ~(1 << 4);
        iowrite32(val, _GPIO1_DR);
    }
    else
    {
        val |= (1 << 4);
        iowrite32(val, _GPIO1_DR);
    }

	return 1;
}

static int led_drv_close (struct inode *node, struct file *file)
{
	printk("close %s %s line %d\n", __FILE__, __FUNCTION__, __LINE__);
    iounmap(_CCM_CCGR1);
    iounmap(_MUX_PAD_GPIO1_IO04);
    iounmap(_GPIO1_DR);
    iounmap(_GPIO1_GDIR);
	return 0;
}
因为有MMU存在,Linux进程中使用的是虚拟地址,需要将寄存器的物理地址转换为内核能使用虚拟地址
重映射物理地址为虚拟地址 :
_CCM_CCGR1 = ioremap(CCM_CCGR1, 4);                        //重映射物理地址为虚拟地址
_MUX_PAD_GPIO1_IO04 = ioremap(MUX_PAD_GPIO1_IO04, 4);
_GPIO1_DR = ioremap(GPIO1_DR, 4);
_GPIO1_GDIR = ioremap(GPIO1_GDIR, 4);
在led设备关闭操作中对虚拟地址解除映射:
 iounmap(_CCM_CCGR1);
 iounmap(_MUX_PAD_GPIO1_IO04);
 iounmap(_GPIO1_DR);
 iounmap(_GPIO1_GDIR);
读寄存器:
val = ioread32(_CCM_CCGR1);
写寄存器:
iowrite32(val, _CCM_CCGR1);
用户空间应用程序通过调用system call时通过swi从用户空间陷入到内核空间进而调用了驱动中提供的函数。
而用户空间和内核空间的内存是隔离的,所以应用程序完内核写如数据需要需要进行数据的拷贝传递
将用户空间的程序拷贝到内核空间:
err = copy_from_user(&status, buf, 1);
4、驱动的入口/出口函数
/* 驱动加载函数 */
static int __init led_init(void)
{
  int err;
    major = register_chrdev(0, "my_led", &led_drv);

    led_class = class_create(THIS_MODULE, "my_led_class");
	err = PTR_ERR(led_class);
	if (IS_ERR(led_class)) {
		unregister_chrdev(major, "my_led");
		return -1;
	}
    device_create(led_class, NULL, MKDEV(major, 0), NULL, "my_led");
   	printk("init %s %s line %d\n", __FILE__, __FUNCTION__, __LINE__);
    return 0;
}

/* 驱动卸载函数 */
static void __exit led_exit(void)
{
    printk("exit %s %s line %d\n", __FILE__, __FUNCTION__, __LINE__);
    device_destroy(led_class, MKDEV(major, 0));           //销毁设备节点
	class_destroy(led_class);                             //销毁跟设备节点相关的类
	unregister_chrdev(major, "my_led");                   //注销设备
}

module_init(led_init);
module_exit(led_exit);

MODULE_AUTHOR("Ares");
MODULE_LICENSE("GPL");
注册字符设备驱动:
major = register_chrdev(0, "my_led", &led_drv); //向系统申请设备号
创建管理LED设备驱动的类:
led_class = class_create(THIS_MODULE, "my_led_class");
加载驱动自动创建设备节点:
device_create(led_class, NULL, MKDEV(major, 0), NULL, "my_led"); //创建了设备节点,用户空间才能通过设备节点进行操作硬件
在驱动入口函数中注册设备、创建设备节点等,相应的需要在驱动卸载的出口函数中进行相反的操作。
通过主设备号和此设备号合并得到设备号:
MKDEV(major, 0) //kdev_t.h头文件中定义
5、加载/卸载驱动
加载驱动:
debian@npi:~/nfs_rootfs$ sudo insmod led.ko
加载驱动 后/dev/目录下出现了设备节点:
debian@npi:~/nfs_rootfs$ ls /dev/my_led
/dev/my_led
/sys/class/目录下生成了类对应的目录:

卸载驱动:
sudo rmmod led.ko
6、编写应用程序测试驱动
#include <sys/types.h>
#include <sys/stat.h>
#include <fcntl.h>
#include <unistd.h>
#include <stdio.h>
#include <string.h>

/*
 * ./ledtest /dev/dev_name on
 * ./ledtest /dev/dev_name off
 */
int main(int argc, char **argv)
{
	int fd;
	char status;

	if (argc != 3)
	{
		printf("Usage: %s <dev> <on | off>\n", argv[0]);
		return -1;
	}

	fd = open(argv[1], O_RDWR);
	if (fd == -1)
	{
		printf("can not open file %s\n", argv[1]);
		return -1;
	}

	if (0 == strcmp(argv[2], "on"))
	{
		status = 1;
		write(fd, &status, 1);
	}
	else
	{
		status = 0;
		write(fd, &status, 1);
	}

	close(fd);

	return 0;
}
执行应用程序操作LED:
debian@npi:~/nfs_rootfs$ sudo ./led_test /dev/my_led on
debian@npi:~/nfs_rootfs$ sudo ./led_test /dev/my_led off


 204
204


 被折叠的 条评论
为什么被折叠?
被折叠的 条评论
为什么被折叠?
 到【灌水乐园】发言


