


文章目录
一、初步认识
1、概念
SPI,全称为 Service Provider Interface,是Java提供的一种服务发现机制,用于实现组件之间的解耦和扩展。
它允许开发人员定义一组接口(Service Interface),并允许其他开发人员通过实现这些接口来提供具体的服务实现(Service Provider),而无需修改Java平台的源代码。
2、工作原理
- 定义接口:开发人员首先定义一个接口,该接口定义了一组操作或功能。
- 提供实现:其他开发人员可以通过实现该接口来提供具体的服务实现。这些实现通常以独立的模块或库的形式提供。
- 配置文件:在Java的SPI机制中,开发人员需要在META-INF/services目录下创建一个以接口全限定名命名的文件,文件内容为提供该接口实现的类的全限定名列表。
- 加载服务:Java的SPI机制会在运行时自动加载并实例化这些服务提供者的实现类,使得开发人员可以通过接口来访问具体的服务实现。
3、作用场景
它提供了一种松耦合的方式(可插拔的设计)来扩展应用程序的功能。通过SPI,开发人员可以在不修改核心代码的情况下,通过添加新的实现来增加应用程序的功能,像很多框架都使用到了,比如Dubbo、JDBC。
通过服务方指定好接口,具体由第三方去实现,就像JDBC中定义好了一套规范,MySQL、Oracle、MongoDB按照这套规范具体去实现,通过在ClassPath路径下的META-INF/services文件夹中查找文件,自动加载文件里所定义的类。
二、源码分析
核心类:ServiceLoader,核心方法:load。
ServiceLoader是加载SPI服务的入口,通过调用ServiceLoader.load()方法,可以加载指定的Service,会根据配置文件中指定的包名和类名,动态地加载符合条件的所有实现类,并创建一个Service Provider的集合,通过遍历这个集合,可以获取具体的实现类对象。
1、ServiceLoader结构
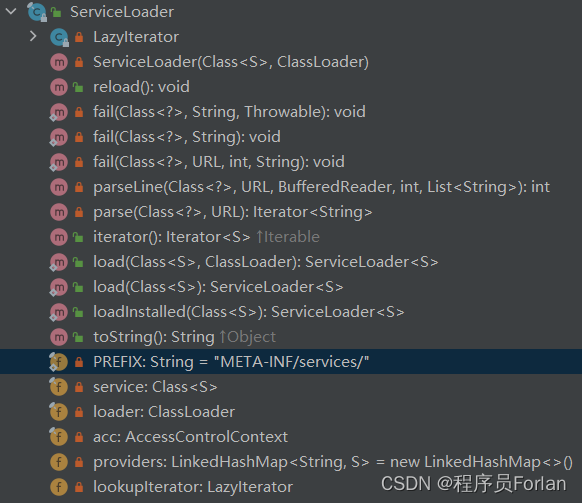
2、相关字段
// 配置文件的路径
private static final String PREFIX = "META-INF/services/";

// 正在加载的服务,类或者接口
private final Class<S> service;

// 类加载器
private final ClassLoader loader;

// 访问控制上下文对象
private final AccessControlContext acc;

// 缓存已经加载的服务类,按照顺序实例化
private LinkedHashMap<String,S> providers = new LinkedHashMap<>();

// 内部类,真正加载服务类
private LazyIterator lookupIterator;
3、核心方法
创建了一些属性service和loader等,最重要的是实例化了内部类LazyIterator
public final class ServiceLoader<S> implements Iterable<S> {

	/**
	 * Creates a new service loader for the given service type, using the
	 * current thread's {@linkplain java.lang.Thread#getContextClassLoader
	 * context class loader}.
	 */
	public static <S> ServiceLoader<S> load(Class<S> service) {
		// 获取当前线程的上下文类加载器
	    ClassLoader cl = Thread.currentThread().getContextClassLoader();
		// 通过请求的Class和ClassLoader创建ServiceLoader
	    return ServiceLoader.load(service, cl);
	}

	private ServiceLoader(Class<S> svc, ClassLoader cl) {
		// 加载的接口不能为空
		service = Objects.requireNonNull(svc, "Service interface cannot be null");
		// 类加载器
		loader = (cl == null) ? ClassLoader.getSystemClassLoader() : cl;
		// 访问权限的上下文对象
		acc = (System.getSecurityManager() != null) ? AccessController.getContext() : null;
		reload();

	}

	/**
	* Clear this loader's provider cache so that all providers will be
	* reloaded.
	*/
	public void reload() {
		// 清空已经加载的服务类
		providers.clear();
		// 实例化内部类迭代器
		LazyIterator lookupIterator = new LazyIterator(service, loader);
	}
}
LazyIterator很重要,查找实现类和创建实现类的过程,都在它里面完成。
private class LazyIterator implements Iterator<S>{
    Class<S> service;
    ClassLoader loader;
    Enumeration<URL> configs = null;
    Iterator<String> pending = null;
    String nextName = null;
	private LazyIterator(Class<S> service, ClassLoader loader) {
		this.service = service;
		this.loader = loader;
	}

    private boolean hasNextService() {
		省略详细代码...
    }
	private S nextService() {
		省略详细代码...
	}
}
当我们调用iterator.hasNext,实际上调用的是LazyIterator的hasNextService方法,判断是否还有下一个服务提供者
private boolean hasNextService() {
	if (nextName != null) {
		return true;
	}
	if (configs == null) {
		try {
			// private static final String PREFIX = "META-INF/services/";
			// META-INF/services/ + 该对象表示的类或接口的全限定类名(类路径+接口名)
			String fullName = PREFIX + service.getName();
			// 将文件路径转成URL对象
			if (loader == null)
				configs = ClassLoader.getSystemResources(fullName);
			else
				configs = loader.getResources(fullName);
		} catch (IOException x) {
			fail(service, "Error locating configuration files", x);
		}
	}
	while ((pending == null) || !pending.hasNext()) {
		// Enumeration<URL> configs是否包含更多元素
		if (!configs.hasMoreElements()) {
			return false;
		}
		// 解析URL文件对象,读取内容
		pending = parse(service, configs.nextElement());
	}
	// 拿到下一个实现类的类名
	nextName = pending.next();
	return true;
}
private S nextService() {
当我们调用iterator.next方法的时候,实际上调用的是LazyIterator的nextService方法,获取下一个服务提供者,它通过反射的方式,创建实现类的实例并返回
private S nextService() {
	if (!hasNextService())
		throw new NoSuchElementException();
	String cn = nextName;
	nextName = null;
	Class<?> c = null;
	try {
		// 创建类的Class对象
		c = Class.forName(cn, false, loader);
	} catch (ClassNotFoundException x) {
		fail(service,
				"Provider " + cn + " not found");
	}
	if (!service.isAssignableFrom(c)) {
		fail(service,
				"Provider " + cn + " not a subtype");
	}
	try {
		// 通过newInstance实例化
		S p = service.cast(c.newInstance());
		// 放入providers缓存
		providers.put(cn, p);
		return p;
	} catch (Throwable x) {
		fail(service,
				"Provider " + cn + " could not be instantiated",
				x);
	}
	throw new Error();          // This cannot happen
}
三、案例
connector连接器小案例
1、新建SPI项目
导入依赖到pom.xml
<artifactId>java-spi-connector</artifactId>
写1个简单接口
public interface IBaseInfo {
	public void url();
}
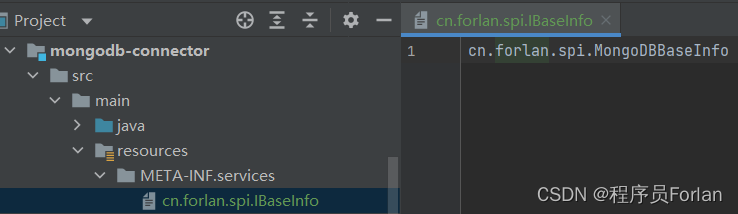
2、创建扩展实现项目1-MongoDB
导入依赖到pom.xml
<artifactId>mongodb-connector</artifactId>

<dependencies>
    <dependency>
        <groupId>cn.forlan</groupId>
        <artifactId>java-spi-connector</artifactId>
        <version>1.0-SNAPSHOT</version>
    </dependency>
</dependencies>
写1个简单实现类,重新url方法,打印mongoDB:url
public class MongoDBBaseInfo implements IBaseInfo{
	@Override
	public void url() {
		System.out.println("mongoDB:url");
	}
}
在resources目录下创建 META-INF/services目录,创建一个文件,命名为接口的类路径+接口名(必须),内容为实现类路径+类名
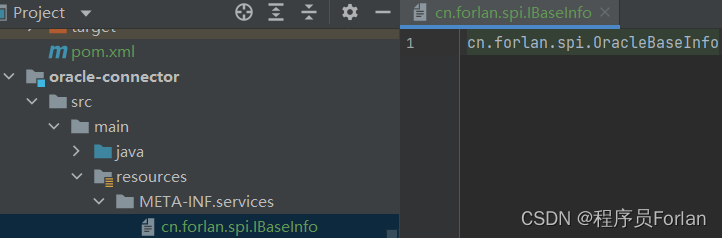
3、创建扩展实现项目2-Oracle
导入依赖到pom.xml
<artifactId>oracle-connector</artifactId>

<dependencies>
    <dependency>
        <groupId>cn.forlan</groupId>
        <artifactId>java-spi-connector</artifactId>
        <version>1.0-SNAPSHOT</version>
    </dependency>
</dependencies>
写1个简单实现类,重新url方法,打印oracle:url
public class OracleBaseInfo implements IBaseInfo{
	@Override
	public void url() {
		System.out.println("oracle:url");
	}
}
在resources目录下创建 META-INF/services目录,创建一个文件,命名为接口的类路径+接口名(必须),内容为实现类路径+类名
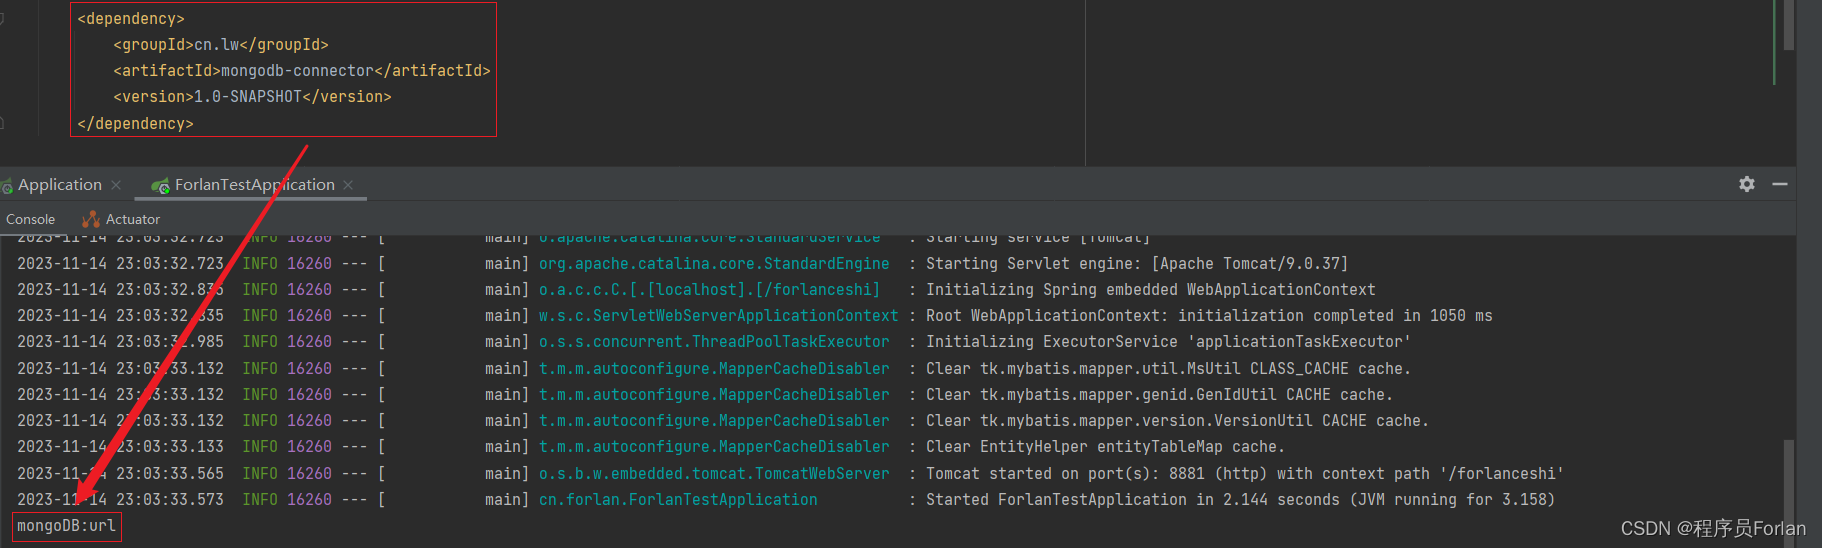
4、测试
测试方法
ServiceLoader<IBaseInfo> serviceLoader = ServiceLoader.load(IBaseInfo.class);
Iterator<IBaseInfo> iterator = serviceLoader.iterator();
while (iterator.hasNext()){
	IBaseInfo next = iterator.next();
	next.url();
}
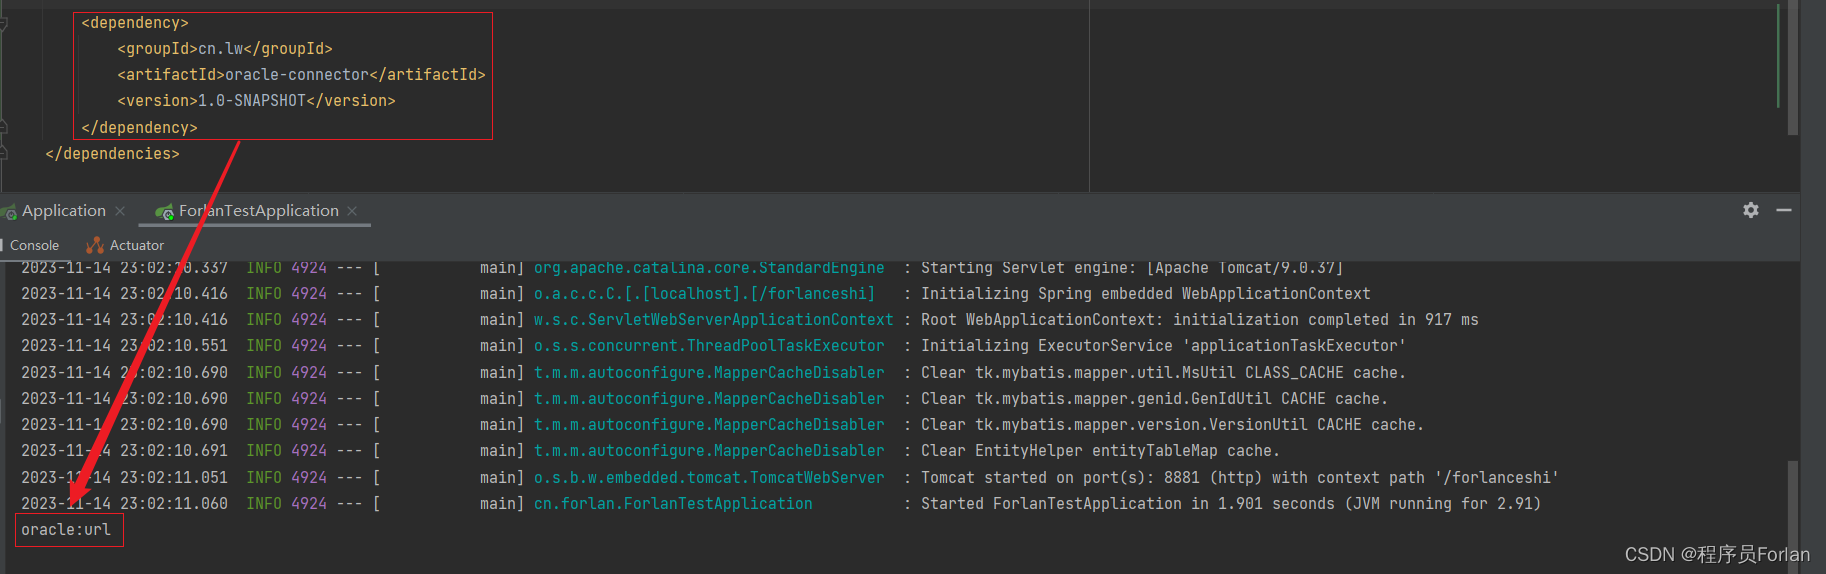
它会根据你导入不同的依赖出现不同的效果
- 导入MongoDB
- 导入Oracle
Spring应用
我们要说的应用就是SpringFactoriesLoader工具类,类似Java中的SPI机制,只不过它更优,不会一次性加载所有类,可以根据key进行加载
作用:从classpath/META-INF/spring.factories文件中,根据key去加载对应的类到spring IoC容器中
1、创建study工程
创建ForlanCore类
package cn.forlan.spring;

public class ForlanCore {
	public void code() {
		System.out.println("Forlan疯狂敲代码");
	}
}
创建ForlanConfig配置类
package cn.forlan.spring;

import org.springframework.beans.factory.annotation.Configurable;
import org.springframework.context.annotation.Bean;

@Configurable
public class ForlanConfig {
	@Bean
	public ForlanCore forlanCore() {
		return new ForlanCore();
	}
}
2、创建forlan-test工程
打包study为jar,引入依赖
<dependency>
    <groupId>cn.forlan</groupId>
    <artifactId>study1</artifactId>
    <version>1.0-SNAPSHOT</version>
</dependency>
测试获取属性
@SpringBootApplication
public class ForlanTestApplication {
	public static void main(String[] args) {
		ApplicationContext applicationContext = SpringApplication.run(ForlanTestApplication.class, args);
		ForlanCore fc=applicationContext.getBean(ForlanCore.class);
		fc.code();
	}
}
运行报错,原因很简单,ForlanCore在spring容器中找不到,没有注入
Exception in thread "main" org.springframework.beans.factory.NoSuchBeanDefinitionException: No qualifying bean of type 'cn.forlan.spring.ForlanCore' available
	at org.springframework.beans.factory.support.DefaultListableBeanFactory.getBean(DefaultListableBeanFactory.java:352)
	at org.springframework.beans.factory.support.DefaultListableBeanFactory.getBean(DefaultListableBeanFactory.java:343)
	at org.springframework.context.support.AbstractApplicationContext.getBean(AbstractApplicationContext.java:1127)
	at cn.forlan.ForlanTestApplication.main(ForlanTestApplication.java:12)
解决方法
在study工程的resources下新建文件夹META-INF,在文件夹下面新建spring.factories文件,配置key和value,然后重新打包即可
org.springframework.boot.autoconfigure.EnableAutoConfiguration=cn.forlan.spring.ForlanConfig
注:key=EnableAutoConfiguration的全路径,value=配置类的全路径
3、进阶使用
指定配置文件生效条件
在META-INF/增加配置文件,spring-autoconfigure-metadata.properties
cn.forlan.spring.ForlanConfig.ConditionalOnClass=cn.forlan.spring.Study
格式:自动配置的类全名.条件=值
该配置的意思是,项目中com.forlan.spring包下存在Study,才会加载ForlanConfig
执行之前的测试用例,运行报错
解决:在当前工程指定包下创建一个Study即可


 4350
4350


 被折叠的 条评论
为什么被折叠?
被折叠的 条评论
为什么被折叠?
 到【灌水乐园】发言


