


网上有很多方式搭建Netty项目,但是都很繁琐,而且不够详细,然后这里列一下最简单的创建方式。
一、新建项目:
File->New->Project:

然后新建maven项目,不知道maven的可以参考如下链接,其中对后面的项目结构也有说明:
https://www.cnblogs.com/whgk/p/7112560.html

填名称和项目标签,示例如下:

填文件位置:

新建完后项目文件结构如下:

二、添加依赖
看完上面关于maven的介绍后这一部分就很好理解了,直接在pom.xml下添加如下语句即可:

三、测试
测试代码随便网上找,这里我引用一下别人的代码
EchoSeverHandler:
import io.netty.buffer.ByteBuf;
import io.netty.buffer.Unpooled;
import io.netty.channel.ChannelFutureListener;
import io.netty.channel.ChannelHandler.Sharable;
import io.netty.channel.ChannelHandlerContext;
import io.netty.channel.ChannelInboundHandlerAdapter;
import io.netty.util.CharsetUtil;
@Sharable
public class EchoServerHandler extends ChannelInboundHandlerAdapter{
@Override
public void channelRead(ChannelHandlerContext ctx, Object msg) throws Exception {
//将客户端传入的消息转换为Netty的ByteBuf类型
ByteBuf in = (ByteBuf) msg;
// 在控制台打印传入的消息
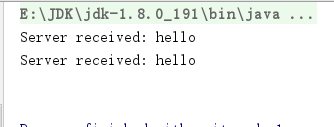
System.out.println(
"Server received: " + in.toString(CharsetUtil.UTF_8)
);
//将接收到的消息写给发送者,而不冲刷出站消息
ctx.write(in);
}
@Override
public void channelReadComplete(ChannelHandlerContext ctx) throws Exception {
// 将未处决消息冲刷到远程节点, 并且关闭该Channel
ctx.writeAndFlush(Unpooled.EMPTY_BUFFER)
.addListener(ChannelFutureListener.CLOSE);
}
/**
* 异常处理
* @param ctx
* @param cause
* @throws Exception
*/
@Override
public void exceptionCaught(ChannelHandlerContext ctx, Throwable cause) throws Exception {
//打印异常栈跟踪
cause.printStackTrace();
// 关闭该Channel
ctx.close();
}
}EchoServer:
import io.netty.bootstrap.ServerBootstrap;
import io.netty.channel.ChannelFuture;
import io.netty.channel.ChannelInitializer;
import io.netty.channel.EventLoopGroup;
import io.netty.channel.nio.NioEventLoopGroup;
import io.netty.channel.socket.SocketChannel;
import io.netty.channel.socket.nio.NioServerSocketChannel;

import java.net.InetSocketAddress;

public class EchoServer {
    private final static int port = 1234;

    public static void main(String[] args) {
        start();
    }

    private static void start() {
        final EchoServerHandler serverHandler = new EchoServerHandler();
        // 创建EventLoopGroup
        EventLoopGroup bossGroup = new NioEventLoopGroup();
        EventLoopGroup workerGroup = new NioEventLoopGroup();
        // 创建EventLoopGroup
        ServerBootstrap b = new ServerBootstrap();
        b.group(bossGroup, workerGroup)
                //指定所使用的NIO传输Channel
                .channel(NioServerSocketChannel.class)
                //使用指定的端口设置套接字地址
                .localAddress(new InetSocketAddress(port))
                // 添加一个EchoServerHandler到Channle的ChannelPipeline
                .childHandler(new ChannelInitializer<SocketChannel>() {
                    @Override
                    protected void initChannel(SocketChannel socketChannel) throws Exception {
                        //EchoServerHandler被标注为@shareable,所以我们可以总是使用同样的案例
                        socketChannel.pipeline().addLast(serverHandler);
                    }
                });

        try {
            // 异步地绑定服务器;调用sync方法阻塞等待直到绑定完成
            ChannelFuture f = b.bind().sync();
            // 获取Channel的CloseFuture,并且阻塞当前线程直到它完成
            f.channel().closeFuture().sync();
        } catch (InterruptedException e) {
            e.printStackTrace();
        } finally {
            // 优雅的关闭EventLoopGroup,释放所有的资源
            bossGroup.shutdownGracefully();
            workerGroup.shutdownGracefully();
        }
    }
}
客户端直接用Sockettool测试:网上下载,很小的一个软件。

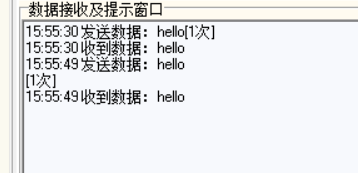
输入ip地址:127.0.0.1 Port:1234(例如其他端口也行,但必须是服务器的端口)然后开启服务端(运行EchoSever),然后连接Socket,发送hello, 会收到服务器发回的消息hello
然后你就可以开始学习其他Netty的操作了。


 841
841


 被折叠的 条评论
为什么被折叠?
被折叠的 条评论
为什么被折叠?
 到【灌水乐园】发言


