


文章目录
引入redis
   <!-- 引入 redis 依赖 -->
        <dependency>
            <groupId>org.springframework.boot</groupId>
            <artifactId>spring-boot-starter-data-redis</artifactId>
        </dependency>
在spring-boot-starter-data-redis中依赖了lettuce-core和
 <dependency>
      <groupId>org.springframework.data</groupId>
      <artifactId>spring-data-redis</artifactId>
      <version>2.4.1</version>
      <scope>compile</scope>
    </dependency>
    <dependency>
      <groupId>io.lettuce</groupId>
      <artifactId>lettuce-core</artifactId>
      <version>6.0.1.RELEASE</version>
      <scope>compile</scope>
</dependency>
在spring-data-redis-version.pom中中又依赖了redis各个需要的jar包
自动配置
springBoot原生就很好支持了redis的整合
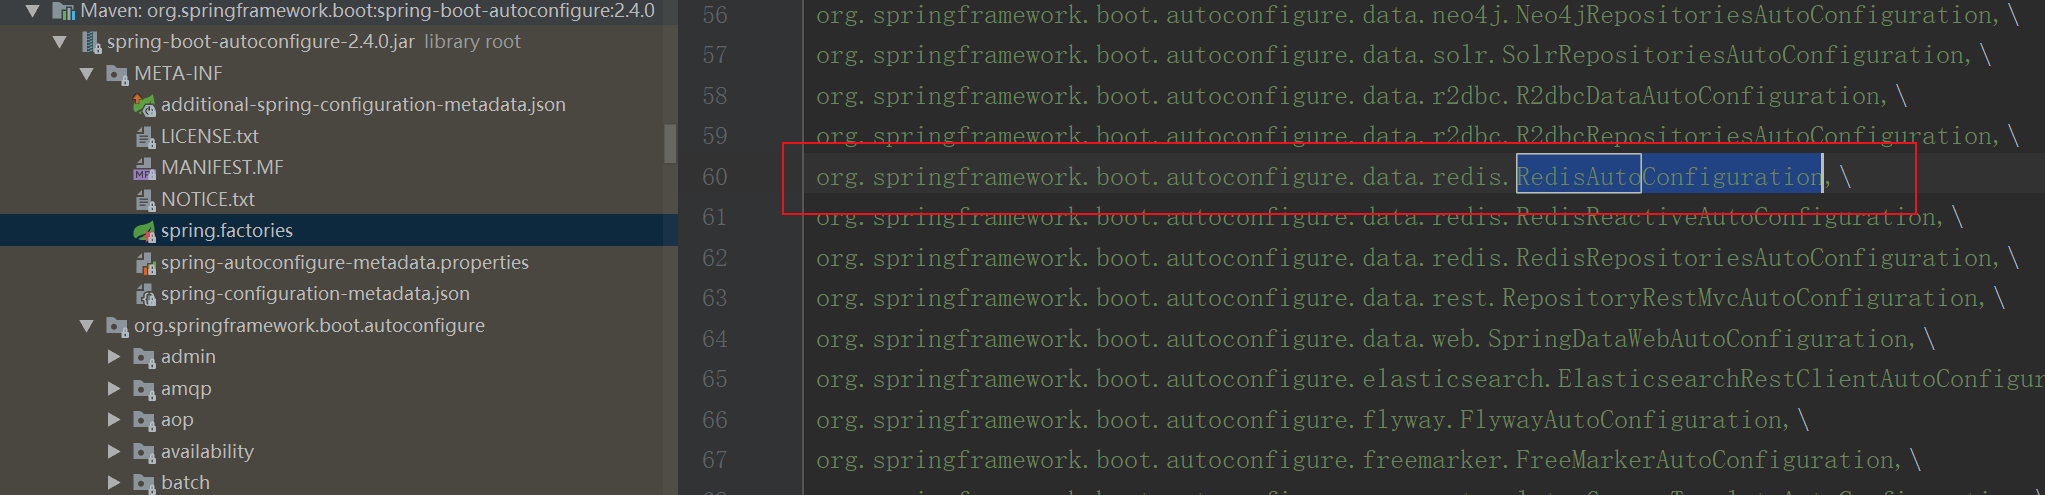
spring-boot-autoconfigure的spring.factories中指定了redis的自动配置类RedisAutoConfiguration
@Configuration(proxyBeanMethods = false)  //不开启代理,如果通过调方法,获取bean
    ,每次获取方法bean的都会重新执行一次方法,获取一个新的实例
@ConditionalOnClass(RedisOperations.class)//在依赖了相关redis的包才会进行加载
@EnableConfigurationProperties(RedisProperties.class) //@EnableConfigurationProperties({ConfigBean.class})  注解使ConfigurationProperties注解生效,是RedisProperties配置作为bean生效
@Import({ LettuceConnectionConfiguration.class, JedisConnectionConfiguration.class })//粉分别导入LettuceConnectionConfiguration和JedisConnectionConfiguration。顺序是LettuceConnectionConfiguration优先
public class RedisAutoConfiguration {

	@Bean
	@ConditionalOnMissingBean(name = "redisTemplate")
	@ConditionalOnSingleCandidate(RedisConnectionFactory.class)
	public RedisTemplate<Object, Object> redisTemplate(RedisConnectionFactory redisConnectionFactory) {
		RedisTemplate<Object, Object> template = new RedisTemplate<>();
		template.setConnectionFactory(redisConnectionFactory);
		return template;
	}

	@Bean
	@ConditionalOnMissingBean
	@ConditionalOnSingleCandidate(RedisConnectionFactory.class)
	public StringRedisTemplate stringRedisTemplate(RedisConnectionFactory redisConnectionFactory) {
		StringRedisTemplate template = new StringRedisTemplate();
		template.setConnectionFactory(redisConnectionFactory);
		return template;
	}

}
这里分别导入了LettuceConnectionConfiguration和JedisConnectionConfiguration两种配置
有两种客户端Lettuce和Jedis
如果你在网上搜索Redis 的Java客户端,你会发现,大多数文献介绍的都是 Jedis。
不可否认,Jedis是一个优秀的基于Java语言的Redis客户端。
但是,其不足也很明显:Jedis在实现上是直接连接Redis-Server,在多个线程间共享一个Jedis实例时是线程不安全的,如果想要在多线程场景下使用Jedis,需要使用连接池,每个线程都使用自己的Jedis实例,当连接数量增多时,会消耗较多的物理资源。
与Jedis相比,Lettuce则完全克服了其线程不安全的缺点:Lettuce是一个可伸缩的线程安全的Redis客户端,支持同步、异步和响应式模式。
多个线程可以共享一个连接实例,而不必担心多线程并发问题。
它基于优秀Netty NIO框架构建,支持Redis的高级功能,如Sentinel,集群,流水线,自动重新连接和Redis数据模型。
Jedis在实现上是直接连接的redis server,如果在多线程环境下是非线程安全的,这个时候只有使用jedis pool连接池,为每个Jedis实例增加物理连接。
类似BIO模式
Lettuce的连接是基于Netty的,连接实例(StatefulRedisConnection)可以在多个线程间并发访问,应为StatefulRedisConnection是线程安全的,所以一个连接实例(StatefulRedisConnection)就可以满足多线程环境下的并发访问,当然这个也是可伸缩的设计,一个连接实例不够的情况也可以按需增加连接实例。
类似NIO模式
springboot2.0后,之前使用的jedis已改成Lettuce。用netty去实现这些是目前最好的选择了
因为JedisConnectionConfiguration上有注解@ConditionalOnMissingBean(RedisConnectionFactory.class)
熟悉这个注解的知道在LettuceConnectionConfiguration正常引入的情况下JedisConnectionConfiguration是不会被加载的
那么看看LettuceConnectionConfiguration中都配置了什么吧
先看构造
@Configuration(proxyBeanMethods = false)
@ConditionalOnClass(RedisClient.class)
@ConditionalOnProperty(name = "spring.redis.client-type", havingValue = "lettuce", matchIfMissing = true)
class LettuceConnectionConfiguration extends RedisConnectionConfiguration {

	LettuceConnectionConfiguration(RedisProperties properties,
			ObjectProvider<RedisSentinelConfiguration> sentinelConfigurationProvider,
			ObjectProvider<RedisClusterConfiguration> clusterConfigurationProvider) {
		super(properties, sentinelConfigurationProvider, clusterConfigurationProvider);
    }

}
这里有个ObjectProvider泛型包装类
那么什么时候使用ObjectProvider接口?
如果待注入参数的Bean为空或有多个时,便是ObjectProvider发挥作用的时候了。
如果注入实例为空时,使用ObjectProvider则避免了强依赖导致的依赖对象不存在异常;
如果有多个实例,ObjectProvider的方法会根据Bean实现的Ordered接口或@Order注解指定的先后顺序获取一个Bean。从而了提供了一个更加宽松的依赖注入方式。
这里是因为sentinelConfigurationProvider和clusterConfigurationProvider可能是空的,因此使用ObjectProvider包装。后续可以通过类似 getIfAvailable方法进行获取
这里这么做的目的是,如果用过想要自定义RedisSentinelConfiguration和RedisClusterConfiguration可以进行自定义注入,那么这里会优先使用用户自定义的配置bean
配置类中还注入了两个bean
@Bean(destroyMethod = "shutdown")
	@ConditionalOnMissingBean(ClientResources.class)
	DefaultClientResources lettuceClientResources() {
		return DefaultClientResources.create();
	}

	@Bean
	@ConditionalOnMissingBean(RedisConnectionFactory.class)
	LettuceConnectionFactory redisConnectionFactory(
			ObjectProvider<LettuceClientConfigurationBuilderCustomizer> builderCustomizers,
			ClientResources clientResources) {
		LettuceClientConfiguration clientConfig = getLettuceClientConfiguration(builderCustomizers, clientResources,
				getProperties().getLettuce().getPool());
		return createLettuceConnectionFactory(clientConfig);
	}
DefaultClientResources是netty线程,定时任务等的一些初始化
 static {

        int threads = Math.max(1, SystemPropertyUtil.getInt("io.netty.eventLoopThreads",
                Math.max(MIN_IO_THREADS, Runtime.getRuntime().availableProcessors())));

        DEFAULT_IO_THREADS = threads;
        DEFAULT_COMPUTATION_THREADS = threads;
        if (logger.isDebugEnabled()) {
            logger.debug("-Dio.netty.eventLoopThreads: {}", threads);
        }
    }
默认io线程和默认计算线程都为计算机硬件线程数
看看DefaultClientResources中初始化了那些内容吧,初始化netty的io线程数,就是我们常说的work线程,和业务处理线程eventExecutorGroup
int ioThreadPoolSize = builder.ioThreadPoolSize;

            if (ioThreadPoolSize < MIN_IO_THREADS) {
                logger.info("ioThreadPoolSize is less than {} ({}), setting to: {}", MIN_IO_THREADS, ioThreadPoolSize,
                        MIN_IO_THREADS);
                ioThreadPoolSize = MIN_IO_THREADS;
            }

            this.sharedEventLoopGroupProvider = false;
            this.eventLoopGroupProvider = new DefaultEventLoopGroupProvider(ioThreadPoolSize);

 int computationThreadPoolSize = builder.computationThreadPoolSize;
            if (computationThreadPoolSize < MIN_COMPUTATION_THREADS) {

                logger.info("computationThreadPoolSize is less than {} ({}), setting to: {}", MIN_COMPUTATION_THREADS,
                        computationThreadPoolSize, MIN_COMPUTATION_THREADS);
                computationThreadPoolSize = MIN_COMPUTATION_THREADS;
            }

            eventExecutorGroup = DefaultEventLoopGroupProvider.createEventLoopGroup(DefaultEventExecutorGroup.class,
                    computationThreadPoolSize);
创建LettuceConnectionFactory
先创建LettuceClientConfiguration
	private final boolean useSsl;
	private final boolean verifyPeer;
	private final boolean startTls;
	private final Optional<ClientResources> clientResources;
	private final Optional<ClientOptions> clientOptions;
	private final Optional<String> clientName;
	private final Optional<ReadFrom> readFrom;
	private final Duration timeout;
	private final Duration shutdownTimeout;
	private final Duration shutdownQuietPeriod;
private LettuceClientConfiguration getLettuceClientConfiguration(
			ObjectProvider<LettuceClientConfigurationBuilderCustomizer> builderCustomizers,
			ClientResources clientResources, Pool pool) {
		LettuceClientConfigurationBuilder builder = createBuilder(pool);
		applyProperties(builder);
		if (StringUtils.hasText(getProperties().getUrl())) {
			customizeConfigurationFromUrl(builder);
		}
		builder.clientOptions(createClientOptions());
		builder.clientResources(clientResources);
		builderCustomizers.orderedStream().forEach((customizer) -> customizer.customize(builder));
		return builder.build();
	}
使用建造者模式创建LettuceClientConfiguration
进入org.springframework.boot.autoconfigure.data.redis.LettuceConnectionConfiguration#createLettuceConnectionFactory
	private LettuceConnectionFactory createLettuceConnectionFactory(LettuceClientConfiguration clientConfiguration) {
		if (getSentinelConfig() != null) {
			return new LettuceConnectionFactory(getSentinelConfig(), clientConfiguration);
		}
		if (getClusterConfiguration() != null) {
			return new LettuceConnectionFactory(getClusterConfiguration(), clientConfiguration);
		}
		return new LettuceConnectionFactory(getStandaloneConfig(), clientConfiguration);
	}
这里代表客户端的三模式,哨兵,集群,单例
创建LettuceConnectionFactory bean完成
LettuceConnectionFactory 继承了InitializingBean接口,还会执行afterPropertiesSet,创建客户端信息
public void afterPropertiesSet() {

		this.client = createClient();

		this.connectionProvider = new ExceptionTranslatingConnectionProvider(createConnectionProvider(client, CODEC));
		this.reactiveConnectionProvider = new ExceptionTranslatingConnectionProvider(
				createConnectionProvider(client, LettuceReactiveRedisConnection.CODEC));

		if (isClusterAware()) {

			this.clusterCommandExecutor = new ClusterCommandExecutor(
					new LettuceClusterTopologyProvider((RedisClusterClient) client),
					new LettuceClusterConnection.LettuceClusterNodeResourceProvider(this.connectionProvider),
					EXCEPTION_TRANSLATION);
		}

		if (getEagerInitialization() && getShareNativeConnection()) {
			initConnection();
		}
	}
RedisTemplate
大部分的情况下,我们使用RedisTemplate来实现和redis数据库的交互。
RedisTemplate是Redis模块的中心类,它为与Redis的交互提供了一个高级抽象。RedisConnection提供低级方法,接收和返回二进制数组,RedisTemplate则负责序列化和连接管理,使用户不用处理这些细节。官方文档中,RedisTemplate定义为:performs automatic serialization/deserialization between the given objects and the underlying binary data in the Redis Store。
RedisTemplate一旦配置好,就是线程安全的,可供多个实例重用
RedisTemplate的大多数操作都使用基于Java的序列化程序。这意味着它读写的任何对象都通过Java进行序列化和反序列化。你可以更改序列化机制(org.springframework.data.redis.serializer中提供了几种实现)。RedisCache和RedisTemplate默认的情况下使用JdkSerializationRedisSerializer。对于JSON格式的数据,可以使用Jackson2JsonRedisSerializer或者GenericJackson2JsonRedisSerialize。对于String密集型操作,可以考虑StringRedisTemplate。
看下其属性
	private boolean enableTransactionSupport = false;
	private boolean exposeConnection = false;
	private boolean initialized = false;
	private boolean enableDefaultSerializer = true;
	private @Nullable RedisSerializer<?> defaultSerializer;
	private @Nullable ClassLoader classLoader;

	@SuppressWarnings("rawtypes") private @Nullable RedisSerializer keySerializer = null;
	@SuppressWarnings("rawtypes") private @Nullable RedisSerializer valueSerializer = null;
	@SuppressWarnings("rawtypes") private @Nullable RedisSerializer hashKeySerializer = null;
	@SuppressWarnings("rawtypes") private @Nullable RedisSerializer hashValueSerializer = null;
	private RedisSerializer<String> stringSerializer = RedisSerializer.string();

	private @Nullable ScriptExecutor<K> scriptExecutor;

	private final ValueOperations<K, V> valueOps = new DefaultValueOperations<>(this);
	private final ListOperations<K, V> listOps = new DefaultListOperations<>(this);
	private final SetOperations<K, V> setOps = new DefaultSetOperations<>(this);
	private final StreamOperations<K, ?, ?> streamOps = new DefaultStreamOperations<>(this,
			ObjectHashMapper.getSharedInstance());
	private final ZSetOperations<K, V> zSetOps = new DefaultZSetOperations<>(this);
	private final GeoOperations<K, V> geoOps = new DefaultGeoOperations<>(this);
	private final HyperLogLogOperations<K, V> hllOps = new DefaultHyperLogLogOperations<>(this);
	private final ClusterOperations<K, V> clusterOps = new DefaultClusterOperations<>(this);
对于不同的类型有不同的操作方式Operation,对于key和value也可以指定不同的序列化方式
在初始化方法中
@Override
	public void afterPropertiesSet() {

		super.afterPropertiesSet();

		boolean defaultUsed = false;

		if (defaultSerializer == null) {

			defaultSerializer = new JdkSerializationRedisSerializer(
					classLoader != null ? classLoader : this.getClass().getClassLoader());
		}

		if (enableDefaultSerializer) {

			if (keySerializer == null) {
				keySerializer = defaultSerializer;
				defaultUsed = true;
			}
			if (valueSerializer == null) {
				valueSerializer = defaultSerializer;
				defaultUsed = true;
			}
			if (hashKeySerializer == null) {
				hashKeySerializer = defaultSerializer;
				defaultUsed = true;
			}
			if (hashValueSerializer == null) {
				hashValueSerializer = defaultSerializer;
				defaultUsed = true;
			}
		}

		if (enableDefaultSerializer && defaultUsed) {
			Assert.notNull(defaultSerializer, "default serializer null and not all serializers initialized");
		}

		if (scriptExecutor == null) {
			this.scriptExecutor = new DefaultScriptExecutor<>(this);
		}

		initialized = true;
	}
这里默认采用JdkSerializationRedisSerializer也就是,序列化反序列化都采用的字节数组。当然也可以自行替换
StringRedisTemplate
public class StringRedisTemplate extends RedisTemplate<String, String> {

	/**
	 * Constructs a new <code>StringRedisTemplate</code> instance. {@link #setConnectionFactory(RedisConnectionFactory)}
	 * and {@link #afterPropertiesSet()} still need to be called.
	 */
	public StringRedisTemplate() {
		setKeySerializer(RedisSerializer.string());
		setValueSerializer(RedisSerializer.string());
		setHashKeySerializer(RedisSerializer.string());
		setHashValueSerializer(RedisSerializer.string());
	}
····
}
四种序列化采用的都是StringRedisSerializer进行序列化
public static final StringRedisSerializer UTF_8 = new StringRedisSerializer(StandardCharsets.UTF_8);
那么就可以得出一个结论,如果你想使用默认的配置来操作redis,则如果操作的数据是字节数组,就是用redistemplate,如果操作的数据是明文,使用stringredistemplate。
当然在项目中真实使用时,一般是自定义redistemplate的bean实例,来设置具体的序列化策略,说白了就是redistemplate通过自定义bean可以实现和stringredistemplate一样的序列化,使用起来更加灵活。
如何序列化,序列化是怎么工作的
可配置四种序列化
KeySerializer和ValueSerializer是十分简单的,就是执行set时分别对key和value进行序列化,将序列化后的数据传到redis,如果使用get方法,会使用ValueSerializer解析
那么HashKeySerializer和HashValueSerializer的用处分别是什么,看这个方法就知道了
	public void put(K key, HK hashKey, HV value) {

		byte[] rawKey = rawKey(key);
		byte[] rawHashKey = rawHashKey(hashKey);
		byte[] rawHashValue = rawHashValue(value);

		execute(connection -> {
			connection.hSet(rawKey, rawHashKey, rawHashValue);
			return null;
		}, true);
	}
就是分别对hashkey和hashvalue进行序列化
如何与redis服务器建立一条连接
从获取一条连接开始
org.springframework.data.redis.connection.lettuce.LettuceConnectionFactory#getConnection
	public RedisConnection getConnection() {

		if (isClusterAware()) {
			return getClusterConnection();
		}

		LettuceConnection connection;
		connection = doCreateLettuceConnection(getSharedConnection(), connectionProvider, getTimeout(), getDatabase());
		connection.setConvertPipelineAndTxResults(convertPipelineAndTxResults);
		return connection;
	}
private SharedConnection<byte[]> getOrCreateSharedConnection() {

		synchronized (this.connectionMonitor) {

			if (this.connection == null) {
				this.connection = new SharedConnection<>(connectionProvider);
			}

			return this.connection;
		}
	}
初始化需要创建一个SharedConnection
再通过SharedConnection的getConnection方法
org.springframework.data.redis.connection.lettuce.LettucePoolingConnectionProvider#getConnection
	@Override
	public <T extends StatefulConnection<?, ?>> T getConnection(Class<T> connectionType) {

		if (connectionType.equals(StatefulRedisSentinelConnection.class)) {
			return connectionType.cast(client.connectSentinel());
		}

		if (connectionType.equals(StatefulRedisPubSubConnection.class)) {
			return connectionType.cast(client.connectPubSub(codec));
		}

		if (StatefulConnection.class.isAssignableFrom(connectionType)) {

			return connectionType.cast(readFrom.map(it -> this.masterReplicaConnection(redisURISupplier.get(), it))
					.orElseGet(() -> client.connect(codec)));
		}

		throw new UnsupportedOperationException("Connection type " + connectionType + " not supported!");
	}
调用client的connect方法,client指的是RedisClient
使用redisClient进行创建连接,接着进入
   public <K, V> StatefulRedisConnection<K, V> connect(RedisCodec<K, V> codec) {

        checkForRedisURI();

        return getConnection(connectStandaloneAsync(codec, this.redisURI, getDefaultTimeout()));
    }
io.lettuce.core.RedisClient#connectStandaloneAsync看方法名称的含义好像指的是获取一个单例的异步连接
继续看
 private <K, V> ConnectionFuture<StatefulRedisConnection<K, V>> connectStandaloneAsync(RedisCodec<K, V> codec,
            RedisURI redisURI, Duration timeout) {

        assertNotNull(codec);
        checkValidRedisURI(redisURI);

        logger.debug("Trying to get a Redis connection for: " + redisURI);

        DefaultEndpoint endpoint = new DefaultEndpoint(getOptions(), getResources());
        RedisChannelWriter writer = endpoint;

        if (CommandExpiryWriter.isSupported(getOptions())) {
            writer = new CommandExpiryWriter(writer, getOptions(), getResources());
        }

        StatefulRedisConnectionImpl<K, V> connection = newStatefulRedisConnection(writer, endpoint, codec, timeout);
        ConnectionFuture<StatefulRedisConnection<K, V>> future = connectStatefulAsync(connection, endpoint, redisURI,
                () -> new CommandHandler(getOptions(), getResources(), endpoint));

        future.whenComplete((channelHandler, throwable) -> {

            if (throwable != null) {
                connection.close();
            }
        });

        return future;
    }
DefaultEndpoint
看其继承的接口
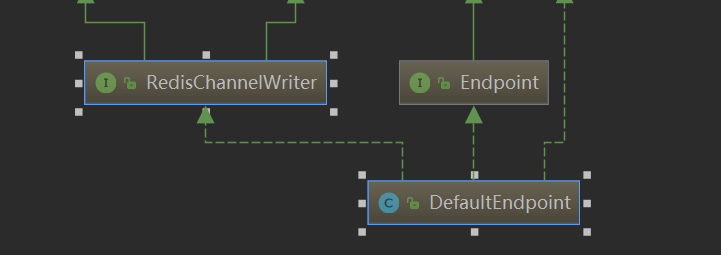
主要具有维护channel的功能,和通过channel去发送消息的功能
Endpoint,在建立断开连接时会被调用,维护DefaultEndPoint的channel。
public interface Endpoint extends PushHandler {

    /**
     * Reset this endpoint to its initial state, clear all buffers and potentially close the bound channel.
     *
     * @since 5.1
     */
    void initialState();

    /**
     * Notify about channel activation.
     *
     * @param channel the channel
     */
    void notifyChannelActive(Channel channel);

    /**
     * Notify about channel deactivation.
     *
     * @param channel the channel
     */
    void notifyChannelInactive(Channel channel);

    /**
     * Notify about an exception occured in channel/command processing
     *
     * @param t the Exception
     */
    void notifyException(Throwable t);

    /**
     * Signal the endpoint to drain queued commands from the queue holder.
     *
     * @param queuedCommands the queue holder.
     */
    void notifyDrainQueuedCommands(HasQueuedCommands queuedCommands);

    /**
     * Associate a {@link ConnectionWatchdog} with the {@link Endpoint}.
     *
     * @param connectionWatchdog the connection watchdog.
     */
    void registerConnectionWatchdog(ConnectionWatchdog connectionWatchdog);

}
继续向后看connectStandaloneAsync方法
writer = new CommandExpiryWriter(writer, getOptions(), getResources());
创建了writer,实际上还是包装了endpoint,内部主要还是由endpoint来实现
创建StatefulRedisConnectionImpl
StatefulRedisConnectionImpl<K, V> connection = newStatefulRedisConnection(writer, endpoint, codec, timeout);
传入参数进入构造
 public StatefulRedisConnectionImpl(RedisChannelWriter writer, PushHandler pushHandler, RedisCodec<K, V> codec,
            Duration timeout) {

        super(writer, timeout);

        this.pushHandler = pushHandler;
        this.codec = codec;
        this.async = newRedisAsyncCommandsImpl();
        this.sync = newRedisSyncCommandsImpl();
        this.reactive = newRedisReactiveCommandsImpl();
    }
这里有三种类型
分别时异步,同步 和reactive(灵活的)三种实现
reactive使用响应式编程的方式。暂时先不现就这个
StatefulRedisConnectionImpl
先看当前StatefulRedisConnectionImpl 继承自RedisChannelHandler的dispatch方法
   protected <T> RedisCommand<K, V, T> dispatch(RedisCommand<K, V, T> cmd) {

        if (debugEnabled) {
            logger.debug("dispatching command {}", cmd);
        }

        if (tracingEnabled) {

            RedisCommand<K, V, T> commandToSend = cmd;
            TraceContextProvider provider = CommandWrapper.unwrap(cmd, TraceContextProvider.class);

            if (provider == null) {
                commandToSend = new TracedCommand<>(cmd,
                        clientResources.tracing().initialTraceContextProvider().getTraceContext());
            }

            return channelWriter.write(commandToSend);
        }

        return channelWriter.write(cmd);
    }
实际上就是将命令通过channelWriter发送出去
RedisAsyncCommandsImpl
异步命令实现是依赖StatefulRedisConnectionImpl的
构造将StatefulRedisConnectionImpl传到
 protected RedisAsyncCommandsImpl<K, V> newRedisAsyncCommandsImpl() {
        return new RedisAsyncCommandsImpl<>(this, codec);
    }
在继承的AbstractRedisAsyncCommands抽象类中对redis各个命令都有实现
例如
  @Override
    public RedisFuture<V> getset(K key, V value) {
        return dispatch(commandBuilder.getset(key, value));
    }
对创建的命令使用dispatch方法处理
  public <T> AsyncCommand<K, V, T> dispatch(RedisCommand<K, V, T> cmd) {
        AsyncCommand<K, V, T> asyncCommand = new AsyncCommand<>(cmd);
        RedisCommand<K, V, T> dispatched = connection.dispatch(asyncCommand);
        if (dispatched instanceof AsyncCommand) {
            return (AsyncCommand<K, V, T>) dispatched;
        }
        return asyncCommand;
    }
发现异步实现实际上就是将原命令使用AsyncCommand命令包装,调用StatefulRedisConnectionImpl的dispatch发送命令。
AsyncCommand

可以看出来除了命令相关的父类还继承了CompletableFuture,这也是其实现的异步的关键
newRedisSyncCommandsImpl
protected <T> T syncHandler(Object asyncApi, Class<?>... interfaces) {
        FutureSyncInvocationHandler h = new FutureSyncInvocationHandler((StatefulConnection<?, ?>) this, asyncApi, interfaces);
        return (T) Proxy.newProxyInstance(AbstractRedisClient.class.getClassLoader(), interfaces, h);
    }
发现就是对异步实现做了一个代理
@Override
    protected Object handleInvocation(Object proxy, Method method, Object[] args) throws Throwable {

        try {

            Method targetMethod = this.translator.get(method);
            Object result = targetMethod.invoke(asyncApi, args);

            if (result instanceof RedisFuture<?>) {

                RedisFuture<?> command = (RedisFuture<?>) result;

                if (!isTxControlMethod(method.getName(), args) && isTransactionActive(connection)) {
                    return null;
                }

                long timeout = getTimeoutNs(command);

                return Futures.awaitOrCancel(command, timeout, TimeUnit.NANOSECONDS);
            }

            return result;
        } catch (InvocationTargetException e) {
            throw e.getTargetException();
        }
    }
在执行对应api时,如果是RedisFuture,执行 Futures.awaitOrCancel(command, timeout, TimeUnit.NANOSECONDS);知道有结果返回或者超时结束阻塞这hi才会返回结果
创建完毕后进入io.lettuce.core.RedisClient#connectStatefulAsync方法
 private <K, V, S> ConnectionFuture<S> connectStatefulAsync(StatefulRedisConnectionImpl<K, V> connection, Endpoint endpoint,
            RedisURI redisURI, Supplier<CommandHandler> commandHandlerSupplier) {

        ConnectionBuilder connectionBuilder;
        if (redisURI.isSsl()) {
            SslConnectionBuilder sslConnectionBuilder = SslConnectionBuilder.sslConnectionBuilder();
            sslConnectionBuilder.ssl(redisURI);
            connectionBuilder = sslConnectionBuilder;
        } else {
            connectionBuilder = ConnectionBuilder.connectionBuilder();
        }

        ConnectionState state = connection.getConnectionState();
        state.apply(redisURI);
        state.setDb(redisURI.getDatabase());

        connectionBuilder.connection(connection);
        connectionBuilder.clientOptions(getOptions());
        connectionBuilder.clientResources(getResources());
        connectionBuilder.commandHandler(commandHandlerSupplier).endpoint(endpoint);

        connectionBuilder(getSocketAddressSupplier(redisURI), connectionBuilder, redisURI);
        connectionBuilder.connectionInitializer(createHandshake(state));
        channelType(connectionBuilder, redisURI);

        ConnectionFuture<RedisChannelHandler<K, V>> future = initializeChannelAsync(connectionBuilder);

        return future.thenApply(channelHandler -> (S) connection);
    }
创建connectionBuilder,设置客户端的信息
在io.lettuce.core.AbstractRedisClient#connectionBuilder中,构建Bootstrap
 protected void connectionBuilder(Mono<SocketAddress> socketAddressSupplier, ConnectionBuilder connectionBuilder,
            RedisURI redisURI) {

        Bootstrap redisBootstrap = new Bootstrap();
        redisBootstrap.option(ChannelOption.ALLOCATOR, ByteBufAllocator.DEFAULT);

        ClientOptions clientOptions = getOptions();
        SocketOptions socketOptions = clientOptions.getSocketOptions();

        redisBootstrap.option(ChannelOption.CONNECT_TIMEOUT_MILLIS,
                Math.toIntExact(socketOptions.getConnectTimeout().toMillis()));

        if (LettuceStrings.isEmpty(redisURI.getSocket())) {
            redisBootstrap.option(ChannelOption.SO_KEEPALIVE, socketOptions.isKeepAlive());
            redisBootstrap.option(ChannelOption.TCP_NODELAY, socketOptions.isTcpNoDelay());
        }

        connectionBuilder.apply(redisURI);

        connectionBuilder.bootstrap(redisBootstrap);
        connectionBuilder.channelGroup(channels).connectionEvents(connectionEvents);
        connectionBuilder.socketAddressSupplier(socketAddressSupplier);
    }
connectionBuilder设置connectionInitializer为RedisHandshake
    protected RedisHandshake createHandshake(ConnectionState state) {
        return new RedisHandshake(clientOptions.getConfiguredProtocolVersion(), clientOptions.isPingBeforeActivateConnection(),
                state);
    }
RedisHandshake继承自ConnectionInitializer
当连接初始化的时候执行
   @Override
    public CompletionStage<Void> initialize(Channel channel) {

        CompletableFuture<?> handshake;

        if (this.requestedProtocolVersion == ProtocolVersion.RESP2) {
            handshake = initializeResp2(channel);
            negotiatedProtocolVersion = ProtocolVersion.RESP2;
        } else if (this.requestedProtocolVersion == ProtocolVersion.RESP3) {
            handshake = initializeResp3(channel);
        } else if (this.requestedProtocolVersion == null) {
            handshake = tryHandshakeResp3(channel);
        } else {
            handshake = Futures.failed(
                    new RedisConnectionException("Protocol version" + this.requestedProtocolVersion + " not supported"));
        }

        return handshake.thenCompose(ignore -> applyPostHandshake(channel, getNegotiatedProtocolVersion()));
    }


private AsyncCommand<String, String, Map<String, Object>> initiateHandshakeResp3(Channel channel) {

        if (connectionState.hasPassword()) {

            return dispatch(channel, this.commandBuilder.hello(3,
                    LettuceStrings.isNotEmpty(connectionState.getUsername()) ? connectionState.getUsername() : "default",
                    connectionState.getPassword(), connectionState.getClientName()));
        }

        return dispatch(channel, this.commandBuilder.hello(3, null, null, connectionState.getClientName()));
    }
实际上就是在连接建立时发送hello命令(hello命令得到回复之后才真正任务redis连接建立)
继续在channelType方法中为bootstrap设置eventloop
protected void channelType(ConnectionBuilder connectionBuilder, ConnectionPoint connectionPoint) {

        LettuceAssert.notNull(connectionPoint, "ConnectionPoint must not be null");

        connectionBuilder.bootstrap().group(getEventLoopGroup(connectionPoint));

        if (connectionPoint.getSocket() != null) {
            NativeTransports.assertAvailable();
            connectionBuilder.bootstrap().channel(NativeTransports.domainSocketChannelClass());
        } else {
            connectionBuilder.bootstrap().channel(Transports.socketChannelClass());
        }
    }
最终看
 if (NioEventLoopGroup.class.equals(type)) {
            return new NioEventLoopGroup(numberOfThreads, factoryProvider.getThreadFactory("lettuce-nioEventLoop"));
        }
实际上就是之前初始化的ioThread为evntLoop的线程数
注意:redis为每个连接都会创建一个bootstrap,但是他们都会共享eventLoop!
connectionBuilder.bootstrap().channel(Transports.socketChannelClass());
为bootstrap设置channel类型NioSocketChannel.class;
完成对builder的构建之后,进入
io.lettuce.core.AbstractRedisClient#initializeChannelAsync
  @SuppressWarnings("unchecked")
    protected <K, V, T extends RedisChannelHandler<K, V>> ConnectionFuture<T> initializeChannelAsync(
            ConnectionBuilder connectionBuilder) {

        Mono<SocketAddress> socketAddressSupplier = connectionBuilder.socketAddress();

        if (clientResources.eventExecutorGroup().isShuttingDown()) {
            throw new IllegalStateException("Cannot connect, Event executor group is terminated.");
        }

        CompletableFuture<SocketAddress> socketAddressFuture = new CompletableFuture<>();
        CompletableFuture<Channel> channelReadyFuture = new CompletableFuture<>();

        socketAddressSupplier.doOnError(socketAddressFuture::completeExceptionally).doOnNext(socketAddressFuture::complete)
                .subscribe(redisAddress -> {

                    if (channelReadyFuture.isCancelled()) {
                        return;
                    }
                    initializeChannelAsync0(connectionBuilder, channelReadyFuture, redisAddress);
                }, channelReadyFuture::completeExceptionally);

        return new DefaultConnectionFuture<>(socketAddressFuture,
                channelReadyFuture.thenApply(channel -> (T) connectionBuilder.connection()));
    }
其中创建了channelReadyFuture含义就是 netty的channel准备好的一个future
直接返回DefaultConnectionFuture。包装了channelReadyFuture
虽然DefaultConnectionFuture也继承了CompletableFuture,但是都重写了操作的方法。例如
   @Override
    public <U> DefaultConnectionFuture<U> thenApply(Function<? super T, ? extends U> fn) {
        return adopt(delegate.thenApply(fn));
    }
后续继续执行
future.thenApply(channelHandler -> (S) connection);
也就说,后续通过DefaultConnectionFuture的操作都是通过 实际都是通过channelReadyFuture.thenApply产生的
 protected <T> T getConnection(ConnectionFuture<T> connectionFuture) {

        try {
            return connectionFuture.get();
        } catch (InterruptedException e) {
            Thread.currentThread().interrupt();
            throw RedisConnectionException.create(connectionFuture.getRemoteAddress(), e);
        } catch (Exception e) {
            throw RedisConnectionException.create(connectionFuture.getRemoteAddress(), Exceptions.unwrap(e));
        }
    }
这里阻塞等待future完成,连接真正建立时返回,获取有效连接。
initializeChannelAsync0方法
创建ChannelInitializer
ChannelInitializer<Channel> initializer = connectionBuilder.build(redisAddress);
public ChannelInitializer<Channel> build(SocketAddress socketAddress) {
        return new PlainChannelInitializer(this::buildHandlers, clientResources);
    }
设置netty的handler处理类
protected List<ChannelHandler> buildHandlers() {

        LettuceAssert.assertState(channelGroup != null, "ChannelGroup must be set");
        LettuceAssert.assertState(connectionEvents != null, "ConnectionEvents must be set");
        LettuceAssert.assertState(connection != null, "Connection must be set");
        LettuceAssert.assertState(clientResources != null, "ClientResources must be set");
        LettuceAssert.assertState(endpoint != null, "Endpoint must be set");
        LettuceAssert.assertState(connectionInitializer != null, "ConnectionInitializer must be set");

        List<ChannelHandler> handlers = new ArrayList<>();

        connection.setOptions(clientOptions);

        handlers.add(new ChannelGroupListener(channelGroup, clientResources.eventBus()));
        handlers.add(new CommandEncoder());
        handlers.add(getHandshakeHandler());
        handlers.add(commandHandlerSupplier.get());

        handlers.add(new ConnectionEventTrigger(connectionEvents, connection, clientResources.eventBus()));

        if (clientOptions.isAutoReconnect()) {
            handlers.add(createConnectionWatchdog());
        }

        return handlers;
    }
ChannelFuture connectFuture = redisBootstrap.connect(redisAddress);
进行连接
connectFuture添加监听器
  connectFuture.addListener(future -> {

            if (!future.isSuccess()) {

                logger.debug("Connecting to Redis at {}: {}", redisAddress, future.cause());
                connectionBuilder.endpoint().initialState();
                channelReadyFuture.completeExceptionally(future.cause());
                return;
            }

            RedisHandshakeHandler handshakeHandler = connectFuture.channel().pipeline().get(RedisHandshakeHandler.class);

            if (handshakeHandler == null) {
                channelReadyFuture.completeExceptionally(new IllegalStateException("RedisHandshakeHandler not registered"));
                return;
            }

            handshakeHandler.channelInitialized().whenComplete((success, throwable) -> {

                if (throwable == null) {

                    logger.debug("Connecting to Redis at {}: Success", redisAddress);
                    RedisChannelHandler<?, ?> connection = connectionBuilder.connection();
                    connection.registerCloseables(closeableResources, connection);
                    channelReadyFuture.complete(connectFuture.channel());
                    return;
                }

                logger.debug("Connecting to Redis at {}, initialization: {}", redisAddress, throwable);
                connectionBuilder.endpoint().initialState();
                Throwable failure;

                if (throwable instanceof RedisConnectionException) {
                    failure = throwable;
                } else if (throwable instanceof TimeoutException) {
                    failure = new RedisConnectionException(
                            "Could not initialize channel within " + connectionBuilder.getTimeout(), throwable);
                } else {
                    failure = throwable;
                }
                channelReadyFuture.completeExceptionally(failure);
            });
        });
这段代码的含义是
连接成功的前提,获取RedisHandshakeHandler中的future
handshakeFuture完成后再进行一些操作
那么handshakeFuture何时完成?
RedisHandshakeHandler
其中初始化handshakeFuture
private final CompletableFuture<Void> handshakeFuture = new CompletableFuture<>();
RedisHandshakeHandler是一个入栈方法,继承了channelActive方法
    public void channelActive(ChannelHandlerContext ctx) {

        CompletionStage<Void> future = connectionInitializer.initialize(ctx.channel());

        future.whenComplete((ignore, throwable) -> {

            if (throwable != null) {
                fail(ctx, throwable);
            } else {
                ctx.fireChannelActive();
                succeed();
            }
        });
    }
其中connectionInitializer 就是前面的redisShakeHand
 private CompletableFuture<?> tryHandshakeResp3(Channel channel) {

        CompletableFuture<?> handshake = new CompletableFuture<>();
        AsyncCommand<String, String, Map<String, Object>> hello = initiateHandshakeResp3(channel);

        hello.whenComplete((settings, throwable) -> {

            if (throwable != null) {
                if (isUnknownCommand(hello.getError())) {
                    fallbackToResp2(channel, handshake);
                } else {
                    handshake.completeExceptionally(throwable);
                }
            } else {
                handshake.complete(null);
            }
        });

        return handshake;
    }
创建CompletableFuture类型的handshake
hello完成时,也执行handshake的complete
 private <T> AsyncCommand<String, String, T> dispatch(Channel channel, Command<String, String, T> command) {

        AsyncCommand<String, String, T> future = new AsyncCommand<>(command);

        channel.writeAndFlush(future).addListener(writeFuture -> {

            if (!writeFuture.isSuccess()) {
                future.completeExceptionally(writeFuture.cause());
            }
        });

        return future;
    }
这里可以看出来,命令command既是消息,又是一个future,那么时怎么实现command的这个future功能的。
处理类
CommandHandler既是出栈方法也是入栈方法
继承write方法 出栈时
   @Override
    @SuppressWarnings("unchecked")
    public void write(ChannelHandlerContext ctx, Object msg, ChannelPromise promise) throws Exception {

        if (debugEnabled) {
            logger.debug("{} write(ctx, {}, promise)", logPrefix(), msg);
        }

        if (msg instanceof RedisCommand) {
            writeSingleCommand(ctx, (RedisCommand<?, ?, ?>) msg, promise);
            return;
        }
···
   }
  private void writeSingleCommand(ChannelHandlerContext ctx, RedisCommand<?, ?, ?> command, ChannelPromise promise) {

        if (!isWriteable(command)) {
            promise.trySuccess();
            return;
        }

        addToStack(command, promise);
        ····

        ctx.write(command, promise);
    }
  private void addToStack(RedisCommand<?, ?, ?> command, ChannelPromise promise) {
      ········
          if (promise.isVoid()) {
                stack.add(redisCommand);
            } else {
                promise.addListener(AddToStack.newInstance(stack, redisCommand));
            }
      ·········
  }
要么将命令加入到stack,要么等到消息发送完成,回调监听器调用AddToStack的operationComplete方法
stack中存储了当前已经发送的消息command实际上就是一个AsyncCommand,而AsyncCommand又是
消息得到回复入栈时
执行继承的channelRead方法,中间会执行节码方法
   public void channelRead(ChannelHandlerContext ctx, Object msg) throws Exception {
       ···
          decode(ctx, buffer);
       ···
   }
 protected void decode(ChannelHandlerContext ctx, ByteBuf buffer) throws InterruptedException {
   RedisCommand<?, ?, ?> command = stack.peek();
                if (debugEnabled) {
                    logger.debug("{} Stack contains: {} commands", logPrefix(), stack.size());
                }

                pristine = false;

                try {


                    if (!decode(ctx, buffer, command)) {//将服务器的响应buffer写入到command的output中
                        decodeBufferPolicy.afterPartialDecode(buffer);
                        return;
                    }
                } catch (Exception e) {

                    ctx.close();
                    throw e;
                }


   if (canComplete(command)) {
                        stack.poll();

                        try {
                            if (debugEnabled) {
                                logger.debug("{} Completing command {}", logPrefix(), command);
                            }
                            complete(command);
                        } catch (Exception e) {
                            logger.warn("{} Unexpected exception during request: {}", logPrefix, e.toString(), e);
                        }
                    }
 }
这里提一个问题,这个stack如果被多个线程使用多个线程使用一个连接,能否入栈和出栈的command是否匹配?这里说明是可以保证的
当Lettuce收到Redis的回复消息时就从stack的头上取第一个RedisCommand,这个RedisCommand就是与该Redis返回结果对应的RedisCommand。为什么这样就能对应上呢,是因为Lettuce与Redis之间只有一条tcp连接,在Lettuce端放入stack时是有序的,tcp协议本身是有序的,redis是单线程处理请求的 这三个条件缺一不可,所以Redis返回的消息也是有序的。这样就能保证Redis中返回的消息一定对应着stack中的第一个RedisCommand。当然如果连接断开又重连了,这个肯定就对应不上了,Lettuc对断线重连也做了特殊处理,防止对应不上。
也就是说在收到回复之后,执行complete完成future
 hello.whenComplete((settings, throwable) -> {

            if (throwable != null) {
                if (isUnknownCommand(hello.getError())) {
                    fallbackToResp2(channel, handshake);
                } else {
                    handshake.completeExceptionally(throwable);
                }
            } else {
                handshake.complete(null);
            }
        });
hello完成之后,继续触发handshake.complete
 future.whenComplete((ignore, throwable) -> {

            if (throwable != null) {
                fail(ctx, throwable);
            } else {
                ctx.fireChannelActive();
                succeed();
            }
        });
触发 ctx.fireChannelActive();
最终再io.lettuce.core.protocol.CommandHandler#channelActive
为endpoint设置了生效的channel
endpoint.notifyChannelActive(ctx.channel());
endpoint就是前面用于真正发送消息的writer,因此这里需要设置channel
handshake还会继续触发channelReadyFuture.complete
   handshakeHandler.channelInitialized().whenComplete((success, throwable) -> {

                if (throwable == null) {

                    logger.debug("Connecting to Redis at {}: Success", redisAddress);
                    RedisChannelHandler<?, ?> connection = connectionBuilder.connection();
                    connection.registerCloseables(closeableResources, connection);
                    channelReadyFuture.complete(connectFuture.channel());
                    return;
                }
   }
这样经过链式触发,最终会触发获取连接成功,返回,至此,一条有效的连接创建成功。
protected <T> T getConnection(ConnectionFuture<T> connectionFuture) {

        try {
            return connectionFuture.get();
        } catch (InterruptedException e) {
            Thread.currentThread().interrupt();
            throw RedisConnectionException.create(connectionFuture.getRemoteAddress(), e);
        } catch (Exception e) {
            throw RedisConnectionException.create(connectionFuture.getRemoteAddress(), Exceptions.unwrap(e));
        }
    }
后面会被SharedConnection包装,而后SharedConnection会继续被LettuceConnection包装
如何发送一条消息
例如发送一条get命令
使用redisTemplete操作。进入get方法
public Object  get(String key) {
         return key == null ? null : redisTemplate.opsForValue().get(key);
}
opsForValue函数
对应的是不同的命令类型处理类
	private final ValueOperations<K, V> valueOps = new DefaultValueOperations<>(this);
	private final ListOperations<K, V> listOps = new DefaultListOperations<>(this);
	private final SetOperations<K, V> setOps = new DefaultSetOperations<>(this);
	private final StreamOperations<K, ?, ?> streamOps = new DefaultStreamOperations<>(this,
			ObjectHashMapper.getSharedInstance());
	private final ZSetOperations<K, V> zSetOps = new DefaultZSetOperations<>(this);
	private final GeoOperations<K, V> geoOps = new DefaultGeoOperations<>(this);
	private final HyperLogLogOperations<K, V> hllOps = new DefaultHyperLogLogOperations<>(this);
	private final ClusterOperations<K, V> clusterOps = new DefaultClusterOperations<>(this);
普通的get命令直接返回的就是 valueOps
进入get方法
	@Override
	public V get(Object key) {

		return execute(new ValueDeserializingRedisCallback(key) {

			@Override
			protected byte[] inRedis(byte[] rawKey, RedisConnection connection) {
				return connection.get(rawKey);
			}
		}, true);
	}
对execute方法传入一个回调方法
进入execute方法
	@Nullable
	public <T> T execute(RedisCallback<T> action, boolean exposeConnection, boolean pipeline) {

	        //获取一个连接
			conn = RedisConnectionUtils.getConnection(factory);

			RedisConnection connToExpose = (exposeConnection ? connToUse : createRedisConnectionProxy(connToUse));
			T result = action.doInRedis(connToExpose);

			// close pipeline
			if (pipeline && !pipelineStatus) {
				connToUse.closePipeline();
			}

			// TODO: any other connection processing?
			return postProcessResult(result, connToUse, existingConnection);
		} finally {
			RedisConnectionUtils.releaseConnection(conn, factory, enableTransactionSupport);
		}
	}
获取连接后,通过连接发送消息
public final V doInRedis(RedisConnection connection) {
			byte[] result = inRedis(rawKey(key), connection);
			return deserializeValue(result);
		}
将key序列化之后,执行connection的get方法
protected byte[] inRedis(byte[] rawKey, RedisConnection connection) {
				return connection.get(rawKey);
			}
继续到LettuceConnection中
default byte[] get(byte[] key) {
		return stringCommands().get(key);
	}
创建了一个LettuceStringCommands执行get方法
org.springframework.data.redis.connection.lettuce.LettuceStringCommands#get
@Override
	public byte[] get(byte[] key) {

		Assert.notNull(key, "Key must not be null!");

		try {
			if (isPipelined()) {
				pipeline(connection.newLettuceResult(getAsyncConnection().get(key)));
				return null;
			}
			if (isQueueing()) {
				transaction(connection.newLettuceResult(getAsyncConnection().get(key)));
				return null;
			}
			return getConnection().get(key);
		} catch (Exception ex) {
			throw convertLettuceAccessException(ex);
		}
	}
	protected RedisClusterCommands<byte[], byte[]> getConnection() {

		if (isQueueing()) {
			return getDedicatedConnection();
		}
		if (asyncSharedConn != null) {

			if (asyncSharedConn instanceof StatefulRedisConnection) {
				return ((StatefulRedisConnection<byte[], byte[]>) asyncSharedConn).sync();
			}
			if (asyncSharedConn instanceof StatefulRedisClusterConnection) {
				return ((StatefulRedisClusterConnection<byte[], byte[]>) asyncSharedConn).sync();
			}
		}
		return getDedicatedConnection();
	}
根据前面看的获取一个连接的流程
我们知道asyncSharedConn的sync方法返回一个被代理的异步连接,实现同步发送数据的功能。
那么进入代理类方法
io.lettuce.core.FutureSyncInvocationHandler#handleInvocation
@Override
    protected Object handleInvocation(Object proxy, Method method, Object[] args) throws Throwable {

        try {

            Method targetMethod = this.translator.get(method);
            Object result = targetMethod.invoke(asyncApi, args);

            if (result instanceof RedisFuture<?>) {

                RedisFuture<?> command = (RedisFuture<?>) result;

                if (!isTxControlMethod(method.getName(), args) && isTransactionActive(connection)) {
                    return null;
                }

                long timeout = getTimeoutNs(command);

                return Futures.awaitOrCancel(command, timeout, TimeUnit.NANOSECONDS);
            }

            return result;
        } catch (InvocationTargetException e) {
            throw e.getTargetException();
        }
    }


public static <T> T awaitOrCancel(RedisFuture<T> cmd, long timeout, TimeUnit unit) {

        try {
            if (timeout > 0 && !cmd.await(timeout, unit)) {
                cmd.cancel(true);
                throw ExceptionFactory.createTimeoutException(Duration.ofNanos(unit.toNanos(timeout)));
            }
            return cmd.get();
        } catch (Exception e) {
            throw Exceptions.bubble(e);
        }
    }
代理类中会对返回的future做一个等待,同时有一个超时时间,默认60000000000纳秒
实际就是60秒
执行异步api
  @Override
    public RedisFuture<V> get(K key) {
        return dispatch(commandBuilder.get(key));
    }
经过一些列消息分发,来到
io.lettuce.core.RedisChannelHandler#dispatch(io.lettuce.core.protocol.RedisCommand<K,V,T>)
protected <T> RedisCommand<K, V, T> dispatch(RedisCommand<K, V, T> cmd) {


        return channelWriter.write(cmd);
    }
通过channelWriter发送消息,最终实际上就是前面提到的DefaultEndpoint
io.lettuce.core.protocol.DefaultEndpoint#write(io.lettuce.core.protocol.RedisCommand<K,V,T>)
   @Override
    public <K, V, T> RedisCommand<K, V, T> write(RedisCommand<K, V, T> command) {

        LettuceAssert.notNull(command, "Command must not be null");

        RedisException validation = validateWrite(1);
        if (validation != null) {
            command.completeExceptionally(validation);
            return command;
        }

        try {
            sharedLock.incrementWriters();

            if (inActivation) {
                command = processActivationCommand(command);
            }

            if (autoFlushCommands) {

                if (isConnected()) {
                    writeToChannelAndFlush(command);
                } else {
                    writeToDisconnectedBuffer(command);
                }

            } else {
                writeToBuffer(command);
            }
        } finally {
            sharedLock.decrementWriters();
            if (debugEnabled) {
                logger.debug("{} write() done", logPrefix());
            }
        }

        return command;
    }
逻辑其实就是发送comman并且返回这个command,我们知道command其实就是AsyncCommand,还是一个future,可以作为获取结果使用
在同步发送消息的代理类中,利用这个command。等待结果的返回。
那么看是如何利用netty的handler处理类来处理请求的
看过前面我们知道添加了CommandHander,RedisHandshakeHandler
RedisHandshakeHandler我们前面看了主要就是为了初始化一个连接作用的。
主要看看CommandHandler是怎么处理的
CommandHandler
消息发送write方法
 @Override
    @SuppressWarnings("unchecked")
    public void write(ChannelHandlerContext ctx, Object msg, ChannelPromise promise) throws Exception {


        if (msg instanceof RedisCommand) {
            writeSingleCommand(ctx, (RedisCommand<?, ?, ?>) msg, promise);
            return;
        }

        if (msg instanceof List) {

            List<RedisCommand<?, ?, ?>> batch = (List<RedisCommand<?, ?, ?>>) msg;

            if (batch.size() == 1) {

                writeSingleCommand(ctx, batch.get(0), promise);
                return;
            }

            writeBatch(ctx, batch, promise);
            return;
        }

        if (msg instanceof Collection) {
            writeBatch(ctx, (Collection<RedisCommand<?, ?, ?>>) msg, promise);
        }
    }
以发送单个命令为例,发现,
rivate void writeSingleCommand(ChannelHandlerContext ctx, RedisCommand<?, ?, ?> command, ChannelPromise promise) {


        addToStack(command, promise);


        ctx.write(command, promise);
    }
发现在发送消息之前 有一个addTask的操作,再发送消息
io.lettuce.core.protocol.CommandHandler#addToStack
 private void addToStack(RedisCommand<?, ?, ?> command, ChannelPromise promise) {

            if (promise.isVoid()) {
                stack.add(redisCommand);
            } else {
                promise.addListener(AddToStack.newInstance(stack, redisCommand));
            }

    }
在发送完成回调的监听器中会将commad放入stack
消息接收的read方法
  @Override
    public void channelRead(ChannelHandlerContext ctx, Object msg) throws Exception {

        ByteBuf input = (ByteBuf) msg;
        input.touch("CommandHandler.read(…)");

        if (!input.isReadable() || input.refCnt() == 0) {
            logger.warn("{} Input not readable {}, {}", logPrefix(), input.isReadable(), input.refCnt());
            return;
        }

        if (debugEnabled) {
            logger.debug("{} Received: {} bytes, {} commands in the stack", logPrefix(), input.readableBytes(), stack.size());
        }

        try {
            if (buffer.refCnt() < 1) {
                logger.warn("{} Ignoring received data for closed or abandoned connection", logPrefix());
                return;
            }

            if (debugEnabled && ctx.channel() != channel) {
                logger.debug("{} Ignoring data for a non-registered channel {}", logPrefix(), ctx.channel());
                return;
            }

            if (traceEnabled) {
                logger.trace("{} Buffer: {}", logPrefix(), input.toString(Charset.defaultCharset()).trim());
            }

            buffer.touch("CommandHandler.read(…)");
            buffer.writeBytes(input);

            decode(ctx, buffer);
        } finally {
            input.release();
        }
    }
io.lettuce.core.protocol.CommandHandler#decode(io.netty.channel.ChannelHandlerContext, io.netty.buffer.ByteBuf)
再decode中发现,首先从栈顶取出元素,将接收到的消息写入到command
                RedisCommand<?, ?, ?> command = stack.peek();
                if (debugEnabled) {
                    logger.debug("{} Stack contains: {} commands", logPrefix(), stack.size());
                }

                pristine = false;

                try {
                    if (!decode(ctx, buffer, command)) {
                        ····
                    }
写入后,弹出并完成这个命令,并且完成这个命令
    if (canComplete(command)) {
                        stack.poll();

                        try {
                            if (debugEnabled) {
                                logger.debug("{} Completing command {}", logPrefix(), command);
                            }
                            complete(command);
                        } catch (Exception e) {
                            logger.warn("{} Unexpected exception during request: {}", logPrefix, e.toString(), e);
                        }
                    }
io.lettuce.core.FutureSyncInvocationHandler#handleInvocation
中等待到结果之后就会返回,command中的结果
 public static <T> T awaitOrCancel(RedisFuture<T> cmd, long timeout, TimeUnit unit) {

        try {
            if (timeout > 0 && !cmd.await(timeout, unit)) {
                cmd.cancel(true);
                throw ExceptionFactory.createTimeoutException(Duration.ofNanos(unit.toNanos(timeout)));
            }
            return cmd.get();
        } catch (Exception e) {
            throw Exceptions.bubble(e);
        }
redistemplate会利用valueSerializer进行反序列化并返回
共享连接
jedis为什么是线程不安全的
jedis是基于redis设计的,redis本身就是单线程的,所以jedis就没有做多线程的处理。
jedis实例抽象的是发送命令相关,一个jedis实例使用一个线程与使用100个线程去发送命令
(这与传统的BIO也十分相似,假设一个socket首先发送了一个消息,在没有得到回复的情况下,另一个线程也调用了write方法,那么先得到处理被调用得得回复还是首先发送的receive。这样直接的使用也无法保证线程安全,因此对于BIO一般不是使用多个线程共享一个socket)
没有本质上的区别,所以没有必要设置为线程安全的。
但是redis的性能瓶颈主要在网络通讯,网络通讯速度比redis处理初度要慢很多。
单客户端会导致网络通讯的时间里,redis处于闲暇,无法发挥其的处理能力。
所以就需要用多线程方式访问redis服务器。那就使用多个jedis实例,每个线程对应一个jedis
实例,而不是一个jedis实例多个线程共享。一个jedis关联一个client,相当于一个客户端,client
继承了connection,connection维护了socket连接,对于socket这种昂贵的连接,一半都会做池化,所以jedis提供了jedisPool。
lettuce这么好那么jedis是不是就可以被舍弃了?
Jedis是直接的Redis客户端,当应用程序要跨多个线程共享单个Jedis实例时,它不是线程安全的。在多线程环境中使用Jedis的方法是使用连接池。在Jedis交互期间,使用Jedis的每个并发线程都会获得自己的Jedis实例。连接池是以每个Jedis实例的物理连接为代价的,这增加了Redis连接的数量。
Lettuce建立在netty之上,并且连接实例(StatefulRedisConnection**)可以在多个线程之间共享**。因此多线程应用程序可以使用单个连接,无论与Lettuce交互的并发线程数如何,当然这个也是可伸缩的设计,一个连接实例不够的情况也可以按需增加连接实例。
那么看看lettuce是如何共享连接的
在使用org.springframework.data.redis.connection.lettuce.LettuceConnectionFactory#getConnection
获取redis连接时
connection = doCreateLettuceConnection(getSharedConnection(), connectionProvider, getTimeout(), getDatabase());
getSharedConnection获取一个共享的连接
@Nullable
	protected StatefulRedisConnection<byte[], byte[]> getSharedConnection() {
		return shareNativeConnection ? (StatefulRedisConnection) getOrCreateSharedConnection().getConnection() : null;
	}
如果shareNativeConnection为true(默认为true)。使用getOrCreateSharedConnection
然后执行org.springframework.data.redis.connection.lettuce.LettuceConnectionFactory.SharedConnection#getConnection
	@Nullable
		StatefulConnection<E, E> getConnection() {

			synchronized (this.connectionMonitor) {

				if (this.connection == null) {
					this.connection = getNativeConnection();
				}

				if (getValidateConnection()) {
					validateConnection();
				}

				return this.connection;
			}
		}
- 要注意这里维护了StatefulConnection,第一个为null的时候,才调用getNativeConnection去获取
- 另外要注意,这里的getValidateConnection,默认是false的,也就是说只要connection不为null,就不会归还,每次用同一个connection
- 如果开启validate的话,每次get的时候都会validate一下,而其validate方法不仅判断isOpen,还判断ping,如果超时等,则会将连接释/归还,再重新获取一次(如果使用连接池的话,则重新borrow一次)
- 这里的validateConnection方法有点问题,调用了两次connectionProvider.release(connection)
就是前面说的真正获取一条连接,获取之后就存到了connection中,后面每次获取连接都共享这个NativeConnection,即一个连接被多个线程共用,且能够保证线程安全。
返回之后会使用LettuceConnection进行包装,也就是一个连接对应了多个LettuceConnection,多个线程共享
	protected LettuceConnection doCreateLettuceConnection(
			@Nullable StatefulRedisConnection<byte[], byte[]> sharedConnection, LettuceConnectionProvider connectionProvider,
			long timeout, int database) {

		LettuceConnection connection = new LettuceConnection(sharedConnection, connectionProvider, timeout, database);
		connection.setPipeliningFlushPolicy(this.pipeliningFlushPolicy);

		return connection;
	}
这种情况下,redis连接池不会起作用,因为始终使用的都是这个共享连接
按照lettuce官方文档说法,对简单命令没有必要使用连接池,因为redis本身也是单线程处理命令
redis连接池
Lettuce 连接被设计为线程安全,所以一个连接可以被多个线程共享,同时lettuce连接默认是自动重连.虽然连接池在大多数情况下是不必要的,但在某些用例中可能是有用的.lettuce提供通用的连接池支持. 如有疏漏后续会更新
连接池是否有必要?
Lettuce被线程安全的,它满足了多数场景需求. 所有Redis用户的操作是单线程执行的.使用多连接并不能改善一个应用的性能. 阻塞操作的使用通常与获得专用连接的工作线程结合在一起.
使用Redis事务是使用动态连接池的典型场景,因为需要专用连接的线程数趋于动态.也就是说,动态连接池的需求是有限的.连接池总是伴随着复杂性和维护成本提升.
在一般情况下可以说没什么必要了
配置shareNativeConnection为false
 @Autowired
    public void  setRedisFactory(LettuceConnectionFactory factory){
        factory.setShareNativeConnection(false);
}
public RedisConnection getConnection() {

		if (isClusterAware()) {
			return getClusterConnection();
		}

		LettuceConnection connection;
		connection = doCreateLettuceConnection(getSharedConnection(), connectionProvider, getTimeout(), getDatabase());
		connection.setConvertPipelineAndTxResults(convertPipelineAndTxResults);
		return connection;
	}
getSharedConnection会返回空
在每次执行命令时会实际获取实际可用的连接
org.springframework.data.redis.connection.lettuce.LettucePoolingConnectionProvider#getConnection
@Override
	public <T extends StatefulConnection<?, ?>> T getConnection(Class<T> connectionType) {

		GenericObjectPool<StatefulConnection<?, ?>> pool = pools.computeIfAbsent(connectionType, poolType -> {
			return ConnectionPoolSupport.createGenericObjectPool(() -> connectionProvider.getConnection(connectionType),
					poolConfig, false);
		});

		try {

			StatefulConnection<?, ?> connection = pool.borrowObject();

			poolRef.put(connection, pool);

			return connectionType.cast(connection);
		} catch (Exception e) {
			throw new PoolException("Could not get a resource from the pool", e);
		}
	}
先看这pool
private final Map<Class<?>, GenericObjectPool<StatefulConnection<?, ?>>> pools = new ConcurrentHashMap<>(32);
key是一个类型 这里入参是StatefulConnection
value就是连接池了GenericObjectPool
如果value为空,创建连接池GenericObjectPool
io.lettuce.core.support.ConnectionPoolSupport#createGenericObjectPool(java.util.function.Supplier, org.apache.commons.pool2.impl.GenericObjectPoolConfig, boolean)
 public static <T extends StatefulConnection<?, ?>> GenericObjectPool<T> createGenericObjectPool(
            Supplier<T> connectionSupplier, GenericObjectPoolConfig<T> config, boolean wrapConnections) {

        LettuceAssert.notNull(connectionSupplier, "Connection supplier must not be null");
        LettuceAssert.notNull(config, "GenericObjectPoolConfig must not be null");

        AtomicReference<Origin<T>> poolRef = new AtomicReference<>();

        GenericObjectPool<T> pool = new GenericObjectPool<T>(new RedisPooledObjectFactory<T>(connectionSupplier), config) {

            @Override
            public T borrowObject() throws Exception {
                return wrapConnections ? ConnectionWrapping.wrapConnection(super.borrowObject(), poolRef.get())
                        : super.borrowObject();
            }

            @Override
            public void returnObject(T obj) {

                if (wrapConnections && obj instanceof HasTargetConnection) {
                    super.returnObject((T) ((HasTargetConnection) obj).getTargetConnection());
                    return;
                }
                super.returnObject(obj);
            }

        };

        poolRef.set(new ObjectPoolWrapper<>(pool));

        return pool;
    }
这里connectionSupplier是一个lamda入参,当实际调用的时候才会执行,真正的获取连接
connectionProvider.getConnection(connectionType)
构造GenericObjectPool
GenericObjectPool是commons-pool2下的,如果需要使用,需要引入commons-pool2
   public GenericObjectPool(final PooledObjectFactory<T> factory,
            final GenericObjectPoolConfig<T> config) {

        super(config, ONAME_BASE, config.getJmxNamePrefix());

        if (factory == null) {
            jmxUnregister(); // tidy up
            throw new IllegalArgumentException("factory may not be null");
        }
        this.factory = factory;

        idleObjects = new LinkedBlockingDeque<>(config.getFairness());

        setConfig(config);
    }
获取连接的lamda作为一个获取连接的factory,需要连接时通过factory获取
根据config对连接池进行设置。看看都有那些配置项
发现其配置项十分的多那么来看几个常用的配置项。
查看其获取一个连接和归还一个连接的过程
获取连接进入borrowObject 从获取一个连接,如果没有则创建一个连接
使用完毕调用returnObject归还连接到
GenericObjectPool 对于lettuce常用参数含义
基本参数
- lifo
GenericObjectPool 提供了后进先出(LIFO)与先进先出(FIFO)两种行为模式的池。默认为true,即当池中有空闲可用的对象时,调用borrowObject方法会返回最近(后进)的实例 - fairness
当从池中获取资源或者将资源还回池中时 是否使用java.util.concurrent.locks.ReentrantLock.ReentrantLock 的公平锁机制,默认为false
数量控制参数
- maxTotal
链接池中最大连接数,默认为8 - maxIdle
链接池中最大空闲的连接数,默认也为8 - minIdle
连接池中最少空闲的连接数,默认为0
超时参数
- maxWaitMillis
当连接池资源耗尽时,等待时间,超出则抛异常,默认为-1即永不超时
哨兵模式
设置读写分离,写主读从
   @Bean
    public LettuceClientConfigurationBuilderCustomizer clientConfigurationBuilderCustomizer(){
        return clientConfigurationBuilder -> clientConfigurationBuilder.readFrom(ReadFrom.REPLICA_PREFERRED);
    }
连接哨兵集群
获取连接
@Override
	public <T extends StatefulConnection<?, ?>> T getConnection(Class<T> connectionType) {

		if (connectionType.equals(StatefulRedisSentinelConnection.class)) {
			return connectionType.cast(client.connectSentinel());
		}

		if (connectionType.equals(StatefulRedisPubSubConnection.class)) {
			return connectionType.cast(client.connectPubSub(codec));
		}

		if (StatefulConnection.class.isAssignableFrom(connectionType)) {

			return connectionType.cast(readFrom.map(it -> this.masterReplicaConnection(redisURISupplier.get(), it))
					.orElseGet(() -> client.connect(codec)));
		}

		throw new UnsupportedOperationException("Connection type " + connectionType + " not supported!");
	}
如果readFrom不为空,进入masterReplicaConnection方法
io.lettuce.core.masterreplica.MasterReplica#connectAsyncSentinelOrAutodiscovery
  private static <K, V> CompletableFuture<StatefulRedisMasterReplicaConnection<K, V>> connectAsyncSentinelOrAutodiscovery(
            RedisClient redisClient, RedisCodec<K, V> codec, RedisURI redisURI) {


        if (isSentinel(redisURI)) {
            return new SentinelConnector<>(redisClient, codec, redisURI).connectAsync();
        }

        return new AutodiscoveryConnector<>(redisClient, codec, redisURI).connectAsync();
    }
对于sentinel模式。创建SentinelConnector,创建一个异步连接
最终进入
io.lettuce.core.RedisClient#connectSentinelAsync(io.lettuce.core.codec.RedisCodec<K,V>, io.lettuce.core.RedisURI, java.time.Duration)
  for (RedisURI uri : sentinels) {

            Mono<StatefulRedisSentinelConnection<K, V>> connectionMono = Mono
                    .fromCompletionStage(() -> doConnectSentinelAsync(codec, uri, timeout, redisURI.getClientName()))
                    .onErrorMap(CompletionException.class, Throwable::getCause)
                    .onErrorMap(e -> new RedisConnectionException("Cannot connect Redis Sentinel at " + uri, e))
                    .doOnError(exceptionCollector::add);

            if (connectionLoop == null) {
                connectionLoop = connectionMono;
            } else {
                connectionLoop = connectionLoop.onErrorResume(t -> connectionMono);
            }
        }
挨个sentinel进行连接
io.lettuce.core.RedisClient#doConnectSentinelAsync
 private <K, V> ConnectionFuture<StatefulRedisSentinelConnection<K, V>> doConnectSentinelAsync(RedisCodec<K, V> codec,
            RedisURI redisURI, Duration timeout, String clientName) {

        ConnectionBuilder connectionBuilder;
        if (redisURI.isSsl()) {
            SslConnectionBuilder sslConnectionBuilder = SslConnectionBuilder.sslConnectionBuilder();
            sslConnectionBuilder.ssl(redisURI);
            connectionBuilder = sslConnectionBuilder;
        } else {
            connectionBuilder = ConnectionBuilder.connectionBuilder();
        }
        connectionBuilder.clientOptions(ClientOptions.copyOf(getOptions()));
        connectionBuilder.clientResources(getResources());

        DefaultEndpoint endpoint = new DefaultEndpoint(getOptions(), getResources());
        RedisChannelWriter writer = endpoint;

        if (CommandExpiryWriter.isSupported(getOptions())) {
            writer = new CommandExpiryWriter(writer, getOptions(), getResources());
        }

        StatefulRedisSentinelConnectionImpl<K, V> connection = newStatefulRedisSentinelConnection(writer, codec, timeout);
        ConnectionState state = connection.getConnectionState();

        state.apply(redisURI);
        if (LettuceStrings.isEmpty(state.getClientName())) {
            state.setClientName(clientName);
        }

        connectionBuilder.connectionInitializer(createHandshake(state));

        logger.debug("Connecting to Redis Sentinel, address: " + redisURI);

        connectionBuilder.endpoint(endpoint).commandHandler(() -> new CommandHandler(getOptions(), getResources(), endpoint))
                .connection(connection);
        connectionBuilder(getSocketAddressSupplier(redisURI), connectionBuilder, redisURI);

        channelType(connectionBuilder, redisURI);
        ConnectionFuture<?> sync = initializeChannelAsync(connectionBuilder);

        return sync.thenApply(ignore -> (StatefulRedisSentinelConnection<K, V>) connection).whenComplete((ignore, e) -> {

            if (e != null) {
                logger.warn("Cannot connect Redis Sentinel at " + redisURI + ": " + e.toString());
                connection.close();
            }
        });
    }
连接单个sentinel的逻辑与前面说的连接单机redis大同小异
建立连接后,RedisShakeHandler会发送Hello与sentinel真正建立连接。
真正建立连接后,会发送订阅请求,获取主从节点信息
io.lettuce.core.RedisPublisher#subscribe
 @Override
    public void subscribe(Subscriber<? super T> subscriber) {

        if (this.traceEnabled) {
            LOG.trace("subscribe: {}@{}", subscriber.getClass().getName(), Objects.hashCode(subscriber));
        }

        // Reuse the first command but then discard it.
        RedisCommand<K, V, T> command = ref.get();

        if (command != null) {
            if (!ref.compareAndSet(command, null)) {
                command = commandSupplier.get();
            }
        } else {
            command = commandSupplier.get();
        }

        RedisSubscription<T> redisSubscription = new RedisSubscription<>(connection, command, dissolve, executor);
        redisSubscription.subscribe(subscriber);
    }
接收订阅的返回消息之后
会对redis主从节点分别建立连接
io.lettuce.core.masterreplica.UpstreamReplicaTopologyRefresh#getConnections
  private AsyncConnections getConnections(Iterable<RedisNodeDescription> nodes) {

        List<RedisNodeDescription> nodeList = LettuceLists.newList(nodes);
        AsyncConnections connections = new AsyncConnections(nodeList);

        for (RedisNodeDescription node : nodeList) {

            RedisURI redisURI = node.getUri();
            String message = String.format("Unable to connect to %s", redisURI);
            try {
                CompletableFuture<StatefulRedisConnection<String, String>> connectionFuture = nodeConnectionFactory
                        .connectToNodeAsync(CODEC, redisURI);

                CompletableFuture<StatefulRedisConnection<String, String>> sync = new CompletableFuture<>();

                connectionFuture.whenComplete((connection, throwable) -> {

                    if (throwable != null) {

                        if (throwable instanceof RedisConnectionException) {
                            if (logger.isDebugEnabled()) {
                                logger.debug(throwable.getMessage(), throwable);
                            } else {
                                logger.warn(throwable.getMessage());
                            }
                        } else {
                            logger.warn(message, throwable);
                        }

                        sync.completeExceptionally(new RedisConnectionException(message, throwable));
                    } else {
                        connection.async().clientSetname("lettuce#MasterReplicaTopologyRefresh");
                        sync.complete(connection);
                    }
                });

                connections.addConnection(redisURI, sync);
            } catch (RuntimeException e) {
                logger.warn(String.format(message, redisURI), e);
            }
        }

        return connections;
    }
消息发送
与普通消息发送的区别为
io.lettuce.core.masterreplica.UpstreamReplicaChannelWriter#write(io.lettuce.core.protocol.RedisCommand<K,V,T>)
 public <K, V, T> RedisCommand<K, V, T> write(RedisCommand<K, V, T> command) {

        Intent intent = inTransaction ? Intent.WRITE : getIntent(command.getType());
        CompletableFuture<StatefulRedisConnection<K, V>> future = (CompletableFuture) upstreamReplicaConnectionProvider
                .getConnectionAsync(intent);


        if (isSuccessfullyCompleted(future)) {
            writeCommand(command, future.join(), null);
        } else {
            future.whenComplete((c, t) -> writeCommand(command, c, t));
        }

        return command;
    }
发送消息会根据操作类型判断操作主/从节点,这里就是写主读从
集群模式
连接集群
获取连接org.springframework.data.redis.connection.lettuce.LettuceConnectionFactory#getConnection
public RedisConnection getConnection() {

		if (isClusterAware()) {
			return getClusterConnection();
		}

		LettuceConnection connection;
		connection = doCreateLettuceConnection(getSharedConnection(), connectionProvider, getTimeout(), getDatabase());
		connection.setConvertPipelineAndTxResults(convertPipelineAndTxResults);
		return connection;
	}
集群模式下走的是getClusterConnection
@Override
	public RedisClusterConnection getClusterConnection() {

		if (!isClusterAware()) {
			throw new InvalidDataAccessApiUsageException("Cluster is not configured!");
		}

		RedisClusterClient clusterClient = (RedisClusterClient) client;

		StatefulRedisClusterConnection<byte[], byte[]> sharedConnection = getShareNativeConnection()
				? (StatefulRedisClusterConnection<byte[], byte[]>) getOrCreateSharedConnection().getConnection()
				: null;

		LettuceClusterTopologyProvider topologyProvider = new LettuceClusterTopologyProvider(clusterClient);
		return doCreateLettuceClusterConnection(sharedConnection, connectionProvider, topologyProvider,
				clusterCommandExecutor, clientConfiguration.getCommandTimeout());
	}
这跟之前的获取单例的连接相似,先创建一个共享连接,后续步骤也是先创建连接池,创建连接,区别在于对于集群,使用的ClusterConnectionProvider进行连接获取
	public <T extends StatefulConnection<?, ?>> CompletableFuture<T> getConnectionAsync(Class<T> connectionType) {

		if (!initialized) {

			// partitions have to be initialized before asynchronous usage.
			// Needs to happen only once. Initialize eagerly if
			// blocking is not an options.
			synchronized (monitor) {
				if (!initialized) {
					client.getPartitions();
					initialized = true;
				}
			}
		}
······
    }}
初始化需要获取分区信息
io.lettuce.core.cluster.topology.DefaultClusterTopologyRefresh#loadViews
       long commandTimeoutNs = getCommandTimeoutNs(seed);
        ConnectionTracker tracker = new ConnectionTracker();
        long connectionTimeout = commandTimeoutNs + connectTimeout.toNanos();
        openConnections(tracker, seed, connectionTimeout, TimeUnit.NANOSECONDS);
首先与redis集群配置的所有节点建立连接
后对集群节点分别发送消息
     Requests requestedTopology = connections.requestTopology(commandTimeoutNs, TimeUnit.NANOSECONDS);
            Requests requestedClients = connections.requestClients(commandTimeoutNs, TimeUnit.NANOSECONDS);
分别获取,集群每个节点的主从信息,槽分配信息,还有服务器节点为客户端分配的读写缓冲区等信息。
        return CompletableFuture.allOf(requestedTopology.allCompleted(), requestedClients.allCompleted())
                    .thenCompose(ignore -> {

                        NodeTopologyViews views = getNodeSpecificViews(requestedTopology, requestedClients);

                        if (discovery && isEventLoopActive()) {

                            Set<RedisURI> allKnownUris = views.getClusterNodes();
                            Set<RedisURI> discoveredNodes = difference(allKnownUris, toSet(seed));

                            if (discoveredNodes.isEmpty()) {
                                return CompletableFuture.completedFuture(views);
                            }

                            openConnections(tracker, discoveredNodes, connectionTimeout, TimeUnit.NANOSECONDS);

                            return tracker.whenComplete(map -> {
                                return new Connections(clientResources, map).retainAll(discoveredNodes);
                            }).thenCompose(newConnections -> {

                                Requests additionalTopology = newConnections
                                        .requestTopology(commandTimeoutNs, TimeUnit.NANOSECONDS).mergeWith(requestedTopology);
                                Requests additionalClients = newConnections
                                        .requestClients(commandTimeoutNs, TimeUnit.NANOSECONDS).mergeWith(requestedClients);
                                return CompletableFuture
                                        .allOf(additionalTopology.allCompleted(), additionalClients.allCompleted())
                                        .thenApply(ignore2 -> {

                                            return getNodeSpecificViews(additionalTopology, additionalClients);
                                        });
                            });
                        }

                        return CompletableFuture.completedFuture(views);
                    })
当发送到每个节点的信息都得到回复之后对结果进行处理存储
如果发现没有配置在配置文件的集群节点,通过一个集群节点,可以获取整个集群的信息。然后对集群的所有节点都会进行连接,因此,实际上只需要配置一个个节点,就能连接整个集群了。

这两种方式都是可以的,不过,多配置几个可以增加启动的容错
消息发送
其他步骤和单机的基本一致
但是在选择连接时有集群的逻辑
io.lettuce.core.cluster.ClusterDistributionChannelWriter#doWrite
        // exclude CLIENT commands from cluster routing
        if (args != null && !CommandType.CLIENT.equals(commandToSend.getType())) {

            ByteBuffer encodedKey = args.getFirstEncodedKey();
            if (encodedKey != null) {

                int hash = getSlot(encodedKey);
                Intent intent = getIntent(command.getType());

                CompletableFuture<StatefulRedisConnection<K, V>> connectFuture = ((AsyncClusterConnectionProvider) clusterConnectionProvider)
                        .getConnectionAsync(intent, hash);

                if (isSuccessfullyCompleted(connectFuture)) {
                    writeCommand(commandToSend, false, connectFuture.join(), null);
                } else {
                    connectFuture
                            .whenComplete((connection, throwable) -> writeCommand(commandToSend, false, connection, throwable));
                }

                return commandToSend;
            }
        }

        writeCommand(commandToSend, defaultWriter);
根据hash值,和读/写命令获取匹配的连接
io.lettuce.core.cluster.PooledClusterConnectionProvider#getConnectionAsync(io.lettuce.core.cluster.ClusterConnectionProvider.Intent, int)
 @Override
    public CompletableFuture<StatefulRedisConnection<K, V>> getConnectionAsync(Intent intent, int slot) {

        if (debugEnabled) {
            logger.debug("getConnection(" + intent + ", " + slot + ")");
        }

        if (intent == Intent.READ && readFrom != null && readFrom != ReadFrom.UPSTREAM) {
            return getReadConnection(slot);
        }

        return getWriteConnection(slot).toCompletableFuture();
    }
列入,配置了readFrom = _REPLICA_PREFERRED_从节点,那么会使用从节点进行读取操作
readerCandidates = readers[slot];
根据slot获取能够处理指定槽的节点的节点,对于读操作,主从节点都可以操作,因此获取到槽相关的主节点和从节点,再根据_REPLICA_PREFERRED_过滤得到从节点进行命令发送和获取返回结果。
max-redirects
最大重定向次数
正常情况下,客户端维护了集群节的slot对应关系是不需要进行重定向的,但是当某台服务器下线,或者槽的移动操作,客户端的映射关系未及时更新时
例如请求 key 为a,客户端认为应该请求集器9001
但是实际上集群主从关系已经发生变化,导致需要重定向到9002
当请求9002的时候,主从关系又变化…当达到最大重定向次数,
就会报错。
从此推断,发生该问题的原因为:
- 节点主从切换/迁移后,客户端与redis的slot不一致导致一直重试
- asking 一直失败,当槽点数值分布在两个节点上时,容易引起该错误
因此,导致该错误的原因可为:
- 节点主从切换/迁移后,网络等各种原因导致更新slot信息失败
- asking时一直指向同一个节点,导致asking一直失败(该几率较少?)
订阅连接
redis订阅用于接收频道发布的事件,也可以用于订阅键空间通知(某个命令被什么键执行了),键事件通知(某个命令被什么键执行了)
配置
监听器
** TestListener.java**
import org.springframework.stereotype.Service;

/**
 * The type Test listener.
 */
@Service
public class TestListener {

    /**
     * Receive message.
     *
     * @param msg the msg
     */
    public void receiveMessage(String msg){
        System.out.println(" subscribe msg = " + msg);

    }

    /**
     * Receive message 2.
     *
     * @param msg the msg
     */
    public void receiveMessage2(String msg){
        System.out.println(" subscribe msg2 = " + msg);

    }
}
配置类
  @Bean
    public RedisMessageListenerContainer container(LettuceConnectionFactory connectionFactory,
                                                   //这里可以指定多个MessageListenerAdapter,MessageListenerAdapter名字要与下面定义的bean的方法名字一致,否则会注入不进来
                                                   MessageListenerAdapter listenerAdapter1,
                                                   MessageListenerAdapter listenerAdapter){
        RedisMessageListenerContainer container = new RedisMessageListenerContainer();
        container.setConnectionFactory(connectionFactory);
        //这里将channel的订阅者添加到container中,并指定要消费的channel
        container.addMessageListener(listenerAdapter1,new PatternTopic("__keyevent@0__:expired"));
        container.addMessageListener(listenerAdapter,new PatternTopic("news.it"));
        return container;
    }

    /**
     * 绑定消息监听者和接收监听的方法,必须要注入这个监听器,不然会报错
     * 这里的listenerAdapter1要与上面container中定义的名字一致
     * @param sub the sub
     * @return the message listener adapter
     */
    @Bean
    public MessageListenerAdapter listenerAdapter1(TestListener sub){
        //这个地方 是给messageListenerAdapter 传入一个消息接受的处理器,利用反射的方法调用TestListener中的“receiveMessage”方法
        return new MessageListenerAdapter(sub,"receiveMessage");
    }

    /**
     * Listener adapter message listener adapter.
     * 这里的listenerAdapter要与上面container中定义的名字一致
     * @param sub the sub
     * @return the message listener adapter
     */
    @Bean
    public MessageListenerAdapter listenerAdapter(TestListener sub){
        //这里通过反射的放射调用TestListener中的receiveMessage2方法
        return new MessageListenerAdapter(sub,"receiveMessage2");
    }
订阅连接的建立
org.springframework.data.redis.connection.lettuce.LettuceConnection#initSubscription
初始化需要为订阅建立专用的订阅连接
private LettuceSubscription initSubscription(MessageListener listener) {
		return doCreateSubscription(listener, switchToPubSub(), connectionProvider);
	}
如果是单机
public StatefulRedisPubSubConnection<String, String> connectPubSub() {
        return getConnection(connectPubSubAsync(newStringStringCodec(), redisURI, getDefaultTimeout()));
    }
如果是集群最终进入io.lettuce.core.cluster.RedisClusterClient#connectClusterPubSubAsync.,建立一个订阅联链接
private <K, V> CompletableFuture<StatefulRedisClusterPubSubConnection<K, V>> connectClusterPubSubAsync(
            RedisCodec<K, V> codec) {

        if (partitions == null) {
            return Futures.failed(new IllegalStateException(
                    "Partitions not initialized. Initialize via RedisClusterClient.getPartitions()."));
        }

        topologyRefreshScheduler.activateTopologyRefreshIfNeeded();

        logger.debug("connectClusterPubSub(" + initialUris + ")");

        PubSubClusterEndpoint<K, V> endpoint = new PubSubClusterEndpoint<>(getClusterClientOptions(), getResources());
        RedisChannelWriter writer = endpoint;

        if (CommandExpiryWriter.isSupported(getClusterClientOptions())) {
            writer = new CommandExpiryWriter(writer, getClusterClientOptions(), getResources());
        }

        ClusterDistributionChannelWriter clusterWriter = new ClusterDistributionChannelWriter(getClusterClientOptions(), writer,
                topologyRefreshScheduler);

        ClusterPubSubConnectionProvider<K, V> pooledClusterConnectionProvider = new ClusterPubSubConnectionProvider<>(this,
                clusterWriter, codec, endpoint.getUpstreamListener(), topologyRefreshScheduler);

        StatefulRedisClusterPubSubConnectionImpl<K, V> connection = new StatefulRedisClusterPubSubConnectionImpl<>(endpoint,
                pooledClusterConnectionProvider, clusterWriter, codec, getDefaultTimeout());

        clusterWriter.setClusterConnectionProvider(pooledClusterConnectionProvider);
        connection.setPartitions(partitions);

        Supplier<CommandHandler> commandHandlerSupplier = () -> new PubSubCommandHandler<>(getClusterClientOptions(),
                getResources(), codec, endpoint);
        Mono<SocketAddress> socketAddressSupplier = getSocketAddressSupplier(connection::getPartitions,
                TopologyComparators::sortByClientCount);
        Mono<StatefulRedisClusterPubSubConnectionImpl<K, V>> connectionMono = Mono
                .defer(() -> connect(socketAddressSupplier, endpoint, connection, commandHandlerSupplier));

        for (int i = 1; i < getConnectionAttempts(); i++) {
            connectionMono = connectionMono
                    .onErrorResume(t -> connect(socketAddressSupplier, endpoint, connection, commandHandlerSupplier));
        }

        return connectionMono.flatMap(c -> c.reactive().command().collectList()
                //
                .map(CommandDetailParser::parse)
                //
                .doOnNext(detail -> c.setCommandSet(new CommandSet(detail)))
                .doOnError(e -> c.setCommandSet(new CommandSet(Collections.emptyList()))).then(Mono.just(c))
                .onErrorResume(RedisCommandExecutionException.class, e -> Mono.just(c)))
                .doOnNext(
                        c -> connection.registerCloseables(closeableResources, clusterWriter, pooledClusterConnectionProvider))
                .map(it -> (StatefulRedisClusterPubSubConnection<K, V>) it).toFuture();
    }
集群模式下会挑选一个节点,订阅就够了,所有的发布消息都可以通过这个节点进行订阅。(注意。对于订阅键空间事件和键事件模式我在集权模式下尝试不太理想。只能订阅一个节点的事件,并不会将其他节点的键事件通过建立订阅连接的节点过来)
事务
注意:reids在集群模式下无法使用事务,单节点可以。
如何开启事务
        redisTemplate.setEnableTransactionSupport(true);
        redisTemplate.multi();
        redisTemplate.opsForValue().set("aaa","sss");
        redisTemplate.opsForValue().set("aaaa","ssssss");
        try {
            sleep(1000*60*55);
        } catch (InterruptedException e) {
            e.printStackTrace();
        }
        redisTemplate.exec();
事务执行过程
首先进入multi
public void multi() {
		execute(connection -> {
			connection.multi();
			return null;
		}, true);
	}
获取一个连接用来执行multi命令
和之前的命令有些不同 开启enableTransactionSupport之后,会将使用的连接绑定到线程上,当前本线程都会使用这一个连接,保证一个事务只能由一个连接来处理!
@Nullable
	public <T> T execute(RedisCallback<T> action, boolean exposeConnection, boolean pipeline) {

	······················

			if (enableTransactionSupport) {
				// only bind resources in case of potential transaction synchronization
				conn = RedisConnectionUtils.bindConnection(factory, enableTransactionSupport);
			} else {
				conn = RedisConnectionUtils.getConnection(factory);
			}

			boolean existingConnection = TransactionSynchronizationManager.hasResource(factory);

			RedisConnection connToUse = preProcessConnection(conn, existingConnection);

			boolean pipelineStatus = connToUse.isPipelined();
			if (pipeline && !pipelineStatus) {
				connToUse.openPipeline();
			}

	 ························
	}
获取到connection后执行multi方法
org.springframework.data.redis.connection.lettuce.LettuceConnection#multi
public void multi() {
		if (isQueueing()) {
			return;
		}
		isMulti = true;
		try {
			if (isPipelined()) {
				getAsyncDedicatedRedisCommands().multi();
				return;
			}
			getDedicatedRedisCommands().multi();
		} catch (Exception ex) {
			throw convertLettuceAccessException(ex);
		}
	}
这里发现,multi会getDedicatedRedisCommands会获取一个DedicatedConnection
private StatefulConnection<byte[], byte[]> getOrCreateDedicatedConnection() {

		if (asyncDedicatedConn == null) {
			asyncDedicatedConn = doGetAsyncDedicatedConnection();
		}

		return asyncDedicatedConn;
	}
首先知道LettuceConnection是每次获取连接都会创建的。在未执行multi时这个总是空的,在开启multii后会,执行doGetAsyncDedicatedConnection()获取的个单独的连接而非事务连接(此时连接池发挥作用了!)
这样就可以保证事务总是在单独的连接中运行。
命令执行
首先执行命令时获取的连接一定是事务绑定当前线程的连接LettuceConnection。
@Override
	public Boolean set(byte[] key, byte[] value) {

		Assert.notNull(key, "Key must not be null!");
		Assert.notNull(value, "Value must not be null!");

		try {
			if (isPipelined()) {
				pipeline(
						connection.newLettuceResult(getAsyncConnection().set(key, value), Converters.stringToBooleanConverter()));
				return null;
			}
			if (isQueueing()) {
				transaction(
						connection.newLettuceResult(getAsyncConnection().set(key, value), Converters.stringToBooleanConverter()));
				return null;
			}
			return Converters.stringToBoolean(getConnection().set(key, value));
		} catch (Exception ex) {
			throw convertLettuceAccessException(ex);
		}
	}
其中如果在事务模式下。那么使用getAsyncConnection来执行命令,这个就是刚刚multi开启的事务专属连接
保证了本事务的所有命令都使用一个连接与服务器通信.
exec
同样是先获取连接,与之前的步骤相同。
执行连接的exec
org.springframework.data.redis.connection.lettuce.LettuceConnection#exec
public List<Object> exec() {

		isMulti = false;

		try {

			TransactionResult transactionResult = (getDedicatedRedisCommands()).exec();
			List<Object> results = LettuceConverters.transactionResultUnwrapper().convert(transactionResult);
			return convertPipelineAndTxResults
					? new LettuceTransactionResultConverter(txResults, LettuceConverters.exceptionConverter()).convert(results)
					: results;
		} catch (Exception ex) {
			throw convertLettuceAccessException(ex);
		} finally {
			txResults.clear();
		}
	}
执行exec,获取结果,返回是一个list是顺序进入队列的命令执行结果。设置multi未false,关闭事务


 1591
1591

 被折叠的 条评论
为什么被折叠?
被折叠的 条评论
为什么被折叠?
 到【灌水乐园】发言


