


移植sshd
1、准备工作
准备openssh-9.5p1.tar.gz openssl-1.1.1w.tar.gz zlib-1.2.11.tar.gz
我在http://10.45.156.100/IG2100/IG2100.git IG2100/Build/source/third 找到如下源码库
-rw-rw-r-- 1 lanyx lanyx 1843001 5月  30 13:59 openssh-9.5p1.tar.gz
-rw-rw-r-- 1 lanyx lanyx 9893384 5月  30 13:59 openssl-1.1.1w.tar.gz
-rw-rw-r-- 1 lanyx lanyx  660294 5月  30 13:59 zlib-1.2.11.tar.gz
//新建如下目录
lanyx@ubuntu:~/src_lib/sshd$ tree -L 2
.
├── build
├── out
│   ├── openssl
│   └── zlib
├── source
│   ├── openssh-9.5p1
│   ├── openssl-1.1.1w
│   └── zlib-1.2.11
└── tar
    ├── openssh-9.5p1.tar.gz
    ├── openssl-1.1.1w.tar.gz
    └── zlib-1.2.11.tar.gz
2、编译zlib
tar -zxvf zlib-1.2.11.tar.gz -C ../source/
cd ../source/zlib-1.2.11
./configure --prefix=/home/lanyx/src_lib/sshd/out/zlib
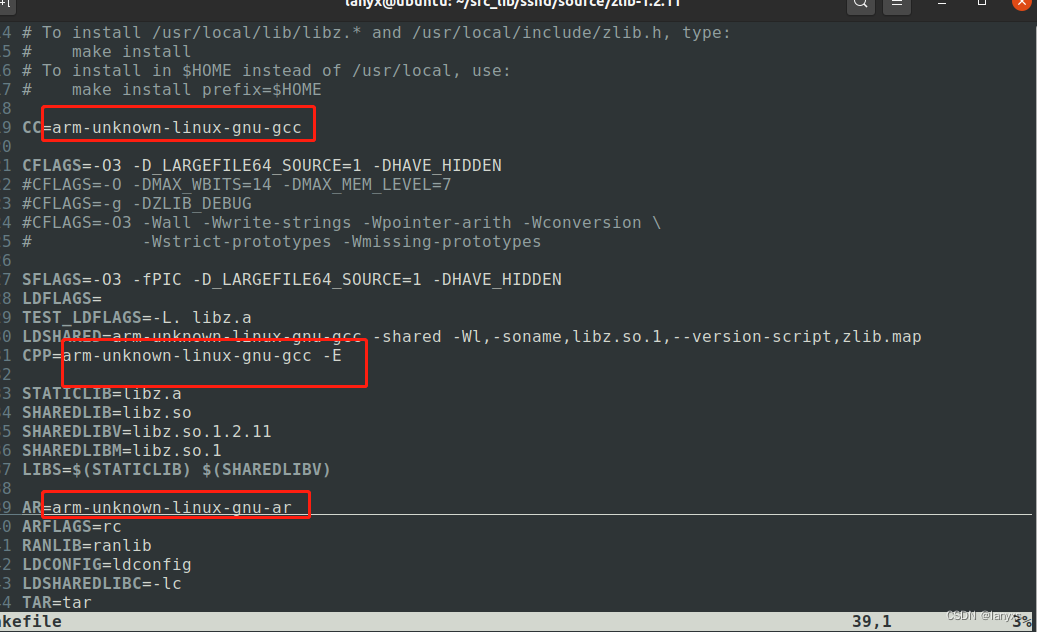
vim Makefile //修改编译链
make
make install
3、编译openssl
tar -zxvf openssl-1.1.1w.tar.gz -C ../source/
cd ../source/openssl-1.1.1w/

./Configure linux-generic32 no-asm no-threads no-zlib no-sse2 no-bf no-cast no-rc2 no-rc4 no-rc5 no-md2 no-mdc2 no-idea shared  --prefix=/home/lanyx/src_lib/sshd/out/openssl --cross-compile-prefix=arm-unknown-linux-gnu-
make
make install
执行Configure的时候可能会报错:
hreads_pthread.c crypto/threads_pthread.c: In function `CRYPTO_THREAD_lock_new': crypto/threads_pthread.c:48: warning: implicit declaration of function `pthread_mutexattr_settype' crypto/threads_pthread.c:48: error: `PTHREAD_MUTEX_RECURSIVE' undeclared (first use in this function) crypto/threads_pthread.c:48: error: (Each undeclared identifier is reported only once crypto/threads_pthread.c:48: error: for each function it appears in.) make[1]: *** [Makefile:5103: crypto/threads_pthread.o] Error 1 make[1]: Leaving directory '/home/lanyx/src_lib/sshd/source/openssl-1.1.1w'


处理:打开 crypto/threads_pthread.c 文件,添加以下定义

#ifndef PTHREAD_MUTEX_RECURSIVE
#define PTHREAD_MUTEX_RECURSIVE PTHREAD_MUTEX_RECURSIVE_NP
#endif
4、编译openssh
tar -zxvf openssh-9.5p1.tar.gz -C ../source/
cd ../source/openssh-9.5p
./configure --host=arm-linux --prefix=/home/lanyx/src_lib/sshd/out/openssh --with-zlib=/home/lanyx/src_lib/sshd/out/zlib --with-ssl-dir=/home/lanyx/src_lib/sshd/out/openssl --disable-etc-default-login CC=arm-unknown-linux-gnu-gcc AR=arm-unknown-linux-gnu-ar

make
make install
5、其他旧版本
上述版本在在IG2000V3设备上可以运行,但是存在sshd无法启动sftp-server服务,导致ftp无法使用,因此又尝试了低版本。
//openssh7.6 && openssl1.0.2n
wget https://zlib.net/fossils/zlib-1.2.11.tar.gz
wget https://www.openssl.org/source/old/1.0.2/openssl-1.0.2n.tar.gz
wget https://mirrors.aliyun.com/pub/OpenBSD/OpenSSH/portable/openssh-7.6p1.tar.gz

#zlib
./configure --prefix=/home/lanyx/src_lib/sshd-7.6/out/zlib
vim Makefile
#修改编译链,一共有五处需要修改
make
make install


#openssl
./Configure linux-generic32 no-asm no-threads no-zlib no-sse2 no-bf no-cast no-rc2 no-rc4 no-rc5 no-md2 no-mdc2 no-idea shared  --prefix=/home/lanyx/src_lib/sshd-7.6/out/openssl --cross-compile-prefix=arm-unknown-linux-gnu-
make
make install


#openssh
#9g25
./configure --host=arm-linux --disable-strip --sysconfdir=/etc/ssh --prefix=/usr --with-zlib=/home/lanyx/src_lib/sshd-7.6/out/zlib --with-ssl-dir=/home/lanyx/src_lib/sshd-7.6/out/openssl  CC=arm-unknown-linux-gnu-gcc AR=arm-unknown-linux-gnu-ar

#9x60
./configure --host=arm-linux --disable-strip --sysconfdir=/etc/ssh --prefix=/usr --with-zlib=/home/lanyx/src_lib/sshd-7.6/out/zlib --with-ssl-dir=/home/lanyx/src_lib/sshd-7.6/out/openssl  CC=arm-linux-gcc AR=arm-linux-ar


--sysconfdir :代表ssdh_config配置文件的默认路径,我将此文件放在/etc/ssh/sshd_config,因此这里我写/etc/ssh
 --prefix    :代表相关的bin文件的前缀,这里我写的/usr,因为我的sftp-server放在/usr/libexec目录
上述版本测试后还是发现sshd无法正常启动sftp-server,但是在IG2100上可以启动,目前原因未知,
将sshd_config中的sftp修改为sshd内部的sftp,测试可以正常。
#Subsystem	sftp	/usr/libexec/sftp-server
Subsystem   sftp    internal-sftp`
小贴士:如果采用/usr/sbin/sshd -d这种方式启动,在IG2000V3上也是无法启动sftp的,一定要/usr/sbin/sshd&或者在启动文件中启动
6、部署测试
准备编译好的文件
-rw-r--r-- 1 lanyx lanyx  553185 6月   4 08:04 moduli
drwxrwxr-x 6 lanyx lanyx    4096 6月   3 18:41 openssl
-rwxrwxr-x 1 lanyx lanyx  212549 6月   4 08:03 scp
-rwxrwxr-x 1 lanyx lanyx  292247 6月   4 08:07 sftp
-rwxrwxr-x 1 lanyx lanyx  234073 6月   4 08:03 sftp-server
-rwxrwxr-x 1 lanyx lanyx 1447435 6月   4 08:03 ssh
-rwxrwxr-x 1 lanyx lanyx  706755 6月   4 08:04 ssh-add
-rwxrwxr-x 1 lanyx lanyx  754599 6月   4 08:04 ssh-agent
-rw-r--r-- 1 lanyx lanyx    1495 6月   4 08:04 ssh_config
-rwxrwxr-x 1 lanyx lanyx 1616635 6月   4 08:05 sshd
-rw-r--r-- 1 lanyx lanyx    3120 6月   4 16:29 sshd_config
-rwxrwxr-x 1 lanyx lanyx  863203 6月   4 08:03 ssh-keygen
-rwxrwxr-x 1 lanyx lanyx  916052 6月   4 08:03 ssh-keyscan
-rwxrwxr-x 1 lanyx lanyx  877530 6月   4 08:05 ssh-keysign
drwxrwxr-x 5 lanyx lanyx    4096 6月   3 18:35 zlib
确保设备有以下目录,如果没有则新建:
/usr//bin
/usr/libexec
/etc/ssh
将 openssh 目录下文件拷贝到开发板系统中,具体为:
客户端文件
scp、sftp、ssh 、ssh-add、ssh-agent、ssh-keygen、ssh-keyscan 共7个文件拷贝到开发板 /usr/bin
sshd配置文件
moduli、ssh_config、sshd_config 共3个文件拷贝到开发板 /etc/ssh
sftp-server文件
sftp-server、ssh-keysign 共2个文件拷贝到开发板 /usr/libexec
sshd 拷贝到 /usr/sbin
chmod 777 /usr/sbin/sshd
libz.so.1.2.11 拷贝到开发板 /lib (必须放在/lib下,不然scp会找不到这个库)
然后建立软链接:
ln -s libz.so.1.2.11 libz.so.1
将out/openssl/lib/libcrypto.so.1.0.0 也要复制到/lib
生成key文件:
ssh-keygen -t rsa -f /etc/ssh/ssh_host_rsa_key -N ""
ssh-keygen -t dsa -f /etc/ssh/ssh_host_dsa_key -N ""
ssh-keygen -t ecdsa -f /etc/ssh/ssh_host_ecdsa_key -N ""
将生成的 ssh_host_rsa_key 、 ssh_host_dsa_key 和 ssh_host_ecdsa_key 拷贝到 /etc/ssh
chmod 600 ssh_host_*
#如果开发板需要 ssh_host_key 的话,执行:
#ssh-keygen -t rsa1 -f /etc/ssh/ssh_host_key -N ""
如果出现 privilege separation user sshd 问题:
在 /etc/passwd 增加以下:
sshd:x:74:74:Privilege-separated SSH:/var/empty/sshd:/sbin/nologin
测试:
/usr/sbin/sshd -d
7、多用户配置
useradd ftptest -m -s /bin/sh -d /TELECOM #/TELECOM是用户目录
echo "ftptest:ftptest" | chpasswd         #修改密码
chmod 755 /TELECOM -R                     #修改权限,这里设置为755,只能下载不能上传,如果想要上传修改为766就可以
8、sshd_config示例
#	$OpenBSD: sshd_config,v 1.103 2018/04/09 20:41:22 tj Exp $

# This is the sshd server system-wide configuration file.  See
# sshd_config(5) for more information.

# This sshd was compiled with PATH=/usr/bin:/bin:/usr/sbin:/sbin

# The strategy used for options in the default sshd_config shipped with
# OpenSSH is to specify options with their default value where
# possible, but leave them commented.  Uncommented options override the
# default value.

#Port 22
#AddressFamily any
#ListenAddress 0.0.0.0
#ListenAddress ::

#HostKey /etc/ssh/ssh_host_rsa_key
#HostKey /etc/ssh/ssh_host_ecdsa_key
#HostKey /etc/ssh/ssh_host_ed25519_key

# Ciphers and keying
#RekeyLimit default none

kexalgorithms curve25519-sha256,curve25519-sha256@libssh.org,ecdh-sha2-nistp256,ecdh-sha2-nistp384,ecdh-sha2-nistp521,diffie-hellman-group1-sha1,diffie-hellman-group14-sha1,diffie-hellman-group-exchange-sha256,diffie-hellman-group16-sha512,diffie-hellman-group18-sha512,diffie-hellman-group14-sha256

# Logging
#SyslogFacility AUTH
#LogLevel INFO


#LoginGraceTime 2m
#PermitRootLogin prohibit-password
PermitRootLogin yes
#StrictModes yes
#MaxAuthTries 6
#MaxSessions 10

PubkeyAuthentication yes

# The default is to check both .ssh/authorized_keys and .ssh/authorized_keys2
# but this is overridden so installations will only check .ssh/authorized_keys
AuthorizedKeysFile	.ssh/authorized_keys

#AuthorizedPrincipalsFile none

#AuthorizedKeysCommand none
#AuthorizedKeysCommandUser nobody

# For this to work you will also need host keys in /etc/ssh/ssh_known_hosts
#HostbasedAuthentication no
# Change to yes if you don't trust ~/.ssh/known_hosts for
# HostbasedAuthentication
#IgnoreUserKnownHosts no
# Don't read the user's ~/.rhosts and ~/.shosts files
#IgnoreRhosts yes

# To disable tunneled clear text passwords, change to no here!
#PasswordAuthentication yes
#PermitEmptyPasswords no

# Change to no to disable s/key passwords
#ChallengeResponseAuthentication yes

# Kerberos options
#KerberosAuthentication no
#KerberosOrLocalPasswd yes
#KerberosTicketCleanup yes
#KerberosGetAFSToken no

# GSSAPI options
#GSSAPIAuthentication no
#GSSAPICleanupCredentials yes

# Set this to 'yes' to enable PAM authentication, account processing,
# and session processing. If this is enabled, PAM authentication will
# be allowed through the ChallengeResponseAuthentication and
# PasswordAuthentication.  Depending on your PAM configuration,
# PAM authentication via ChallengeResponseAuthentication may bypass
# the setting of "PermitRootLogin without-password".
# If you just want the PAM account and session checks to run without
# PAM authentication, then enable this but set PasswordAuthentication
# and ChallengeResponseAuthentication to 'no'.
#UsePAM no

#AllowAgentForwarding yes
#AllowTcpForwarding yes
#GatewayPorts no
#X11Forwarding no
#X11DisplayOffset 10
#X11UseLocalhost yes
#PermitTTY yes
#PrintMotd yes
#PrintLastLog yes
#TCPKeepAlive yes
#PermitUserEnvironment no
#Compression delayed
#ClientAliveInterval 0
#ClientAliveCountMax 3
UseDNS no
#PidFile /var/run/sshd.pid
#MaxStartups 10:30:100
#PermitTunnel no
#ChrootDirectory none
#VersionAddendum none

# no default banner path
#Banner none

# override default of no subsystems
#Subsystem	sftp	/usr/libexec/sftp-server
Subsystem   sftp    internal-sftp

# Example of overriding settings on a per-user basis


 3441
3441


 被折叠的 条评论
为什么被折叠?
被折叠的 条评论
为什么被折叠?
 到【灌水乐园】发言


