


由于软件安装的地方不止一个地方,所有先说查看文件安装的所有路径(地址)。
这里以hbase为例。比如说我安装了Oracle,但是不知道文件都安装在哪些地方、放在哪些文件夹里,可 以用下面的命令查看所有的文件路径
在终端输入:
whereis hbase
回车,如果你安装好了hbase,就会显示文件安装的地址,例如我的显示(安装地址可能会不同)
hbase: /usr/bin/hbase /etc/hbase
可以看出来,hbase安装在是个目录里。
如果你没有安装hbase或者hbase安装没成功,则不会显示文件路径出来。只提示:
hbase:
二、查询运行文件所在路径:
如果你只要查询文件的运行文件所在地址,直接用下面的命令就可以了(还是以Oracle为例):
which oracle
结果会显示:
/usr/bin/oracle
从主机复制到容器sudo docker cp host_path containerID:container_path
从容器复制到主机sudo docker cp containerID:container_path host_path
容器ID的查询方法想必大家都清楚:docker ps -a
例如 docker cp mysqld.cnf mysql:/etc/mysql/mysql.conf.d
docker cp mysqld.cnf mysql:/etc/mysql/mysql.conf.d
二.配置Mycat文件,实现简单的读写分离
1.修改mycat/conf/server.xml文件,具体修改如下
- <?xml version="1.0" encoding="UTF-8"?>
- <!-- - - Licensed under the Apache License, Version 2.0 (the "License");
- - you may not use this file except in compliance with the License. - You
- may obtain a copy of the License at - - http://www.apache.org/licenses/LICENSE-2.0
- - - Unless required by applicable law or agreed to in writing, software -
- distributed under the License is distributed on an "AS IS" BASIS, - WITHOUT
- WARRANTIES OR CONDITIONS OF ANY KIND, either express or implied. - See the
- License for the specific language governing permissions and - limitations
- under the License. -->
- <!DOCTYPE mycat:server SYSTEM "server.dtd">
- <mycat:server xmlns:mycat="http://org.opencloudb/">
- <system>
- <property name="defaultSqlParser">druidparser</property>
- <!--
- <property name="processorBufferChunk">40960</property>
- <property name="processors">1</property>
- <property name="processorExecutor">32</property>
- -->
- <!--默认是65535 64K 用于sql解析时最大文本长度 -->
- <!--<property name="maxStringLiteralLength">65535</property>-->
- <!--<property name="sequnceHandlerType">0</property>-->
- <!--<property name="backSocketNoDelay">1</property>-->
- <!--<property name="frontSocketNoDelay">1</property>-->
- <!--<property name="processorExecutor">16</property>-->
- <!--
- <property name="mutiNodeLimitType">1</property> 0:开启小数量级(默认) ;1:开启亿级数据排序
- <property name="mutiNodePatchSize">100</property> 亿级数量排序批量
- <property name="processors">32</property> <property name="processorExecutor">32</property>
- <property name="serverPort">8066</property> <property name="managerPort">9066</property>
- <property name="idleTimeout">300000</property> <property name="bindIp">0.0.0.0</property>
- <property name="frontWriteQueueSize">4096</property> <property name="processors">32</property>
- -->
- </system>
- <user name="root">
- <property name="password">123456</property>
- <property name="schemas">TESTDB</property>
- </user>
- <user name="user">
- <property name="password">123456</property>
- <property name="schemas">TESTDB</property>
- <property name="readOnly">true</property>
- </user>
- <!--以上配置的是连接mycat的用户名和密码-->
- <!--
- <cluster>
- <node name="cobar1"> <property name="host">127.0.0.1</property>
- <property name="weight">1</property> </node>
- </cluster>
- -->
- <!--
- <quarantine>
- <host name="1.2.3.4"> <property name="user">test</property> </host>
- </quarantine>
- -->
- </mycat:server>
- <?xml version="1.0"?>
- <!DOCTYPE mycat:schema SYSTEM "schema.dtd">
- <mycat:schema xmlns:mycat="http://org.opencloudb/">
- <schema name="TESTDB" checkSQLschema="false" sqlMaxLimit="100" dataNode="dn1">
- <!-- auto sharding by id (long) -->
- <!-- <table name="travelrecord" dataNode="dn1,dn2,dn3" rule="auto-sharding-long" />-->
- <!-- global table is auto cloned to all defined data nodes ,so can join with any table whose sharding node is in the same data node -->
- <!-- <table name="company" primaryKey="ID" type="global" dataNode="dn1,dn2,dn3" />-->
- <!-- <table name="goods" primaryKey="ID" type="global" dataNode="dn1,dn2" />-->
- <!-- random sharding using mod sharind rule -->
- <!-- <table name="hotnews" primaryKey="ID" dataNode="dn1,dn2,dn3" rule="mod-long" />-->
- <!-- <table name="worker" primaryKey="ID" dataNode="jdbc_dn1,jdbc_dn2,jdbc_dn3" rule="mod-long" /> -->
- <!-- <table name="employee" primaryKey="ID" dataNode="dn1,dn2" rule="sharding-by-intfile" />-->
- <!--<table name="customer" primaryKey="ID" dataNode="dn1,dn2"rule="sharding-by-intfile">
- <childTable name="orders" primaryKey="ID" joinKey="customer_id" parentKey="id">
- <childTable name="order_items" joinKey="order_id" parentKey="id" /></childTable>
- <childTable name="customer_addr" primaryKey="ID" joinKey="customer_id" parentKey="id" />
- </table>-->
- </schema>
- <dataNode name="dn1" dataHost="localhost1" database="test" />
- <!--上面的database属性设置的就是你要连接的数据库-->
- <!--
- <dataNode name="dn2" dataHost="localhost1" database="db2" />
- <dataNode name="dn3" dataHost="localhost1" database="db3" />
- <dataNode name="jdbc_dn1" dataHost="jdbchost" database="db1" />
- <dataNode name="jdbc_dn2" dataHost="jdbchost" database="db2" />
- <dataNode name="jdbc_dn3" dataHost="jdbchost" database="db3" />
- -->
- <dataHost name="localhost1" maxCon="1000" minCon="10" balance="1" writeType="0" dbType="mysql" dbDriver="native">
- <heartbeat>select user()</heartbeat>
- <!-- can have multi write hosts -->
- <!--设置执行写操作的数据库的IP地址、用户名以及密码-->
- <writeHost host="hostM1" url="127.0.0.1:3306" user="root" password="123456">
- <!-- 以下是设置多个执行读操作的数据库的IP地址、用户名以及密码 -->
- <readHost host="hostS1" url="192.168.1.1:3306" user="root" password="123456"/>
- <readHost host="hostS1" url="192.168.1.2:3306" user="root" password="123456"/>
- <readHost host="hostS1" url="192.168.1.3:3306" user="root" password="123456"/>
- </writeHost>
- <!-- <writeHost host="hostM2" url="localhost:3316" user="root" password="123456"/> -->
- </dataHost>
- <!--
- <dataHost name="jdbchost" maxCon="1000" minCon="1" balance="0" writeType="0" dbType="mongodb" dbDriver="jdbc">
- <heartbeat>select user()</heartbeat>
- <writeHost host="hostM" url="mongodb://192.168.0.99/test" user="admin" password="123456" ></writeHost>
- </dataHost>
- -->
- <!--
- <dataHost name="jdbchost" maxCon="1000" minCon="10" balance="0"
- dbType="mysql" dbDriver="jdbc">
- <heartbeat>select user()</heartbeat>
- <writeHost host="hostM1" url="jdbc:mysql://localhost:3306"
- user="root" password="123456">
- </writeHost>
- </dataHost>
- -->
- </mycat:schema>
- 找到wrapper.java.command=java 将其改为wrapper.java.command=%JAVA_HOME%/bin/java

因为我这里之前已经启动过了,所以提示已经在运行,可以使用ps -ef |grep mycat检查进程

如果使用该命令查询出来的不是如图所示的话,有可能mycat服务就没启动起来,这是进入log目录查看日志文件,使用 cat /usr/local/mycat/logs/wrapper.log,我第一次启动的时候就失败了,查看日志文件发现如下错误
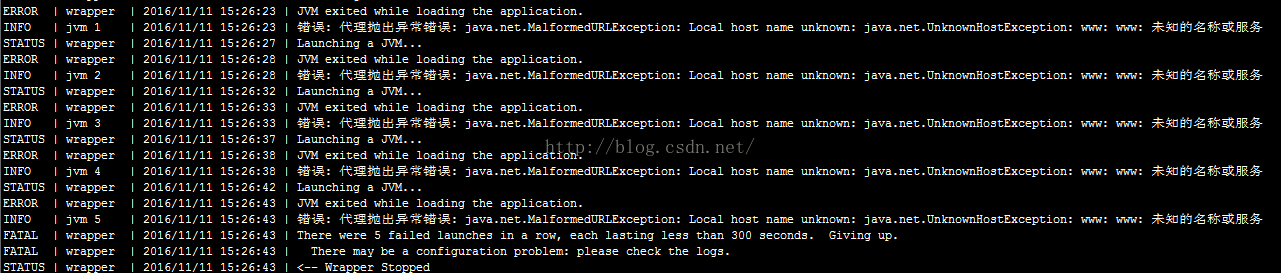
这是不要慌,仔细排查日志,这里说的就是我的端口名称未被识别,这是就应该想到肯定跟hosts文件有关,使用cat /etc/sysconfig/network
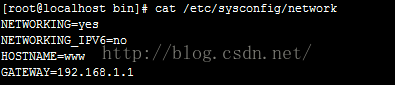
这是我们将上图中的HOSTNAME属性改为localhost,这是应重启才会使修改生效,重启完之后启动mycat,然后查看日志文件,提示启动成功


 5318
5318

 被折叠的 条评论
为什么被折叠?
被折叠的 条评论
为什么被折叠?
 到【灌水乐园】发言


