


http服务器产品
- lis
- lighttpd
- apache
- tomcat
- nginx
nginx的优点
- 开源
- 轻量级
- 高性能
- 易扩展
- 稳定
- 模块化
- 热更新
nginx下载与编译
环境:CentOS7
1 下载
下载nginx源码:
wget https://github.com/nginx/nginx
nginx编译需要pcre,下载pcre:
wget https://github.com/PhilipHazel/pcre2
nginx编译需要zlib,下载zlib:
wget https://github.com/madler/zlib
2 解压
解压pcre:
tar -zxvf pcre-8.41
解压zlib:
tar -zxvf zlib-1.2.11
解压nginx:
tar -zxvf nginx-1.14.0.tar.gz -C /usr/local/src/
3 编译
编译pcre:
./configure && make && make install
编译zlib:
./configure && make && make install
编译nginx:
./configure && make && make install
nginx启动与停止
启动nginx:
cd /usr/local/nignx #进入nginx目录
./sbin/nginx -c conf/nginx.conf #以conf/nginx.conf文件作为配置文件,启动./sbin/nginx程序
关闭nginx:
cd /usr/local/nginx
./sbin/nginx -s stop
重新载入配置文件:
cd /usr/local/nginx
./sbin/nginx -s reload
nginx启动流程
启动./sbin/nginx流程是,先启动master进程,读取配置,根据配置信息启动slave进程。
nginx主要应用场景
【1】反向代理
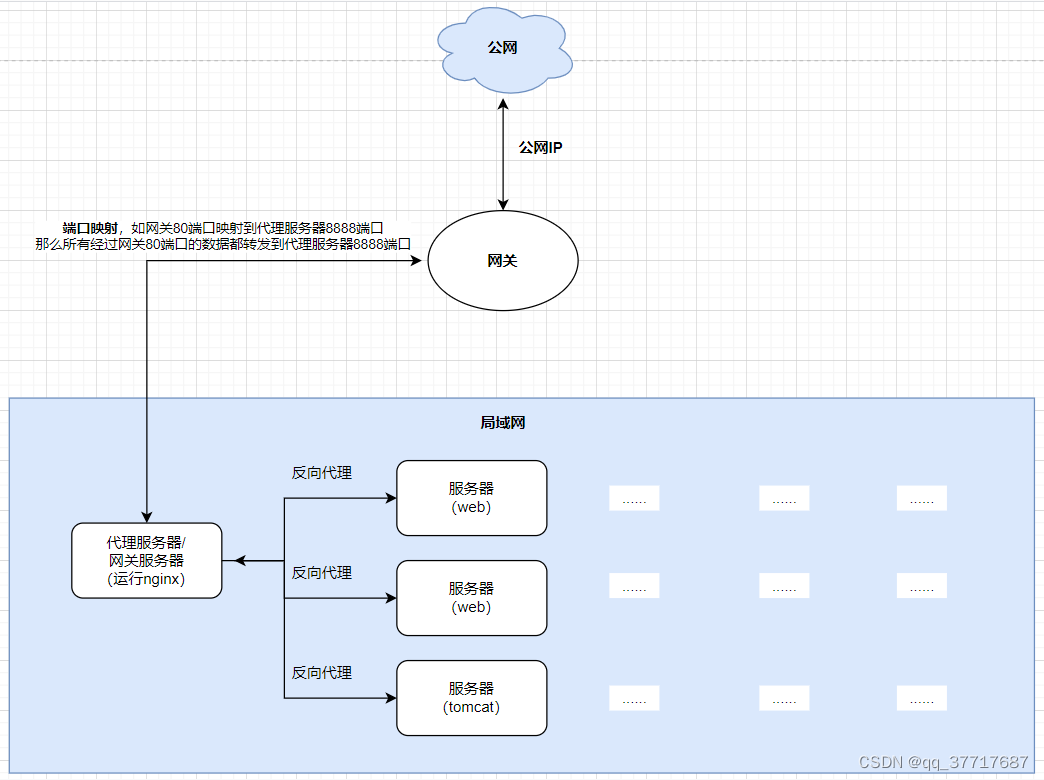
反向代理应该是 Nginx 做的最多的一件事了,什么是反向代理呢,反向代理(Reverse Proxy)方式是指以代理服务器来接受internet上的连接请求,然后将请求转发给内部网络上的服务器,并将从服务器上得到的结果返回给 internet 上请求连接的客户端,此时代理服务器对外就表现为一个反向代理服务器。简单来说就是真实的服务器不能直接被外部网络访问,所以需要一台代理服务器,而代理服务器能被外部网络访问的同时又跟真实服务器在同一个网络环境,当然也可能是同一台服务器,端口不同而已。
下面贴上一段简单的实现反向代理的代码:
server {
 	listen 80;
 	server_name localhost;
 	client_max_body_size 1024M;
 	location / {
 		proxy_pass http://localhost:8080;
 		proxy_set_header Host $host:$server_port;
 	}
 }
保存配置文件后启动 Nginx,这样当我们访问 localhost 的时候,就相当于访问localhost:8080了。
【2】负载均衡
1、RR 轮转(默认)
2、权重
3、ip_hash
4、fair(第三方)
5、url_hash(第三方)
【3】http服务器
Nginx 本身也是一个静态资源的服务器,当只有静态资源的时候,就可以使用 Nginx 来做服务器,同时现在也很流行动静分离,就可以通过 Nginx 来实现,首先看看 Nginx 做静态资源服务器
server {
	listen 80;
	server_name localhost;
 	client_max_body_size 1024M;
 	location / {
 		root /usr/local/nginx/html/www;
 		index index.html;
 	}
 }
这样如果访问 http://localhost 就会默认访问到 html/www 目录下面的 index.html,如果一个网站只是静态页面的话,那么就可以通过这种方式来实现部署。
【4】动静分离
动静分离是让动态网站里的动态网页根据一定规则把不变的资源和经常变的资源区分开来,动静资源做好了拆分以后,我们就可以根据静态资源的特点将其做缓存操作,这就是网站静态化处理的核心思路。
upstream test{
	 server localhost:8080;
	 server localhost:8081;
 }

server {
	listen 80;
 	server_name localhost;
 	location / {
 		root root /usr/local/nginx/html/www;
 		index index.html;
	 }
 	# 所有静态请求都由 nginx 处理,存放目录为 html
 	location ~ .(gif|jpg|jpeg|png|bmp|swf|css|js)$ {
		root /var/www;
	}
	# 所有动态请求都转发给 tomcat 处理
 	location ~ .(jsp|do)$ {
		proxy_pass http://test;
 	}
 	error_page 500 502 503 504 /50x.html;
 	location = /50x.html {
 		root /var/www;
 	}
 }
这样我们就可以吧 HTML 以及图片和 css 以及 js 放到 html/www 目录下,而 tomcat 只负责处理 jsp 和请求,例如当我们后缀为 gif 的时候,Nginx 默认会从 html/www 获取到当前请求的动态图文件返回,当然这里的静态文件跟 Nginx 是同一台服务器,我们也可以在另外一台服务器,然后通过反向代理和负载均衡配置过去就好了,只要搞清楚了最基本的流程,很多配置就很简单了,另外 localtion 后面其实是一个正则表达式,所以非常灵活
【5】正向代理
正向代理,意思是一个位于客户端和原始服务器(origin server)之间的服务器,为了从原始服务器取得内容,客户端向代理发送一个请求并指定目标(原始服务器),然后代理向原始服务器转交请求并将获得的内容返回给客户端。客户端才能使用正向代理。
 resolver 114.114.114.114 8.8.8.8;
 server {
 	resolver_timeout 5s;
 	listen 81;
 	access_log /var/www/access.log;
 	error_log /var/www/error.log;
 	location / {
 		proxy_pass http://$host$request_uri;
 	}
 }
resolver 是配置正向代理的 DNS 服务器,listen 是正向代理的端口,配置好了就可以在 ie上
面或者其他代理插件上面使用服务器 ip+端口号进行代理了。
正向代理和反向代理的区别
正向代理:代课客户端。用途:比如VPN,访问外网时,nginx把客户端的ip修改成了自己的ip去访问外网。
反向代理:代理服务器。用途:比如公网IP费用和带宽很贵,可以考虑只够买一个公网IP,这个公网IP上的路由器(网关)做一个端口映射,映射到局域网的装有nginx的一个机器(代理服务器,也叫做网关服务器), 利用代理服务器(网关服务器)代器局域网内其他服务器机器,实现了一个机器代理后面多个服务器的反向代理。
代理和重定向的区别
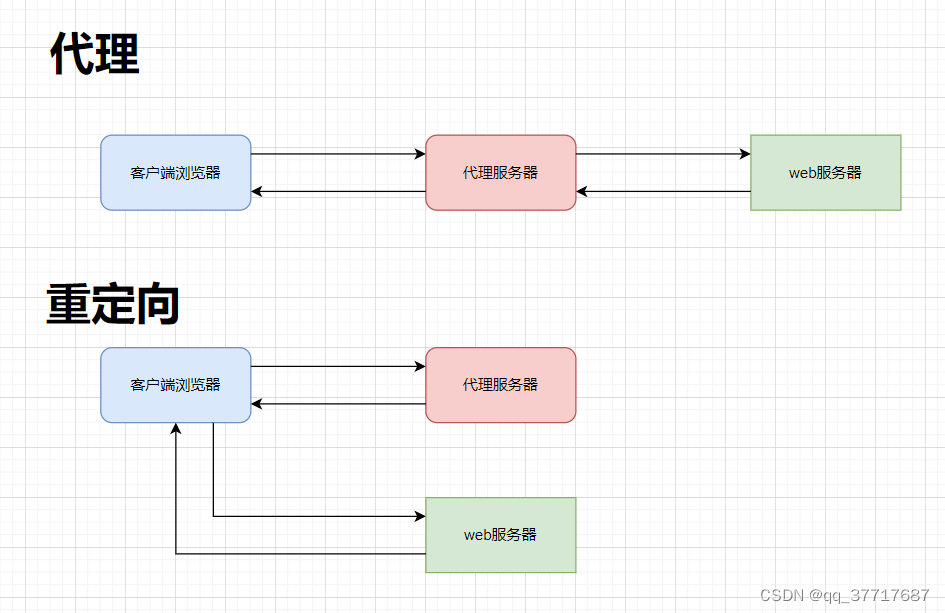
代理:客户端浏览器与代理服务器建立连接,代理服务器与被代理的服务器连接,获取到信息后,由代理服务器发给客户端浏览器。因此客户端浏览器地址上显示的仅仅是代理服务器的ip地址。
重定向:客户端浏览器与代理服务器建立连接后,代理服务器发出重定向的网址给客户端,客户端根据网址跟重定向的服务器建立连接。因此重定向后客户端浏览器地址上显示的是web服务器的ip地址而不是代理服务器的ip地址。
返回特定状态码:
一些网站 URI 需要立即返回具有特定错误或重定向代码的响应,例如当页面被暂时移动或永久移动时。 最简单的方法是使用 return 指令。 例如返回未找到的 404 状态码:
location /wrong/url {
	return 404;
}
返回重定向URL:
返回的第一个参数是响应代码。可选的第二个参数可以是重定向的 URL(代码 301,302,303 和 307)或在响应体中返回文本。 例如:
location /permanently/moved/url {
	return 301 http://www.example.com/moved/here;
}
返回指令可以包含在 location 和 server 上下文中。
nginx配置解析
基础配置解析与nginx监听端口行为
配置:
worker_processes 4;

events {
	worker_connections 1024;
}

# smtp协议
smtp {
}

# http协议
http {

	# http协议可以有多个server
	server {
		listen 8888;
	}

	server {
		listen 8889;
	}

	server {
		listen 8890;
	}

	server {
		listen 8891;
	}

}
行为:
# netstat -nap | grep 8888
tcp        0      0 0.0.0.0:8888            0.0.0.0:*               LISTEN      2081/nginx: master
# netstat -nap | grep 8889
tcp        0      0 0.0.0.0:8889            0.0.0.0:*               LISTEN      2081/nginx: master
# netstat -nap | grep 8890
tcp        0      0 0.0.0.0:8890            0.0.0.0:*               LISTEN      2081/nginx: master
# netstat -nap | grep 8888
tcp        0      0 0.0.0.0:8891            0.0.0.0:*               LISTEN      2081/nginx: master
可以如上看到监听8888、8889、8890、8891这四个端口的都是nginx:master进程监听。
原理解析:
1、listen操作是在master进程。一个进程如何监听多个端口?进程申请的epoll管理所有端口,这就是IO多路复用的解决方案。
2、listen操作完后,master进程进行fork出子进程。因此所有子进程也都持有父进程中listen后返回的同一个fd。
3、当有fd新来请求,master不去具体响应请求,而是由worker进程去响应accept、read、send等操作。
4、因为所有子进程都持有和父进程同一个fd,当一个fd新来请求,那么所有子进程会去抢夺响应这个请求,此时发生“惊群”现象。解决“惊群”现象:在共享内存中实现一把全局锁,所有子进程去共享内存中抢夺锁的拥有权,拥有锁的子进程可以获得处理fd请求的权力。
访问静态资源配置示例
配置:
worker_processes 4;	#开启进程数

events {
        worker_connections 1024;	#每个进程允许并发连接数
}

http {
 		#开启服务
        server {
                listen 8888;

		·		#一个http请求对应一个location,get资源的路径
                location / {
                        root /usr/local/nginx/html;
                }
                #root是根路径,访问完整路径是root+location后面带的路径。比如这里访问的完整路径就是/usr/local/nginx/images;
                location /images/ {
                        root /usr/local/nginx/;
                }
                # ~ \. 是正则表达式中表示任意前缀的意思
                location ~ \.(mp3|mp4) {
                        root /usr/local/nginx;
                }
        }
}
验证:
# 启动nginx
cd /usr/local/nginx
./sbin/nginx -s conf/mynginx.conf

# 查看nginx根目录资源分布
# tree
.
├── client_body_temp
├── conf
│   ├── fastcgi.conf
│   ├── fastcgi.conf.default
│   ├── fastcgi_params
│   ├── fastcgi_params.default
│   ├── koi-utf
│   ├── koi-win
│   ├── mime.types
│   ├── mime.types.default
│   ├── myconf.conf
│   ├── mynginx.conf
│   ├── nginx.conf
│   ├── nginx.conf.default
│   ├── scgi_params
│   ├── scgi_params.default
│   ├── uwsgi_params
│   ├── uwsgi_params.default
│   └── win-utf
├── fastcgi_temp
├── html
│   ├── 50x.html
│   └── index.html
├── images
│   └── a.jpg
├── logs
│   ├── access.log
│   ├── error.log
│   └── nginx.pid
├── media
│   └── a.mp4
├── proxy_temp
├── sbin
│   ├── nginx
│   └── nginx.old
├── scgi_temp
├── test
│   └── chapter2
│       └── my.html
└── uwsgi_temp


# 访问图片
浏览器地址访问 http://192.168.184.131:8888/images/a.jpg

# 访问音频
浏览器地址访问 http://192.168.184.131:8888/media/a.mp4

# 访问my.html
浏览器地址访问 http://192.168.184.131:8888/test/chapter2/my.html
反向代理、负载均衡配置示例
配置:
worker_processes 4;	#开启进程数

events {
        worker_connections 1024;	#每个进程允许并发连接数
}

http {

        #nginx反向代理的服务器地址
    	#这里的负载均衡实现是RR(轮询),是默认的nginx负载均衡方案
        #upstream backend {
        #        server 192.168.184.132;
        #        server 192.168.184.133;
        #}

		#nginx反向代理的服务器地址
        #这里的负载均衡实现是ip_hash,每个请求按ip的hash结果分配,这样每个访客固定访问一个后端服务器,可以解决session问题
		#upstream backend {
		#		ip_hash;
        #       server 192.168.184.132;
        #       server 192.168.184.133;
        #}

		#nginx反向代理的服务器地址
        #这里的负载均衡实现是fair,接后端服务器的响应时间来分配请求,响应时间短的优先分配。
		#upstream backend {
		#	    fair;
        #       server 192.168.184.132;
        #       server 192.168.184.133;
        #}

		#nginx反向代理的服务器地址
        #这里的负载均衡实现是url_hash,按访问的url的hash结果来分配请求,使每个url定向到一个后端服务器,后端服务器为缓存时比较有效,在upstream中加入hash语句,server语句中不能写入weight等其他参数,hash_method是使用的hash算法。
		#upstream backend {
		#	    hash $require_url;
		#	    hash_method crc32;
        #       server 192.168.184.132;
        #       server 192.168.184.133;
        #}

        #nginx反向代理的服务器地址
        #这里的负载均衡实现是权重,给不同server配了一个weight,转发时根据weight转发到不同的server
		upstream backend {
                server 192.168.184.132 weight=2;
                server 192.168.184.133 weight=1;
        }

		#开启服务
        server {
                listen 8888;
        }
        #开启服务
        server {
                listen 8889;
        }
        #开启服务
        server {
                listen 8890;

                #localtion ~ \.cgi {
                #       fastcgi_pass 192.168.184.131:9000;
                #       fastcgi_index index.cgi;
                #       fastcgi_param SCRIPI_FILENAME cgi$fastcgi_script_name;
                #       include ../conf/fastcgi_params;
                #}
        }
        #开启服务
        server {
        		#监听的端口
                listen 8891;
				#匹配客户端请求
                location / {
                		#资源所在的文件路径
                        root /usr/local/nginx/html;
                        #反向代理地址
                        #proxy_pass http://192.168.184.132;
                        #反向代理地址,根据策略转发到某个服务器地址
                        proxy_pass http://backend;
                }
                #匹配客户端请求
                location /images/ {
                        root /usr/local/nginx/;
                }
                #匹配客户端请求
                location ~ \.(mp3|mp4) {
                        root /usr/local/nginx;
                }
        }
}
验证
# 分别启动192.168.184.131、192.168.184.132、192.168.184.133的机器上的nginx
cd /usr/local/nginx
./sbin/nginx -s conf/mynginx.conf

# 浏览器访问
http://192.168.184.131:8891 ##此时发生反向代理,根据权重访问到了132或者133的机器上的首页资源
nginx数据结构

nginx基础数据结构
ngx_int_t
//ngx_config.h
typedef intptr_t        ngx_int_t;	//为了兼容不同平台int的sizeof
在不同平台(如x86和x64),int所占用的字节数是不同的,在不同平台下使用强转如下就会出现问题(long变量出现无意义空字节情况)。ngx_int_t 的定义为了兼容不同平台int的sizeof。
int idx = sum;
long a = (long)idx;
ngx_str_t
//ngx_string.h
typedef struct {
    size_t      len;	//数据长度
    u_char     *data;	//数据内容指针
} ngx_str_t;
对比字符存储形式是柔性数组和字符存储形式是nginx使用的数组指针的好处坏处:
字符存储形式是柔性数组:
typedef struct {
    size_t      len;
    u_char     data[0];
} str_t;

字符存储形式是数组指针:
typedef struct {
    size_t      len;
    u_char     *data;
} str_t;
- 字符存储形式是柔性数组的结构体在申请内存的时候,data的内容是跟在len之后的,一旦整个内存申请好后,data里面的内容长度就确定了,再更改比较困难。
- 字符存储形式是数组指针的结构体在申请内存的时候,data的内容可以在任意地方申请(如其他的堆),用一个指针记录真正内容的地方,所以修改data内容比较容易。
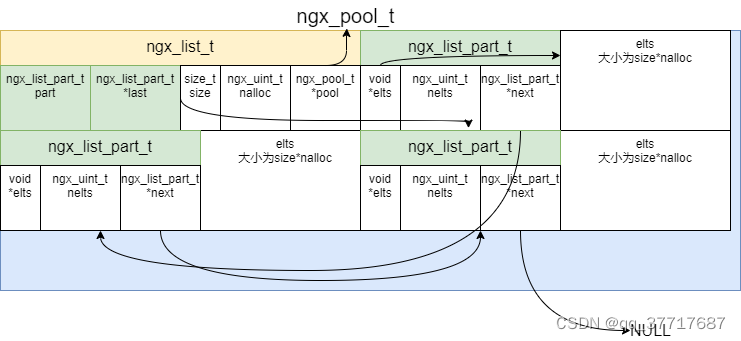
ngx_list_t
//ngx_list.h
typedef struct ngx_list_part_s  ngx_list_part_t;

struct ngx_list_part_s {
    void             *elts;	//真正存放ngx_str_t数据的地方
    ngx_uint_t        nelts;	//ngx_str_t长度
    ngx_list_part_t  *next;	//下一个ngx_list_part_s
};

typedef struct {
    ngx_list_part_t  *last;	//ngx_list_part_s结尾结点
    ngx_list_part_t   part;	//ngx_list_part_s开头结点
    size_t            size;	//每个数据的大小
    ngx_uint_t        nalloc;	//分配数据个数
    ngx_pool_t       *pool;	//指向当前list被分配内存所在的内存池
} ngx_list_t;
问:一般一个数据结构至少拥有增、删、改、查四个函数,为什么ngx_list_t 结构体数据结构只提供操作函数(void *ngx_list_push(ngx_list_t *list))?
答:
- ngx_list_t使用了内存池结构,而nginx的内存池使用场景是一个用户连接(socket)建立对应的一个内存池,当用户断开连接后,整个内存池一起释放,因此不需要单独的释放内存池内部的某个结构(如这里的ngx_list_t整个使用的内存)。因此不需要删除函数操作。
- ngx_list_t 的某个应用场景是客户端多条数据上传到nginx,nginx做一个缓存,然后隔一段时间把内容保存到数据库,因此不需要查函数和改函数。
使用示例:
//gcc -o ngx_list_main ngx_list_main.c -I ../nginx-1.13.7/src/core/ -I ../nginx-1.13.7/objs/  -I ../nginx-1.13.7/src/os/unix/ -I ../pcre-8.41/ -I ../nginx-1.13.7/src/event/ ../nginx-1.13.7/objs/src/core/ngx_list.o ../nginx-1.13.7/objs/src/core/ngx_string.o ../nginx-1.13.7/objs/src/core/ngx_palloc.o ../nginx-1.13.7/objs/src/os/unix/ngx_alloc.o

#include <stdio.h>
#include <string.h>

#include "ngx_config.h"

#include "ngx_core.h"

#include "ngx_list.h"
#include "ngx_palloc.h"
#include "ngx_string.h"

#define N	10

volatile ngx_cycle_t *ngx_cycle;

void ngx_log_error_core(ngx_uint_t level, ngx_log_t *log,
			ngx_err_t err, const char *fmt, ...)
{


}


void print_list(ngx_list_t *l) {
	ngx_list_part_t *p = &(l->part);

	while (p) {

		int i = 0;
		for (i = 0;i < p->nelts;i ++) {
			printf("%s\n", (char*)(((ngx_str_t*)p->elts + i)->data));
		}
		p = p->next;
		printf(" -------------------------- \n");
	}

}

int main() {

	ngx_pool_t *pool = ngx_create_pool(1024, NULL);

	ngx_list_t *l = ngx_list_create(pool, N, sizeof(ngx_str_t));

	int i = 0;
	for (i = 0;i < 24;i ++) {

		ngx_str_t *ptr = ngx_list_push(l);

		char *buf = ngx_palloc(pool, 32);
		sprintf(buf, "King %d", i+1);

		ptr->len = strlen(buf);
		ptr->data = buf;
	}

	print_list(l);
}
ngx_table_elt_t
//ngx_hash.h
typedef struct {
    ngx_uint_t        hash;	//hash值,方便找到key所在位置
    ngx_str_t         key;	//key
    ngx_str_t         value;	//value
    u_char           *lowcase_key;	//小写key
} ngx_table_elt_t;
ngx_buf_t
//ngx_buf.h
typedef struct ngx_buf_s  ngx_buf_t;
struct ngx_buf_s {
    u_char          *pos;	//当前读取位置
    u_char          *last;	//当前读取结尾位置
    off_t            file_pos;	//文件位置
    off_t            file_last;	//文件结尾位置

    u_char          *start;         /* start of buffer */
    u_char          *end;           /* end of buffer */
    ngx_buf_tag_t    tag;
    ngx_file_t      *file;	//文件指针
    ngx_buf_t       *shadow;


    /* the buf's content could be changed */
    unsigned         temporary:1;

    /*
     * the buf's content is in a memory cache or in a read only memory
     * and must not be changed
     */
    unsigned         memory:1;

    /* the buf's content is mmap()ed and must not be changed */
    unsigned         mmap:1;

    unsigned         recycled:1;
    unsigned         in_file:1;
    unsigned         flush:1;
    unsigned         sync:1;
    unsigned         last_buf:1;
    unsigned         last_in_chain:1;

    unsigned         last_shadow:1;
    unsigned         temp_file:1;

    /* STUB */ int   num;
};
ngx_chain_t
//ngx_code.h
typedef struct ngx_chain_s           ngx_chain_t;
//ngx_buf.h
struct ngx_chain_s {
    ngx_buf_t    *buf;	//持有ngx_buf_t
    ngx_chain_t  *next;	//指向下一个
};
- nginx中用ngx_buf_t管理内存中的一个文件,用于持续化到磁盘。ngx_buf_t实例化的时候也是在ngx_pool_t里实例化的。
- nginx中用ngx_chain_t管理一系列ngx_buf_t,用于管理内存中一系列文件,持续化到磁盘。
nginx高级数据结构
ngx_array_t
//ngx_array
//nginx实现的动态数组
typedef struct {
    void        *elts;	//具体数据内存块
    ngx_uint_t   nelts;	//已使用个数
    size_t       size;	//每个数据分配大小
    ngx_uint_t   nalloc;	//分配个数
    ngx_pool_t  *pool;	//所属内存池
} ngx_array_t;
使用示例:
// gcc -o ngx_array_main ngx_array_main.c -I ../nginx-1.13.7/src/core/ -I ../nginx-1.13.7/objs/  -I ../nginx-1.13.7/src/os/unix/ -I ../pcre-8.41/ -I ../nginx-1.13.7/src/event/ ../nginx-1.13.7/objs/src/core/ngx_list.o ../nginx-1.13.7/objs/src/core/ngx_string.o ../nginx-1.13.7/objs/src/core/ngx_palloc.o ../nginx-1.13.7/objs/src/os/unix/ngx_alloc.o ../nginx-1.13.7/objs/src/core/ngx_array.o

#include <stdio.h>
#include <string.h>

#include "ngx_config.h"

#include "ngx_core.h"
#include "ngx_list.h"
#include "ngx_palloc.h"
#include "ngx_string.h"

#define N		10

typedef struct _key {
	int id;
	char name[32];
} Key;

volatile ngx_cycle_t *ngx_cycle;

void ngx_log_error_core(ngx_uint_t level, ngx_log_t *log,
			ngx_err_t err, const char *fmt, ...)
{

}

void print_array(ngx_array_t *array) {

	Key *key = array->elts;

	int i = 0;
	for (i = 0;i < array->nelts;i ++) {
		printf("%s .\n", key[i].name);
	}
}

int main() {

	ngx_pool_t *pool = ngx_create_pool(1024, NULL);

	ngx_array_t *array = ngx_array_create(pool, N, sizeof(Key));

	int i = 0;
	Key *key = NULL;
	for (i = 0;i < 25;i ++) {

		key = ngx_array_push(array);
		key->id = i+1;
		sprintf(key->name, "King %d", key->id);

	}

	key = ngx_array_push_n(array, 10);
	for (i = 0;i < 10;i ++) {
		key[i].id = 25+i+1;
		sprintf(key[i].name, "King %d", key[i].id);
	}

	print_array(array);
}
ngx_rbree_t
//ngx_rbtree.h
typedef struct ngx_rbtree_s  ngx_rbtree_t;
struct ngx_rbtree_s {
    ngx_rbtree_node_t     *root;
    ngx_rbtree_node_t     *sentinel;
    ngx_rbtree_insert_pt   insert;
};
使用示例:
// gcc -o ngx_array_main ngx_array_main.c -I ../nginx-1.13.7/src/core/ -I ../nginx-1.13.7/objs/  -I ../nginx-1.13.7/src/os/unix/ -I ../pcre-8.41/ -I ../nginx-1.13.7/src/event/ ../nginx-1.13.7/objs/src/core/ngx_list.o ../nginx-1.13.7/objs/src/core/ngx_string.o ../nginx-1.13.7/objs/src/core/ngx_palloc.o ../nginx-1.13.7/objs/src/os/unix/ngx_alloc.o ../nginx-1.13.7/objs/src/core/ngx_rbtree.o

#include <stdio.h>
#include <string.h>

#include "ngx_config.h"

#include "ngx_core.h"

#include "ngx_list.h"
#include "ngx_palloc.h"
#include "ngx_string.h"
#include "ngx_rbtree.h"

volatile ngx_cycle_t *ngx_cycle;

void ngx_log_error_core(ngx_uint_t level, ngx_log_t *log,
			ngx_err_t err, const char *fmt, ...)
{

}

int main() {

	ngx_rbtree_t rbtree;
	ngx_rbtree_node_t sentinel;

	ngx_rbtree_init(&rbtree, &sentinel, ngx_str_rbtree_insert_value);

	ngx_str_node_t strnode[10];
	ngx_str_set(&strnode[0].str, "he");
	ngx_str_set(&strnode[1].str, "jon");
	ngx_str_set(&strnode[2].str, "Issac");
	ngx_str_set(&strnode[3].str, "tursom");
	ngx_str_set(&strnode[4].str, "will");
	ngx_str_set(&strnode[5].str, "birate");
	ngx_str_set(&strnode[6].str, "ren");
	ngx_str_set(&strnode[7].str, "stephen");
	ngx_str_set(&strnode[8].str, "ultimate");
	ngx_str_set(&strnode[9].str, "he");

	int i = 0;
	for (i = 0;i < 10;i ++) {
		strnode[i].node.key = i;
		ngx_rbtree_insert(&rbtree, &strnode[i].node);
	}

	ngx_str_t str = ngx_string("will");

	ngx_str_node_t *node = ngx_str_rbtree_lookup(&rbtree, &str, 0);
	if (node != NULL) {
		printf(" Exit\n");
	}
}
nginx进程通信机制
ngx_shm_t
//ngx_shmem.h
typedef struct {
    u_char      *addr;
    size_t       size;
    ngx_str_t    name;
    ngx_log_t   *log;
    ngx_uint_t   exists;   /* unsigned  exists:1;  */
} ngx_shm_t;
ngx_pool_t
//ngx_core.h
typedef struct ngx_pool_s            ngx_pool_t;

//ngx_palloc.h
typedef struct {
    u_char               *last;
    u_char               *end;
    ngx_pool_t           *next;
    ngx_uint_t            failed;
} ngx_pool_data_t;

struct ngx_pool_s {
    ngx_pool_data_t       d;
    size_t                max;
    ngx_pool_t           *current;
    ngx_chain_t          *chain;
    ngx_pool_large_t     *large;
    ngx_pool_cleanup_t   *cleanup;
    ngx_log_t            *log;
};
使用示例:
// gcc -o ngx_array_main ngx_array_main.c -I ../nginx-1.13.7/src/core/ -I ../nginx-1.13.7/objs/  -I ../nginx-1.13.7/src/os/unix/ -I ../pcre-8.41/ -I ../nginx-1.13.7/src/event/ ../nginx-1.13.7/objs/src/core/ngx_list.o ../nginx-1.13.7/objs/src/core/ngx_string.o ../nginx-1.13.7/objs/src/core/ngx_palloc.o ../nginx-1.13.7/objs/src/os/unix/ngx_alloc.o ../nginx-1.13.7/objs/src/core/ngx_array.o

#include <stdio.h>
#include <string.h>

#include "ngx_config.h"

#include "ngx_core.h"

#include "ngx_list.h"
#include "ngx_palloc.h"
#include "ngx_string.h"

// ngx_create_pool
// ngx_palloc

typedef struct _key {
	int id;
	char name[32];
} Key;

volatile ngx_cycle_t *ngx_cycle;

void ngx_log_error_core(ngx_uint_t level, ngx_log_t *log,
			ngx_err_t err, const char *fmt, ...)
{

}

void print_pool(ngx_pool_t *pool) {

	ngx_pool_t *pool_head = pool;

	while (pool) {
		printf("unused : %ld\n", pool->d.end - pool->d.last);

		pool = pool->d.next;
		printf(" ----------------- \n");
	}
}

int main() {

	ngx_pool_t *pool = ngx_create_pool(1024, NULL);

	Key *key = ngx_palloc(pool, sizeof(Key));
	key->id = 10;
	sprintf(key->name, "king %d", key->id);

	print_pool(pool);

	char *ptr = ngx_palloc(pool, 990);
	ptr[989] = 'a';

	print_pool(pool);

	ngx_destroy_pool(pool);
}
思考一下,操作上面这些数据结构,需要什么样的对应函数(增删改查)。然后看下具体的函数如何操作这些数据结构数据,怎么增删改查。


 2084
2084


 被折叠的 条评论
为什么被折叠?
被折叠的 条评论
为什么被折叠?
 到【灌水乐园】发言


