


 本文介绍制作语音聊天数字人机器人的方法。先从文本 ChatBot 起步,增加语音输入与回复功能,再用 D-ID 给语音对口型并生成视频,嵌入 Gradio 应用。还体验了 PaddleGAN 开源模型下的数字主播,最后给出完全开源的数字人解决方案及相关思考和推荐。
上一讲里,我们已经学会了通过 AI 来进行语音合成。有了语音识别、ChatGPT,再加上这个语音合成,我们就可以做一个能和我们语音聊天的机器人了。不过光有声音还不够,我们还希望这个声音可以是某一个特定的人的声音。就好像在电影《Her》里面那样,AI 因为用了影星斯嘉丽·约翰逊的配音,也吸引到不少观众。最后,光有声音还不够,我们还希望能够有视觉上的效果,最好能够模拟自己真的在镜头面前侃侃而谈的样子。
这些需求结合在一起,就是最近市面上很火的“数字人”,也是我们这一讲要学习的内容。当然,在这么短的时间里,我们做出来的数字人的效果肯定比不上商业公司的方案。不过作为概念演示也完全够用了。
制作一个语音聊天机器人
从文本 ChatBot 起步
我们先从最简单的文本 ChatBot 起步,先来做一个和第 6 讲一样的文本聊天机器人。对应的代码逻辑和第 6 讲的 ChatGPT 应用基本一样,整个的 UI 界面也还是使用 Gradio 来创建。
唯一的区别在于,我们把原先自己封装的 Conversation 类换成了 Langchain 的 ConversationChain 来实现,并且使用了 SummaryBufferMemory。这样,我们就不需要强行设定只保留过去几轮对话了。
import openai, os
import gradio as gr
from langchain import OpenAI
from langchain.chains import ConversationChain
from langchain.memory import ConversationSummaryBufferMemory
from langchain.chat_models import ChatOpenAI

openai.api_key = os.environ["OPENAI_API_KEY"]

memory = ConversationSummaryBufferMemory(llm=ChatOpenAI(), max_token_limit=2048)
conversation = ConversationChain(
    llm=OpenAI(max_tokens=2048, temperature=0.5),
    memory=memory,
)

def predict(input, history=[]):
    history.append(input)
    response = conversation.predict(input=input)
    history.append(response)
    responses = [(u,b) for u,b in zip(history[::2], history[1::2])]
    return responses, history

with gr.Blocks(css="#chatbot{height:800px} .overflow-y-auto{height:800px}") as demo:
    chatbot = gr.Chatbot(elem_id="chatbot")
    state = gr.State([])

    with gr.Row():
        txt = gr.Textbox(show_label=False, placeholder="Enter text and press enter").style(container=False)

    txt.submit(predict, [txt, state], [chatbot, state])

demo.launch()
对应界面:

增加语音输入功能
接着,我们来给这个聊天机器人加上语音输入的功能,Gradio 自带 Audio 模块,所以要做到这一点也不难。
1. 首先,我们在 Gradio 的界面代码里面增加一个 Audio 组件。这个组件可以录制你的麦克风的声音。
    with gr.Row():
        txt = gr.Textbox(show_label=False, placeholder="Enter text and press enter").style(container=False)
2. 然后,我们封装了一个 transcribe 方法,通过调用 OpenAI 的 Whisper API 就能够完成语音识别。这里有一点需要注意,OpenAI 的 Whisper API 有点笨,它是根据文件名的后缀来判断是否是它支持的文件格式的。而 Gradio 的 Audio 组件录制出来的 WAV 文件没有后缀,所以我们要在这里做个文件重命名的工作。
def transcribe(audio):
    os.rename(audio, audio + '.wav')
    audio_file = open(audio + '.wav', "rb")
    transcript = openai.Audio.transcribe("whisper-1", audio_file)
    return transcript['text']
3. 接着,我们就要把麦克风录好的声音自动发送给语音识别,然后再提交给原先基于文本聊天的机器人就好了。
audio.change(process_audio, [audio, state], [chatbot, state])我们先在 Audio 的 change 事件里,定义了触发 process_audio 的函数。这样,一旦麦克风的声音录制下来,就会直接触发聊天对话,不需要再单独手工提交一次内容。
def process_audio(audio, history=[]):
    text = transcribe(audio)
    return predict(text, history)
然后在 process_audio 函数里,我们先是转录对应的文本,再调用文本聊天机器人的 predict 函数,触发对话。
修改后的完整代码在下面,可以在本地运行,体验一下。
import openai, os
import gradio as gr
import azure.cognitiveservices.speech as speechsdk
from langchain import OpenAI
from langchain.chains import ConversationChain
from langchain.memory import ConversationSummaryBufferMemory
from langchain.chat_models import ChatOpenAI

openai.api_key = os.environ["OPENAI_API_KEY"]

memory = ConversationSummaryBufferMemory(llm=ChatOpenAI(), max_token_limit=2048)
conversation = ConversationChain(
    llm=OpenAI(max_tokens=2048, temperature=0.5),
    memory=memory,
)

def predict(input, history=[]):
    history.append(input)
    response = conversation.predict(input=input)
    history.append(response)
    responses = [(u,b) for u,b in zip(history[::2], history[1::2])]
    return responses, history

def transcribe(audio):
    os.rename(audio, audio + '.wav')
    audio_file = open(audio + '.wav', "rb")
    transcript = openai.Audio.transcribe("whisper-1", audio_file)
    return transcript['text']

def process_audio(audio, history=[]):
    text = transcribe(audio)
    return predict(text, history)

with gr.Blocks(css="#chatbot{height:350px} .overflow-y-auto{height:500px}") as demo:
    chatbot = gr.Chatbot(elem_id="chatbot")
    state = gr.State([])

    with gr.Row():
        txt = gr.Textbox(show_label=False, placeholder="Enter text and press enter").style(container=False)

    with gr.Row():
        audio = gr.Audio(source="microphone", type="filepath")

    txt.submit(predict, [txt, state], [chatbot, state])
    audio.change(process_audio, [audio, state], [chatbot, state])

demo.launch()
对应界面:
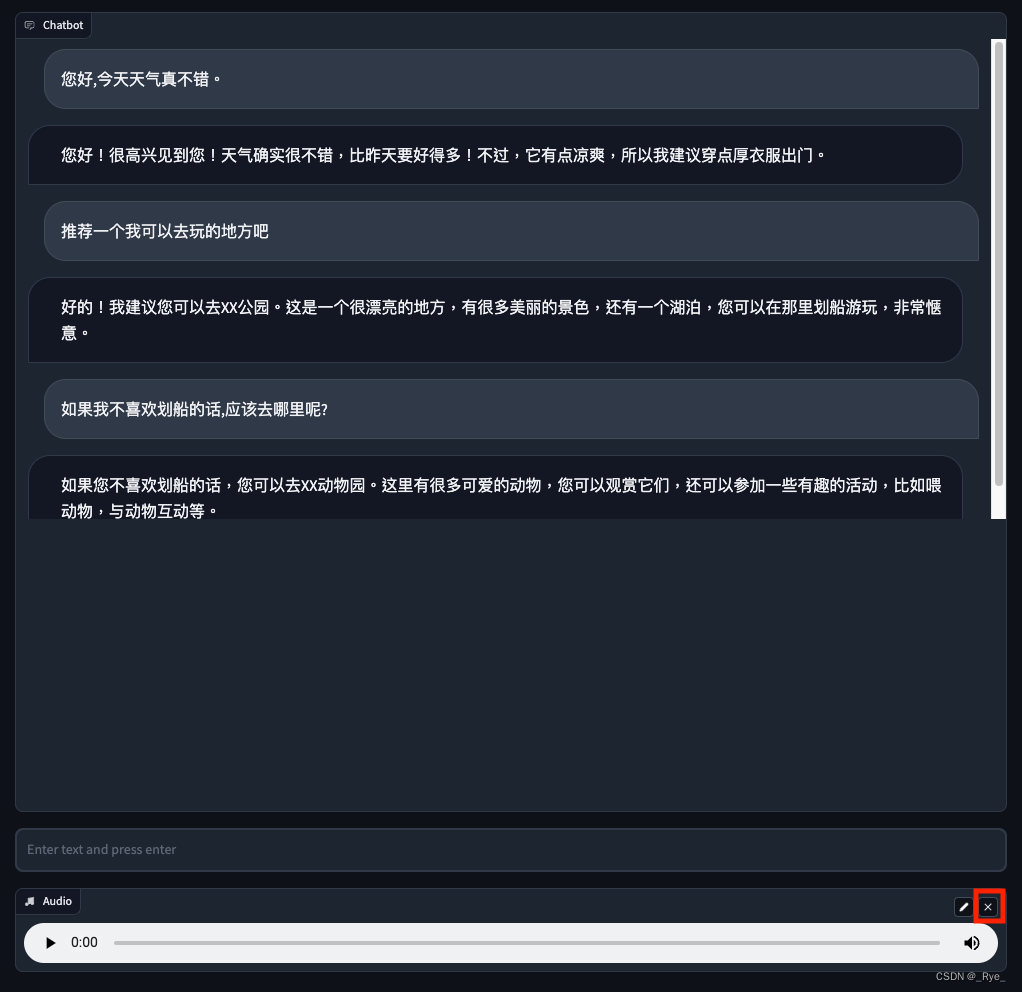
增加语音回复功能
在能够接收语音输入之后,我们要做的就是让 AI 也能够用语音来回答我们的问题。而这个功能,通过上一讲我们介绍过的 Azure 的语音合成功能就能实现。我们只需要封装一个函数,来实现语音合成与播
 最低0.47元/天 解锁文章


 被折叠的 条评论
为什么被折叠?
被折叠的 条评论
为什么被折叠?
 到【灌水乐园】发言


