


一、多表关联
一对一的关系
<!--resultMap="resultMap标签的id属性的值"-->
<select id="queryOneToOne" parameterType="String" resultMap="wifeMap">
      select * from husband h,Wife w where h.hus_id=w.hid
      and w.wife_name = #{wifeName};
    </select>
<!--
	resultMap中的标签
	id="唯一标识"
	type="实体类型"

	<id property="实体类中属性的名字" column="数据库的字段名字" javaType="实体类属性类型" jdbcTyp="字段类型"></id>
	id标签:表示描述主键
	result:表示描述的是普通字段
	association:描述的是实体的类型,一般用在1对1的关系中
	<association property="实体属性名" javaType="实体类属性的类型"
-->
<resultMap id="wifeMap" type="Wife">
        <id property="wifeId" column="wife_id"></id>
        <result property="age" column="age"></result>
        <result property="sex" column="sex"></result>
        <result property="wifeName" column="wife_name"></result>
        <result property="hid" column="hid"></result>
        <association property="husband" javaType="Husband">
            <id property="husId" column="hus_id"></id>
            <result property="age" column="age"></result>
            <result property="gender" column="gender"></result>
            <result property="husbandName" column="husband_name"></result>
        </association>
    </resultMap>
一对多的关系
<!--
 collection:描述的是集合中的实体,一般是用于1对多的关系中
 ofType="集合中实体的类型"
-->
<resultMap id="usersMap" type="Users">
        <id column="id" property="id"></id>
        <result column="uName" property="uName"></result>
        <result column="phone" property="phone"></result>
        <result column="address" property="address"></result>
        <collection property="ordersList" ofType="Orders">
            <id property="orderId" column="orderId"></id>
            <result column="remark" property="remark"></result>
            <result column="orderNo" property="orderNo"></result>
            <result column="cost" property="cost"></result>
            <result column="createTime" property="createTime"></result>
            <result column="userId" property="userId"></result>
        </collection>
    </resultMap>
二、逆向工程
作用:自动生成dao层的代码。
实现步骤
1.引入坐标
<!--逆向工程-->
    <dependency>
      <groupId>org.mybatis.generator</groupId>
      <artifactId>mybatis-generator-core</artifactId>
      <version>1.3.7</version>
    </dependency>
2.配置逆向工程的插件
 <!--mybatis逆向工程-->
      <plugin>
        <groupId>org.mybatis.generator</groupId>
        <artifactId>mybatis-generator-maven-plugin</artifactId>
        <version>1.3.2</version>
        <configuration>
          <!--配置文件的位置-->
        <configurationFile>src/main/resources/generatorConfig.xml</configurationFile>
          <verbose>true</verbose>
          <overwrite>true</overwrite>
        </configuration>
        </plugin>
3.把generatorConfig.xml文件放到resources文件夹下面。需要根据情况修改内容,如下:
<?xml version="1.0" encoding="UTF-8"?>
<!DOCTYPE generatorConfiguration
PUBLIC "-//mybatis.org//DTD MyBatis Generator
Configuration 1.0//EN"
"http://mybatis.org/dtd/mybatis-generator-
config_1_0.dtd">
<generatorConfiguration>
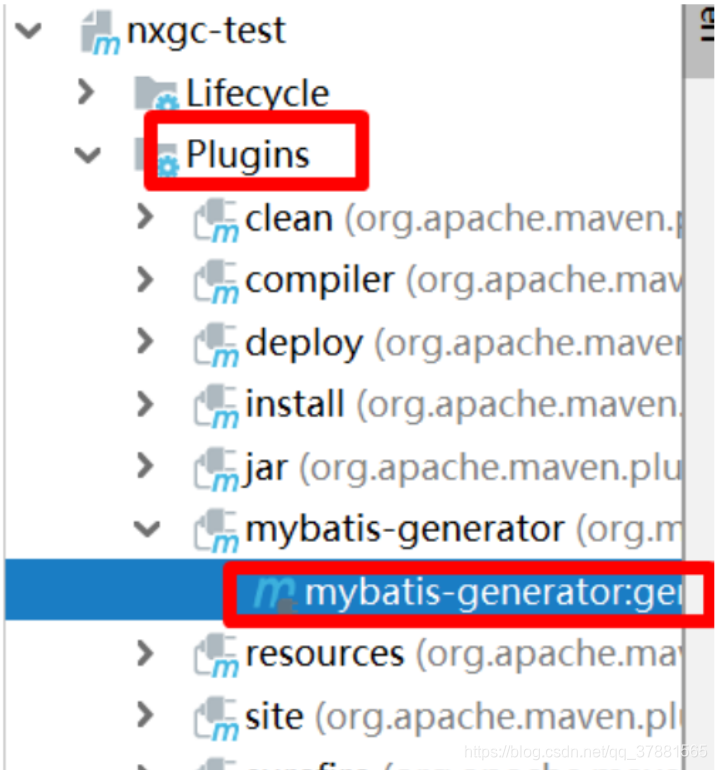
<!--启动命令:mybatis-generator:generate -e-->
<properties resource="db.properties"></properties>
<classPathEntry location="${db.driverLocation}"/>
<context id="context1" targetRuntime="MyBatis3">
<commentGenerator>
<!-- 是否去除自动生成的注释 true:是 : false:否 -->
<property name="suppressAllComments" value="true"/>
<!-- 是否去除所有自动生成的文件的时间戳,默认为false -->
<property name="suppressDate" value="true"/>
</commentGenerator>
<!--数据库连接的信息:驱动类、连接地址、用户名、密码 -->
<jdbcConnection driverClass="${db.driverClass}"
connectionURL="${db.jdbcUrl}"
userId="${db.user}"
password="${db.password}">
</jdbcConnection>
<!-- targetPackage:包名称(自定义) targetProject:项目路径(自
定义) -->
<!--定义model的包名称-->
<javaModelGenerator targetPackage="cn.kgc.domain"
targetProject="src/main/java">
<!-- enableSubPackages:是否让schema作为包的后缀 -->
<property name="enableSubPackages" value="false"/>
<!-- 从数据库返回的值被清理前后的空格 -->
<property name="trimStrings" value="true"/>
</javaModelGenerator>
<!-- 配置生成相应的实体Mapper.xml,对于Mapper3.X我们需要把
type="XMLMAPPER" -->
<!-- targetPackage:包名称(自定义) targetProject:项目路径(自
定义) -->
<sqlMapGenerator targetPackage="cn.kgc.mapper"
targetProject="src/main/java">
<property name="enableSubPackages" value="false"/>
</sqlMapGenerator>
<!-- 配置生成相应的接口类,对应与Mapper.xml中的一系列CRUD方法SQL
语句 -->
<!-- targetPackage:包名称(自定义) targetProject:项目路径(自
定义) -->
<javaClientGenerator targetPackage="cn.kgc.mapper"
targetProject="src/main/java" type="XMLMAPPER">
<property name="enableSubPackages" value="false"/>
</javaClientGenerator>
<!-- 员工表 -->
<table schema="SSMBlog" tableName="emp"
domainObjectName="Emp"
enableCountByExample="false"
enableUpdateByExample="false"
enableDeleteByExample="false"
enableSelectByExample="false"
selectByExampleQueryId="false">
</table>
<!-- 部门表 -->
<table schema="SSMBlog" tableName="dept"
domainObjectName="Dept"
enableCountByExample="false"
enableUpdateByExample="false"
enableDeleteByExample="false"
enableSelectByExample="false"
selectByExampleQueryId="false">
</table>
</context>
</generatorConfiguration>
4.在db.properties文件中配置如下:
一定要注意:driverLocation要写自己本地额仓库的位子!!!
driver=com.mysql.jdbc.Driver
driverLocation=F:\\Repositories\\maven2\\mysql\\mysql-connector-
java\\5.1.47\\mysql-connector-java-5.1.47.jar
url=jdbc:mysql://localhost:3306/person_info?
useUnicode=true&characterEncoding=utf8
username=root
password=sa123
5.双击插件运行
三、Mybatis实现分页
Mybatis与PageHelper整合
步骤
1.导入pageHelper的两个依赖pom文件
<dependency>
	<groupId>com.github.pagehelper</groupId>
	<artifactId>pagehelper</artifactId>
	<version>4.1.6</version>
</dependency>
<dependency>
	<groupId>com.github.jsqlparser</groupId>
	<artifactId>jsqlparser</artifactId>
	<version>0.9.5</version>
</dependency>
2.在Mybatis.xml主配置文件中配置拦截器
<plugins>
	<plugin interceptor="com.github.pagehelper.PageHelper">
		<property name="dialect" value="mysql"></property>
	</plugin>
</plugins>
3.编写接口方法,做查询操作
查询:直接写查询:select * from emp 不需要在写limit
4.使用PageHelper、PageInfo 的api工具类
写测试类测试
四. mybatis注解开发
注解:写在类上,写在方法上
语法:@XXXX(xxxxx)
实现增删改查
public interface UserDao {
  /**
  * 查询所有
  * @return
  */
  @Select("select * from user")
//  @Results 映射结果集, value = @Result 数组对象
//  @Result 映射列名与属性名不一样的
//      id 的默认值是false 默认为非主键
//  id=true 指定该列为主键
//  注解中:只需要写列名与属性名不一样的,一样的可以不写
//  特殊情况: 如果某列数据使用了两次或者两次以上,则两次映射都需要写出来
  @Results({
      @Result(id=true, column = "uid",property = "id"),
      @Result(column = "uname",property = "username")
 })
  public List<User> findAll();
  /**
  * 根据id查询
  * @param id
  * @return
  */
  @Select("select * from user where uid=#{id}")
  public User findById(Integer id);
  /**
  * 根据姓名模块查询
  * @param username
  * @return
  */
  @Select("select * from user where uname like \"%\"#
{username}\"%\" ")
  public List<User> findByUsername(String username);
  /**
  * 查询总的记录数
  * @return
  */
  @Select("select count(*) from user")
  public Integer findTotalCount();
  /**
  * 添加用户
  * @param user
  */
  @Insert("insert into user values(null ,#{username},#
{password},#{sex},#{address},#{birthday})")
  public void insert(User user);
  /**
  * 更新用户
  * @param user
  */
  @Update("update user set uname = #{username}, password=#
{password}, sex = #{sex}" +
      ",address=#{address},birthday = #{birthday} where uid
= #{id}")
  public void update(User user);
  /**
  * 删除用户
  * @param id
  */
  @Delete("delete from user where uid = #{id}")
  public void del(Integer id);
}
如有错误,请指正,谢谢!!!


 2万+
2万+


 被折叠的 条评论
为什么被折叠?
被折叠的 条评论
为什么被折叠?
 到【灌水乐园】发言


