


xamarin使用极光推送JPush (安卓)
初次接触xamarin极光推送, 慢慢摸索.
SDK集成
1.首先去官网下载最新的Jpush推送sdk.
2.新建项目 Android–>Android绑定库
3.将解压出来的两个jar包 放到jar文件夹下, 同时新建libs文件夹
4.将arm开头的三个文件夹放到libs中, 如果用的是模拟器,x86也需要放里面
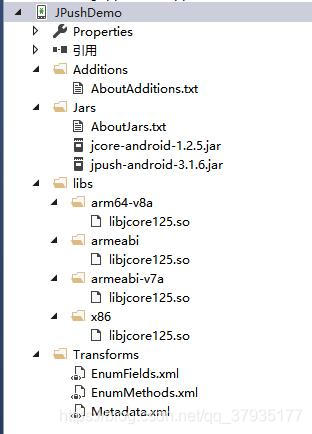
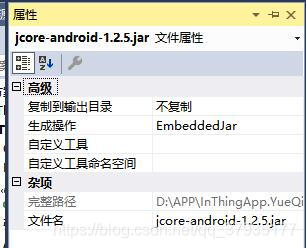
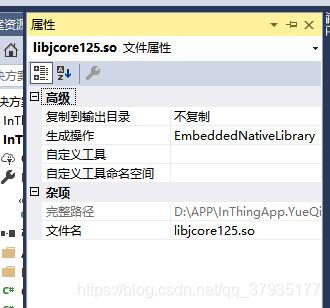
5.修改jar包属性和so文件属性
6.最后生成dll.
SDK引用
1.把生成好的Jpushdemo.dll 添加引用
2.修改AndroidMainfest.xml, 具体的查看极光官网
3.在MainActivity里的 OnCreate中添加方法 InitSdk();
internal static MainActivity Instance { get; private set; }
     protected override void OnCreate(Bundle bundle) {
     		TabLayoutResource = Resource.Layout.Tabbar;
            ToolbarResource = Resource.Layout.Toolbar;
            base.OnCreate(bundle);
            InitSdk();
            Instance = this; //后面alias会用到
		}
	private void InitSdk() {
            JPushInterface.SetDebugMode(true);    //开启日志,app发布后可以关闭
            JPushInterface.Init(this);    //必须存在
            string tag = "my app";
            Log.Info(tag, "init ok");
        }
4.到这边保存发布之后, 在Jpush官网推送广播, 应该就可以收到推送了
注意点
推送需要分Alias和tap, 推送alias我使用的是用户名, 事件放在用户登录之后
1.
   var jPushHelper = DependencyService.Get<IJPushHelper>();
                if (jPushHelper != null)
                    jPushHelper.Push(retResult.Data[0].USER_USERID);
2.新建接口类文件 IJPushHelper.cs
 public  interface IJPushHelper
    {
        bool Push(string alias);
    }
[assembly: Dependency(typeof(Jpush))]
namespace InThingApp.Droid {
    public class Jpush : IJPushHelper {

        public bool Push(string alias) {
            var context = MainActivity.Instance;
            if (context == null)
                return false;

            string tag = "my app";
            //登录以后才能接收通知
            if (JPushInterface.IsPushStopped(context)) {
                JPushInterface.ResumePush(context);
            }
            JPushInterface.SetAlias(context, 0, alias);
            Log.Info(tag, "LoginAlias:" + alias);

            //JPushInterface.StopPush(context);//停止推送
            //JPushInterface.SetAlias(context, 0, "");

            return true;
        }

    }
}
4.到这边就设置好alias了, 用户登录之后, 可以通过alias接收
接收通知后点击进入APP
*按照极光推送API, 直接在android中设置如下代码 就可以
    <!-- User defined. 用户自定义的广播接收器-->
    <receiver
        android:name="MyReceiver"
        android:enabled="true"
        android:exported="false">
      <intent-filter>
        <!--Required 用户注册 SDK 的 intent-->
        <action android:name="cn.jpush.android.intent.REGISTRATION" />
        <!--Required 用户接收 SDK 消息的 intent-->
        <action android:name="cn.jpush.android.intent.MESSAGE_RECEIVED" />
        <!--Required 用户接收 SDK 通知栏信息的 intent-->
        <action android:name="cn.jpush.android.intent.NOTIFICATION_RECEIVED" />
        <!--Required 用户打开自定义通知栏的 intent-->
        <action android:name="cn.jpush.android.intent.NOTIFICATION_OPENED" />
         <!--接收网络变化 连接/断开 since 1.6.3-->
        <action android:name="cn.jpush.android.intent.CONNECTION" />
        <category android:name="包名" />
      </intent-filter>
    </receiver>
但是我不管怎么弄就是不行, android:name="MyReceiver" , 编译一直报java类的错误, 包名.MyReceiver 方法不存在,
很头疼,研究了好几天. 在xamarin官网 BroadcastReceiver介绍中, 看到有静态和动态注册. 发现修改.xml文件是静态的, 就改成动态的试试
  [BroadcastReceiver(Enabled = true, Exported = false)]
    [IntentFilter(new string[] { "cn.jpush.android.intent.REGISTRATION" }, Categories = new string[] { "包名" })]
    [IntentFilter(new string[] { "cn.jpush.android.intent.MESSAGE_RECEIVED" }, Categories = new string[] { "包名" })]
    [IntentFilter(new string[] { "cn.jpush.android.intent.NOTIFICATION_RECEIVED" }, Categories = new string[] { "包名" })]
    [IntentFilter(new string[] { "cn.jpush.android.intent.NOTIFICATION_OPENED" }, Categories = new string[] { "包名" })]

    public class MyReceiver : BroadcastReceiver {
    }
总算成功了!!!
下面就是 接收到通知进行处理, override OnReceive方法
  Bundle bundle = intent.Extras;
            Log.Info(TAG, "MyReceiver - " + intent.Action);

            if (JPushInterface.ActionRegistrationId.Equals(intent.Action)) {
                String regId = bundle.GetString(JPushInterface.ActionRegistrationId);
                Log.Info(TAG, "[MyReceiver] 接收 Registration Id : " + regId);
            }
            else if (JPushInterface.ActionMessageReceived.Equals(intent.Action)) {
                Log.Info(TAG, "[MyReceiver] 收到了自定义消息。消息内容是:" + bundle.GetString(JPushInterface.ExtraMessage));
            }
            else if (JPushInterface.ActionNotificationReceived.Equals(intent.Action)) {
                Log.Info(TAG, "[MyReceiver] 收到了通知");
            }
            else if (JPushInterface.ActionNotificationOpened.Equals(intent.Action)) {
                Log.Info(TAG, "[MyReceiver] 用户点击打开了通知");
                string content = bundle.GetString(JPushInterface.ExtraAlert);
                if (content!=null) {
                     Intent i = new Intent(context, typeof(LoginActivity));  //打开消息界面

                    i.PutExtra("content", content);
                    i.SetFlags(ActivityFlags.NewTask);
                    context.StartActivity(i);
                }

            } else {
                Log.Info(TAG, "Unhandled intent - " + intent.Action);
            }
最后贴上LoginActivity.cs代码
   [Activity(LaunchMode = Android.Content.PM.LaunchMode.SingleTask, Label = "LoginActivity")]
    public class LoginActivity : Activity {

        protected override void OnCreate(Bundle savedInstanceState) {
            base.OnCreate(savedInstanceState);
            string content = Intent.GetStringExtra("content");
            Toast.MakeText(this, "OnCreate:" + content + "!", ToastLength.Short).Show();    //闪窗
        }

        protected override void OnNewIntent(Intent intent) {
            string content = intent.GetStringExtra("content");
            Toast.MakeText(this, "OnNewIntent:" + content + "!", ToastLength.Short).Show();    //闪窗
            base.OnNewIntent(intent);
        }
到这边,已经可以接收到alias通知了, 并且可以点击进行跳转页面+提示,
但是我需要的是跳转到.xaml文件里, 还在摸索ing…


 193
193


 被折叠的 条评论
为什么被折叠?
被折叠的 条评论
为什么被折叠?
 到【灌水乐园】发言


