


docker部署前后端分离项目
前提,服务器环境是docker环境,如果服务器没有安装docker,可以先安装docker环境。
各个环境安装docker:
Ubuntu上安装Docker:
ubuntu离线安装docker:
CentOS7离线安装Docker:
CentOs7在线安装docker:
docker安装成功后,执行docker ps命令

一、打包一个前端项目
1.1 创建安装目录
- 在自己安装的目录先创建三个文件夹
mkdir config frontend logs

- 将打包好的前端项目dist,上传到frontend 目录下;

1.2 编写Dockerfile
- 编写一个Dockerfile文件放到frontend 目录下;
Dockerfile:
FROM nginx:latest
COPY ./dist /opt/nginx/aiinspector-frontend3/frontend/dist
- FROM nginx:latest 表示基于nginx镜像生成一个新镜像,因此前提是先拉去一个nginx:latest镜像
- 拉取Nginx最新镜像,docker pull nginx
- 查看拉取的镜像:docker images

- COPY ./dist /opt/nginx/aiinspector-frontend3/frontend/dist 表示复制宿主机中的项目到容器目录;
- /opt/nginx/aiinspector-frontend3/frontend/dist 宿主机安装目录
- ./dist 容器目录
1.3 配置nginx.conf
# 修改监听端口
listen 8000;
listen [::]:8000 default_server;
server_name localhost;

# 修改项目部署路径
root /opt/nginx/aiinspector-frontend3/frontend/dist;

# 修改后端代理路径
location /api {
            proxy_set_header Host $host;  #反向代理过程中可能会丢失Host头
            proxy_pass http://192.168.124.11:3000;
            proxy_connect_timeout 60s;
            proxy_send_timeout 180s;
            proxy_read_timeout 180s;
            proxy_buffer_size 1M;
            proxy_buffers 8 1M;
            proxy_busy_buffers_size 1M;
}
- nginx.conf配置如下
# For more information on configuration, see:
#   * Official English Documentation: http://nginx.org/en/docs/
#   * Official Russian Documentation: http://nginx.org/ru/docs/

user nginx;
worker_processes auto;
error_log /var/log/nginx/error.log;
pid /run/nginx.pid;

# Load dynamic modules. See /usr/share/doc/nginx/README.dynamic.
include /usr/share/nginx/modules/*.conf;

events {
    worker_connections 1024;
}

http {
    log_format main
        '$remote_addr - $remote_user [$time_local] "$request" '
        '$status $body_bytes_sent "$http_referer" '
        '"$http_user_agent" "$http_x_forwarded_for"';

    access_log /var/log/nginx/access.log main;

    sendfile on;
    tcp_nopush on;
    tcp_nodelay on;
    keepalive_timeout 65;
    types_hash_max_size 2048;
    client_max_body_size 11m;

    include /etc/nginx/mime.types;
    default_type application/octet-stream;

    # Load modular configuration files from the /etc/nginx/conf.d directory.
    # See http://nginx.org/en/docs/ngx_core_module.html#include
    # for more information.
    include /etc/nginx/conf.d/*.conf;
    fastcgi_intercept_errors on;
    proxy_intercept_errors on;

    gzip_vary on;
    gzip on;
    gzip_static on;
    gzip_buffers 16 8k;
    gzip_min_length 1k;
    gzip_comp_level 6;
    gzip_types text/plain
        text/xml
        text/css
        application/x-javascript
        application/xml
        application/xml+rss
        application/javascript
        application/json;

    server {
        #root         /opt/nginx/aiinspector-frontend3/frontend/dist;
        listen 8000;
        listen [::]:8000 default_server;
        server_name localhost;
        #root         /usr/share/nginx/html;


        # Load configuration files for the default server block.
        include /etc/nginx/default.d/*.conf;


        location / {
            proxy_set_header HOST $host;
            proxy_set_header X-Forwarded-Proto $scheme;
            proxy_set_header X-Real-IP $remote_addr;
            proxy_set_header X-Forwarded-For $proxy_add_x_forwarded_for;
            # 加这个是支持history的路由模式
            try_files $uri /index.html;
            root /opt/nginx/aiinspector-frontend3/frontend/dist;
            index index.html;
            error_page 404 /index.html;
            error_page 405 =200 $request_uri;
            # 跨域配置
            if ($request_method = OPTIONS ) {
                add_header Access-Control-Allow-Origin "*";
                add_header Access-Control-Allow-Methods "POST, GET, PUT, OPTIONS, DELETE";
                add_header Access-Control-Max-Age "3600";
                add_header Access-Control-Allow-Headers
                    "Origin, X-Requested-With, Content-Type, Accept, Authorization";
                add_header Access-Control-Allow-Credentials "true";
                add_header Content-Length 0;
                add_header Content-Type text/plain;
                return 200;
            }
            add_header 'Access-Control-Allow-Origin' '*';
            add_header 'Access-Control-Allow-Credentials' 'true';
            add_header 'Access-Control-Allow-Methods' 'GET, PUT, POST, DELETE, OPTIONS';
            add_header 'Access-Control-Allow-Headers' 'Content-Type,*';
        }

       location /api {
            proxy_set_header Host $host;  #反向代理过程中可能会丢失Host头
            proxy_pass http://192.168.124.11:3000;
            proxy_connect_timeout 60s;
            proxy_send_timeout 180s;
            proxy_read_timeout 180s;
            proxy_buffer_size 1M;
            proxy_buffers 8 1M;
            proxy_busy_buffers_size 1M;
        }

        error_page 404 /404.html;
        location = /404.html {
            root /opt/nginx/aiinspector-frontend3/frontend/dist/index.html;
        }

        # error_page 500 502 503 504 /50x.html;
        # location = /50x.html {
        # }
    }
}
二、编写启动文件
- vim build-aiinspector-frontend3.sh
- 将下面配置复制到build-aiinspector-frontend3.sh文件中
#!/bin/bash

echo "-----clear container start-----"
# 容器名称
rep=frontend3-react
# 判断容器是否存在,存在则先停止容器
if docker ps | grep "$rep";then
        docker stop $rep
fi
# 如果容器已经停止,则删除容器
if docker ps -a | grep "$rep";then
        docker rm $rep
fi
# 如果镜像存在,则删除镜像
if docker images -a | grep "$rep";then
        docker rmi $rep
fi

echo "----clear container end----"

echo "----build docker image satrt----"
# 制作镜像,目录必须是项目的安装路径,且与Dockerfile在同一个目录
docker build -t $rep /opt/nginx/aiinspector-frontend3/frontend || ! echo "build new image error" || exit
echo "----build docker image end----"

echo "----build nginx container start-----"
# 启动容器
# -d 后台运行,
# -p 8000:8000 -p [宿主机端口:容器端口],蒋容器为8000的端口映射到宿主机为8000的端口,
# --restart=always,docker 服务重启时此容器自动重启,
# --name $rep 容器名称为 frontend3-react
# -e TZ=Asia/Shanghai ,容器时间为亚洲上海时间
# -v /opt/nginx/aiinspector-frontend3/config/nginx.conf:/etc/nginx/nginx.conf 映射宿主机目录文件nginx.conf到容器的目录文件中/etc/nginx/nginx.conf
docker run -d -p 8000:8000 \
--restart=always \
--name $rep \
-e TZ=Asia/Shanghai \
-v /opt/nginx/aiinspector-frontend3/config/nginx.conf:/etc/nginx/nginx.conf \
-v /opt/nginx/aiinspector-frontend3/logs:/var/log/nginx $rep || ! echo "cannot run container:$rep,exit" || exit
echo "----build nginx container end-------"
- 执行启动文件命令: sh build-aiinspector-frontend3.sh
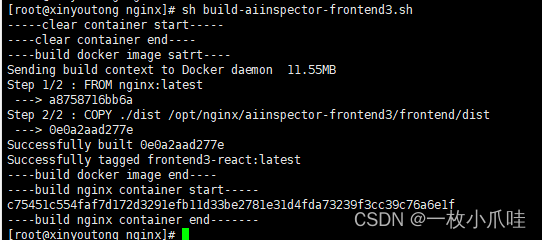
三、查看启动容器
- docker ps

- 浏览器访问:http://localhost:port
四、总结
- docker容器化部署前端项目,首先需要拉去一个nginx基础镜像;
- 需要编写Dockerfile制作镜像;
- 需要配置nginx.conf配置文件;
- 需要编写一个启动容器项目的脚本;
- 宿主机的端口不能被其他程序占用,否则启动失败。


 979
979


 被折叠的 条评论
为什么被折叠?
被折叠的 条评论
为什么被折叠?
 到【灌水乐园】发言


